The construction of swimming pools at dachas or in country houses is no longer some kind of luxury or curiosity. Each owner of a country property decides for himself whether he needs a pond near his house or whether he prefers water treatments on public, crowded beaches. For many in the summer, swimming pools near the house are simply a necessity, since dacha worries take up a lot of their time. Part of the time, and you don’t really want to go somewhere through traffic jams or off-road. And then - once - and you escape from the heat in a pool you built with your own hands. The choice of pools today is huge. You can simply buy yourself an inflatable bowl - and also swim in it. And by winter, blow it off and put it in the basement. But practical summer residents are increasingly giving preference to concrete pools. Building a concrete pool requires special knowledge. Read the instructions on how to build a concrete pool with your own hands in our article.
Theoretical foundations of the process
Before you begin construction, you need to understand the structural features of a concrete pool. The standard design consists of the following parts:
- bowl;
- waterproofing layer;
- water supply and outlet system;
- filters;
- external finishing;
- decorative elements.
The bowl is the concrete base of the pool. The thickness directly depends on the dimensions of the future structure, but should not be less than 10 cm. There is a general formula for calculation - (3.1415926*R2*Depth)*2/10 = cm. The thickness of the walls of the bowl must withstand water pressure on one side, pressure dense soil - on the other.
Waterproofing protects concrete in swimming pools from constant contact with water. In principle, concrete is not susceptible to high humidity, but with prolonged exposure the material loses its dense structure, falls apart and is subject to erosion.
Monolithic concrete pools are filled in two ways - using a hose or installing a water supply system. The first method is a budget option, but it takes too long and there is no way to control water quality. Speaking about special systems, it is worth taking into account the presence of filters that improve the properties of the water used.
Exterior finishing - laying tiles, grouting joints - is an important stage of construction. You can make another coating, but in practice it has been proven that tiles are the most suitable option. Any type of tile can be used for wall cladding; non-slip tiles are preferably chosen for flooring.
The decorating stage is the final stage of pool construction, which includes the manufacture of stairs, handrails and other details to aesthetically improve the appearance of the pool.
Having decided on the type of structure, it is necessary to draw up detailed drawings, each point of the process is carefully planned. It is better to make several sketches and choose the best option that will match the landscape and size of the dacha.
Long, expensive, capital
Surely you have seen the word “classic” in articles about concrete pools. Behind just a beautiful word lies the main advantage of such tanks:
Classic implies vast experience in construction - a modern project is based on decades of practice. How to build is described in the smallest details - you just need to know them (this is a matter of choosing a contractor).
Form according to your requirements . Unlike composite ones, the bowl of which is manufactured at the factory in a strictly specified geometry, the “classic” can be built in any shape. And if in the case of a composite bowl the choice of location is limited by shape and size, then a concrete bowl can be built where you specify. You can name an amount that suits you and get a project for it.
These are the 2 fundamental advantages why people build concrete pools, despite the advent of innovative materials (the same composite that NASA uses). Now about the disadvantages.
- Long (unlike a composite bowl, which takes 21 days to install, “classic” takes time - up to 6 months, depending on the size and placement conditions).
- Expensive . It is debatable, although many articles mention the disadvantage - construction takes a long time, materials become more expensive and the cost increases. Firstly, a composite bowl is also quite expensive. Secondly, when designing, the customer receives from us a full estimate: what materials are needed and in what quantity. When we conclude a contract, we “book” the necessary materials at the current price, so the estimate remains fixed.
And if we compare the total cost of construction of different pools, it will be approximately the same.
Long and Expensive – is it possible to make pros out of cons? Yes - service life. With professional work, high-quality materials and proper care, concrete pools last for decades without restoration. This is where the contractor comes to the fore:
Calculating the dimensions of the pool
First of all, let's take into account the recommendations for pool depth:
- If the depth of the pool is 1.2 - 1.5 m, then this will be enough for an adult to fully swim.
- If you plan to equip the structure with a diving board, then the minimum depth of the bowl will need to be at least 2.3 m.
To calculate the pool bowl, consider the following example:
- the internal length of the pool will be 5 m;
- internal width – 2 m;
- water level – 1.3 m;
- depth at the highest point (including the side) - 1.5 m;
- depth at the lowest point (with sides) – 1.8 m;
- distance to the ledge – 2 m;
- wall thickness – 20 cm.
- bottom thickness – 25 cm;
- side width – 45 cm;
- height of sides – 30 cm.
Based on these numbers, we will get a calculation of the dimensions of the pool, the diagram of which will look like this.
According to this project, the volume of water in the pool will be 6.9 m3, the volume of the pit will be 14.41 m3 and the volume of concrete will be 6.55 m3.
In addition to calculating the volume of building material, you need to know how to properly prepare a solution for a structure of this type.
Surface pool made of concrete - rare, but it happens
How to make a surface concrete pool? This question is asked by a small part of summer residents. But there is still an option to build a concrete pool on the ground surface. For this, the most important thing is to choose the place where the concrete bowl will be erected. The criteria for choosing a location are the same as for the pit option. Only the preparation of the place will be different.
- Select the location of the required area.
- Let's level this part of the area.
- We remove roots, debris, stones.
- Fill it with 30 cm of sand.
- 10 cm of gravel on top.
- Let's ram it.
- Cover with 2 sheets of roofing felt.
- We strengthen it with mastic and sealants.
In principle, the place for a surface concrete pool is ready. You can also concrete the area under the pool for better stability.
We begin to build the concrete pool itself with our own hands from a frame, which we strengthen in the chosen place, we strengthen the longitudinal and transverse crossbars. Then, according to the scheme for concreting the pit, we install the mesh and formwork and begin pouring concrete. This concrete box definitely needs a ladder; we fix it immediately during concreting. The finishing of a finished concrete box or bowl can also be done with any materials.
If a pool is being built with a depth of more than 2.2 m, a length of more than 4 m and a width of more than 2.2 m, which will be equipped with a starting stand or will be used for diving from the side, then permission from the Ministry of Emergency Situations and consumer supervision will be required.
Concrete pools - photos of construction methods
- problems with the water supply system. As a rule, they appear as a result of errors during their laying and installation of pipeline systems. If the work is carried out correctly, no difficulties arise;
- Possible water leakage. This significant problem can be eliminated with the help of several layers of good waterproofing, the use of high-quality concrete and compliance with all rules for their installation;
- peeling of ceramic tiles or mosaics. Eliminated by using high-quality special-purpose glue;
- spread of fungus.
Pool care The appearance of fungus can be easily eliminated by regular cleaning and treating the surface of the bowl with special disinfection solutions.
Regular care and implementation of the above actions is the prevention of fungus formation.
- Design work.
- We choose the placement of the bowl relative to the floor (at the same level or higher).
- We take into account the number of people who can be in it at the same time.
- We determine the size of the pool and its shape.
- Will there be a diving board? The depth of the bowl and the height of the springboard depend on this; if a diving tower is provided, then the depth should be 2.3-2.5 m.
- We calculate the thickness of the bottom and walls. Depends on the quality of the soil and groundwater level, as well as the depth of the pool. The deeper it is, the greater the weight of water will press per 1 sq. m., respectively, the greater the load will be on the bottom of the pool.
- We design the drainage system, the location of communications, steps or the location of stairs and lighting. Corrugations must be provided for electrical wiring.
Any work becomes more understandable if there is a clear work plan and diagram.
Choosing a location for the poolChoosing the location of the pool - on the street or in the house. This will make adjustments to the arrangement technology.
Since the construction of a pool in a house usually occurs along with laying the foundation and erecting the house itself, in this article we will look at how to make a concrete pool in an open area.
Advice. It is believed that for swimming an adult, the optimal bowl size (length-depth) is 5.5 x 1.5 meters.
It will come in handy. At this stage, the possibility of arranging planned and emergency water discharges is taken into account.
Preparing the site
DIY concrete poolConcrete pool - original versionTwo concrete pools - for children and adultsDouble concrete pool - for children and adultsChic concrete pool
We invite you to study the technology of work at each stage and watch a video - a concrete pool with your own hands.
| Image | Description |
| Marking and digging a pit | Using pegs and a rope stretched between them, mark the contours of the pit at the selected location. It should be 10-20 cm wider and longer than the future pool. The depth is determined taking into account the thickness of the bedding layer and the concrete bottom, as well as the presence or absence of sides protruding above the ground. |
| Bottom preparation | The bottom of the dug pit is first leveled, making a slight slope towards the drain, then compacted well. |
| Drainage cushion device | A layer of sand 30 cm thick and a layer of gravel 10 cm thick are poured onto the compacted bottom. |
| Photo of the finished drainage pillow | These layers are also alternately leveled and compacted, maintaining the specified slope. |
| Installation of a drain system | Before continuing work, a drain pipe is installed in the lowest place of the bottom and taken out of the pit. Contaminated water will subsequently be pumped out through it. |
| Waterproofing with roofing felt | Before filling the pool with concrete, you need to perform primary waterproofing using roofing felt, covering the bottom and walls of the pit with access to the surface of the earth. |
| Gluing joints | Sheets of roofing felt are laid with an overlap of 10-15 cm and the joints are glued with bitumen mastic or soldered together using a powerful construction hair dryer. |
Reinforcement
At the stage of reinforcing the walls and bottom of the pit, all necessary communications must be laid. For example, water supply pipes.
Reinforcement is carried out with extreme caution, trying not to tear the waterproofing layer with metal pins.
- First, two layers of reinforcement mesh with a diameter of 14 mm are laid on the bottom.
Bottom reinforcement
- Then a reinforcement frame made of two rows of the same rods is installed along the walls. The lower ends of the reinforcement must be bent and inserted into the mesh at the bottom.
Reinforcement of walls and installation of pipes for water supply
When learning how to make a concrete pool, be sure to pay special attention to the technology for installing the fittings. All elements of the reinforcing mesh must be connected to each other using binding wire.
We invite you to read: Laying slate on the roof - All about roofing
In no case should they be welded, since a rigid connection creates strong internal stress, which can cause cracks to appear on the concrete surface along the reinforcing bars.
Connecting metal rods with wire
Formwork installation
The formwork is built from ready-made elements or from available materials: timber, plywood, edged boards, iron sheets. It should be 3-5 cm away from the reinforcing mesh, and the top edge of the reinforcement should be below the top of the formwork. Its inner surface is covered with film from the inside.
Manufacturing of formwork
Concreting
To create a pool bowl, you need high-quality heavy concrete with hydrophobic and plasticizing additives.
Its main parameters:
- Brand not lower than M350 - M400;
- Waterproof rating W6;
- Frost resistance index F100.
It is best to order the ready-made mixture from a specialized enterprise. This will give you confidence in the quality of the solution and immediately all the necessary volume to fill the pool.
If there is no such enterprise nearby, you can prepare concrete yourself using the following proportions:
- Cement M400 – 600 kg;
- Medium fraction sand – 1600 kg;
- Fiber fiber – 800 kg;
- Microsilica – 60 kg;
- Plasticizer – 1 kg;
- Water – 180 l.
From this number of components one cubic meter of concrete is obtained.
Do-it-yourself concrete pools can be poured in one step - the bottom and walls at the same time. Or in two passes, first concreting the bottom, letting it set, and then installing the formwork and pouring the walls.
Mechanized supply of concrete from a concrete mixer truck
The second method is more convenient, especially if the solution is prepared with your own hands. It allows you to distribute labor-intensive processes over time. And it is more convenient to build formwork on a rigid foundation. But there is a risk of leakage, cracks and cold joints at the junction of old and new concrete.
This can be avoided by using a hydrolining - a hydrophobic self-expanding cord.
Hydrophobic cord for high-quality connection of the bottom and walls of the pool
It is laid on a hardened layer of concrete before pouring a new layer into the formwork. Having an initial cross-section of 1.5-3.5 cm, this cord absorbs water from the solution and increases in volume several times - up to 15-20 cm.
The diagram shows the “pie” of a concrete bowl with the installation location of the hydraulic pad
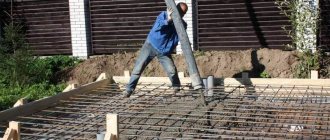
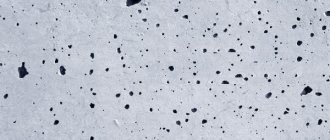
To expel air bubbles from the solution, it is advisable to use a special vibrator during concreting. Frequent vibration movements of the nozzle of this device, immersed in the solution, destroy air formations and help remove excess moisture.
The vibrator makes the concrete more dense and reduces the risk of pitting
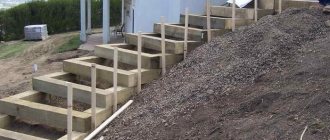
All additional elements of the pool - seating areas, stairs - are poured either simultaneously with the entire structure, or last.
Reinforced frame for concrete steps
But the work doesn’t end there, since pouring a concrete pool is only half the battle.
After a technological break of 15-20 days, necessary to gain strength, the following activities are carried out:
- Carefully disassemble and remove the formwork;
- If it was double-row and located on both sides of the reinforcement frame, then the soil is backfilled and compacted between the walls of the pit and the concrete bowl.
The edges of the roofing felt are placed on the sides before backfilling.
- If cracks appear in the concrete, they are carefully opened, cleaned and filled with epoxy resin, working in 2-3 passes with a break for each layer to completely harden;
DIY concrete pool repair using epoxy resin
- The embedded elements of the bottom drain and other equipment available in the pool are installed;
- The surface is leveled with a latex mixture in a layer of 3-4 cm and the embedded elements are fixed in the solution.
Leveling the surface with installation of embedded elements
- The surface is treated with an adhesive primer.
Waterproofing
The next important stage is waterproofing the concrete bowl. It can be done in different ways and materials. Coating or film waterproofing is mainly used.
Materials for coating waterproofing of swimming pools include:
- Polymer cement mixtures. These are paste-like cement mortars with the addition of polymers, which after drying create a waterproof layer on the surface of the pool. To make it as durable as possible, the mixture is applied in two layers and reinforced with a synthetic mesh.
Waterproofing with polymer cement composition
- Liquid rubber. An ideal material for creating a hydrobarrier: safe for human health, resistant to mechanical damage, and when microcracks appear, the coating self-heals. After application to the surface and drying, it forms an elastic, seamless membrane with high vapor and waterproof properties.
Pool bowl covered with liquid rubber
- Liquid glass. This is an aqueous emulsion of polymer resins that can penetrate through the smallest capillaries into the thickness of concrete. When hardened, it polymerizes, turning into plastic and reliably isolating water from the walls of the pool. In addition, liquid glass is an excellent base for plaster or tile adhesive, and its price compared to other waterproofing materials is much lower.
Liquid glass
Composite pools are based on a special coke-polyester bowl.
How to make a concrete pool with your own hands
Before taking the first steps to organize construction, you will need to do a little preliminary preparation. At a minimum, you will need to thoroughly understand the technology; it is best to draw up step-by-step instructions for building a concrete pool with your own hands, which outlines each step and the approximate consumption of materials for a particular operation.
A good help would be to draw up technological maps in which you can describe all the necessary procedures. For these purposes, the design and drawings of the pool must be used. Then, in the process of work, some points will have to be clarified, but such a cheat sheet will be very useful. To assess what you will have to face, you can understand the construction of a concrete pool with your own hands from the video:
Preparing the site, pit
The first thing you will have to deal with is the correct marking of the site for the construction of a swimming pool. For these purposes, you can use a standard set of pegs and marking cords or a laser level. After the stakes are driven in and the cords are stretched around the perimeter of the pit of the future pool, it is necessary to additionally measure the lengths of the diagonals; if marked correctly, they should be equal to each other.
There should be no wet soil in the pit, this means that there is an underground spring or stream somewhere nearby
The dimensions of the pit are larger than the dimensions of the pool; usually the size is increased by 75 cm on one side of the box. This is necessary for safe and comfortable installation of the formwork. Accordingly, the depth is increased by the thickness of the pillow, this is 20-25 cm, a layer of preliminary screed is 60-70 mm and a layer of concrete, another 25 cm. When digging a pit, you need to pay attention to the presence of a slight slope of the walls within 5-7 degrees, this will avoid collapse breeds
Reinforcement and filling of the bottom
It is correct to fill the bottom of the pool with concrete twice. Initially, it is necessary to lay a layer of sand 20 cm thick, then the same layer of crushed stone. To ensure that the bottom of the pool is stable and concrete does not overflow under one of the walls of the box, the crushed stone layer is leveled, leveled and compacted with a vibrating machine.
The next step is to pour a preliminary screed with a thickness of only 50 mm. The concrete layer is leveled, and two days after pouring, coating waterproofing can be applied.
In some cases, if concrete is poured using a formless method, the reinforcement is laid directly on compacted clay soil. The rods are laid in a grid in two layers with the obligatory use of conductors. The distance between the reinforcement layers is 12 cm. In this case, you will need to immediately install a plug under the flange and pipes for draining water from the pool, always in a deformation cover.
The ends of the reinforcement must be placed on the walls, there must be at least 50 cm on each side. In this way, it is possible to tie the bottom frame with the reinforcement of the vertical walls of the pool. All that remains is to install wooden panels so as not to push through the frame and the gutter along which the concrete is poured. After pouring the mixture, the bottom of the pool must stand for at least five days.
Reinforcement and production of formwork
On the second and third days after pouring the bottom of the pool, you can begin making the frame of the pool walls, steps and pit. Initially, vertical sections are tied to the previously lowered reinforcement, which are connected to each other by three rows of horizontal strapping. At the corners of the reinforcement frame, an overlap is also made with a rod onto the adjacent wall.
The formwork is knocked down from boards, covered in advance with plastic film, and transferred to a pit for installation on a reinforcement frame. The lower part of the formwork is reinforced with wooden slats, which are wedged with beams against the opposite wall, and horizontal tie strips are filled along the upper edge from the remains of the board. This is the most critical stage of installing a concrete pool, so weakened areas should not be allowed, otherwise the heavy concrete mixture will squeeze out the formwork walls when pouring.
Simultaneously with the installation of the panels, technological plugs are placed in the frame in the places of future installation of lanterns and water supply pipe outlets.
How to fill a concrete pool with your own hands
Pour the concrete mixture in small portions. On average, no more than 30 liters of mixture should fall into a wall 25 cm thick at a time. The concrete is leveled in an area of 60-70 cm with a shovel, after which it is moved further along the perimeter. At this time, an assistant should be ready to beat the laid concrete with a vibrator.
It will not be possible to compact strongly, since the reinforcement gets in the way, but it is necessary to break through the concrete for 5-7 minutes in order to squeeze out the air from the sinuses adjacent to the formwork.
After three days, the formwork will need to be removed, the walls of the pool will be cleaned and plastered in places where there was a defect.
Waterproofing concrete
After cleaning the pool walls, it is recommended to impregnate and strengthen the concrete surface. To do this, you can use various types of primers based on acrylic and epoxy.
External walls must be covered with coating insulation
The next step is to apply waterproofing to the walls of the pool; it is best to use specialized compounds based on butylstyrene mixture. The material is applied over the entire surface of the walls, excluding the top edge in the box, on which decorative ceramic tile cladding will be laid.
Finishing work
Traditionally, ceramic tiles are used to line the inner surface of the bowl, but given that the pool will be located in the country house, this is an unaffordable luxury. Typically, concrete walls are simply lined with a specialized polyvinyl chloride film. The panels are welded in advance with a hot-soldering iron and laid on the bottom and walls of the pool, always with an overlap onto the parapet.
The top of the box can be decorated with ceramic tiles using waterproof glue. If the height of the parapet is below 30 cm, then a gutter will need to be laid on the outside of the edge of the pool to drain overflowed water.
What to pay attention to before starting construction
To do everything right, you need to consider several important aspects:
- There should be no large trees near the future building, as their root system may damage the integrity of the structure. In addition, leaves and small branches will constantly fall into the outdoor pool, which in turn will lead to rapid water pollution.
- Groundwater should lie quite deep; if it is at a depth of 0.5-1 m, then such a building should be abandoned.
- It is not recommended to build a pool close to residential buildings.
- It is best to build an artificial pond on clay soil, as it will allow less moisture to pass through.
- Determine the direction of the wind. It is better if he nails the debris accumulated in the pool to one wall. An overflow pipe should be placed in the same area.
If we talk about choosing a skimmer or overflow pool, then it is better to give preference to the first option for water circulation. In this case, after being taken from the bowl using a skimmer, the water immediately goes into the purification system. At the overflow pool, water is taken over the edge, after which the water is redirected into special overflow gutters and only after that it goes into the disinfection systems.
After all the calculations and determination of the soil quality, you can proceed to digging a pit.
In fact, an outdoor pool in a yard or plot can be built without approval from Rostechnadzor.
According to Article 51 (clause 17) of the Town Planning Code of the Russian Federation, auxiliary use facilities do not require a documentary permit for construction. But there are some nuances here, it all depends on the parameters of the structure, if it is a small decorative or children’s pool, then no questions asked, but if it is a permanent building for swimming, i.e. sufficient depth, length and width, then it is better to draw up documents.
If the pool is not registered in the BTI, accordingly, it will not be on the certificate of ownership, and it will not be included in the technical passport. In the future it will be possible to legalize it, but it will cost more than registering it right away.
Preparing the site
Technology and construction stages
Preparing the base for the bowl.
If you decide to make a concrete pool with your own hands, you should unconditionally follow the recommendations for work at each stage of construction. The following steps are mandatory:
- project development, execution of drawings;
- preparation of the base;
- installation of technical systems;
- formwork installation;
- strengthening the finished pit;
- concreting in several stages;
- waterproofing;
- finishing and decoration of the adjacent space.
We suggest you read: Is it possible to go to the bathhouse if you have sinusitis? Benefits and rules of visiting
Two well-known technologies are used for concreting:
- creating a monolithic structure using formwork;
- pouring concrete mortar into polystyrene foam structure.
As mentioned earlier, construction is divided into several separate stages. It is important to maintain consistency and approach the process with all seriousness - a defect in the future can lead to problems with operation or premature destruction.
DIY concrete pool
The affordable cost and widespread availability of the materials needed to build a concrete pool with their own hands allows site owners to save money and carry out work on the construction of the bowl without the involvement of outside specialists. However, the opportunity to implement the project on their own does not mean that developers will compromise and lower the bar for quality requirements for the hydraulic structure, because for the long-term and reliable functioning of the pool, the concrete bowl must be built conscientiously.
Private builders will be able to achieve an impeccable result by following the recommendations from this review, which will cover in detail the intricacies of constructing concrete pools.
Prepare the foundation pit and fill the pillow
All country pools are divided into two main groups:
- Frame.
- Inflatable.
- Pit pits.
The construction of a concrete pool involves the pit method, which is permanent, stationary in nature. Such a pool cannot be blown away or put away - not for storage, it will delight its owners both in summer and winter. A concrete pool at the dacha has a number of advantages:
- You can build a bowl of any size, any depth.
- In addition to traditional shapes (rectangular, square, round, oval), you can include arched, serpentine, and any other shape in your project.
- A concrete pool in a country house can be finished with different materials.
- A DIY pool made of concrete does not require a lot of money.
- Eco-friendly.
- Reliable.
- Durable.
- Resistant to corrosion and exposure from the external environment.
- With proper use it will last for decades.
Before starting work, it is necessary to think through the drainage system of the pools. To do this, determine where the drain and fill lines will be located.
To dig a pit, it is necessary to apply markings to the ground, which will be 60-80 cm larger in width and length than the dimensions of the pool itself. When calculating the depth of the hole, also take into account the height of the bedding, bottom slab and finishing.
To prevent the walls of the pit from crumbling during work, it is better to make them at a slope of 5 degrees.
At the next stage, you need to lay pipes under the drain (bottom), if you are planning for just such a water intake system. The system is brought out into the pit at an angle.
It is also necessary to lay 2 layers of roofing material or geotextile on the bottom, which will act as a waterproofing material. It is better that the waterproofing extends 20 cm onto the walls of the pit.
After this, a pillow is poured into the bottom of the finished pit and compacted:
- The first layer is 15 cm of sand.
- The second layer is 15 cm of crushed stone.
In the process of compacting the pillow, it is also necessary to form a slope aimed at draining (bottom).
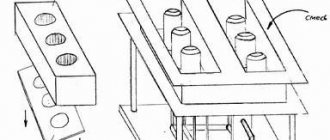
Country pool made of concrete ring
As an option, you can build a swimming pool from concrete rings at your dacha. Standard ring sizes range from 1 to 2.5 m. You can’t swim much in such a bowl, but in a small country house it will be enough to swim for the whole summer:
- Dig a hole according to the size of the ring and concrete the bottom in the same way as making a bottom slab.
- Lower the ring into the hole with a crane, placing it on the concrete bottom. Next, you carry out the same work on waterproofing, thermal insulation and finishing.
- To avoid concreting the bottom, you can use a ready-made concrete cover placed on the bottom of the pit. Then you will only have to concrete the hole for the inspection hatch. Just first run the pipes through it to drain the water from the bowl.
Attach a ladder to the ring to descend into the bowl, do the finishing touches and the mini-pool at the dacha is ready.
In winter, do not drain all the water from the pool, but only below the level of the nozzles. The ice inside the bowl compensates for the external soil pressure. Throw plastic bottles with sand into the water so that they half stick out of the water. They compensate for the pressure of the ice, saving the walls of the bowl from destruction.
Construction of a swimming pool at the dacha will decorate the landscape of the yard and improve the health of all family members by taking water procedures.
As you can see, making a concrete pool with your own hands is a difficult but doable task. In contact with
Reinforcement
To concrete the pool, you will need to prepare low formwork and reinforcement, the rods of which should never be welded. To avoid corrosion, use only wire to fasten the mesh.
The formwork for the pool should outline the outline of the future building. Two levels of reinforcement are neatly laid inside it:
- The first one should rise 5 cm above the edges of the slab.
- The second level is laid 5 cm below the top edge.
- Since a slab about 20 cm thick is usually poured onto the bottom, the distance between two layers of reinforcement should be 10 cm.
Healthy! For difficult soil, use thicker reinforcement.
The pool is reinforced with ribbed rods with a diameter of 10-14 mm and cells 20 x 20 cm, which are laid on small stones. The laying step is 20 cm. You need to step back 5 cm from the edge of the slab and bend the rods with the letter “G” (these bends will be required to create the frame of the walls).
Finishing and lining of the pool bowl
Preparing the site
Grinding machine Grouting is done manually or using a special grinder.
Waterproofing is applied using special liquid solutions, between the layers of which reinforcing fabric (mesh) is laid.
Waterproofing a swimming poolWaterproofing a swimming pool – 2
When performing this type of work, special attention should be paid to:
- seams between the bottom and walls of the structure;
- seams that appeared when pouring concrete;
- place of communications entry;
- chips, gouges and cracks.
Finishing
Before doing this, it is important to check the quality of the waterproofing. To do this, you need to fill the pool with water. Measure the water level. Then wait 10-12 days. And measure the water level again. Changes in this parameter are an alarming sign. This means that the waterproofing was done poorly and there is a leak somewhere.
The amount by which these two indicators differ can say a lot. For example, a slight discrepancy would indicate that the water could simply evaporate under the influence of heat.
For the walls, you will need to build formwork from moisture-resistant plywood with a thickness of about 21 mm or boards planed on one side (it will be more convenient to work with plywood). In this case, it is necessary to maintain a distance of 40 cm between the vertical slope of the pit and the formwork itself, and also take into account the thickness of the walls (20 cm).
After this, it is necessary to install reinforcement in the formwork and connect it to the “tails” of the horizontal reinforcing layer. The reinforcement spacing and mesh type are the same as for the bottom.
At the next stage, concrete solution is poured into the finished formwork. It also dries in 7 days.
Scheme of the formwork of the pool bowl.
The construction of the bowl, in turn, consists of the following stages:
- pit preparation;
- erection of formwork;
- fill;
- installation of bedding.
The dimensions of the pit should be slightly larger than the expected parameters of the pool - about 20 cm. This margin implies the width of the backfill and the thickness of the pool fill. Mostly the pit is created using an excavator, but if the project is designed for small dimensions, you can use a regular shovel.
We fill the walls of the bowl using formwork. After finishing work with the walls, you can start pouring the floor - the concrete mixture is poured onto the bedding or directly onto the ground. In fact, the production of the floor occurs after the construction of the formwork. The construction of formwork occurs in the following sequence:
- construction of shields;
- construction of sheathing;
- attaching shields to the frame;
- tying support stakes;
- installation of supports.
Now you can start pouring the walls; the formwork will be dismantled in a week. All work must be carried out at a temperature of 10 degrees or more, otherwise the concrete will not harden well. As soon as the walls harden, it’s time to pour the floor. After 10 days, the pool floor is ready for installation of the bedding. For backfilling, use sand cleared of shells and pebbles.
Concrete pool bowl
The bowl is cast from heavy concrete of a class not lower than B25P4W6 (strength) and grade not lower than W6 (water resistance). Concrete must be strong, waterproof and plastic. Since the water in swimming pools contains dissolved oxygen, chlorine, and microorganisms, limiting their access to polymer and metal parts helps stop oxidative processes.
Construction of a reinforced concrete pool bowl
- Class AI, A-III fittings
- Anti-corrosion coating of fittings
- Concrete
- Cold seam sealing (Idrostop)
- Primer
- Leveling plaster layer
- Mesh waterproofing
- Tile adhesive
- Mosaic
- Grouting joints
- Floor tiles
- Termoshov
Attention!!! The bowl of a cast pool should not be subjected to any mechanical stress, otherwise water will inevitably leak into the resulting cracks and voids. Sealing any crack is much more expensive and more difficult than doing everything correctly right away.
Casting a pool bowl usually occurs in two stages. In this case, the bottom is concreted first, then the walls. This technology is based on the use of a self-expanding cord, which will ensure the tightness of the bowl at the junction of new and already hardened concrete. At the joints of hardened and unhardened concrete, a self-expanding cord with a cross-section of 2.5x3.5 cm (for example IDROSTOP) is pre-laid. Then concreting is done. The tightness of the joints is ensured due to the physical properties of the cord. When immersed in water, its volume increases at least 6 times. The cord covers all possible gaps and does not allow water to pass through.
Waterproofing a concrete pool
The main work on internal waterproofing is largely determined by the selected finishing materials. So, if PVC film is used as a finishing material, labor-intensive waterproofing work will not be required. The base for ceramics or mosaics, on the contrary, is prepared very carefully. First, defects and minor errors are corrected using plasters or special repair compounds. The latter are preferable - they harden faster and, in addition, may have water-stopping properties. To ensure that the plaster layer adheres better to smooth concrete, contact adhesive compounds are first applied to it. Plastering is carried out over a metal mesh fixed to the concrete surface using dowels. This ensures the resistance of the leveling layer, as well as the waterproofing and finishing layers, to dynamic loads. Deviations from the vertical and horizontal are controlled by rack metal beacons.
Finishing critical areas with alternative waterproofing is of great importance. The joints between the walls and the bottom must additionally be glued with sealing tapes. A prerequisite when building a concrete pool lined with mosaic or ceramic tiles is to check the bowl for water leakage. Testing for water tightness must be carried out after manufacturing and leveling the surfaces of the concrete bowl. In this case, the pool is filled with water and kept for 10 days. It would not be superfluous to make sure that the bowl is waterproof even after applying waterproofing. It should be taken into account that after draining the water, the surface of the bowl may remain contaminated, which will lead to a decrease in the adhesion of the adhesive solution when laying the cladding.
After plastering the bathtub, embedded elements are installed. To seal the frames, expanding concrete or special cords are used. After completion of waterproofing measures, the bowl is subjected to hydrotechnical tests. Water is poured into it and the condition of the structure is observed for three days. If the tightness is confirmed and there are no leaks, the pool is drained, backfilled and finishing of the structure begins.
Fill the bottom
After the frame is made, prepare and pour concrete mixture onto the bottom of the pool. To increase strength during the pouring process, use a vibrating device that will compact the solution.
After pouring and leveling (don't forget to maintain the slope), you need to wait a week until the slab hardens. If the weather is hot, then during this time wet the concrete surface with water 2 times a day.
After filling the pool bowl, you can not waste time and start preparing communications for draining water into the cesspool.
Installation of water supply and drainage systems
There are two systems - permanent and cyclical. Permanent involves constant circulation of water; despite its high cost, it can significantly reduce water consumption.
Installation of a permanent system consists of the following steps:
- Installation of the storage tank is below the water level in the pool.
- Equipping the tank with additional devices - filters, ionizers, controllers, installing a pump.
- Ensuring a constant flow of water - connecting the pump to a constant source.
- Installation of an overflow system - it is necessary to maintain a slope of up to 5 degrees.
- Installation of a drain system to regulate the water level in the pool - such a system is controlled automatically or manually.
The cyclic system involves periodically adding water to the pool as needed. Water purification is carried out using chemicals. This system is much cheaper than a permanent one, but the cost of chemically cleaning a large pool after 5 years exceeds the cost of a permanent system.
We suggest you familiarize yourself with: Do-it-yourself heat exchanger for a chimney pipe
Stages of pool construction
Upon completion of the design work, you can begin construction directly. Doing this on your own is quite difficult. This process requires certain knowledge and equipment. But still, nothing is impossible here. The right technology will help you follow all the nuances and tell you about some aspects of pool construction. Where should I start?
- The first stage of building an outdoor pool will be the process of digging a pit. An important nuance here is the waterproofing of the bowl of the future design. To do this, it is necessary, through geodetic work, to find out at what level the groundwater lies and how it can affect the construction process itself and the quality of the future structure. If groundwater passes close enough to the planned location of the pool, then it will be necessary to install a drainage system that will ensure its high-quality drainage. If the threat of groundwater exposure is low, then external waterproofing of the pool would be the best option. Thanks to it, groundwater, even if it leaks through the bowl in a small amount, will not be able to get directly into the pool. Waterproofing is a process that can be done with your own hands by selecting high-quality and proven materials. This stage should be approached with all responsibility, because high-quality waterproofing will be the key to the long functioning of your pool.
- In the case where the pool is planned indoors, it is usually located on the ground floor and does not require additional waterproofing. But there is another threat hidden here. It is worth remembering that a concrete bowl absolutely cannot be reinforced to the structures of the house itself. Depending on many factors, the structure of the house may settle and, thus, lead to the subsidence of the bowl and its destruction. Here everything must be done as accurately and correctly as possible, and the pool bowl must be an independent structure.
- After the pit for the outdoor pool has been dug, and waterproofing in any of its variants has been carried out, you can proceed to the next stage - the manufacture of external thermal insulation of the pool. Since the pool is a stationary structure, it will be outdoors all year round. And for its high-quality functioning, even in winter it is necessary to maintain a certain temperature regime. The ground temperature around the pool can range from +5 to -5 degrees. The device of high-quality thermal insulation implies the use of such modern materials as: foam concrete, expanded clay, expanded clay concrete, polystyrene foam and polyethylene foam. Each of these options is ideal, but if you are doing this process yourself, then expert advice will not hurt. At this stage, in addition to the quality of the materials used, it is also necessary to take into account the level of their ability to retain thermal performance. In addition, in this case, the construction of a pool requires a cement-concrete screed. The technology for its creation implies that such a screed should have a thickness of no more than 10 cm. A thicker layer can quickly crumble or succumb to cracks. If everything is done correctly, it will become a good basis for the next stage - reinforcement.
In order to qualitatively strengthen the future structure of the pool, class A3 reinforcement is most often used, which has a diameter of 14 to 16 mm. This option is perfect for the floor. For walls, you should choose reinforcement with a smaller diameter - from 10 to 12 mm. You can do the reinforcement yourself, but you must be prepared for a fairly large amount of work. In addition, do not use welding to connect the rods under any circumstances. This can lead to disruption of the metal structure, corrosion and destruction. The structure is connected into a single whole using a special wire for tying reinforcement.
Next, you can begin constructing the formwork. This design comes in two types and the construction of a concrete pool bowl involves any of them:
- Disposable - made of wood;
- Reusable - made of plywood or metal.
After the formwork is installed, you can proceed to the main stage - pouring the pool bowl. This will require high-grade concrete, which must contain plasticizer admixtures and hydrophobic additives, since the material for constructing the bowl must have a high level of water resistance. Filling the bowl can be done in several ways, but most likely you will not be able to do all the work yourself without the involvement of specialists.
If you are constructing formwork with your own hands, then you need to act in accordance with the created project. It stipulates the thickness of the protective layer of concrete, the strength of the formwork, and even the installation technology. Whatever formwork option you choose, it must have the main qualities: withstand the hydrostatic pressure of concrete and not deform, and also be moisture resistant.
Plastering and re-waterproofing
After the main construction of the pool has been completed, we move on to plastering work. We use the following solution as plaster:
- 1 part of cement grade not lower than M 500;
- 2 parts sand;
- latex plasticizer (will make the composition water-repellent);
- microfiber (has the same properties as reinforcement).
Liquid coating waterproofing must be applied to the plastered surface. To give the protective layer greater strength, it is better to apply the solution to a special plaster network made of fiberglass with cells of 5 x 5 mm.
At this point, the construction of the concrete pool is almost complete, and you can move on to finishing work. The easiest way is to cover the bowl with PVC film; it is easy to apply and has additional waterproofing properties.
After this, all that remains is to connect devices for disinfecting pools and equip the structure with stairs, springboards and removable flaps for draining water.
PVC film for the pool is durable and non-slip.
The following materials are used for waterproofing:
- waterproofing films - a classic option, but a rather labor-intensive installation process;
- bitumen resins - protect concrete from destruction, but to glue the tiles it is necessary to cover the waterproofing layer with plaster;
- chemical impregnations are an expensive technology, but the price is justified by the ease of work and the unnecessary need for additional finishing coatings.
Insulation begins with the walls; if necessary, a layer of plaster is applied under the insulating layer to eliminate unevenness.
How to decorate
Decoration with stones
The pool can be decorated and improved in different ways. First of all, you need to trim its edges. To do this, you can lay out tiles or other material. Some people prefer to make a circular path from natural stone.
The pool itself can be made simply fabulous, especially at night. To do this, you just need to install special LED flashlights underwater. Such lamps can shine and sparkle, or they can create a quiet glow.
You can also install lighting around the pool. This will make the landscape of the site more expressive and give it additional charm. Having built a concrete pool, it would simply be unacceptable to leave it in the form of a stone bag. Arranging a relaxation corner is simply necessary. If building a concrete pool is hard work, then all other work should bring only pleasure. Installing various systems such as additional lighting, water heating functions or decorating the sides will not take much time. If desired, you can even install a fountain next to the pool.
Finishing work
Preparing the site
Upon completion of waterproofing work, they proceed to laying tiles. There are three groups of tiles that are used for lining a pool:
- Porcelain tiles - looks beautiful in clear weather due to the refraction of light, does not slip. Used for finishing floors.
- Mosaic - glass, ceramic, gives the pools a glowing effect. The price of the first reaches 500 dollars. for 1 sq. m., so ceramic is often used. Externally there is no difference from glass, but the cost is 7-8 times lower.
- Pool tiles are resistant to water damage, a special coating reduces slipping.
Often, when finishing the surface of a pool, I combine several types of tiles.
Decoration
Decoration is the final touch in the construction of a swimming pool.
The pool will take on its final appearance after finishing touches. First, the stairs are installed. Ready-made metal structures are popular, which can be purchased in a store and installed without much effort. They do not rust and do not require additional maintenance.
The space that borders the concrete pool is turned into a platform with sun loungers, and a sun canopy can be made. You can also add several modern gadgets - fountains, hydromassage, whirlpools. But it is better to plan such moments in advance; most of them cannot be installed without dismantling the bowl. After completion of construction, you will receive a real decoration for your dacha.
Step-by-step description of the construction of a concrete pool
The first composite material to be used is reinforced concrete. The reinforcement makes the structure more durable, and the concrete protects the metal components from corrosion. Reinforcement techniques are used to produce durable polymers. Such composite materials are stronger than reinforced concrete, but they do not retain their original dimensions - they sag under external influences.
Another disadvantage of composite materials is the difficulty in eliminating scratches, the appearance of which is guaranteed during operation. For repairs, it is necessary to dismantle the entire bowl. In addition, composite materials are short-lived, they lose their initial properties under the influence of ultraviolet radiation and chemicals - fungal microorganisms develop in the cracks formed.
Do not despair and think about dismantling the bowl if a crack appears in the concrete. There are two ways to eliminate this nuisance without causing more damage to the pool:
- injection of resin or solution into the resulting cavity;
- manual sealing - remove weak concrete near the crack by 30 cm on both sides, coat the crack with 3 layers of epoxy resin.
Figure 3. Finishing concrete with your own hands
Finishing options depend on the design of the pool, the landscape of the site, the taste of the owner and his financial capabilities. To perform the work they usually use:
- PVC film;
- mosaic tiles;
- natural stone or wood.
- 600 kg of cement;
- 1,600 kg medium granular sand;
- 60 kg fine silica;
- 800 kg of special fiber fiber;
- 1 kg of additives for plasticization.
The water-cement ratio of the prepared concrete should be 0.3%. If these values are observed, the pool will last for many years, delighting you with the opportunity to take water treatments in the summer.
When building a concrete pool, the main building material, naturally, is concrete. It must be chosen wisely so that it meets the criteria:
- Waterproof.
- Frost-resistant.
- Resistant to sudden temperature changes.
- Insensitive to external influences.
| M350 |
Composition of material for a concrete pool
Concrete pools have the longest service life, which is about 100 years (for comparison, polypropylene, which is very popular, lasts no more than 30 years). But, in order to build a durable concrete pool with your own hands, of course, you need to select the correct composition of the building material and calculate its proportions.
The grade of concrete for the pool must be at least M 350; it is better to take Portland cement M 400. It is also important that the material meets the requirements of frost resistance. For an artificial reservoir, this indicator should not be lower than F 100. The water resistance of the PC should be W6.
To model a bowl and independently construct concrete monolithic pools, heavy concrete, plasticizing and hydrophobic additives are usually used.
Healthy! You can give the material the desired density during work using a construction vibrator or a vacuum pump.
To make concrete for a pool (per 1 m3) you will need:
- 600 kg PC;
- 1,600 kg of sand (it is better to choose medium granulation raw materials);
- 60 kg microsilica;
- 800 kg of fiber fiber;
- 1 kg of plasticizing additives.
In this case, the water-cement ratio will be 0.3%.
If we talk about other analogues from which a pool can be built, then, unlike houses and garages made of cinder block, this material is absolutely not suitable for artificial reservoirs. It’s not for nothing that such products are called wall blocks.
It is better not to build a pool from cinder blocks, since this material allows moisture to pass through too much, especially if sawdust is used as a filler for the block. In the best case, you can make permanent formwork for a concrete pool from cinder blocks, but even for this purpose you will need to choose a solid material with the highest strength. In addition, the cost of such formwork will be decent.
It is also worth considering some features of your suburban area.