Reinforced reinforcement belt
A monolithic aerated concrete belt is an essential element of any structure, connecting the entire building structure into a single spatial frame.
Properly designed and assembled according to technical standards, the reinforced concrete belt reliably fixes all vertical load-bearing elements, and evenly distributes the alternating loads that arise from the roof and walls of the building to the base of the foundation (see video in this article).
General information
The reinforced belt is designed to strengthen the walls of a building and to protect them from all types of loads arising due to deformation under the influence of two types of factors:
- External (wind exposure, unstable loose soils, elevation changes in the building area, unevenness of the territory, seismic soil movements);
- Internal (installation of building elements into the walls necessary for the internal cladding of the building).
All these phenomena are fraught with weakening of supporting structures, cracking of blocks and even collapse of the house. It is in order to avoid such consequences that an armored belt is performed.
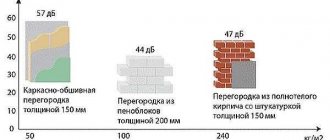
Many non-professionals believe that a reinforced belt can be built from brick blocks, but their assumption is wrong. An armored belt in a house made of aerated concrete cannot be made from brick, since this construction element itself is a solid closed structure made of reinforced concrete, running along the perimeter of the entire building. Often, craftsmen who build private country buildings neglect this rule in order to save money and use brickwork reinforced with metal mesh. But such a “reinforcement belt” is unable to protect a building made of aerated concrete from destruction.
The correct belt for construction from aerated blocks is arranged throughout the entire area of the house. Often it is installed between two floors and directly under the future roof. If the work is done correctly, the walls will not “corrode” or undergo unfavorable changes.
Necessity of the device
When wondering whether an armored belt is needed in a house made of aerated concrete, you should take a more in-depth look at all the nuances of creating a block structure.
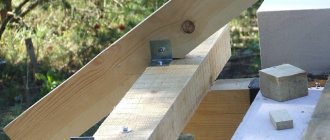
During the construction of the roof, there is a need to attach wooden beams to the walls. Attaching timber with anchors to aerated concrete blocks is prohibited, since the material cannot easily cope with a point load. And if the blocks cope with one fastening, then multiple loads will become disastrous for the wall.
In addition, after the installation of the roof, the walls made of aerated concrete are affected by the vertical load, which weakens the load-bearing structures. In order to secure the house, you need to add rigidity to it, and also distribute the weight in equal amounts onto the frame. The armored belt copes well with this; it’s not for nothing that professionals call it “unloading”.
This building element strengthens the walls and takes on the load that occurs during unstable shrinkage of the house. Its abilities are due to the materials used for the device - concrete, which turns into a monolith after maturation, and reinforcing bars (longitudinal and transverse).
Concrete has tremendous resistance to compression, and metal rods do an excellent job of tensile strength. The concrete structure, reinforced with a steel skeleton, does not deform even under a weight exceeding the norm. Naturally, the part of the wall that is located above the reinforced belt takes the load, but thanks to the reinforced concrete belt, its distortion does not occur.
Summarizing all of the above, it can be noted that the armored belt in a house made of aerated concrete (with an attic, with a second floor, with a roof of any weight, etc.) is a truly necessary element.
Monolithic Belt for Aerated Concrete: Rules for Strengthening Masonry
Reinforced reinforcement belt
Monolithic aerated concrete belt is a mandatory element of any structure, connecting the entire building structure into a single spatial frame.
Properly designed and assembled according to technical standards, the reinforced concrete belt reliably fixes all vertical load-bearing elements, and evenly distributes the alternating loads that arise from the roof and walls of the building to the base of the foundation (see video in this article).
general information
The organization of a monolithic reinforced concrete belt (reinforced concrete belt) is provided along the entire perimeter of the main walls at the levels of interfloor ceilings, as well as at the level of fastening the roof mauerlat.
Such a structure is designed to ensure the joint operation of load-bearing walls with horizontal floor membranes, as well as to evenly redistribute emerging loads and increase the stability of the building. The load-bearing capacity of the structure, efficiency and manufacturability of construction largely depend on the design solution for the installation of a reinforced concrete belt.
When building a house from aerated concrete, the installation of an armored belt is provided at the following stages of construction:
- Upon completion of installation of the foundation from prefabricated reinforced concrete blocks, rubble stone, etc.
- Along the top row of main walls - before laying floor slabs (interfloor).
- Upon completion of the wall laying - for attaching the roof Mauerlat.
Materials
To construct a monolithic belt, you will need the following materials:
- edged board 25 mm thick;
- U-shaped aerated concrete blocks;
- adhesive for U-blocks made of aerated concrete;
- steel reinforcement AIII, Ø 10–12 mm;
- fittings Вр–1;
- tie wire 0.8–1.2 mm;
- heavy concrete, class B15.
Equipment and tools
Overview of required tools and equipment (see table):
| Name | Description |
| Cutting boards for making shields | |
| Rebar cutting | |
| Fixing the position of reinforcing bars using tying wire | |
| Manufacturing of corner elements of reinforcement frame | |
| Compaction of concrete mixture | |
| Checking the horizontal and vertical level | |
| Measuring distances |
Characteristics
Before starting work, we will consider in more detail the main characteristics of the belt.
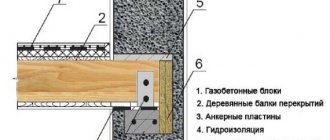
The size of the armored belt for aerated concrete directly depends on the perimeter and thickness of the building walls:
- The height is usually equal to the standard block height, but can vary from 250 to 350 mm (for panel formwork).
- The size of the reinforcement cage is calculated based on the condition - the metal reinforcement bars must be covered on all sides with concrete by at least 50 mm.
- This requirement must be met when calculating the size of the reinforcement cage clamps, since their surface is closest to the formwork panels.
- In a structure located on walls up to 6 m long, it is allowed to install three longitudinal rods Ø 10 mm. The diameter of the wire Вр–1 is 4.5 mm. The gap between the clamps is 250 mm.
Reinforcement frame - three rods
In an armored belt intended for walls over 6 m, 4 reinforcement rods Ø 12 mm are laid. For clamps, use Ø 5.5 mm wire and distribute them at a distance of 300 mm from each other along the entire length of the frame (see photo).
Frame - four reinforcement bars
Longitudinal reinforcement and corner additional elements must be overlapped using a special knitting wire.
Attention! When assembling a reinforcement frame, it is strictly forbidden to use electric welding, since spot heating of the metal at the junction of the reinforcement negatively affects the strength of the entire structure (tension-compression, bending).
Work order
A reinforced reinforcement belt for aerated concrete, depending on the formwork used, can be made in three ways:
- using wooden shields;
- using partition aerated concrete blocks;
- using special U-shaped aerated concrete blocks.
Wooden formwork panels
The construction of a monolithic belt using wooden panels consists of the following operations:
- production of wooden panels;
- production and assembly of reinforcement cage;
- laying concrete mixture;
- dismantling of shields;
- curing.
The edged board for formwork should be 2.5–4.0 cm thick and 200–300 mm wide. Also, when assembling panels, bars of measured length with a thickness of 40x40 mm are used. For fastening, nails or wood screws are used.
Instructions for pouring a monolithic belt with your own hands at a construction site:
- The wood is laid out on a separate area and the size is selected so that the height of the finished shield is not much greater than the height of the future belt.
- The boards are knocked down into panels in sections up to 2.5 m long (the length is for ease of assembly on the walls, you can do more).
- You can immediately install internal bars to screed the lower part of the structure. When installing them, it is necessary to take into account that the panels are overlapped with the wall - the lower part of the formwork is overlapped with the wall up to 30–50 mm. Therefore, the bottom of the block should be at this level.
- The section is lifted up and placed on the wall.
- The boards are leveled (vertical) and fixed with horizontal ties (bars). To begin with, one is enough, otherwise it will be difficult to insert frames.
- Thus, the remaining sections are lifted and mounted. Using horizontally installed bars (top and bottom), the sections are fastened into a single structure.
- All walls are built in this sequence.
Reinforcement cage manufacturing process:
- First, clamps are made on a bending machine and tightened with knitting wire.
- At the same time, from pieces of reinforcement 1.0–1.2 m long at an angle of 90 °, additional elements are bent to connect the frame sections at the corners of the walls.
- Then take four rods and thread them into vertical clamps.
- Assembly of the frame begins from the center of the section, gradually moving in different directions (towards the edge).
After preparing all the details of the metal frame, it is lifted and placed in the formwork, not forgetting to maintain the tolerances provided for by the technical specifications:
- the distance from the shield to the frames should not be less than 50 mm;
- the displacement of the frames from the central axis of the walls should not exceed 100 mm or more than 0.25% of the measured length;
- deflection of the spatial frame - no more than 0.175% of the control length.
Then the concrete mixture is prepared and poured into the formwork. Using deep vibrators, the belt is compacted and left until the required strength is reached (at least 72 hours).
Installation of reinforcing belt
When starting to create a belt, it is worth knowing that only high-quality materials should be used to make the structure. To work, you will need M200 concrete (the higher the grade of material, the better) and metal rods, the diameter of which should be 12 mm.
First, the reinforcement skeleton itself is assembled, consisting of two rows: upper and lower. The rows, the distance between which should be from 10 cm to 15 cm, are connected by 4-6 mm transverse rods (the reinforcement pitch is 10 cm). The rods are fixed along their length overlapping with special steel wire (15 cm overlap). The resulting rows are also connected to transverse reinforcing bars.
Sometimes a simplified armored belt is made - single-layer. The longitudinal rods are fastened with knitting wire to the transverse rods, forming a mesh. In areas of transition from one wall to another, the rods overlap and are tied at the intersection points.
After the skeleton is ready, it is placed in formwork or in a pre-designed cavity. It is imperative to ensure a distance between the reinforcement and the formwork to create a protective layer of concrete that prevents rusting of the reinforcement. For this purpose, specially designed plastic products are used, which are support sprockets and tables. They help to fix the reinforcement at a suitable distance. Almost always the size of the gap is 3-5 cm.
The final stage is pouring the formwork with concrete mortar. The mixture is thoroughly compacted and leveled using a trowel and a rule. It is worth remembering that the use of a vibrating mace when constructing a reinforced belt is impractical due to the shallow depth of the structure.
If the construction was carried out during the hot season, the finished product is covered with polyethylene and periodically moistened with water. If the installation of the belt took place in the cold season, it is protected from freezing.
You can return to construction activities in 2-3 days - during this time the concrete will have time to gain initial strength. Dismantling of the formwork can be done after a week.
Video about the design and installation of the armored belt:
How to do everything wisely?
In conclusion, we can say that the installation of an armored belt for an aerated concrete house is not particularly difficult if you act strictly according to the instructions and good faith
A reinforcing or unloading belt is a mandatory structural element of any building made of aerated concrete. It is a monolithic reinforced concrete strip that encircles the entire perimeter of the building and follows the contour of the walls.
How to make armored belt correctly
How to make an armored belt correctly, avoid mistakes. The procedure is determined by the way the belt is laid. When pouring this concrete element, there are four main stages:
1. Calculation of armored belt parameters and preparation of materials.
2. Laying and fastening the formwork.
3. Knitting reinforced frame
4. Concrete works.
At the first stage, in addition to calculating the metal and the volume of the solution, a method of insulating the armored belt is selected. In this case, the owners can lay out the outer wall from thin slabs of aerated concrete and insulation with a thickness of 50 cm or more (the best option), lay permanent polystyrene foam formwork, lay a piece of polystyrene foam inside the formwork (with subsequent reinforcement with disc dowels) or leave an 80 mm gap for installing insulation from the outside in the future. .
In the absence of any gap, the armored belt requires additional insulation, which in turn limits the methods of finishing the facade and leads to the need to completely cover the external walls with heat-insulating materials, since individual protruding areas do not look aesthetically pleasing.
The height of the formwork is selected taking into account the obligatory fit of any removable panels onto the walls made of blocks and a 2-3 cm margin on top. If you are sure that the walls are laid evenly, concrete can be poured flush with the edges of the formwork, but if it is necessary to level them, it is easier to install higher panels and mark the pouring line using a level and a marker.
Most experts recommend immediately making the outer wall non-removable, sequentially placing aerated concrete and insulation, and the inner wall removable, with fastening to blocks in the lower part, transverse bridges made of thin planks in the upper part, or a through tie with studs.
To simplify removal after the concrete has hardened, the latter are wrapped in parchment and lubricated with machine oil.
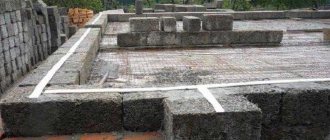
The reinforced frame is installed in the formwork taking into account standard requirements:
• A distance from the edge of the concrete of 5 cm. To fulfill this requirement, pieces of brick are placed under the lower rows of rods, and rigid wire spacers are installed on the sides every 1.5-2 m.
• Rigidity and continuity throughout the entire volume. The lower and upper rows are connected by thinner jumpers using clamps or wires vertically and horizontally in increments of 50-70 cm; at the corners and outlet areas of load-bearing walls, the reinforcement is additionally tacked by welding. In these same problem areas and joints of segments, the reinforcement is laid with an overlap of 30 cm.
• Increasing the cross-section of rods or their number when pouring thick strips or expecting high spacer and weight loads.
After installing and checking the evenness of the frame, thick concrete with fine filler and a strength class of at least B15 is poured into the formwork. Work is carried out without interruption, with the obligatory removal of air bubbles and leveling of the top layer. The poured structure is covered with film and watered with water for the first week (in cold weather - the first 3 days or if necessary); removal of the formwork begins after a crack appears between the panels and concrete. The lower fasteners, longitudinal padding boards and threaded rods are removed first, the walls themselves are the last, if necessary, a crowbar or grinder is used at this stage (without hitting the belt or cutting its edges).
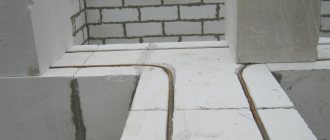
An important nuance: when laying an armored belt under the mauerlat or planning to tie a concrete interfloor ceiling to the walls inside, the corresponding vertical studs or protruding reinforcement are placed in advance. Ignoring this requirement is considered a violation; making additional holes in the finished belt is not recommended.
When constructing a belt from U-shaped aerated concrete blocks (factory-made or cut out yourself), the technology is simplified. In this case, it is enough to lay blocks matching the width of the walls on mortar or glue, place a thin layer of extruded polystyrene foam and a reinforced frame inside, and fill the structure with thick concrete.
The last step is carried out after the final hardening of the masonry mortar; if there is any doubt about the stability of the gas silicate blocks or the time limit is limited, the structure is strengthened with formwork. T
the requirements for the reliability of the frame, the preliminary laying of studs or the quality of the solution remain unchanged, but if necessary, the loading of such armored belts can be started after 2 weeks instead of the 28 days required for monolithic concrete.
Functions of the armored belt
- Provides additional strength to the entire structure.
- Prevents wall deformation due to soil movements and foundation shrinkage.
- Distributes point loads evenly over the entire area of load-bearing walls.
The unloading belt forms stiffening ribs that connect the structure into a single whole and increase the resistance of the building walls to strong gusts of wind, seasonal soil deformations and other loads. Its presence allows you to equip large window openings and prevents the destruction of an aerated concrete house in earthquake-prone areas.
Aerated concrete is not able to withstand point loads that occur when attaching the Mauerlat with anchors or studs directly to the load-bearing wall. For the same reason, you cannot attach the beams of the rafter system to the gas block. The installation of an armored belt allows you to evenly redistribute the load created by the rafter system throughout the entire house and prevents the appearance of cracks in the walls.
Some builders mistakenly call a brick structure reinforced with reinforced mesh an armored belt. However, brickwork cannot fully serve as a load-bearing belt.
How many unloading belts are needed?
A reinforced belt is made under each interfloor ceiling and under the fastening of the rafter system. The armored belt is poured along the walls that rest on the foundation. If floor slabs or beams will rest on internal walls, then they must also be built on a foundation.
In some cases, an armored belt is also poured over the foundation, and the first row of aerated concrete blocks is placed on it.
- the foundation base has a shallow structure;
- the house is being built on a hillside or on subsidence soils;
- there is a ravine, stream or river near the site;
- The construction site is located in an earthquake-prone area.
How to build a reinforced belt?
A monolithic belt is a structurally simple element. A formwork is built along the perimeter of the wall, into which metal reinforcement is mounted. Then the structure is poured with concrete and insulated.
To construct a monolithic armored belt, the following materials are required:
For a 2-story house, the armored belt is made after the construction of the walls of the first floor, before laying the floor slabs, and after the construction of the second floor, before installing the roof.
- Plywood/boards;
- Quick installation;
- Self-tapping screws;
- Nails;
- Ribbed metal rods;
- Bricks/stones;
- Concrete/sand, cement, crushed stone;
- Cellophane film;
- Insulation (foam);
- Knitting wire.
And tools:
- Welding machine;
- Screwdriver;
- Hammer;
- Concrete mixer;
- Building level;
- Hammer.
Stages of installation of a reinforcing belt
Most often, the unloading belt is poured into formwork, for which a frame is erected from ordinary boards, moisture-resistant plywood or OSB. The width of the armored belt, as a rule, is equal to the width of the wall or slightly less than it, and the height is usually 30 cm. The lower part of the formwork boards is screwed to the gas blocks with self-tapping screws on both sides, and on top the frame is fastened with cross members every 80-90 cm.
You can also fill the unloading belt using aerated concrete U-blocks. They are mounted with glue on the last row of wall masonry. A layer of thermal insulation is laid inside the block to the outside, after which a frame of reinforcement is assembled inside.
The reinforcement frame for a wooden floor can be made of two metal rods, connecting them with parallel jumpers with a pitch of 50-70 cm. If the house design provides for a floor made of concrete slabs, then a powerful frame is arranged, which is a parallelepiped of four rods with jumpers between them.
It is important to consider that the reinforcement cage must be level and at least five centimeters away from all edges of the structure. The pieces of reinforcement are tied together with a special wire; welding is not recommended. The frame is knitted directly inside the formwork, since it is heavy and when assembled it is extremely difficult to transport it from place to place.
To fill the unloading belt, concrete of a grade not lower than M200 is used. It is better to use ready-made purchased concrete, but you can prepare it yourself by mixing cement, sand and crushed stone in a ratio of 1:3:5. Since concrete is required in large quantities at once, we recommend using a concrete mixer.
The poured concrete is compacted by bayoneting to get rid of voids inside the monolithic tape. To do this, use a special tool or a piece of reinforcement. In hot weather, the flooded unloading belt is covered with film to avoid excessively rapid evaporation of water. The formwork can be dismantled after 5-6 days.
Installation of formwork for the third and fourth reinforced belt
You can create and install formwork in different ways:
- Wooden panels are secured from below using anchors. For strength, a metal plug is welded onto the anchor so that it does not squeeze out through the wood.
- Wooden panels are fastened to a brick wall with self-tapping screws. First, holes are drilled in the formwork for plastic mushrooms, 6 mm in size. A distance of about 70 cm is left between them. After installing the fungi, they begin to tighten the screws. The upper parts of the formwork panels are fastened together using boards of suitable size.
Before pouring, the formwork should be carefully checked for strength to avoid its breakage during concreting.
Insulation of the unloading belt
A reinforced concrete armored belt is a cold bridge, so it must be insulated during construction or immediately after its completion. Insulation is carried out only on the outside of the wall.
The following are used as insulation:
- Styrofoam;
- extruded polystyrene foam;
- mineral wool;
- sprayed polyurethane foam.
The use of new technologies in construction contributes to the durability, stability and strength of any building. Why do you need an armored belt on aerated concrete? Anyone who wants to build a house should learn more about the properties of this structure, its varieties and the intricacies of installation.
Application of armored belt for aerated concrete
An armored belt is a reinforced strip of concrete that covers the entire building. It is designed to strengthen walls made of aerated concrete, which contributes to their resistance to various loads and prevents deformation. Reinforcement brings all parts of the structure together and creates special stiffening ribs. This significantly increases the resistance of the walls to any load and is an excellent way to strengthen the load-bearing structure.
The use of an armored belt is necessary for aerated concrete, because it performs important functions:
- Protects wall structures from deformations as a result of ground movements that can occur during changing seasons and shrinkage of the building.
Provides walls with increased strength.
Gives rigidity to the structure and strengthens it.
Distributes the load evenly.
Removes point loads when attaching beams with anchor bolts.
What other reasons are there for the construction of a reinforcing belt? Mauerlat is a special support that supports the roof truss system. It helps connect the walls of the building with the roof. This helps distribute the load evenly across all surfaces. If the roof structure is secured with bolts, cracks may occur. If hanging rafters are present, the aerated concrete blocks experience most of the load, which can result in their expansion. To distribute the load, monolithic belts are made.
Advice! Such an unloading belt must be unbreakable. Its main purpose is to increase the resistance of building walls to loads and prevent the appearance of cracks.
Monolithic belt for aerated concrete under floors
Due to the introduction of advanced technologies and the use of new building materials, the requirements for the stability of buildings and their durability have increased.
To strengthen the building structure and increase the strength of load-bearing external walls, a load-bearing belt is made in the upper part of the box in the form of a concrete contour, reinforced with reinforcement. The reinforced belt evenly distributes the pressure of the roof and transfers the load to the foundation through the walls.
The strength properties are affected by the height and thickness of the reinforced belt, as well as the design features of the reinforcement frame and the grade of concrete.
To smooth out the loads from the weight of the roof and interfloor panels, a special reinforced concrete belt is constructed on the end plane of the main walls. It is also performed during the process of pouring a monolithic foundation.
Types of armored belts
There are several types of reinforcing belts:
- Sub-foundation armored belt, otherwise called grillage. The walls of the strip foundation rest on this structure. Also, such a belt connects pillars in the structures of pile and columnar foundations. It differs from its analogues in that it fits under all existing load-bearing walls of the building. The structure uses 14 mm reinforcement with 10 mm strapping. In this case, the step for tying should be no more than 20 cm. On a home base, you should not skimp on materials; the safety margin of the grillage should be about 20-30%.
Basement, performed between the walls and the foundation. This belt is installed after the foundation has been erected. This structure must be erected regardless of whether the foundation walls protrude above the ground or are level with it. It should be done under all load-bearing walls, especially if the floors are slabs.
An interfloor reinforced belt is installed in order to strengthen the walls and distribute the load from the slabs throughout the frame of the house. This belt is also called the unloading belt. Another feature of it is that it prevents the walls from moving apart. The number of interfloor reinforced belts depends on the number of floors.
The underroof belt to which the Mauerlat is attached is very important. It distributes the loads from the roof and the entire rafter system. Allows you to level the box and secure the Mauerlat well.
Important! Under-roof and inter-floor armored belts are required. If the foundation is on a slab-cushion, then there is no need for a base reinforced belt and grillage.
Stages of installation of an armored belt
In order for the structure to serve you for a long time and be as durable as possible, the reinforced belt must be made, gradually observing all the important rules. The creation of this product occurs in three stages.
Stage 1: Formwork
To install the armored belt, you will need special formwork. It is made from boards, as well as from bricks and blocks.
Note! Reinforcement for making an armored belt is placed inside the formwork and filled with concrete. You can make this solution yourself or use a concrete mixer. You will need a lot of solution.
The simplest formwork can be considered a frame made of boards. These boards must be at least 2 cm thick. They must be joined together using pieces of wood. This structure must be secured on top with special ties; the entire lower part is screwed to the wall using self-tapping screws.
Stage 2: Reinforcement frame for armored belt
How to knit reinforcement in an armored belt? This question is answered by the next stage of creating an armored belt.
First, a square is made from four reinforcing bars. The rods are secured with jumpers. For such a frame, ribbed reinforcement is used. After this, the main fittings are installed. For fastening you need to take a soft wire. With its help, the longitudinal reinforcement is first fixed at a height of 40 mm from the edge of the wall. Then the two rods are connected by short jumpers. In this case, their installation step should be about 250 mm. Next, the vertical elements are mounted in a similar way. Then the longitudinal reinforcement is screwed to the vertical parts.
Important! When creating an armored belt for aerated concrete, it is made with a minimum number of connecting seams. This ensures uniformity of the material.
Stage 2: Pouring concrete
The final stage is pouring concrete. This procedure can be done using ready-made mixtures or you can make the mixture yourself. To do this, take 3 parts sand and 5 crushed stone for 1 part cement. Gradually adding water, you need to mix the solution.
To prevent voids from forming inside the mixture, the solution must be poked several times with a piece of reinforcement. After 4-5 days the formwork can be dismantled.
Armobelt for walls made of brick or aerated concrete
The purpose of the reinforced belt under the walls is to distribute the load on the foundation.
The second structure is poured onto the concrete foundation blocks before the walls are built. It should be used almost always. An armored belt is laid around the perimeter of the building along the external walls, but it is not installed under load-bearing internal walls.
Due to the fact that this belt is additionally capable of strengthening the structure, if the grillage is filled correctly, it can be made less durable. Its height is assumed to be in the range of 0.2-0.4 m. Possible concrete for use is not lower than grade 200. For the second belt, two-core ribbed reinforcement rods, which have a diameter of 10-12 mm, should be used as reinforcement. The reinforcing mesh will be laid in one layer.
When there is a need to strengthen the belt, you should use reinforcement with a large diameter, lay the mesh in two layers, thereby forming a frame, or use a larger number of cores.
An armored belt can be made this way - reinforcement is placed between the bricks and filled with concrete.
The thickness of the basement wall and the external brick wall of the house is most often 510-610 mm. In such a case, in order to fill the belt, it is not necessary to install wooden formwork - it is possible to replace it with brickwork. To do this, half-brick masonry is made on both edges of the wall. Between such masonry a void is formed, into which it is necessary to lay reinforcement and pour concrete mortar.
It is worth considering that if there is no first belt (grillage), making a second one is useless. Some novice builders, without having made a grillage, are engaged in maximizing the strengthening of the second chord, while using reinforcement with a larger diameter with greater load-bearing capacity. This is exactly the case in which the money that was spent on strengthening the structure is thrown away.
The first belt is the main one, while the second one is only additional, although it is mandatory to do it. Their joint protection of the foundation from below and from above can serve as a guarantee of a reliable foundation even in cases with the most problematic soils.