The maximum simplicity and relative cheapness of a shallow columnar foundation allows you to build a foundation for a building in a short time, with relatively little labor and consumption of materials. Columnar foundations are built in huge quantities in a wide variety of conditions, even on clay and water-saturated sand. If you use modern information resources when requesting a description of a shallow columnar foundation, you can get a huge amount of advice, opinions and recommendations, which are not so easy to understand.
For a small and light frame house or bathhouse, a shallow columnar foundation is even better suited; it is much easier to manufacture, and can successfully stand for decades, under one condition - if you are lucky with the soil on which the supports stand.
Advantages of shallow foundation options
If the building stood on rock or compacted clastic soil, and the question came down only to the vertical static load, the bearing capacity and strength of the non-buried version of the columnar foundation would be sufficient. Unfortunately, the soil that bears the load from the weight of the house behaves extremely unevenly and unpredictably. Settlement of any section of a columnar foundation can lead to the overturning of columnar supports or the tilting of the entire structure.
There is only one way out: combine the individual elements and increase the horizontal stability and rigidity of the columnar foundation to the required level.
There are several ways to deal with the problem:
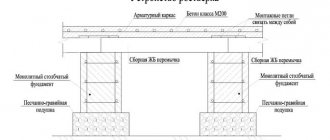
By building up and connecting the columnar foundation supports with a very powerful reinforced concrete grillage.
A monolithic reinforced concrete beam will easily hold and level out lateral loads, thereby compensating for the settlement of the building; Combine the foundation pillars with a strip of shallow foundation and get a hybrid of a columnar and strip version that can easily support even a brick house weighing more than 150 tons. In this case, the rigidity increases by an order of magnitude, due to the soil and concrete strip; Increase the immersion depth of the pillars to 1-2 meters, thereby turning the columnar foundation into a pile foundation. In this case, it will be easier and more economical to install bored or screw piles with a grillage; Build a columnar foundation with your own hands, using shallow pillars tied with supporting concrete or gravel pads.
Advice! If you do not thoroughly know the composition of the soil on your site, do not try to imitate the example of neighboring houses installed on a shallow columnar foundation.
Often within one area there may be lenses and areas of clay, fine sandy loam or hard clastic soil. A more detailed assessment of the situation can only be done by drilling holes in the area.
Of all the options presented, only the shallow-depth scheme is characterized by a slight increase in the cost of work on arranging the foundation system. Schemes using a grillage or reinforcement with a shallow concrete strip practically negate the main advantages of a columnar foundation.
Shallow columnar foundation, step-by-step installation instructions
Structurally, this is the same version of a columnar foundation, in which the supports are immersed in the ground by 30-40, maximum 50 cm, depending on the level of groundwater, the composition of the layers and the presence of rigid piping. Thus, shallow foundation schemes get rid of the main reasons that may cause pillars to tip over or tilt under load:
- Moving the support platform under the columnar support to a depth significantly reduces watering and pushing through of wet and loose surface layers. Due to the direct impact of a large amount of rain and melt water under the support platform, the soil under the pillar became limp and lost resistance to load; The shallow-depth installation scheme of the columnar foundation supports made it possible to significantly reduce the overturning moment due to the compensation of lateral forces by the walls of the pit and the crushed stone filling of the sinuses; It became possible to effectively deal with heaving of the soil - with the help of high-quality drainage of water around the columnar support, drainage of the cushion and backfill, fixing the shallow part of the support.
In this case, a ready-made support element in the form of a concrete-reinforced slab with a centering hole is placed at the bottom of the pit. A shallow columnar support installed on a base plate is capable of bearing double or triple loads compared to the option of installing a pillar on a conventional shallow pillow. But such solutions are quite expensive, so for strengthening it would be more rational to simply increase the thickness and reinforce the base of the columnar support.
Shells
The simplest column shell for a columnar foundation is a pipe made of layers of roofing material wrapped in wire. It is lightweight and inexpensive. And most importantly, it will not require additional waterproofing. But with the reverse method of backfilling soil (with tamping), such a shell wrinkles and does not contribute to the reinforcement of the structure. That is why the shells of pillars are most often made of pipes - steel, plastic or asbestos-cement.
By the way, asbestos cement shells can even act as pillars themselves. For example, under a channel grillage this is the best option. Pipes can then be driven into the ground without any additional excavation work.
But it is better not to use steel pipes in columnar foundations - they may rust. And shells for poles are rarely made from plastic pipes. They, of course, have a lot of advantages (lightness, ability to waterproof + wrinkle resistance), but they have one serious drawback - they are too smooth and practically do not cling to the ground. And in fact it’s more expensive than roofing felt.
( 87 votes, average: 4.90 out of 5)
How to make formwork with your own hands
How to make a wooden gazebo with your own hands: step-by-step instructions
Related Posts
Preparing the pit for installation of shallow supports
After marking is completed, cords are stretched on the site, using which the exact location of each of the supports of the columnar foundation is determined. Depending on how the supports are made, the dimensions of the pit may be 30-40 cm larger than the diameter of the support, as, for example, in the case of a pillar cast from concrete, or require a space of at least a meter if the element is laid out of brick or concrete blocks.
In any case, the walls and bottom of the shallow pit are carefully leveled to avoid soil falling onto the support pad, the bottom is additionally compacted in several passes and covered with a small layer of crushed stone. The further settlement of the foundation and its ability to withstand seasonal heaving depend on how thoroughly the soil is compacted.
If it is planned to build a columnar support made of bricks or blocks, we install a wooden frame 12-15 cm high on the compacted surface at the bottom. We level the body of the frame horizontally and fill it half with fine gravel, laying a mesh of steel wire.
If the support for the foundation is cast from concrete, simply fill the bottom of the pit with a gravel cushion, the thickness of which should be at least 20 cm. The filling is done in layers of 5 cm, each of which is leveled and passed several times with an electric tamper.
What is a columnar foundation for baths made of?
Most often, professionals use:
- monolithic reinforced concrete pillars;
- building blocks made of aerated concrete, foam blocks, expanded clay concrete and so on;
- good fired brick.
All these supports for a columnar foundation for a bathhouse can be made with your own hands, if you strictly follow the load calculations and take into account the characteristics of the soil.
Sometimes combined structures are used, for example, making part of the support in the ground from concrete, and on the surface from bricks or blocks. In some cases, pipes and even wooden logs are used for poles, but these are exceptions to the rule.
Analysis of the foundation
Manufacturing of shallow foundation supports
The simplest and fastest way to make pillars for a shallow foundation is to cast a concrete mixture into a wooden formwork made in the form of a box or circular section. In the latter case, a two-hundredth asbestos-cement pipe is most often used as a form. To obtain an accurate and strictly vertical position of the cast columnar foundation support, two parallel boards are nailed to the outer walls of the formwork, on which the form itself is hung and placed in a vertical position exactly in the center of the future wall of the house.
After adjusting the position of the formwork, the body is fixed with additional wooden spacers. It is recommended to line the inside of wooden formwork with plastic film or other coating that ensures normal separation of the form walls from the hardened concrete.
It is advisable that before the concrete is poured, the lower end of the formwork does not reach or touch the gravel cushion, and the form remains suspended on the external fastening made of boards. At the next stage, we insert a steel reinforcement frame inside the wooden or asbestos-cement form, rest it on the gravel cushion and fix it with wedges inside formwork. If the design of a columnar shallow foundation provides for the production of a concrete grillage, the upper mustache of the reinforcement frame will need to be raised above the support to a height of at least 30-40 cm in order to subsequently tie it with the reinforcement of a horizontal concrete beam. Next comes pouring concrete mortar. The first part of concrete, a volume of 5-6 liters, is poured into the mold and carefully pressed down with a concrete tamper so that part of the mortar and cement laitance penetrates deep into the gravel cushion and comes out around the perimeter of the mold, forming a kind of compaction.
The rest of the concrete is poured in two portions with intermediate settling using a thin tubular tamper. After hardening, the fastening is removed and the wooden formwork of the foundation is removed. If there are no flaws, holes, or exposed reinforcement on the surface, the concrete is covered with bitumen mastic and filled with soil. The backfill around the shallow columnar element must be compacted to the maximum depth.
Making columnar supports made of bricks looks a little more complicated. In this case, it is necessary to lay a reinforcing grid made of rods with a thickness of at least 8 mm on the gravel layer of the cushion and fill it with a layer of concrete.
The thickness of the concrete above the reinforcement should be within 2.5-3 cm. To tie the brickwork of the columnar support and the reinforcement grid embedded in the pillow, 3-4 pieces of steel wire are often released from under the concrete, which is used to tie the first row of brickwork and the body of the pillow. Most often, the support is laid out the size of one and a half bricks, to a height of 60-70 cm. If a greater height is required, a concrete block is laid at the base of the columnar element, and only then the brick is laid.
Columnar base, its advantages and disadvantages
What is a columnar base?
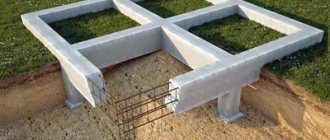
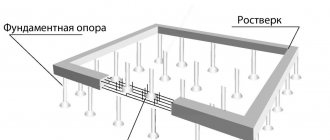
These are support pillars located in the ground, the tops of which protrude above the soil level. Each support is a kind of mini-foundation. Most often, their upper parts are connected into a strong frame - this adds reliability to the structure and helps to properly distribute the weight.
This type of foundation has many advantages:
- laying it does not require much time; you do not have to purchase additional tools; there is no need to carry out a large amount of excavation work; the foundation can withstand any climatic conditions, in particular sudden changes in temperature; it is possible to make it yourself without the help of specialists; you can do well in construction work save.
The columnar base also has disadvantages that are worth mentioning:
- repairs, if necessary, require a lot of effort, time and money; there is no point in installing such a foundation on swampy and loose soils - the structure will be unreliable and shaky.
Types of columnar foundations
There are a large number of types of shallow columnar foundations. Depending on the materials from which they are made, foundations are:
Wooden. In the past, they were often erected, but in the modern world such foundations are almost never used - the laying is expensive, and the structure itself is not durable. Concrete or reinforced concrete.
Now they are at the peak of popularity. Cement bases with a reinforcement frame are inexpensive, reliable and easy to make. Brick. The most affordable, but you have to spend too much effort to install them.
There is a classification according to the shape of the supports, they are:
- Square; Round; Rectangular; In the shape of a truncated cone or pyramid (if they have a design that expands towards the bottom).
How is a columnar foundation constructed?
A columnar foundation for a building is a set of separately located supports for a building. This structure is made of concrete. But its use has some limitations, primarily related to the soils where it can be installed. Outwardly, it is similar to a pile foundation, but there are a number of significant differences between them:
Laying length. The linear size of the pile can be more than 5 meters. The pillars take the load on the foundation, which is laid during its construction. At piles, the load is also transferred to the side surfaces. The cross-sectional size of piles is usually smaller. Area of use.
Self-assembly of a columnar base from “a” to “z”
Laying a columnar foundation yourself, especially a shallow one, will not be difficult. But it’s worth making the effort, because the future fate of the entire building depends on the correct installation of the foundation, and repairing this type of foundation will cost a decent amount.
A few simple steps, and the result will not be long in coming:
Step 1. Before work, you need to prepare the area - clear it of vegetation and slightly level the soil.
Step 2. Marking is applied. It is very important to check the design.
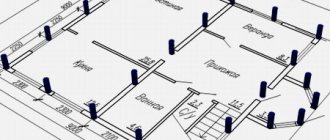
The pillars will need to be located specifically at the corners of the building, as well as at the intersection and connection points of the walls. The central axes of the pillar and the wall resting on it must coincide. The total amount of supports and their location are calculated in relation to the loads and bearing capacity of the soil.
Step 3. Recesses for supports are dug.
If the pillars are solid, then the holes are dug in accordance with their sizes and shapes, taking into account permanent formwork. If the supports are made of brick, wider recesses are dug. The depth of the holes depends on the level of soil freezing.
Step 4. Prepare the pillow for the pillars. Crushed stone or sand is poured into the bottom of the pit, then they are compacted and a sheet of waterproofing (roofing felt) is laid on top so that the mixture does not flow down during concreting.
Step 5. Installation of formwork begins.
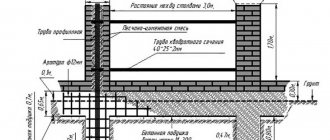
Its walls should be protected with waterproofing material. After this, a reinforcement frame is installed inside, which is made of metal rods connected with wire. If you plan to fasten the supports with a grillage, it is important to take care of increasing the reinforcement skeleton of the pillars in order to connect it with the reinforcement of such a base.
Step 6. Concrete pouring is done. The mixture is placed tightly; for the best effect, shaking with a vibrator is needed every 20 cm.
Step 7. After the concrete has completely dried, its upper part is covered with waterproofing. If your plans include fastening the pillars with a solid concrete base, you should skip this step (the waterproofing is installed after the grillage is made).
Columnar shallow foundations. Columnar foundations
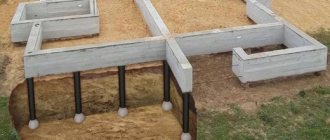
These are the most economical foundations, requiring a minimum of material and financial costs. Their basis is pillars sunk into the ground, installed at the corners of the building, at the intersection of internal and external walls and in places of increased load. Between the main ones, intermediate pillars are installed in increments of 1-2.5 meters.
Attention! A columnar foundation is the easiest to make with your own hands. But it cannot be used for the construction of heavy and massive structures.
Its production consists of the following steps:
- In accordance with the project, excavations of a certain depth are made in the ground, located in the places indicated above.
- A sand cushion is placed at the bottom, after which formwork and reinforcement are installed in the recess. If the pillar is completely monolithic, the height of the formwork above ground level must correspond to the design height of the foundation. But it can only be poured to ground level, and above it can be laid out from blocks or bricks.
Manufacturing a monolithic pillar
- Concrete is poured into the formwork.
- After the concrete has hardened, the formwork is removed, and the free space between the pillars and the walls of the recess is filled with crushed stone or gravel, followed by concreting.
The pillars can also be prefabricated - made of stone or brickwork. To make them, you need to dig a trench around the perimeter of the house, install pillars in specified places and fill the spaces between them with crushed stone.
If the supports do not reach solid layers of soil to prevent them from “walking,” it is necessary to construct a base for a sand foundation. To do this, coarse sand is poured into the bottom of the depression or trench in a layer of 15-20 cm, which is watered and compacted.
A sand cushion is also made for shallow strip foundations. And so that they do not freeze, their basement (above-ground) part and blind area are insulated with special materials, for example, extruded polystyrene foam.
Insulation of shallow strip or column foundations
Note. When installing sand cushions in water-logged soils that are prone to heaving during freezing, drainage is necessary to prevent them from silting. Otherwise, the pillows will quickly lose their properties, and eliminating foundation subsidence will cost you much more.
What you need to know about the construction of shallow columnar foundations
Facts that will help in building a quality foundation:
The best time to build a columnar foundation is the warm season - summer. As a last resort - the beginning of autumn. An unbuilt foundation, built on damp soil and abandoned during cold weather, can be damaged - the pillars will settle and begin to deform. If the foundation is built on wooden pillars, holes are dug, supports are placed in them, and their base is filled with concrete mixture.
Each wooden pillar is pre-treated to remove moisture and parasites. A shallow columnar foundation does not require insulation around the perimeter, since it is located where the soil freezes. Freezing of the ground from the outside and inside will balance each other, and therefore the risk of pillars moving will be minimized. It is better to concentrate on insulating the floor on the first floor.
Do not repeat at home: mistakes when building a columnar foundation
Poor-quality foundation laying entails many problems: settlement of pillars, erosion, etc.
This could lead to the destruction of the entire building. To avoid unpleasant surprises, it is worth remembering the most common mistakes made by non-professionals and not repeating them. Should be avoided:
- Incorrect calculation of the load; Errors in calculating the depth when constructing the foundation; Use of low-quality building materials; Use of building materials after their expiration date; Laying supports at different depths; Incorrect determination of the type of soil on the site.
As a conclusion, we can say that a shallow columnar foundation is an excellent option for DIY construction. It is simple to implement, its installation does not require special skills or large financial investments, and it can be erected in a couple of days. A well-made columnar base will withstand any load and become a reliable support for the building.
About deepening
All foundations currently being built can be divided into 3 main categories:
- Deep and/or normal burial (they are also called simply “buried”), when the base of the structure (in the case of a columnar foundation, these are the “heels” of the pillars) is 0.3 below the freezing depth of the soil in a particular area (for a foundation on pillars) -0.7 m.
- Shallow-depth, in which the sole or heels are located in the swelling layer. For columnar foundations, this is 40% of the calculated freezing on low-heaving soils and up to 70% on medium-heaving soils.
- Non-buried foundations, which are constructed on practically non-heaving soils and to form foundations for light, elastic, often non-residential wooden or metal buildings (seasonal country houses, sheds, outdoor showers and toilets, garages, outbuildings, greenhouses, etc.).
Video material:
31.08.2017
The construction of any building or structure, be it a small private house or a high-rise building, begins with the foundation. Its importance is difficult to overestimate. After all, if the calculations are incorrect or the work is performed poorly, a well-designed and rebuilt building can collapse in one moment.
If the building is planned to be small, made of lightweight materials such as aerated concrete, wood, foam blocks, you can use a shallow columnar foundation. They are less expensive and easier to implement compared to other types of foundations. However, reliability and durability with proper execution and strict adherence to technology are quite high.
The basis of the foundation is a columnar base. It is a grid of vertical type supports, the cross-section of which is minimal. The supports must be distributed throughout the base of the building, taking into account the areas of maximum load.
These are corners, load-bearing walls and beams, piers, columns. Do not forget about stoves and fireplaces. It must be borne in mind that a shallow columnar foundation is suitable only for light frame-type buildings without basements. Their weight should not exceed 1 t/m3. These are, for example, wooden baths and saunas, small outbuildings and guest houses, sheds and gazebos.
Classification of columnar bases
All columnar foundations are divided into three groups according to their depth:
- Recessed, when the lowest point of the structure is located below the soil freezing level. Shallow, when the supports are immersed in the ground at 0.4 -0.7 meters from the surface of the earth. Non-recessed, in which there are no buried parts of the structure at all.
On the Internet you can find several free programs with the help of which you can independently calculate the structures of the future foundation. But to do this, you need to enter the following data into the program:
- approximate weight of the planned building; reinforcement features; geological features of the area; data on precipitation levels and wind speed; desired foundation depth.
After carrying out the appropriate calculations, the program will provide data on the total number of pillars, load-bearing capacity and dimensions of a single structural element.
Shallow foundation. Shallow strip foundation - calculations
There are two types of calculations that must be performed when designing a shallow strip foundation: the first is the calculation of its load-bearing capacity and dimensions, the second is the calculation of the materials required to create the foundation.
Calculating the bearing capacity is a complex process; it is necessary to take into account a very large number of factors: the depth of freezing and soil resistance, the deformation loads that the soil will exert on the future foundation, the weight of the structure and many others.
| Important! We recommend entrusting the calculation of the bearing capacity of the foundation to our professionals. Services for designing a shallow strip foundation are not expensive (since this type belongs to the category of simple foundations), but in this case you will be completely confident that everything is done correctly, and if the project is implemented according to all the rules of technology, your house will stand a hundred years. |
Rice.
1.1: Shallow strip foundation The calculation of the required materials from start to finish can be done independently. To do this, you need to know the dimensions of the foundation, on the basis of which further calculations will be made for such materials as:
- Concrete;
- Reinforcement and wire for knitting;
- Crushed stone and sand;
As an example, we provide a calculation of the materials required to create a shallow strip foundation 40 cm wide and 60 cm deep for a house with a wall perimeter of 54 m (length - 9 m, width - 6 m).
Advantages and disadvantages of columnar structures
The advantages of using non-buried and shallow columnar foundations include:
- long service life with proper installation; relative cheapness compared to other types of foundation; the possibility of designing and building one’s own, without the involvement of expensive specialists; the absence of complex and expensive thermal insulation; the possibility of use on sloping ground and in the case of a significant difference in heights; high installation speed; the need for preliminary leveling of the territory; resistance to adverse weather conditions - soil freezing, temperature changes, precipitation; no need to use special construction equipment; low consumption of metal rods for reinforcement.
The only disadvantages include the inability to build basements, strict requirements for the type of soil and the need to carefully monitor the technical condition. A shallow columnar foundation must be repaired immediately if chips or cracks appear, as well as with the slightest signs of destruction. If you miss the moment, it can develop into a serious problem.
Pros and cons of columnar foundations
Like any other modern building structure, a columnar foundation cannot be called absolutely perfect. It has positive qualities and negative properties. And therefore it needs to be formalized in those conditions where the first will manifest itself to the maximum, and the second to the minimum.
The positive features of pillar foundations traditionally include:
- Low cost and labor intensity (and few materials are required, and the volume of excavation work is small).
- Speed of construction (a frame house on a columnar foundation can be built by two people in 1.5-3 months).
- There is no need to use special equipment (the maximum that may be needed is a concrete mixer, which can be rented).
- Simplicity in calculations and, accordingly, excellent interaction of structural elements with each other and with the ground.
- A sufficient working sketch (including a free one from the Internet), allowing you to save from 30 to 100 thousand rubles on creating an individual project.
- Suitable for a wide range of local conditions.
- Simplicity of legal registration.
- There is no need for construction qualifications to lay a columnar foundation. It is quite within the capabilities of an amateur.
- No need for careful planning to organize a construction site.
- Possibility of laying even on a slope of up to 15-20°.
- The need is only for one unqualified assistant, and even then not all the time. In some operations, you will have to invite one or two more people, but also without construction skills.
- Durability and reliability if properly installed. In some situations, such a foundation turns out to be stronger than stone, brick or concrete.
- Maintainability. A foundation on pillars is generally the only foundation that can be repaired efficiently with your own hands.
And if we talk about the disadvantages of such grounds, then they include:
- Low load-bearing capacity.
- Unsuitability for multi-storey construction (under a heavy building it is simply not possible to place as many pillars as needed, because the required distances between them must be maintained).
- Poor disposition to use the bearing capacity of the soil.
- The impossibility of using such foundations on weak and some heterogeneous and specific (watered or littered, for example) types of soil.
- Sensitivity to horizontal loads.
- Impossibility of arranging a basement.
- Vulnerability of the finished structure (especially during some excavation work).
- Difficulty in connecting additional communications (again due to the need for excavation work).
- The impossibility of constructing any major extensions to the house.
- Short service life (the maximum that a columnar foundation can “promise” is 50 years).
Features of the construction of a non-buried columnar foundation
Non-buried concrete block
This type of base is used quite often. The only condition is the small weight and dimensions of the structure being built. They use a non-buried columnar foundation on heaving soils and even rocky ones.
In the latter case, it is also possible to erect a log or timber house over it. If you replace the soil under the building, you can reduce the impact of heaving. The main thing is to know how to fill a hole under a non-buried columnar foundation. Typically, a sand layer is used for these purposes. The pillars are made of stone, concrete blocks for the foundation, sand, iron or rubble concrete.
You can also use brick, just take into account the frost resistance of the ceramic material. It shouldn't be low. And sand-lime brick will not work at all.
If you set out to build a non-buried columnar foundation with your own hands, follow the step-by-step instructions. The main stages of the work include:
- Clearing the construction area of surface debris. Removing the top fertile soil layer. Laying out the site. Digging holes for each support. Arranging each hole with a special sand cushion. Laying out the support from blocks. Waterproofing the parts of the supports that are connected to the house.
A columnar, non-buried foundation on a sand cushion is particularly strong and stable. It is recommended to install it in places where there is a high probability of groundwater appearing due to spring floods or extremely large amounts of precipitation.
Basic properties of heaving soils
These are the sad consequences of such heaving
Heaving is one of the characteristics of soil. It is based on the mechanism of water expansion due to exposure to low temperatures. Soil moisture is the main reason for the increase in its volume at sub-zero temperatures. Soils exposed to this effect are dispersive.
Due to the significant increase in volume during freezing, on the surface you can see with the naked eye the transition from their thawed state to frozen. This greatly affects the foundation of the building. Therefore, the issues of construction of buildings and structures in conditions of heaving soil are given paramount importance.
It is important to conduct a geological survey and analysis of the soil on which the construction of the structure is planned. Not all water-saturated soils behave the same when frozen. Given the same moisture ratio, one type of soil will swell more than another.
And in some types of soil, swelling does not occur at all. Experts who study in detail all the factors affecting the stability of buildings and structures recommend that the foundation be deepened below the freezing level. Thanks to this, many problems will be avoided in the future.
Impact of heaving soils on the stability of columnar foundations
To prevent this heaving, follow all instructions
Due to heaving, the soil expands and the base of the building structure begins to rise. This does not depend on the total weight of the building. Such processes have a detrimental effect on the durability of the structure. In order to minimize such adverse effects, the following measures are taken:
Replace the soil under the base. To do this, before installing load-bearing structures, crushed stone and sand are poured under them. To eliminate lateral heaving, backfill is made with similar materials. Mostly smooth wall structures are used. Along the perimeter of the foundation, the soil is covered with heat and waterproofing. This will also protect the metal parts from moisture, which will help increase their service life. Creating a drainage system for the outflow of wastewater.
Features of using columnar foundations in heaving soils
Before you begin to build a shallow columnar foundation on heaving soils, you should remember that all design work and calculation of the consumption of building materials and the pillar foundation are carried out before the start of construction. The main stages of the technological arrangement of the foundation:
- Initial design. Carrying out the necessary calculations. Applying special markings to the soil surface. Carrying out excavation work. Manufacturing monolithic concrete pads. Manufacturing formwork for support columns. Pouring concrete with mortar. Tying monolithic columns.
Table with soil freezing standards for several Russian cities
It is necessary to determine the depth of soil freezing at the construction site and calculate its density. It should be assumed that the monolithic concrete pad must be located below the frost line. On this basis, the height of the column is noted. Depending on the design features of the building, the shape and cross-sectional size of the concrete pillars is selected.
Most often, it is a square shape, side size 25 cm. There are formulas for calculating the amount of concrete mixture for the production of one monolithic pillar, they can be easily found on the Internet. To the resulting amount it is necessary to add the volume of concrete solution for the support pad.
Do-it-yourself shallow columnar foundation: construction technology
The construction of a columnar foundation with your own hands consists of the following steps:
Minimum permissible nominal diameters of longitudinal and transverse reinforcement when reinforcing the foundation.foundation design and calculation;
- markings on the site;
- excavation;
- construction of monolithic concrete pads;
- installation of formwork for monolithic pillars;
- pouring of pillars and tying.
Design, calculation of a columnar foundation and drawing up estimates of building materials are carried out first. The density of the soil and the level of soil freezing are determined experimentally. Then the length of the pillar is calculated, taking into account that the concrete pad under the pillar should be located below the freezing point. Concrete pillars are usually made with sides 25x25 cm. Knowing the dimensions and length of the sides, calculate the volume of concrete to make 1 pillar. The volume of one support pillow is added to it. When designing, both the number of pillars and the gap between them are calculated. In the calculations, a large role is played by the building material from which the walls will be built, its total mass. Monolithic pillars are placed approximately at a distance of 1.5-2 m. It is equally important to correctly calculate the location of the pillars. First, the pillars are placed at corners and other areas with the greatest load. Additional pillars are then distributed.
Do-it-yourself excavation work
After the calculations, they begin marking on the ground surface and performing excavation work. Excavation work consists of digging square pits with sides of 50×50 cm or 40×40 cm along the perimeter of the future foundation. After this, the bottom of the pits is compacted and covered with a 10 cm layer of crushed stone, mainly of the middle fraction. Then they tamp and begin to reinforce the pillows.
Do-it-yourself foundation reinforcement
To reinforce the pillows, A3 reinforcement with a cross section of 10-12 mm is used. First, rods 35-45 cm long are cut. They are laid on a flat surface and knitted so as to form a lattice with a cell of 15 × 15 cm or 10 × 10 cm. The knitted lattice is laid on the bottom of the pit on top of the crushed stone, having previously placed several fragments of bricks under the reinforcement, so that when pouring the grate is located in the thickness of the concrete mass.
Pouring pillars
Scheme for preparing a concrete mixture.
At the next stage, the pillows are poured, this is done with M250 concrete. The thickness of the concrete pads should be small, 10 cm. When pouring, reinforcement is removed from the center of the concrete pad for further tying to the reinforcement frame of the pillar. If this does not interfere with the pouring, you can tie the frame to the reinforcement bars in advance. After pouring, wait about 7-10 days until the concrete sets, and begin installing the formwork of the pillars. The formwork for the pillars, which is a long box without a bottom, is made from edged boards. If you do not make a columnar foundation yourself, but use the services of professionals, the construction team usually already has ready-made formwork for making foundations of various types.
Do-it-yourself pouring of monolithic pillars for a columnar foundation is done with concrete of the same grade that was used to make the support pads. The head of a deep vibrator is lowered into a box filled with concrete. Under the influence of its vibrations, the concrete mass is well compacted. They begin to vibrate from the very bottom of the column, gradually raising the vibrator to the surface. Then the required amount of concrete is added to the pillar formwork, and a bent metal corner or metal plates are placed into the concrete mass for further tying. Such a device of a columnar foundation allows the production of a monolithic structure.
5-7 days after pouring the pillars, the formwork is removed to speed up the hardening of the concrete, and after about another 3 weeks, all the pillars are tied with a channel. Also, 30 days after the construction of the columnar foundation, the concrete surface of the pillars is waterproofed with your own hands.
