What makes people who have a vague idea about repairs take up this activity seriously?
Moreover, as a rule, the first “experimental” object is your own apartment or house.
It would not be wrong to assume that this is:
- contagious example of relatives, friends, colleagues;
- comprehensive advertising of modern materials and technologies that make the builder’s work easier;
- online lessons on performing this or that type of work with step-by-step instructions that are understandable even to “dummies” who have never held a trowel in their hands.
For those who have decided to take this step, it is worth preparing to perform one of the most important and labor-intensive stages - floor repair. And if the floor is still uneven and old, there is enough work to be done.
Semi-dry leveling and its characteristics
This composition is a half-dry cement-sand mortar, the solidity of which is guaranteed by the use of reinforcing mesh or polypropylene fiber. This screed is an intermediate option between classic and dry screeds. This means that the installation of a semi-dry floor screed allows you to begin the next stage of repair literally in 4 days.
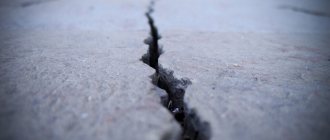
The dry method allows you to continue repairs immediately, while the wet method pauses floor repairs for four weeks. The minimum amount of water introduced solely to start the crystallization process eliminates the formation of cracks and the effect of shrinkage of the screed.
general information
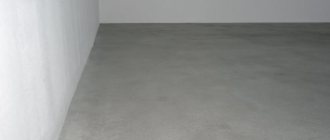
Before we start doing the work, let's look at the concept of “screed” itself, learn about its types and role. The screed is the lower, “underlying” layer of the floor covering, onto which the top, finishing layer is then mounted.
The quality of its installation and the duration of operation will depend on how well the initial base is leveled. In addition to leveling the floor, the screed imparts the required rigidity to its surface; sometimes it is used to hide utility lines.
The screed can be different in the method of installation (wet, semi-dry and dry), in composition and quality of adhesion to the floor. Semi-dry is easy to do yourself - an excellent option for those who are looking for a simple, inexpensive and durable way to get a smooth and durable base for subsequent installation of the final floor covering.
pros
Below are the advantages of semi-dry screed that it has:
- It is endowed with increased density indicators, which accordingly guarantees the solidity of the floors. Dosed addition of water to a semi-dry screed, sufficient only to start the setting process, does not produce the effect of evaporation, which means a complete absence of possible pores and the elimination of the possibility of cracking and shrinkage of the screed.
- During installation of the mixture for semi-dry floor screed, excess dirt and moisture do not form in the room.
- The complete drying time is a couple of days due to the absence of excess moisture.
- The room maintains comfortable conditions for parallel work.
The so-called wet or concrete screed often very often led to damage to wooden products located in the room, for example, wooden window elements. It is also not permissible to store building materials near the “wet” pouring process. The use of a semi-dry floor screed completely eliminated this drawback.
Let's move on to practice
- Preparing the subfloor for subsequent activities. It consists of the following:
- getting rid of garbage and dirt;
- sealing detected chips, cracks, and peelings using a primer. This strengthens the surface and prepares it for subsequent loads during operation;
- the line connecting the floor to the wall is treated with cement mortar even if there are no defects in this part;
- the base should dry for 1–2 days (the exact time is indicated on the packaging).
- Setting the level (preferably laser). Marks are applied to all walls, allowing you to track the horizontal at each stage of the work. You can stretch a fishing line between the marks on the walls or place small beacons on the floor, which can be used as improvised materials (for example, pieces of tile).
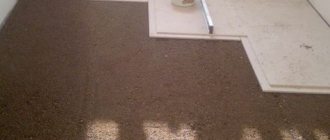
- Now let's get down to the most important part - preparing the components of the solution. Usually a mixture of sand and cement is made, to which a special material is added - propylene fiber, which reduces the risk of cracking of the dried mixture and gives it additional strength. The proportions in which the components are mixed may differ:
- if this is the first layer of screed, on which the heated floor will then be installed, take 1 part cement and 4 parts sand;
- in the case when a semi-dry screed is laid under finishing, it would be better to take cement and sand in a ratio of 1 to 3.
- Mix sand and cement in suitable proportions. Then start adding water little by little - as if to wet the mixture, stirring it continuously. It is difficult to determine the required amount of water in advance; it will depend on how wet the sand is. To determine whether there is enough liquid in the mixture, you need to squeeze the solution in your hand. It should retain the shape of the lump and slightly release moisture. This is the optimal consistency of the mixture.
- Insulation is prepared using polypropylene tape. Its edges should be above the fill level.
- Be sure to lay a damper tape around the perimeter of the room to prevent cracking of the screed during drying and prevent damage to it at the points of contact with the walls.
- Now you need to set up the beacons, which can be made of cement mortar (if the screed layer is not very thick) or you can use T-shaped slats, sold in any hardware store. The beacons are installed in parallel at such a distance from each other that it is possible to support the rule rod on them.
- A small area of the floor between the beacons is filled with the mixture, after which they begin to tighten it using the rule of movements to the left, right and towards themselves. A video describing the semi-dry floor leveling method will be a good visual example and will help you understand how to perform the work. The beacons remain in the screed, so they must be completely covered with it. The optimal layer thickness should be in the range of 30–40 millimeters.
- After laying the mixture, it must be sanded (grouted) immediately. For a large area of the room, it is recommended to carry out installation work with an assistant, who will grout a fresh screed (10–15 minutes after installation) using a grinding machine. In addition to grinding, this device additionally compacts the solution, making it more dense and durable.
- After the work of laying the screed is completed, it is moistened with water and covered with film. The recommended drying time is one to two weeks. In some cases, further finishing work (for example, tiles) can be carried out within 4 days.
That's all, you have prepared a strong, durable floor base with your own hands.
As you can see, this process is not as complicated as it might seem at first glance, and does not take much time. Did you like the article? Then share the link with your friends, leave comments and reviews - this will help us understand what other things related to construction and renovation you would like to know about.
Subscribe to our groups on social networks - there is still a lot of information ahead that will help you become real pros. Bye everyone!
Minuses
The semi-dry floor screed used, the advantages of which are obvious, also has a number of negative aspects. Knowing them will save you from unpleasant surprises and allow you to avoid them.
Negative points include:
- Due to the high viscosity of the mixture, distribution in corners and places where beacons are installed is difficult. For uniform distribution literally on every 1 m2 of area it is necessary to carry out good compaction;
- On large areas, mechanized screeding is used using special units to distribute the mixture. Due to the fact that manually distributing the mixture over a large area will require enormous effort;
- The minimum acceptable level of screed is three centimeters; making it less is unacceptable, since semi-dry cement screed works well with a thickness of five centimeters.
The most serious nuance is to ensure the rigidity of the structure while maintaining a minimum thickness. To ensure a guaranteed result, you need to use reinforcement, and we will consider what material to choose for its implementation below.
How to make a semi-dry floor screed with your own hands
The main stage of work is laying the mixture. Start work from the far corner, gradually moving towards the door. Apply the mixture immediately throughout the room without rest. At this stage, you need to work with several pairs of hands, so that one lays and the other feeds the mixture. This makes it easier and faster to work. The mixture is applied in small portions to individual areas and then smeared. It is better to lay it in layers, gradually and additionally level each layer. The mixture is laid in beacons, while the beacons themselves are not removed after work, but are covered with the mixture. The composition must be distributed evenly. After completely covering one area, the surface is leveled using a rule. Then move on to the next section until the entire floor surface is filled. The final stage of work is grouting. This must be done before the mixture begins to harden. Wait 15 minutes after application and begin sanding.
Preparing the surface for semi-dry screed
Before you begin to implement a semi-dry floor screed with your own hands, you need to carefully prepare the base, and for this you need to do the following:
- Dismantling the old coating;
- Complete cleaning from dirt and dust;
- If necessary, repair defects;
- We calculate the required thickness of the screed;
- Implementation of insulation on the base.
Cracks and chips are repaired using specialized repair mixtures, and waterproofing is carried out using a film 0.2 millimeters thick.
Tools and equipment
Semi-dry screed is carried out using special construction equipment.
- Pneumatic compressors are professional construction equipment for supplying ready-made cement mixture for screeds to the room where work is being carried out. All the necessary components are loaded into the device, after which the automation mixes the solution and delivers it to the screed through the main pipe. Depending on the type of engine, they are divided into gasoline, diesel and electric. Such equipment is rarely purchased; more often it is rented for the duration of the work.
Pneumatic blower – professional equipment for semi-dry screed
- Absorbers are special equipment that extinguishes pressure and receives a ready-made solution from a pneumatic supercharger.
Device for laying mortar on screed
- A trowel is a device that is used to finish leveling a semi-dry screed. Thanks to this device, the likelihood of cracks appearing during drying is reduced, and it is also possible to obtain a perfectly flat surface. Screed trowels can be powered by a gasoline or electric motor.
Trowel with petrol engine
- Concrete shoes are protective pads on the feet that allow you to move along a fresh screed, leveling it.
Such soles help protect the fresh screed from damage during grouting.
- Measuring instruments - when laying semi-dry screed, you cannot do without a tape measure and level. The laser level allows you to determine the horizontal (zero level). An alternative to a laser level can be a hydraulic level, but it will require two people to operate it.
- Mason's tools - when working with semi-dry screed, tools such as trowels, grouts, etc. will be useful.
- Rule - used to distribute the solution throughout the room. Some rules have a built-in bubble level that allows you to check the correctness of the horizontal line.
Using the rule when leveling semi-dry screed
Progress of work on laying semi-dry screed
Before carrying out work on arranging the floor using the semi-dry screed method, it is necessary to properly prepare the base.
- First of all, it is necessary to collect dust and debris in the room; if there are gaps, seams or cracks in the base, they must be sealed. To do this, you can use cement-sand mortar or polyurethane foam. If there are protrusions on the surface (cement deposits, dried lumps of plaster, etc.), they must be removed. Fragile elements are knocked down with a hammer.
Preparing the base begins with cleaning the room
We suggest you read: How much does a cement-sand screed weigh?
The polyurethane foam will harden faster, but after secondary expansion, some of it may be squeezed out of the seam. In this case, the excess is cut off using a construction knife.
- A deep penetration primer is applied to the surface of the base. If there are holes, large unevenness or height differences on the surface, then you can use a self-leveling mixture.
Self-leveling mixture is a special composition that is diluted to a fluid state. After this, it is applied to the surface and levels it. You can use a spatula for distribution.
- The zero level is determined using a laser or hydraulic level. It can be applied to the wall using a marker. From the zero level, use a tape measure to measure the distance to the future screed. When determining the thickness of the future screed, it is necessary to take into account not only the cement-sand layer, but also the thermal insulation layer.
When installing a laser level, you must always set it to the same height. When installing screeds throughout the apartment, it is necessary to carry out calculations in all rooms at the same level so that the floor in all rooms is at the same height. The minimum size of the screed at the highest point cannot be less than 3 cm.
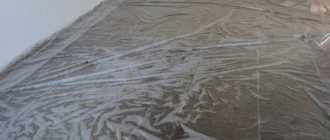
In addition to polyethylene film, it is also possible to use other types of waterproofing and vapor barrier materials.
- It is necessary to glue damper tape around the perimeter of the screed. This element allows you to protect the integrity of the base from deformation during thermal expansion of the surface.
- Before installing the tape, the wall surface is also coated with a deep penetration primer. The tape is glued to the wall at separate points with a certain pitch.
The damper tape is made of foamed polyethylene. When the material is rolled up, it is cut into small pieces. You can use a hacksaw for cutting. Some types of tapes have a self-adhesive base with a protective strip.
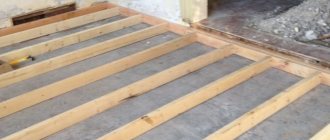
- When the surface is prepared, you can proceed to laying the insulating material. The slab material is cut and adjusted to the length and width of the room. If it is extruded polystyrene foam, then recesses are made in it for the wires, and bulk material (sand or cement-sand mixture) is poured under the sheets for leveling. The sheets are joined to each other by lapping.
Laying slabs of extruded polystyrene foam on a backfill base
Expanded polystyrene is an easy-to-process material; it can be easily cut and trimmed using a construction knife or hacksaw.
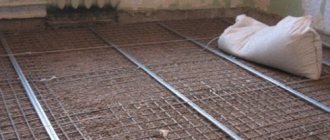
- For reinforcement, a layer of metal mesh is laid. The material used is a rod thickness of 2 – 3 mm. Several meshes are connected to each other with an overlap of 20 cm. The mesh rods are tied together with wire.
- To mix the ingredients, auxiliary equipment (a pneumatic blower) is used; the mixture is delivered to the room via a pipeline using a damper. The solution should not flow, but when squeezed by hand it should stick together into a ball.
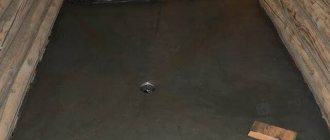
- The solution is distributed throughout the room using a rule. In this case, the mesh is taken out from under the solution and then trampled down. At this stage, heated floor elements are laid into the screed, if their installation is planned. The heated floor cord is secured to the reinforcing mesh with wire.
- The laser level determines the thickness of the screed. Using a construction float, beacons are made on the surface of the mortar - depressions at the level of the screed. Using the rule, the entire remaining solution is leveled using them.
Beacons for semi-dry screed are made from the mortar that is used for laying the floor
A solution is added to the places where gaps form. If excess is formed, then part of the mixture is removed.
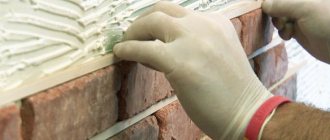
- The surface of the screed is finally leveled using a trowel. This work must be completed within 2 hours after leveling. To avoid damaging the screed, special concrete shoes are worn on your feet.
- A day after laying the screed you can walk on it, the tiles can be laid after 72 hours. Linoleum and carpet are installed after 2 weeks. For parquet and laminate it will take 24 - 28 days. While hardening is taking place, the screed must be moistened with water in order for the process of gaining brand strength to proceed.
A semi-dry screed is a good option if you need to quickly lay the subfloor and quickly move on to creating a finishing coating. Unfortunately, this method is not without its drawbacks. The work requires a lot of experience from the master; also, for a large area, complex construction equipment will be required, and in wet rooms it is not recommended to use the semi-dry screed method at all.
Preparation of semi-dry mixture
To prepare the solution, a certain brand of cement, sand and filler are used. Now let's talk about each of these materials in more detail.
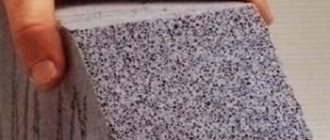
- Sand. To get the desired results, it is better to use lake or river material. A quarry one will do as well, as long as it’s not too dirty. Bulk material is divided into fractions: small, medium, large. If you need to make a high-quality solution, then in this case it is better to prefer fine-grained fractions. The sand will need to be cleaned. First, large debris is removed from it, then sifted through a sieve 2-3 times.
- Cement. This material plays an important role in the cement-sand mortar. To prepare the mixture, the brand of cement is selected based on the required strength. It is recommended to choose cement grades M400 and M500. The latter brand is preferable because less material is required, but you will have to pay more for it. In addition to the brand, it is worth choosing dry and fresh cement.
- Supplements They are plasticizers that improve the quality of cement-sand mortar and reduce the time for its hardening. In addition to plasticizers, fiber is added to the solution. This material is polypropylene fiber.
- Water. When creating a cement-sand mortar, water also plays an important role. Without it, you cannot mix a solution of sand and cement, but pour it in the exact proportion, otherwise you can ruin everything. For the solution, use only clean water without impurities.
When choosing a filler, they adhere to the following principle: if you need to make heavy concrete, in this case, use a coarse filler: gravel and crushed stone. And for the preparation of ordinary concrete, fine aggregate is used.
First you need to calculate the semi-dry screed, and then purchase the following in the required quantities:
- Portland cement (preferably grade 400 D20);
- washed quarry or river sand;
- additives that improve the fluidity of the mixture.
We suggest you familiarize yourself with: Water heated floor screed thickness above the pipe
It is recommended to rent a concrete mixer, otherwise you will have to do it the old fashioned way, using a trough, a shovel and a lot of physical labor.
The components for preparing the solution have their own requirements:
- Sand will be required with a fineness modulus of up to 2.5. The sand should contain no more than 3% of fine clay inclusions, and should be completely free of any random plant remains and peat veins. Natural humidity is allowed, which in practice can fluctuate over a wide range, so the amount of water added to the mixture may be different.
- You need to buy cement with an unexpired shelf life and in undamaged original packaging. If Portland cement 400 D20 is used, the result will be a solution corresponding to the M200 cement brand, and in the case of the original Portland cement 500 D20, the cement mixture will be M350, which can be used in places with difficult operating conditions.
- You cannot take water from untested reservoirs, as it may be contaminated with biological or technical waste. But tap water is fine.
Proportions of the dry mixture: 3 parts sand x 1 part cement x part water in the amount required for the given case.
- In the middle of the container for preparing the mixture, you need to build a slide, pouring in portions of 3 shovels of sand and 1 shovel of cement in the required quantity.
- Then mix all the components dry, and then begin to slowly pour in water with the fiber fiber added there.
- A semi-dry cement-sand screed should be diluted with water to the consistency of sandy loam - like clay sand that sticks together into a lump, but when compressed, no moisture is released, and the lump itself retains its given shape.
- Since the moisture content of the original sand can be different, water has to be added “by eye”, which often ends in overflow. If moisture begins to ooze from a lump of semi-dry solution, then you need to add the dry components to the mixture in the same proportions.
- Polypropylene fiber should be added to each bucket of water so that it disperses more easily through the mixture. Approximately 80 g of fiber is added to each bucket, but the manufacturer’s labeling indicates how much fiber fiber should be added per cubic meter of mixture.
- If a pneumatic machine is used for semi-dry screed, then with its help you should simultaneously prepare such an amount of semi-dry mixture that would be enough for the entire thickness of the screed. If the mixture is prepared manually, then it must be laid out in layers: first the lower part, followed by tamping, then the upper part, which is leveled by the rule and at the same time sanded.
The solution begins to lose the properties necessary for the leveling mass in an hour or even earlier, so you need to plan all operations in advance and work on the screed at an accelerated pace.
- Some craftsmen recommend starting to lay the mortar from the periphery, but this option is possible if the general leveling layer can then be applied in no longer than an hour. If this takes more time, the laid mixture will be covered with a hardened crust, resulting in an extra seam that will open the way for the penetration of cold.