Stages of assembling a vibrating table
If you know how to handle hand tools, power tools and electric welding, and have the necessary materials at your disposal, making a vibrating table for the production of paving slabs will not be a particular problem for you.
The assembly process can be divided into several stages:
- Selecting installation method;
- Frame installation;
- Manufacturing of vibrating table top;
- Assembling the shock-absorbing mechanism;
- Electric motor installation.
The first thing you need to focus on is the dimensions. It is not appropriate to give you advice and recommendations about the size of the unit, since these characteristics depend solely on what volumes of products the equipment for the production of paving slabs should produce. This value is directly affected by the presence of molds for casting tiles. By the way, on our website you can find information on producing various types of molds with your own hands.
Choosing an installation method
Before planning work and designing the design of the unit, you need to determine for yourself whether your device will be portable or permanently installed in a specific location. The difference between these options is as follows.
If the equipment for the production of blocks and paving slabs is portable, its legs must be equipped with devices that allow the structure to be installed on surfaces with different surfaces.
The legs of a stationary machine will be 20-30 cm longer, because they need to be concreted into the floor at the installation site. You can install embedded structures into the floor, but then the legs must have devices for attaching to the embedded structures. Having decided on the location and method of installation, you can begin to calculate the amount of material needed to make the frame.
Frame installation
The frame can be made of metal of different profiles. But practical experience shows that the best option would be a metal corner with a side of 50-70 millimeters. Everyone determines the height of the legs solely based on their own considerations and requirements. Do not forget about one thing: during installation, the height of the tabletop with a shock-absorbing device will be added to the height of the legs.
The dimensions of the frames depend on the type of tabletop. In turn, its dimensions are determined by the volume of tile production and the availability of tile molds. A small vibrating machine for the production of paving slabs can have dimensions of 50x40 centimeters. If this is not enough - 100x70 cm. Or it may be that you make a unit according to the dimensions of the available workpiece for the tabletop. Dimensions are a very arbitrary thing and quite individual. No one can know what you need better than you yourself.
We recommend reading:Machines for the production of paving slabs
We connect the upper ends of the legs together along the perimeter using the same corner. We connect the parts together by welding. We place the metal corners of the encircling frame so that their sides look inside the perimeter and down. There should be a shelf on top on which the tabletop will be installed. For ease of joining, we cut the ends of the upper jumpers using a grinder with a cutting disc at an angle of 45 degrees. We remove scale from welding areas.
When assembling, use a square to control the angles of the structure: they should be straight, exactly 90 degrees. Otherwise, serious problems will arise in subsequent stages of assembly.
To make the structure stable, we fix the lower parts of the legs around the perimeter with jumpers. They can be made from a metal strip, pipe - any available metal, the thickness of which is approximately equal to the thickness of the legs. If there is a need to further strengthen the frame, a spacer or slope in the form of a right triangle can be welded between the leg and the surrounding strip. This will make the frame more rigid and stable.
If the vibrating machine is portable, we weld square or round plates to the lower ends of the legs, which will serve as supports. If the stationary installation will be attached to embedded structures, mounting holes or fasteners are required.
Making a countertop
The next step in building a vibrating table for the production of paving slabs with your own hands will be the manufacture of a countertop. This part of the unit will be subject to vibration, so it must be strong and reliable.
As a basis we take a sheet of metal with a thickness of at least 5 millimeters. Its size should be the same as the size of the frame. If necessary, it can protrude beyond the base by 5-7 cm. From a metal corner 50 mm wide or more, we weld a frame into which the base sheet will fit tightly, after which we carefully weld all the structural elements together. We clean the weld seams from scale. To correctly join the lower sides of the corners forming the frame, carefully cut off the ends at an angle of 45 degrees with a grinder. The tabletop is almost ready. All that remains is to secure the motor or vibration device. But more on that later.
Shock absorbing mechanism
To compact the mortar in the molds, the countertop must create a certain level of vibration, while a home-made machine for the production of paving slabs must remain stationary. This can be achieved using shock absorbers. In our case, springs from the front fork of a motorcycle or moped will handle this role. Any spring can be used that will “work” under the weight of the countertop loaded with molds with mortar for making tiles.
Read also: Signs of a dove knocking on the window
An alternative to springs can be rubber cushions with a height of 80-100 millimeters, but it is still better to use metal.
Let's take 4 identical springs 5-10 cm high. To fix it on the base of the device and its tabletop, you can proceed as follows. It is necessary to select a piece of metal pipe that will fit relatively tightly inside the coils of the spring. We weld these tubes at the corners of the vibrating table frame and put washers on them. The length of the tube should not exceed 1/3 - 1/2 the length of the spring.
To make the upper fastenings, you can use the same technology as for the lower ones. In this case, the length of the tubes should not exceed 1/3 of the length of the springs.
A more rational option is to select pipe scraps of such a diameter that the springs fit tightly enough inside. We will make “glasses” from them, welding them from below to the corners of the tabletop. The height of the glasses can be approximately 50 mm. The upper and lower spring mounts must be positioned as coaxially as possible, otherwise the mechanism will not function correctly. We put the springs on the guides of the frame, and, directing their upper ends into the glasses, we install the tabletop. All that remains is to install the engine.
Engine Installation
We recommend reading: Making facade tiles with your own hands
In order to set the device in motion, you need an eccentric rotated by an electric motor. You can install it in two ways:
- Directly on the shaft of the electric motor mounted on the underside of the tabletop;
- On a separate shaft mounted on the underside of the tabletop and driven by a belt drive using a pulley.
The first option is easier to implement. The downside in this case will be the increased load on the bearings or shaft bushings caused by imbalance when the eccentric rotates. If, before using it in the engine, you replace the original bushings or bearings with reinforced bearings, when making a small amount of tiles, then the vibration table will last quite a long time. The mount for the electric motor is welded to the tabletop. The eccentric is made from a single piece of metal and fits tightly onto the shaft, after which the engine is securely fixed using bolts and nuts with lock washers.
In the second option, the eccentric is installed on a separate shaft with reinforced bearings, which is mounted on the back side of the tabletop. The engine is mounted on a separate structure, which:
- Mounted on the countertop surface;
- It is attached to the frame in a special way according to the principle of self-tensioning of the belt. The engine is attached to the base by one (or one pair) of mounting lugs in such a way that it remains movable. The second fulcrum will be the pulley with the pass on it.
Rotational motion is applied to the shaft by a belt drive through pulleys. In the first case, the belt tension is stable, since all parts of the vibration installation are in the same condition.
In the second case, the belt, thanks to a special fastening, is tensioned under the weight of the engine. To comply with safety measures and to avoid accidents, the eccentric must be covered with a protective casing made of sheet iron.
It is worth recalling that the power of the electric motor must correspond to the dimensions of the vibrating table. If it is low-power, the solution in the molds will not be compacted to the required degree. Excessive vibration is harmful not only to the products, but also to the device itself. Alternatively, you can use a motor from an old washing machine. You can use a ready-made vibrator like IV98 or IV99, but today we are talking about a homemade unit.
Another nuance is the starting device. Connecting the motor to the network directly, through a plug socket, is unsafe and inconvenient. To do this, you need to install a push-button starting station on the frame. As a rule, they are produced in a dielectric case. To wire the wires, you can install a factory mounting box, in which you can, if necessary, place the starting capacitor of the electric motor.
We remove scale from the welds and prime the metal with a composition that prevents corrosion. We paint the structure.
You need to know this
Home \ You need to know this!
(read for everyone!!!)
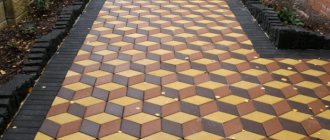
When buying paving stones or tiles, most people do not know what they actually need.
You often hear things like this: “Do you have paving stones that are 8 cm thick? A layman advised us to take one of these for our garden paths!” Or something like this: “We need slabs for the blind area, because they say nothing else can be laid.” After such statements it becomes both funny and sad. It is clear that most people are not in the know about installation technology, but you cannot be led by the contractor - his goal is quite clear, but his qualifications are in question.
Let's try to formulate a few concepts that need to be learned.
1. The strength of the final solution in the form of a finished path or platform is determined by two components: the prepared cushion (this is the most important factor) and the strength of the concrete tile itself (this is secondary). Even the most durable cube-shaped paving stones laid in a loose cushion will soon float.
2. Any tile or pavers installed on the pad must have a perimeter boundary. This limitation can be either buildings between which paving stones will be located, or permanent platforms, or a buried curb . For options when the tiles are glued to a concrete base, a border is not required.
3. You can lay tiles or paving stones not only on dry mix but also on compacted sand. The second (in our opinion) is more preferable. A dry mixture 2-3 cm thick placed under the tiles does not add strength. The only plus is that it temporarily blocks plant growth and allows water to pass through, but this is temporary. The disadvantages of using a dry mixture are the following: in case of work to open up the site, tearing the tiles from a good mixture for reuse is very problematic (you may have to buy it again). Increased cost of the solution. and another important disadvantage, which does not immediately appear, is that workers moving through the dry mixture will inevitably transfer cement to the laid colored tiles - in a week or less the color will be faded.
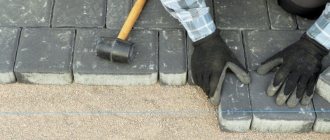
4. Anyone can lay tiles Workers arriving from the south, as a rule, have no idea how to do things right. You cannot begin laying a large area without having the entire volume on site; this applies to both multi-colored and single-color products (the reason for this may be a slight deviation in the tone of the tiles, which is quite acceptable according to the technical conditions). You will find material on our website about how to do it correctly yourself.
Drying seams . Attention ! If you decide to sprinkle the tile seams with a dry mixture, then after pouring, carefully clean the front surface of the tile from cement!!! Otherwise, you risk ruining the tiles and getting faded and non-contrasting coating colors forever! It is strictly prohibited to clean the tile surface with efflorescence agents and other acids - in two years or less the surface structure will be destroyed! When laying paving stones that were recently made in rainy weather, we strongly recommend treating the surface with a water repellent to prevent the formation of efflorescence - in fresh concrete the hydration process is not complete and the entry of atmospheric water into the concrete will lead to the formation of efflorescence.
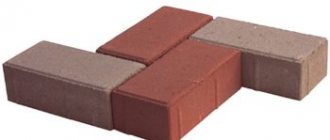
5. Tiles or paving stones produced by unscrupulous manufacturers have a number of characteristic features. Check out their names: “Plate” - a distortion of the front side, looks like a concavity of the plane. The defect is visible to the naked eye and appears especially after rain in the form of persistent puddles on each tile. “Propeller” - looks like a curvature in the vertical plane. The tile seems to be bent. “Barrel” is a distortion of geometry caused by worn-out forms or their initially weak design. Looks like an extension on the sides of the tile. It is not possible to lay such tiles evenly; as a result, the eyes will always catch these defects.
Now there are a lot of counterfeits on the market; unscrupulous manufacturers save on the main price-determining components: cement, pigment and, very importantly, sand . cheap quarry sand is not suitable for tile production !
The price of counterfeit goods is tempting, but stingy people, as you know, pay twice. Such products will not last long; they only look beautiful at the beginning. Several times a year we are asked to correct such creativity, which has fallen to pieces.
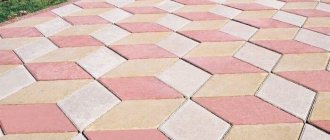
You can also recognize an unscrupulous manufacturer by the way he plagiarizes, using the results of someone else’s work for self-promotion. Here is an example from one of the newly minted manufacturers (the picture shows our tiles laid by our own workers, copied from our website):
The production of concrete products is determined by GOST 17608-91
Dimensions, deviations from straightness and perpendicularity of the slabs, the width of the opening of technological cracks, the sizes of cavities, sagging and chips of concrete should be checked by the methods established by GOST 26433.0 and GOST 26433.1
6. Vibro-pressed and vibro-cast tiles . General and differences. Many buyers ask about the technology used to make the tiles and, without delving into the essence, give preference to the first or second “term”. What these technologies have in common is that in both cases sand, cement, pigment and plasticizer are used and the service life of concrete products is more than 10 years. Differences: With vibration casting, the process of gaining strength takes place in a plastic mold (only the upper part is open, and with vibration pressing, the finished product is removed from the mold immediately after the vibration process and gains strength on the rack without a mold. Many are confused by the syllable “ press ” in the word pressing, - you shouldn’t pay attention to this, the finished product is simply pressed out (approximately like a die-punch). The cost of pressed tiles is significantly lower than cast tiles, therefore the price of the finished product is lower.
Vibropressed tiles do not have a smooth surface; they are rough and slightly porous. As a result, vibropressed paving stones are more susceptible to contamination and require periodic cleaning.
Both vibro-pressed and vibro-cast paving stones, if deviated from production technology, are destroyed over time in the same way.
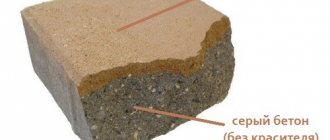
7. The coloring of paving stones is done with specialized pigments. Vibro-cast paving stones are painted over the entire thickness, and vibro-pressed paving stones (usually) a few millimeters from the front side, but this does not mean that it will “wipe” to the gray layer. The maximum degree of coloring is determined by the maximum ratio of pigment to cement, which is set by the pigment manufacturer; as a rule, this ratio does not exceed 4-5%. Exceeding the limit ratio to obtain more saturated tones leads to a loss of strength of the finished product. Often, customers ask for very rich tones; in these cases, when manufacturing products, we decline responsibility for their service life.
8. The laid paving stones will serve you for many years and even decades if you follow simple rules: Do not apply shock loads to concrete products (for example, a crowbar, jackhammer or hammer drill), and do not use acid-containing reagents on the surface.
The appearance of concrete products can be improved with the help of special varnishes and water repellents designed for concrete products used in humid and frosty conditions. Cleaning from dirt and dust is allowed either with a brush (broom) or a high-pressure washer.
Clinker. What do you think: Why do they buy clinker stone in Russia? The answer is simple: because it is beautiful. And nothing more. Why don't they use clinker stone for paving in Europe? Answer: because they know how to count their money.
More useful information...
…
upd 08/12/2015
Dear customers! Remember, after the goods have been paid for and delivered by us to your vehicle and the vehicle has left the factory before arriving at your site, we are not responsible for the safety of the goods and the quality of transportation. Therefore, before signing the invoice, you need to make sure that the goods comply with the declared volume and assortment, and also accompany the transport to your facility.
News all news
- 24.05.2016
Volume discount...
- 01.05.2016
Pavement (English cobblestones) has been produced using cement 600D0 since May
- 07.08.2015
New arrivals of vibropressed paving stones
- 01.06.2014
Check out our recommended color palettes...
Review of brick making machines for making paving slabs
A more productive and mechanized device is a brick press for the production of paving slabs. The working mixture is loaded into a tank from which the molds are filled. The forms are installed in a special compartment of the device and can be replaced. Their variety can range from several types to dozens and depends on the class of the machine.
After filling, the mold is closed and subjected to vibration compaction using a mechanical device. Prices for such equipment start at approximately 340 USD. and increase as the functionality of the devices increases.
The Vibromaster-Universal-480V machine is equipped with an electric motor with an operating voltage of 220V and allows the production of 480 blocks per working day. Simultaneously, the solution is poured into 2 forms. The price of the machine is approximately 460 USD. The same machine for 4 molds Vibromaster-Universal-740V can produce 740 units of products per day. Its price will fluctuate around 560 USD.
Equipment for the production of paving slabs using the vibrocompression method, complete with a concrete mixer, an automatic solution supply line, and a press equipped with hydraulic drives, have significantly higher productivity and allow you to press a very wide range of blocks and paving slabs. The Mastek-Meteor brick making machine has a price of 6050 USD.
By the way, it is worth noting that the simplest vibration table with a factory-produced interchangeable form will cost you at least 136 USD.
What is the right thing to do: buy a ready-made machine or assemble it yourself using drawings and diagrams - it’s up to you to decide. And if the choice falls on a homemade device, we will always come to your aid with kind words and useful information.
For the production of medium and large quantities of pressed tiles, a machine for its production and a cutting device are used.
Machine for the production of paving slabs
You can make a mini-unit for the production of such products with your own hands.
Removing finished paving stones from the mold and organizing storage
If you take 10 liters. cement, 10 l. sand and 20 l. crushed stone, you get about 27 liters. concrete.
To speed up the process of removing finished tiles from molds, there are special attachments. They are attached to two sides of the table and change depending on the shape of the paving stones. The technological map allows no more than 10 seconds for unmolding one tile. In practice, this procedure takes no more than 5. To make the molds last longer and be easier to remove, they are heated to +40°C. When heated, the linear dimensions of the polymer molds increase and they are easily removed from the concrete casting, the expansion coefficient of which is much lower.
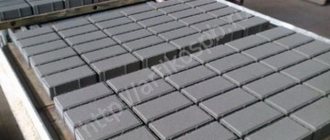
The tiles released from the mold are stored on wooden pallets. Laying is done face up. The tiles stacked on pallets are secured using packaging mechanisms with tape and metal staples. The height of the pallet with the tiles laid on it, as the map provides, should not exceed one meter. In this form, it gains strength on warehouse sites. The technological map provides for 21 days for the installation of paving stones. This period is necessary to achieve the strength determined by GOST - 450 mPa.
The tiles placed in pallets are sorted by shape, color and size, which allows them to be delivered to the customer in the required range and quantity. At the same time, when directly laying on the path, such packaging of paving stones and paving slabs allows you to reduce work time.
What is a professional machine?
The standard device looks like a complex installation. Despite its modest dimensions, it is used to organize not only the production of street tiles, but also to establish mass production, that is, to open their own business. In the second case, it is more advisable to buy a ready-made device. This machine has five main parts:
- matrix;
- platform;
- container for solution;
- vibration installation;
- press.
The operating principle is organized as follows:
- The mixture is placed in the tank. It moves to the forms and concrete is fed through the bottom into the matrices.
- After this, plates are placed on top and the mass is pressed to the platform.
- For better compaction and removal of voids, vibration is applied. The vibrations combined with high pressure instantly compact the solution.
- Afterwards, the forms are raised, and the finished elements remain on the platform.
- Next, they are taken away along with the stand and dried.
Equipment for home production
To make high-quality paving slabs yourself, you need to prepare the appropriate equipment. Otherwise, you will not achieve the ideal state of concrete after pouring into the matrices.
The following devices are used in the production of standard products:
- vibrating table;
- pressing machine;
- polyurethane molds for filling.
The vibration table can be upgraded and equipped with a pressure plate.
A person without design experience is unlikely to produce such equipment without errors, but it’s still worth a try.
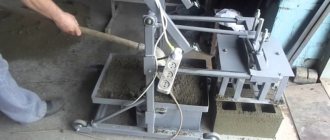
How to make a vibration pressing machine
The simplest option is to make a vibrating table. To construct such equipment, you will need:
- welding machine;
- Bulgarian;
- drill;
- mounting bolts.
The drawings are carefully worked out in advance to calculate the optimal position of the engine under the tabletop. Then a frame of 50x50 mm corners is welded and fixed on legs with plates at the lower end. They are useful to fix the installation in one place. Next, strong metal springs are fixed in the corners and in the middle. A flat tabletop with sides is installed on them. A motor, for example from a washing machine, is screwed onto the bottom.
To set up the press, an additional panel in the form of a flat cover is fixed to the vibrating table, and a lot of pressure is applied to it. Separate elements are used, which are slightly smaller in size than the molds and fit into them to press the solution.
If you rely on a production sample of the machine, you will need sheet metal and a profile. The frame is welded from the latter. The container with the solution should have the shape of a trapezoid, tapering downwards. The bottom is hinged and ensures the supply of the mixture into the matrices, which are formwork made of metal and wooden planks. A sliding press is made on top from plates that fit into the shape of the clamping mechanism. Vibration is added to ensure air release. This option is applicable in the production of ordinary rectangular tiles.
How to make forms
If you want to make shaped street tiles, you will need molds for pouring the mortar. You can make them yourself. You will need polyurethane with a hardener and a sample tile or a homemade element. It is made of gypsum - the best option for creating figures of any complexity and configuration. The volumetric element is filled with liquid polyurethane. Since it is mixed with a hardener, after a while a soft but solid product will be obtained, which can be removed from the workpiece after complete drying.
Polyurethane imprints every bend, indentation or protrusion of the matrix, so select only reference samples as a template.
To ensure sufficient production volumes, you will need at least 10 molds.
Preparing forms
In the process of manufacturing vibration-molded tiles, various types of molds can be used: plastic, polyurethane, rubber. Moreover, each type has a different number of molding cycles: rubber can withstand up to 500 cycles, plastic 230-250, and polyurethane up to 100.
Before pouring the mixture, new molds are treated with an antistatic agent or lubricated with special compounds. After stripping, rubber molds must also be washed with a solution of 5-10% hydrochloric acid. Substances such as emulsols, SYA-3 or OPL-1 can be used as a lubricant.
Mold smearing
To maintain the integrity and good condition of the mold, do not lubricate with oil-containing products.
You need to lubricate with a thin layer, otherwise excess lubricant will cause pores to form on the tile. Products are applied by brush or spray. In this case, it is necessary that the room temperature is 18-20°C.
In the video, an experienced specialist reveals the secrets of preparing forms.
Production recommendations
To fully produce paving slabs, it is not enough to simply purchase the necessary equipment; it is important to follow the technology and take into account all the key points associated with this process:
- A machine with a press must apply uniform, equal pressure to each centimeter of the solution.
- Strong vibration violates the integrity of the mass and breaks the tile.
- In the preparation of concrete, crushed stone and plasticizers are used, which increase the strength and elasticity of the solution.
- The grade of cement should not be lower than M500.
- Before using the tiles, the workpieces are completely dried, this usually takes at least a day. To speed up the process, special dryers are used.
- It is important to maintain optimal tile storage conditions in the production area: humidity, temperature, dust level, etc.
- The equipment is regularly cleaned and checked for proper functioning.
- When planning mass production of products, you will need to prepare an area for storing products.
If you want to start a business producing paving slabs at home, it is better to purchase factory equipment. But for personal needs, a do-it-yourself machine is a completely suitable replacement.
«>
Raw materials for the production of paving slabs
An approximate list of materials and indicators that it must comply with:
- Granite screening is usually used, the fraction of which should not be more than 10 mm.
- For production, it is advisable to use cement of the PC500 D0 or M500 D0 brand, that is, without additives.
- Sand, module less than 2 or granite chips.
- Mineral supplements, which are divided into:
- Dispersant – used for the first layer.
- Plasticizer - for the second.
- Dyes necessary for the production of multi-colored tiles.
The average cost of raw materials for the production of paving slabs with an area of 1 sq. m. is 136 rubles.