General principles
Let's start by formulating a few simple rules that we will have to adhere to during finishing work.
- The insulation must be vapor permeable. Moreover: ideally, the permeability of walls to water vapor should increase from the inside to the outside. In this case, we will avoid the accumulation of moisture in the thickness of the wall with the inevitable decline in its thermal insulation qualities.
In addition: dampness and the accompanying fungus sharply accelerate the destruction of main walls. Mold is quite capable of feeding on inorganic compounds that are part of concrete, limestone, brick and other popular building materials.
- The insulation must be reliably protected from water flowing under it during precipitation. It will evaporate for quite a long time; the consequences in the form of the notorious fungus will not keep you waiting.
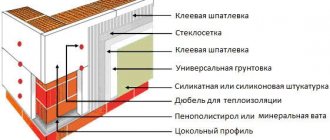
- Plastering the outside of houses is done using reinforcement over insulation and, in addition to being decorative, has a protective function. It protects the thermal insulation material from moisture and accidental mechanical damage: the rigidity of any insulation leaves much to be desired simply because most of their volume is occupied by air.
Useful video
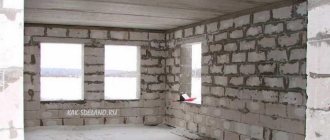
It all depends on the base surface, that is, it all depends on what kind of walls you want to level (plaster).
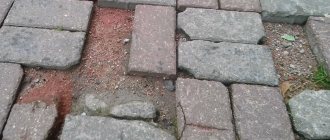
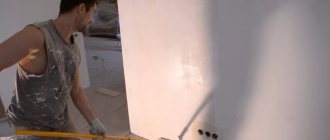
If the wall is brick, then it is better to use a cement-based plaster mixture; it will be cheaper and you can apply a thicker layer. Before applying the layer, the surface is wetted with water or primed with a regular primer. The first stage of work is applying a spray (soil and finishing layer, applied with a trowel (viscous solution) or a scoop (liquid solution)), then plastering the wall surface (using the rule), and depending on the subsequent finishing of the walls, it is necessary to either grout ( the wall with the applied leveling layer is rubbed using a grater) and the surface is sanded (using sandpaper or a special sanding grid), eliminating minor defects, this is preparation for painting or wallpaper. If under tiles, then there is no need to grout; you need to leave a rougher rough surface. If the plaster layer is more than 20 mm, the plaster must be reinforced with a metal plaster mesh.
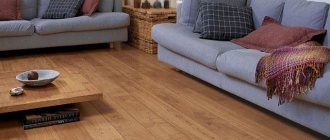
If you are going to plaster a wall made of smooth concrete, you need a gypsum plaster composition of the “Rotband” type. Before starting plastering work, be sure to prime the base surface with a special primer such as “Betonkontakt”. One of the features of Betonkontakt type primers is that they contain quartz particles (sand), which create some roughness on a smooth surface, ensuring good adhesion of the plaster mortar to the base surface. Gypsum plasters are reinforced not with a metal mesh (like cement plasters), but with a polymer mesh with a cell of approximately 5x5 mm.
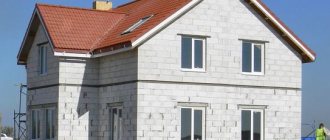
If the surface is made of foam concrete, it is also better to use a gypsum composition, although cement is also quite acceptable. Here you definitely need a primer, and not just a simple one, but a “deep penetration primer for weak and porous surfaces.”
If the partition is made of tongue-and-groove gypsum blocks, it is best to plaster it with gypsum compounds, having previously primed the surface with a regular primer.
Let me give a short comparison of cement-based and gypsum-based plaster mortars:
Cement plaster
very durable and hard. Thanks to these qualities, it is quite durable. Cement plaster is difficult to apply and dry. Which naturally increases the finishing time with its use. Application requires a lot of effort and energy, due to the technology of covering the wall surface with raw cement plaster. The first layer is made no more than 5 cm. The second layer is applied after 6 hours. If the room temperature is not high, the drying time will increase. Cement plaster sets completely within 3-4 weeks. The wall with the applied cement-based leveling mixture should be rubbed down no earlier than 12 hours have passed.
Gypsum plaster
it is preferable in cases where it is necessary to complete the work in the shortest possible time, when operating only in conditions of normal humidity and for indoor use. Gypsum plasters are now widely used both in Russia and in the West precisely because they can significantly reduce the period of work. We also note that their use allows us to significantly simplify the technology. Gypsum plaster is quite easy to apply. In addition, it dries quickly and produces little dust during operation. Gypsum plaster dries completely in 2-3 days. The next layer can be applied after 2 hours. Before working with plasters, it is necessary to prime the surface for better adhesion. This will also avoid problems with fungus and mold. When working with plasters, you need to postpone the remaining finishing work until the applied mixtures have completely dried. Gypsum-based compositions have greater elasticity, are easier to work with and easier to achieve a high-quality surface (which reduces labor and material costs for performing putty work), they are less prone to cracking. In addition, gypsum compositions are more suitable for use on smooth concrete - the material from which the walls of the vast majority of modern new buildings are made.
The main difference between cement-based and gypsum-based solutions is the complete drying time. As a rule, for gypsum plasters it is at least 4-7 days. Cement plasters require at least 24-28 days to dry and fully gain strength.
General recommendations when using plastering technology, you must strictly follow the preparation recipe and the technology for applying the plaster mixture. For small and medium volumes of work, it is advisable to use ready-made plaster mixtures from trusted manufacturers.
Renovating a private home is a set of measures that includes replacing plumbing equipment and heating systems, installing new flooring and updating the finishes. One of the priority stages of finishing work is leveling the walls. Plastering the surface is the most popular way to eliminate such defects. How to plaster walls with your own hands, which solution is better to choose, what is the technology for applying plaster? You can find answers to these and many other questions in our review article.
On the construction market, plaster is presented in the form of a mixture of powdery consistency, packaged in sealed bags. Its components are additives and binders. Before use, the bulk mixture is diluted with water in the proportions specified in the instructions. Special additives included in the plaster help improve the quality of work and provide the coating with special strength and durability.
When choosing a plaster mortar, a number of factors must be taken into account:
- type of surface being processed;
- peculiarity of the room (high humidity, dampness, etc.);
- deadlines for completing finishing work.
Today, gypsum and cement plasters are available for sale. In order to answer the question of what mortar to plaster walls with, it is necessary to consider the advantages and disadvantages of each type and determine the type of surface to be treated.
The composition of cement plaster includes special additives, fractionated sand and cement. Its main advantage is low cost. Ultimately, the solution provides a durable and strong coating that can withstand the effects of negative factors (high humidity, temperature changes). This mixture is used for external and internal work, mainly to hide significant irregularities. The drying time of the cement mortar depends on the degree of humidity and temperature in the room, as well as on the thickness of the applied layer. It is recommended to proceed directly to finishing after 10 days from the completion of plastering work.
When choosing gypsum plaster, it is necessary to take into account the conditions under which it can be used. The gypsum-based solution is intended for finishing work in rooms with an optimal level of humidity. Its main advantages: plasticity, quick adhesion to the surface, uniform application, and the ability to allow vapor to pass through.
Looking ahead, it is worth noting that the technology for plastering walls made of concrete, brick or foam concrete is different. For example, a foam concrete surface is pre-treated with a deep penetration primer and only then plastered.
We will pay special attention to decorative plaster. Among its many advantages are: resistance to mechanical stress, excellent adhesion to any type of surface, microporous structure that allows the walls to “breathe”. In practice, they are used to create original interiors. The best way to plaster the walls is up to you.
Set of necessary tools:
- construction trowel, large spatula;
- grater;
- brush for wetting the plastered surface;
- rule.
Why is this necessary?
Why, in fact, is it better to build an insulated facade than to plaster the outside of the house directly on the brick?
Better thermal insulation is the most obvious argument. But how much does such insulation pay for itself?
Let's put it this way: when using gas, wood or coal as a heat source, the payback period is 3-4 seasons. In case of using solarium or electric heating - one season. In the central zone of Russia, through a brick wall (51 cm) without insulation, twice as much heat is lost as through the same wall, but under a 10-centimeter foam plastic coat.
Please note: air conditioning costs in the summer are also noticeably reduced, since the walls are not heated by direct sunlight.
What other bonuses will we get from facade insulation?
- Better sound insulation . Any insulation, by definition, perfectly absorbs sound: after all, it, in essence, represents a large number of closed cavities, each of which serves as an acoustic trap.
- Complete disappearance of any problems with mold and mildew . Walls that are thermally insulated from the outside will be heated throughout their entire thickness.
- Finally, we will ensure much lower consumption of expensive building materials . Due to what? The fact is that insulation boards will level out all the rubble and serious defects of the facade; All that remains is to cover them with a thin layer of reinforced plaster, providing rigidity, and to enhance the appearance of the house with the final coating.
How to level walls using drywall
Screws or direct fastening to walls is a fastening method with maximum spread. The frame is based on wooden beams or galvanized metal profiles. The latter option has its disadvantages:
- Installation in small pieces in places where pipes exit.
- The likelihood of sheets bending where the differences are large.
- If the corners are severely obstructed, their geometry is almost impossible to correct. It will be more difficult to level.
More often they give preference to false panels, in the form of a full-fledged gypsum plasterboard system:
- Serpyanka tape, reinforcing each joint;
- Waterproof plasterboard, with horizontal seams;
- Horizontal jumpers forming stiffening ribs;
- 0.6-meter pitch of rack profiles. A good option to process the product;
- Guide profiles as a complement for floors with ceilings.
Self-tapping screws are needed so that the drywall forms a strong connection on the vertical lintels and horizontal racks. The heads of the hardware are slightly recessed, then everything is covered with plaster. Coating and painting compounds are used for the last stage, when the room is almost ready.
Screws or direct fastening to walls is a fastening method with maximum spread.
Advantages of drywall as a basis for laying tiles
Drywall sheets are great for tiling on top in many ways because of their smooth surfaces. The material is installed in rooms for different purposes. Application will provide the following benefits for owners:
- Decorative.
- Easy processing and installation.
- Multifunctionality.
- Versatility.
The material is easy to use and remains absolutely safe. You just need to choose an increased coefficient of moisture protection. Then the surface remains even, there are no adjustments to the main walls, including when using a solution.
Drywall sheets are great for tiling on top in many ways because of their smooth surfaces.
Selection of materials
How to plaster the outside of a brick house? Any work begins with procurement.
Insulation
Traditionally used in this capacity:
- Glued mineral wool slabs. They boast excellent vapor permeability; However, their installation is a dubious pleasure: small fibers are volatile and do not at all cause pleasant sensations when inhaled.
Attention: when working with glass or mineral wool, you must wear at least a gauze bandage and safety glasses. Believe me, this recommendation is not reinsurance and is based on the author’s personal experience.
- Polystyrene foam with a density not lower than C-25 (25 kilograms per cubic meter).
The thickness of the insulation is determined by the climate zone. If in the warm Crimea 40-50 mm thermal insulation is quite enough, then in Yakutia 200 mm will not be excessive.
Reinforcement
The reinforcing fiberglass mesh should have a mesh size of 2x2 - 5x5 millimeters with a density of about 150 grams per square meter. A mesh is used that is resistant to an alkaline environment: cement is quite aggressive. The approximate consumption for a width of 1 meter is 1.1 linear meters per square of facade (taking into account the overlap of the strips).
Starting plaster
The main decorative layer usually, in addition to reinforcement, consists of a special cement-based adhesive corresponding to the type of insulation. However, ordinary tile adhesive is often used in this capacity (there are very flattering reviews of the use, in particular, of Ceresit CM17).
Decorative coating
In principle, nothing prevents you from leaving the house covered with a layer of reinforced cement plaster - with or without painting. However, much more often, after priming with penetrating acrylic primer, a decorative coating is formed on top - cement-based structural plaster. A typical solution for the south of Russia is “bark beetle” plaster with a grain size of 2-2.5 millimeters.
Types of irregularities and ways to eliminate them
Most situations involve problems such as vertical deviations or bumps with depressions. Most often, all types of problems are eliminated, only the operating technique differs. Sometimes simple processing and removal of excess is enough. After this, a leveling mixture or tile adhesive is applied.
Sometimes simple processing and removal of excess is enough.
Work technology
How to plaster the outside of a house - we seem to have figured it out. Now let's get acquainted with the technology of work.
Preparing the walls
Plastering a brick house on the outside begins with preparing the surface of the facade to be finished.
It won't take much time:
- Protrusions and noticeable irregularities that may interfere with the fastening of insulation boards are knocked off with a chisel.
- The surface is swept away from dust.
Primer of brickwork is desirable, but not a mandatory operation.
Installation of insulation
- The starting profile, a galvanized corner, is attached to the wall according to the level. Its function is to become a support for the first row of insulation boards and protect their lower edge from accidental damage.
- An adhesive composition is applied to the insulation board pointwise, in a cross or along the edge, after which it is pressed against the wall and leveled parallel to its surface.
- For additional fixation, plastic mushrooms (disc-shaped dowels) are used. The holes for them are drilled with a hammer drill directly through the insulation.
To control the location of the slabs in one plane, a rule or a straight strip of at least 2 meters in length is used. Deviations are leveled out due to adhesive beacons. The slab at the end of the row is cut in place with a sharp knife; vertical seams between thermal insulation elements shift from row to row.
Starting plaster
How to properly plaster the outside of a house using reinforcing fiberglass mesh?
- The adhesive solution is applied to the surface of the insulated facade with a wide spatula, onto which it is first laid with a narrower one. The thickness of the layer is about three millimeters.
- The fiberglass mesh is applied to the wall and pressed into the glue with the same spatula. Reinforcement strips are applied horizontally, with a 10-centimeter overlap. The corners of the facade and openings are additionally reinforced with a reinforcing corner - metal or plastic.
- The covering layer is applied in the same way. It should completely hide the texture of the mesh: ideally, the surface will be perfectly flat, without visible protrusions and joints.
Useful: an adhesive solution of the appropriate consistency is often applied not with a spatula, but with a roller; It is also used to roll the reinforcing mesh. As a rule, at least three layers of such coating are required; however, the final time investment is somewhat less due to the higher speed of glue application.
The dried starting coating is primed. Thus, we strengthen its surface and improve the adhesion of the decorative layer. (See also the article DIY primer for putty.)
Decorative plaster
How to plaster the outside of a house with a decorative “bark beetle” coating?
- The dry mixture is poured into a container with water.
Important: it is better to strictly follow the proportion specified by the manufacturer. An attempt to apply the solution “by eye” usually leads to damage to a section of the facade and re-coating.
- The solution is mixed twice with an interval of 15 minutes with a construction mixer.
- The finished plaster is applied to the walls with a spatula or trowel. The angle of the tool to the surface is about 30 degrees, the thickness of the layer is equal to the grain size (usually no more than 3 millimeters).
- After partial setting for half an hour, the surface is structured: the back-and-forth movements of the plastic grater force the grain (marble chips) to leave streaks on its surface.
After drying, the surface is painted with any facade paint.
Aligning bathroom walls with tiles, order and technique
A layer of moisture-resistant material is used next to showers or bathtubs to avoid problems in the future. Taking into account such nuances is simplified during a preliminary inspection of the walls and assessment of their condition. The materials are laid after applying protective screeds.
- Before leveling the walls under the tiles, look at how vertical the walls are;
A plumb line together with a visual assessment will become indispensable assistants in this matter. The tiles are distinguished by the need for vertical laying; with other options, problems arise. A thread of sufficient length is attached to the plumb line after its installation. Apply a ruler while holding the tip of the thread. Separately measure the base of the walls and the area near the ceiling, below. If the difference is only plus or minus a centimeter, that's normal. If the difference is larger, leveling is necessary using drywall or plaster.
- Surfaces are also checked using a long rule;
The instrument is leaned against the surfaces and seen where the differences are stronger or weaker. The following is a step-by-step order of actions.
- Frames with plaster are relevant when there are a large number of irregularities;
- Smooth walls mean that less work will be required and it will not take as much time. It is enough to simply cover such products with putty, cut off the protruding edges and fill in small recesses.
The most careful preparation is needed for the walls where the mosaic will be. Here they use the most expensive methods to level the surface.
The instrument is leaned against the surfaces and seen where the differences are stronger or weaker.
The nuances of preparing walls in the bathroom
The materials differ from each other, but the same cannot be said about the work processes. The only exception is for old brick houses, using plaster mesh. When getting rid of the plaster layer, there is a high probability of damage to the wall itself. Therefore, partial cleaning is often chosen. Before plastering, the brick is treated with coating insulation, if it was necessary to completely remove the mesh in advance and remove the old layers of finishing. Then you don’t have to worry that high humidity will destroy the wall. When using wood and drywall, it is better to simply replace part of the wall.
When getting rid of the plaster layer, there is a high probability of damage to the wall itself, so partial cleaning is often chosen.
Expenses
How much does it cost to plaster the outside of a house using the method we described?
Let's take as a basis a ready-made calculation from the website of one of the construction companies.
The consumption of materials per square of the facade will be:
- Primer - 0.5 l.
- Glue - 10 kg.
- Insulation (mineral wool or polystyrene foam) - 1 m2.
- Disc-shaped dowel - 10 pcs.
- Fiberglass mesh - 1.1 m.
- Decorative plaster - 3 kg.
Taking into account current market prices, the resulting cost will be, depending on the type of insulation and the selected brands, from 280 to 450 rubles per square meter of facade.
Advantages of plastering
Finishing the facade of a house with plaster has many advantages that explain its popularity:
- The coating prevents the penetration of moisture, which has a destructive effect. This does not create barriers to normal vapor exchange, which allows the walls to breathe.
- The outer layer provides additional sound and heat insulation. This is achieved through additives that improve the characteristics of the mixture.
- Decorative appeal. Various types of products and technologies can be used for cladding, which make it possible to obtain texture and the desired color. The plaster mixture can be tinted well.
- Elasticity.
Compositions with a polymer component have this property. Due to this quality, the coating does not collapse due to shrinkage of the building and temperature changes. Modern polymer compositions have unique performance characteristics and enviable beauty - Easy to install. Finishing facades does not require complex mathematical calculations and the construction of a frame.
- Possibility of repair. Any damage can be easily repaired. But if they make up more than 30% of the surface, this means an incorrect choice of composition or violation of application conditions.
All advantages are supported by the affordable price of the material, even taking into account the purchase of modern polymer solutions.
Leveling large uneven walls with slabs
Separate moisture-resistant plasterboard boards are the cheapest finishing option, but not the only one. Other materials are also suitable. The strength of new floors increases if more profiles are added. Plates with cement and shavings have a number of disadvantages:
- The problem cannot be solved without an assistant due to the large weight of the slabs;
- Difficult material processing. High fragility;
- Expensive.
Plaster mixtures that have a cement base, when hardened, form durable, hard coatings. This material holds ceramic cladding without problems. Cracks are sealed in advance using special compounds. Areas of bricks with a loose or crumbling surface are removed. They are also sealed up. The time it takes for the composition to set is very convenient - 40-50 minutes. Water repellents are added where high humidity persists. Their instructions are provided additionally by the manufacturers.
Plaster mixtures that have a cement base, when hardened, form durable, hard coatings.
Working with various surfaces
Facade plaster fits well on almost all types of surfaces, although in each specific case the process may differ.
- Walls made of wood.
This is the most complex material that requires lengthy preparation. It consists of impregnating the base with protective compounds to prevent putrefactive processes. If work is carried out on a log structure, then a special lathing is created, otherwise the solution will not be able to adhere reliably. Wood and plaster mortars have different coefficients of expansion, so to apply the mortar either a wooden reinforcing cage is built, which is very problematic, or insulation is attached to the walls and plaster is applied to it - Concrete surfaces. This material has good adhesion, but due to the presence of pores it quickly absorbs moisture, so it is treated with deeply penetrating primers. Problems arise with reinforced concrete slabs that have numerous joints. For such cases, initial treatment with cement compounds will be required.
- Brick facades. To ensure reliable fixation of the applied solution, jointing is carried out.
Each material from which the walls are made requires an individual approach.
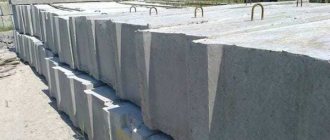
On a note! Plastering the facade of a house made of aerated concrete blocks is a responsible undertaking. The fact is that for work, compositions that have lower strength indicators must be used. This is necessary in order to avoid internal tension between materials.
Direct plastering of cellular concrete requires the use of special compounds, but when installing insulation, you can use simpler and cheaper solutions
Why level the walls before gluing tiles?
Old-built houses make the problem of crooked walls especially pressing. Each layer inside becomes uneven due to the large amount of repair work. Finishing materials must be completely removed during any major repairs and surface preparation. The base is completely cleaned.
Sometimes you can get by with putty, which simply fills small defects. The following factors determine the choice of technologies in a particular case:
- Changes along the lines.
- Protruding parts, depressions.
- Accuracy of angles.
The need to level the walls in the bathroom appears with deviations of 3 mm or more.
Sometimes you can get by with putty, which simply fills small defects.
Types of plaster
The question of what to plaster the walls with is an integral part of the work process. It is not always possible to immediately determine the appropriate type, since there are many options on the construction market that differ in their characteristics.
Plaster for external use is divided into three categories.
Mineral compositions
This group includes mortars based on cement and gypsum.
The first variety is considered the most popular, due to its excellent characteristics and low price. But it has a number of disadvantages that make it difficult to use on newly built houses.
Decorative mineral compositions based on cement have an optimal price-quality ratio
Gypsum composition is used much less frequently due to its low resistance to precipitation, although mixtures have appeared that include many polymers. This leads to the fact that the vapor permeability of the plastered surface is impaired.
Polymer solutions
The group includes the following types for facade plaster: acrylic, silicate and silicone. Each option has a different base, which affects the properties of the material.
The most popular are acrylic mixtures. They have excellent resistance to environmental influences. Their main disadvantage is considered to be flammability and susceptibility to contamination, which implies loss of appearance.
Acrylic compositions are highly resistant to ultraviolet radiation and have a wide color palette
Polymer solutions have a high cost, so initially finishing is carried out with cheaper materials for leveling.
Homemade mixtures
This includes compositions made on the basis of mineral fillers; modifiers and plasticizers act as additives. Plastering external walls using such materials is complicated by the fact that it is almost impossible to achieve the correct selection of components. This limits the durability of the coating.
The choice of one or another composition largely depends on the purpose of the building, so for outbuildings mineral and even homemade plaster is quite suitable, but for the front part of houses it is better to spend money on polymer
Advantages
The beneficial advantages of finishing plaster include:
- low cost compared to other materials;
- well masks wall defects (cracks, holes, other irregularities);
- ease of operation and maintenance;
- quick installation (minimal amount of preliminary work required);
- resistance to mechanical stress, atmospheric changes, humidity;
- protects the room from mold, mildew and dampness;
- some types give the room high sound insulation;
- combines with any type of interior;
- the constituent components (crushed stone, sand, granite, mica, slate) give the room textural depth.
Technology
The technology for exterior plastering of a house with your own hands involves dividing the work into stages that are carried out in a strict sequence:
- Selecting the appropriate composition depending on the type of surface and climatic conditions.
- Preparing the base and tools is a responsible procedure that allows you to avoid further problems.
- Installing beacons is the only solution for uneven walls. In addition, plastering the outside of a house becomes much easier, especially if you have no experience.
- Wall finishing - applying the solution in a suitable way.
- Grouting the surface allows you to eliminate unevenness and avoid the appearance of cracks when using certain types of products.
Material selection
Exterior finishing of a house with plaster begins with choosing the appropriate composition. To do this, follow the following rules:
- Self-prepared mixtures are recommended for situations where the surface is supposed to be plastered partially or for a short period of time.
- Mineral solutions require serious consideration. When deciding how to plaster the facade of a house that is not subject to shrinkage, at minimal cost, it is these compositions that you should pay attention to. It should be borne in mind that the material is sold dry and requires preparation.
- Polymer compositions have good elasticity and adhesion. They are sold ready-made, which simplifies the process. But the work must be carried out without delay, since the mixture sets quickly.
Dry mixtures are cheaper and last longer, but it is better for a home craftsman to choose a ready-made mixture, since it is much easier to work with.
Attention! When purchasing, you need to pay attention to the expiration date and manufacturer. It is better to abandon unknown companies whose material costs are lower than others.
Preparatory work
Plastering external walls requires careful preparation of the base:
- If the surface was previously treated with other decorative coatings, they are completely removed.
Difficulties may arise when removing paint: such areas have weak adhesion and therefore require high-quality cleaning. To do this, you can use special washes. Small fragments of paint are removed mechanically. Fresh plaster should never be applied over the old finish, as the likelihood of subsequent peeling is too high - Assess the condition of the base. Finishing work cannot be carried out on coatings that have cracks, chips or other problems. Plastering the facade helps to hide only minor defects.
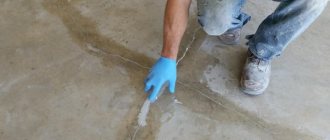
- The cracks are opened and cleaned. If the damage is large or located at the junction, then fiberglass reinforcing mesh is used. It is placed on the applied solution and covered well.
- The walls are primed. A composition suitable for a particular material is selected. Apply two or three layers, after each wait until the surface dries.
If work is carried out on walls that have weak adhesion (for example, reinforced concrete slabs), then before plastering they are covered with reinforcing mesh. It is stretched along the entire perimeter; dowels and screws are used for fastening.
The reinforcing mesh can be steel or fiberglass, but regardless of the material, it must be stretched onto the wall without creases or overlaps.
Insulation
Some doubts may arise when you need to decide how to plaster a house to create a layer of thermal insulation. This situation occurs quite often. To do this, perform the following steps:
- After preparation, the surface is impregnated with antiseptics.
- The work is carried out using rigid insulation: penoplex or polystyrene foam. The sheets are laid in a checkerboard pattern with glue and fixed with special dowels.
- The joints are coated with sealant or foam. This will avoid the occurrence of “cold bridges”.
- A membrane and reinforcing mesh are stretched on top.
On a note! The thickness of thermal insulation products depends on the climate of the area and the characteristics of the house.
In the European part of the country, the thickness of thermal insulation under plaster is 50 – 70 mm, in the northern regions it starts from 100 mm
What plaster to plaster uneven walls
Ready mixes will be too expensive if the gaps are large enough. A profitable solution is to purchase cement-sand products. You can make it yourself using traditional technologies. You just need to make sure that the sand is sifted and that the ratio between the components is correct.
A common practice with sheet materials. An example is drywall.
A profitable solution is to purchase cement-sand products.