Good afternoon I ask for help in repairing and insulating an old adobe house. The house was built in 1937. Adobe size 20x20x40. Over the years it has become so dense that it has become like stone. There was a need to disassemble part of the corner - we could barely do it, the adobe blocks were so firmly attached to each other. But the house is cold. The windows were replaced with modern ones, the slopes and window sills were sealed to perfection - there is no draft from them anywhere. The house is lined with rubbish bricks. The foundation is also adobe. The floor is cold. Heating is from a boiler - the rooms have radiators and PVC pipes. But even with a frost of 10 degrees, the walls are cold. How to insulate a house?
Olga, Salsk, Rostov region.
Hello, Olga from Salsk, Rostov region!
Unfortunately, I can’t be of any real help other than advice. You live too far from me for me to come to you with my workers and try to rectify the situation.
From existing practice I can say the following. There are buildings that, no matter how much they insulate, they still remain cold.
And in order to create a comfortable temperature in the room, it is necessary to have a constantly operating powerful heating system. Which is associated with high costs of fuel or other energy resources.
Let's first step back and think purely theoretically.
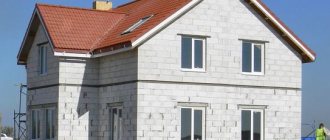
You have a fairly strong adobe house lined on the outside with bricks set on edge, which was done to make it more beautiful on the outside. Most likely there is no insulation between the adobe and brickwork. As a result, the walls form an array that accumulates the temperature regime that is dictated mainly by the external temperature background.
It is clear that heating the internal space slightly increases the temperature of the walls, but not sufficiently. In addition, the temperature inside the room is significantly influenced by the surfaces of the ceiling (indirectly both the attic and roof) and the floor.
Based on these tedious theoretical conclusions, it follows that in order for the temperature inside the house to be bearable for living even in the very cold season, it is necessary to insulate, or rather isolate the flow of cold on all these surfaces. Including windows and doors, which are conductors of cold.
You write that the windows are made to last and the cold does not pass through them. The doors facing the street should also have thermal curtains, or in short, adapter vestibules or similar curtains should be built.
Therefore, all that remains is to insulate the walls, floor and ceiling.
Most often, when covering adobe walls with bricks in problem houses, insulation is placed between the adobe and the brick. Since you have not done this, you should insulate according to one of two options. Or outside the house. Or inside the house. The second option is most likely suitable for your case. Because if you do insulation from the outside, you will be tormented by heating the heating system.
Ideally, insulation in such cases is done as follows. The walls are covered with clapboard, which is mounted on beacons (cranial block with a cross-section of 75/50 millimeters). Insulation 50 millimeters thick is laid between the beacons. Then an air gap of 25 millimeters is left between the insulation and the lining. The insulation is covered with a vapor barrier film on both sides. The distance between beacons is usually made 600 millimeters, a multiple of the size of most insulation.
That is, once again and in order, the whole technology of wall insulation.
A vapor barrier film is attached to the adobe walls. Beacons 75/50 are attached to the walls with self-tapping anchors and installed on the edge. Between the beacons, insulation is attached with “fungi” (screws with plates or special purchased ones). A second layer of film is mounted on the beacons. An air gap of 25 millimeters is obtained between it and the insulation. The clapboard is nailed down (instead, other materials such as plywood, various panels, slabs, etc. can be installed)
The insulation of the ceiling from the inside of the room is carried out using the same method as the insulation of walls. In addition, in the attic space the floor can also be insulated by laying insulation (from expanded clay to mineral slabs or rolls).
Floor insulation is a special matter. This insulation is sometimes more important than wall insulation, since there is not always a warm basement or underground under the house. If possible, then both the base and the ceiling above the basement are insulated approximately according to the same scheme as described above. If there is no trace of a basement or subfloor, then a radical alteration is not ruled out. When the entire old floor is exposed to a decent depth.
That is, floor boards and joists are dismantled, soil is removed to a certain depth. After which a new floor is installed in the form of a layer cake. The soil is leveled, waterproofing made of roofing felt or its analogues is laid. Approximately a 15 cm layer of expanded clay is poured. Then a reinforced concrete screed with a thickness of 5 centimeters or more is made. Floor joists are laid and antisepticized. Laying the floor.
It is clear that all this is quite a long process in terms of time and material costs. It is associated with many inconveniences in removing furniture or dragging it from place to place so as not to interfere with work. Possible dismantling of the heating system pipes and its batteries, since they need to be moved from the old walls by 75 millimeters plus the thickness of the wall material. The internal usable volume of the room will also decrease by double this size. It is also possible to reduce the height of the room by lowering the ceiling surface and raising the floor.
But ultimately, the thermal conditions inside the room increase and you will feel much better than before.
There are, of course, many other insulation options. But the one given is the most frequently used.
Other questions on the topic of adobe houses.
What is the best way to insulate a house from the outside? This question worries all owners. The cool temperature in a living room during the cold season creates discomfort; in addition, money is wasted on additional heating, which is not practical.
The range of modern insulation materials is large. To choose the right thermal insulation, you need to familiarize yourself with the technical characteristics of each.
Beginning of the use of straw in construction
This construction technology originated in the 80s of the 19th century in the USA. The basis of the technology for this construction was developed by the pioneers of Nebraska.
The appearance of houses made of straw was associated with the lack of other building material in the steppe zone, where the state of Nebraska is located. Construction with straw bale construction became possible with the advent of the first mechanical balers, which made it possible to obtain straw blocks of sufficient density and strength.
Some thatch buildings built at that time still stand today. Not only residential buildings, but also schools, shops and other buildings were built from straw. For the most part, these are one-story buildings with an area of no more than 80 m2.
Features of thermal insulation of walls with straw
Straw of various crops is used as feedstock: wheat, barley, rye, oats. First, the stems are dried in special thermal chambers, after which they are pressed to the desired density, tied and packaged. Only after this the raw material becomes a material suitable for thermal insulation work. You should not try to prepare raw materials yourself, because ordinary field straw can be affected by fungus and insect larvae. Another important point is the correct tying of each bale. Metal wire is not suitable for these purposes, as it will rust over time. Most often they are tied with nylon or polypropylene cord. If the bale is tied correctly, then it is not even possible to stick two fingers under the cord. The material is produced in the form of blocks, compressed under pressure in a special apparatus called a baler. The size of the blocks and their density, which is usually in the range from 80 to 100 kg/m3, will depend on its settings. The average weight of each product is approximately 16 kg, and the finished compressed block usually has dimensions of 50x40x100 cm. If you need to insulate walls with straw, you need to carefully select the material. Particular attention should be paid to the quality of pressing. The blocks should retain their shape well and not deform under pressure. Thermal insulation properties, stability of insulated walls and a number of other characteristics will depend on the quality of the pressing. Since the qualities of this material are fully revealed only in compressed form, therefore only carefully compacted straw is used for installation work. One of the popular methods of insulation is the use of clay together with straw. This technology has proven itself well in the thermal insulation of walls, roofs, and ceilings. The process of applying this solution is simple and does not require much time, but it is imperative to let the insulated surface dry, and this can take at least a month, even at above-zero ambient temperatures.
Insulation of the ceiling in a bathhouse with clay and sawdust
Regarding insulation of the ceiling with clay, we can say that it is necessary to first prepare all the material. Bring the clay to a semi-liquid state and mix with straw or sawdust. The resulting mass is applied directly to the previous layer of vapor barrier. The thickness of the layer is about 5-8 cm. The layer must be perfectly smooth and connected to the walls, since if cracks appear in the future, moisture will accumulate there and this will cause fungus. Drying of this layer occurs within 20-30 days at positive temperatures. During this process, cracks may appear. This is an absolutely normal phenomenon that can be easily eliminated by covering the cracks with liquefied clay and filling them with expanded clay or sawdust.
If the initially installed thermal insulation does not cope with its responsibilities, the insulation layer must be increased, otherwise condensation will eventually form on the ceiling.
To give the ceiling an aesthetic appearance, the top can be sheathed with any material such as wooden boards and chipboard. We remember that coating with varnish and paint is strictly prohibited during the process of arranging a bathhouse. One of the positive aspects of insulating the ceiling with sawdust and clay is that in this way you prevent rats and mice from appearing in the attic or roof.
Insulating the ceiling with clay and sawdust is very important when frequent users are children and people prone to allergic reactions. Sawdust is the most environmentally friendly material, which, in addition to being budget-friendly, has the advantages of being natural and harmless to the body. This method of insulation has practically no negative sides. It is a profitable way to preserve heat, both from a financial and operating time point of view. Plus, clay and sawdust are affordable materials that can be found in any commercial construction center. To manipulate the insulation of the ceiling, you should strictly follow the above described scheme and have such available means as: waterproof film, clay, sawdust, wooden boards and aluminum foil. It is worth paying due attention to joints and crevices, if they exist, since they can later be the location of mold and mildew, which cause serious disturbances in the functioning of the respiratory system.
Choosing straw for the ceiling
Straw with clay as insulation for ceilings has the following quality requirements:
- Thermal insulation of ceilings should be carried out only with straw that has been well dried in a special chamber.
- Straw bales should be easy to lift with one hand, strong and maintain their shape. Bundles of the same size should have the same weight. The difference in weight may indicate the presence of moisture in the bundle.
- Metal wire is susceptible to corrosion, so tying should be done with a nylon cord.
Advantages and disadvantages of insulating ceilings with straw
Insulating ceilings with straw has its positive and negative sides, after weighing them, you can decide whether to choose this method.
Advantages:
- excellent thermal insulation properties, several times higher than those of wood;
- environmentally friendly and breathable material;
- the material can be easily disposed of by burning;
- lightness of the material and its installation process.
The disadvantages of straw insulation for ceilings include the ability to ignite poorly compacted material and the likelihood of damage by rodents. The quality of the material is directly dependent on the conditions of collection of raw materials, their storage and drying method.
Instructions for installing straw on the ceiling
You can insulate the ceiling with compressed straw blocks and light adobe.
The first method involves laying blocks tightly pressed against each other or staggered, which are covered on top with a waterproofing film and then with the finishing floor covering.
Ceiling insulation with light adobe looks like this:
- The attic is covered with a vapor barrier film, onto which a solution of clay and straw 5 cm thick is applied.
- A dry straw layer 10-15 cm thick is laid on the dried base.
- A protective layer of clay mortar 2 cm thick is applied.
- The wooden flooring is installed along the joists.
Composition of clay insulation
Red clay is considered optimal for the preparation of insulating composition. Red clay is quite hygroscopic and plastic. You can also use white clay, which is slightly inferior in these characteristics.
The maximum insulation effect can be achieved if insulation is carried out with clay with the addition of sawdust or chopped straw.
It is better to choose sawdust from coniferous or oak wood. When preparing this component for the manufacture of insulation, the sawdust should be dried and soaked in an antiseptic. To protect against rodents, lime should be added to the solution.
Clay-straw insulation is also actively used, when instead of sawdust, chopped straw is introduced into the clay solution. Most often, the roof or ceiling is insulated with straw, but it is also possible to insulate the walls.
Preparing a mixture of these components is one of the main points in the process of insulating the walls of a frame house. The result of insulation will depend on the quality of the composition. If the proportions were violated during the preparation of the clay mass, the insulation will not perform its functions fully; most likely, after drying, it will crack and crumble.
We suggest you read: How to adjust a plastic window so that it does not blow
The process of applying the clay mixture is not that long. It will take more time for the clay layer to dry out, which at above-zero temperatures will take at least a month.
Clay insulation technology consists of only three stages:
- Preparation of insulating composition.
- Application of insulation.
- Drying and strengthening.
There are several ways to insulate a ceiling using clay.
The traditional method is when the ceiling is insulated with a solution of a mixture of clay and sand in a ratio of 6:2. Water is added in such an amount that the resulting mixture has a consistency similar to thick sour cream.
The algorithm for insulation with clay-sand paste is as follows:
- The ceiling of the room is covered with dry boards of the required thickness.
- The gaps between the boards are covered with clay and left to dry.
- The plank ceiling is covered with a vapor barrier membrane film. It's better to use a whole piece. If the vapor barrier is made of several pieces, the film is laid overlapping.
- The joints of the film are fixed with tape.
- Clay, sand and water are mixed in the specified proportions and the mass is brought to a homogeneous consistency.
- The boards and film are covered with a layer of mortar to a thickness of 5-8 cm. The poured surface is leveled with a wooden plank. A horizontal level is established along the top layer of fill.
- When the clay mass hardens, a layer of dry sand 10-15 cm high is poured on top of it.
- Logs and a finishing floor are mounted on top.
The insulation composition may consist of clay and sawdust (or chopped straw). This insulating mass should have a thicker consistency. Clay and sawdust are taken in a ratio of 2:3. Insulation clay and straw is also mixed in this ratio of elements.
The algorithm for insulation with this composition will look like this:
- Ceilings are covered with waterproofing material.
- Ten-centimeter wide slats are laid and fastened on top of the waterproofing in increments of 30-40 cm.
- We prepare the composition; for this, clay and wood (straw) filler are mixed in the specified proportion and brought to the desired consistency.
- Spread the solution into the spaces between the slats and let dry.
Do not be afraid that after drying, cracks or crevices will appear on the surface of the putty. This is a natural addition of material. These defects are eliminated using a thin layer of liquid clay, which can be covered on top with a layer of sawdust or earth 5-6 cm thick. After eliminating the cracks, installation of the finished floor can begin.
We suggest you read: Plastic bottles for the pool for the winter
In this case, we are talking about layer-by-layer laying out insulating layers of clay and sawdust alternately.
The layer-by-layer insulation algorithm is as follows:
- We install a vapor barrier.
- We make a mixture of clay and straw (sawdust) in a ratio of 2:3.
- Add water until the mixture becomes homogeneous and thick like sour cream.
- We spread the resulting mass on boards covered with a vapor barrier in a layer of 2-3 cm. Let it dry completely.
- If cracks appear after drying, fill them with liquid clay, as mentioned above.
- After complete drying, cover the clay insulation with a layer of dry granular substance. Sawdust, shavings, and straw can be used as a dry layer.
- The topmost layer is laid with dry soil 5 cm thick.
You can make a wooden flooring on top of the insulation. If you do not plan to use the attic space, then the layered insulation can be left uncovered.
Despite the fact that clay-based mixtures are most often used to insulate ceilings, this insulation can also be used to improve the energy-saving properties of the walls of a house.
An important point is that the insulation of walls with a clay mixture is carried out only from the outside. The use of this type of insulation indoors is not effective and does not last long. Under the influence of moist air, clay insulation gets wet, and with a temporary increase in temperature it dries out again. Thus, the clay coating applied to the inner surface of the walls very quickly loses strength, cracks and crumbles.
Protecting straw bale from damage
Using straw compressed into blocks as insulation makes it possible to obtain walls that are resistant to rot, fire, rodents and insects. But these conditions are met only with high-quality pressing of raw materials. For the bundles, dry rye is used, which contains a large amount of silica, so rodents do not eat it. Tightly compressed raw materials do not have access to air, therefore they are not flammable and do not allow mice and rats to gnaw through passages. For additional protection against rodents, metal mesh is installed at the bottom of the walls. Rotting of straw can begin when the humidity in the blocks increases to 20%.
Additionally, plaster will help protect the thatched walls. The traditional option is clay plaster, but for external wall coverings it is recommended to use cement-sand plaster, which is more resistant to moisture. Interior finishing can be done with lime plaster.
The process of production and subsequent operation of straw insulation
The production process of wooden panels with straw insulation consists of several stages. It starts with gluing together wooden panels. Only dried and polished boards are used - this is the only way to avoid subsequent deformation. Gluing is done using a vima (a special gluing press) of our own design. Next comes the assembly of the wooden frame for the panel. Thanks to the reinforced structure, each panel can serve as a load-bearing wall. The next step is to press the straw into the panel. This is done using a hydraulic press. At the final stage, the front sides of the panels are covered with a layer of pouring plaster.
Panels for the construction of a one-story house with an area of 28 square meters. meters fit into two or three gazelles. If there is a foundation, then a ready-to-move-in house can be erected in three to four days with just a crane and a hammer. If there is no foundation, the client is asked to contact a contractor. There are no unique or complex requirements for the foundation for such a house. If desired, such a house can be disassembled at any time, loaded into a car and reassembled in a new place.
Wall insulation
Today in the modern building materials market we have a wide selection of thermal insulation.
Each of the materials has certain features and individual properties, as well as certain requirements for installation technology. But since we are looking for a more environmentally friendly and at the same time effective way to insulate a wooden house, we will focus on an old, but not forgotten method and consider insulating a wooden house with straw. The popularity and relevance of insulating houses with clay is explained by the following advantages of this method of thermal insulation:
- The insulating clay mixture is easy to prepare and apply. To insulate a frame house with straw and clay, you do not need special construction skills; you can organize the entire process and bring it to its logical conclusion yourself. This insulation can be done with your own hands without any problems.
- Low cost clay insulation. The comparative cost of clay insulation is significantly lower compared to synthetic materials.
- High thermal insulation performance. This is a fairly reliable way to insulate rooms. Can be used to insulate floors, ceilings, roofs, etc.
- Prepared in accordance with the technology, this composition is not attractive to rodents and insects.
- The environmental friendliness of this insulation is beyond doubt. All residues are of natural origin, which means they are not toxic.
The disadvantages of this method of thermal insulation include certain labor costs and duration of work.
Throughout the evolution of our housing, the inevitable use of clay has always been visible.
Currently, there are also several options for its use for wall insulation. These include:
- the use of adobe, in the form of dried building blocks consisting of clay with filler;
- during frame construction, when a cavity is made in advance, subsequently filled with clay with a binding material;
- due to the application of clay with filler to the inner surface of the wall.
When using it in its natural state, it is imperative to use a binding element in the form of fine straw or sawdust, which helps maintain the integrity of the structure when completely dry.
Technology of wall insulation with straw
Insulation of a multilayer wall with straw involves the alternate installation of heat-insulating layers of clay, as well as straw sawdust. In order to ensure long-term operation of the insulation, you first need to prepare the walls.
Preparatory work before attaching straw
Before you begin the insulation process, you should definitely prepare the surface of the outer wall. At this stage we must carry out a thorough inspection to look for cracks, unevenness or deep seams. The surface is carefully cleaned of traces of old coating, finishing materials and dirt. Large recesses are filled with putty mortar manually. For puttying, you can use ordinary gypsum mixtures, which are inexpensive and do not shrink much. In stores you can find ready-made putties that do not have to be diluted with water and kneaded. But they are more expensive than dry ones and have a much shorter shelf life. Puttying is carried out either in 2 layers, or a painting mesh is used for this, on which the solution fits perfectly. If there are protruding parts or remains of dried plaster on the surface, they can be knocked off with a hammer and chisel. After this, the wall must dry well, otherwise moisture will destroy the insulated insulation. If there are areas of accumulation of moss and mold, then after removal they must be additionally treated with bioprotective preparations. Otherwise, the remaining substances will be able to grow through the insulation. Now you can proceed to priming the surface, which will ensure good adhesive properties. The primer composition is applied either with a roller or with a paint sprayer. To calculate the volume of the required substance, you can use the instructions provided by the manufacturer. Before you begin applying primer paint, be sure to protect all areas that should not be painted: doorways, windows, steps, blind areas and plinths. Regular plastic film is quite suitable for this. For thermal insulation we will need the following tools: a regular pencil, a ruler, a hammer, a plumb line, a jigsaw, a level, a screwdriver, containers for putty and paint, paint brushes and rollers, sandpaper of varying degrees of grain, a fine sieve, a collapsible ladder, dry rags, a chisel, spatulas, as a rule. The following materials and consumables must be prepared: sand, cement, briquetted straw, dry clay, siding panels for finishing, primer paint, putty, screws or nails, bioprotective and antiseptic solutions.
Instructions for installing straw on walls
The step-by-step algorithm will be expressed in the following actions:
- First, a vapor barrier is installed on the walls. The basis is a polyethylene film, which will protect our insulation from getting wet and condensation accumulating. Pieces of film are cut according to the size of each cell of the installed sheathing.
- A working mixture is mixed from clay and straw in a ratio of 2:3. To do this, it is convenient to use a metal trough, a boiler or a large basin. Water must be added until the consistency resembles sour cream.
- The finished mass is laid out on boards already covered with vapor barrier material. The layer is made 2-3 cm, after which it must dry completely.
- If we find cracks after complete drying, then they need to be sealed with the remains of liquid clay.
- When the clay insulation has completely hardened, it is covered with dry sawdust, straw, and shavings. A layer of 5 cm is sufficient.
- If dry compressed straw is laid, then this should not be done in a chaotic manner. Experienced installers calculate in a special way the optimal angle at which the fibers are located, which will reduce heat loss to a minimum value.
- It is advisable to build a wooden flooring on top of the insulation. A board made of any well-dried wood is suitable for it. It is pressed onto the mounted sheathing so as to completely cover the frame.
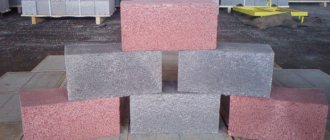
Light adobe
Walls made of lightweight material do not have high inertia, but have high energy-saving ability (at a density of 500 kg/m³ and below, the material can be used as a heat insulator).
Their thickness can be 25 cm, but it is possible to blow through (like shell rock) and, as a rule, the walls are made 30-40 cm thick. The denser the adobe is compacted, the warmer the structure. Due to the fact that the wall structure has a frame, the density of light adobe can be significantly reduced, achieving a high level of thermal insulation with a thin wall. Even with a wall thickness of 25 cm, the house does not require insulation.
However, in this case it is important to use durable plaster and avoid the formation of cracks in order to avoid through blowing.
Gaps can occur when the material is loosely laid and shrinks around the window frames, in places where the adobe comes into contact with the frame, or when the plaster cracks. However, they are easy to cover up and renew the plaster (an adobe house is easy to repair).
To insulate the floor in a house, expanded clay or light adobe is usually used.
Good afternoon I ask for help in repairing and insulating an old adobe house. The house was built in 1937. Adobe size 20x20x40. Over the years it has become so dense that it has become like stone. There was a need to disassemble part of the corner - we could barely do it, the adobe blocks were so firmly attached to each other. But the house is cold. The windows were replaced with modern ones, the slopes and window sills were sealed to perfection - there is no draft from them anywhere. The house is lined with rubbish bricks. The foundation is also adobe. The floor is cold. Heating is from a boiler - the rooms have radiators and PVC pipes. But even with a frost of 10 degrees, the walls are cold. How to insulate a house?
Olga, Salsk, Rostov region.
Hello, Olga from Salsk, Rostov region!
Unfortunately, I can’t be of any real help other than advice. You live too far from me for me to come to you with my workers and try to rectify the situation.
From existing practice I can say the following. There are buildings that, no matter how much they insulate, they still remain cold.
And in order to create a comfortable temperature in the room, it is necessary to have a constantly operating powerful heating system. Which is associated with high costs of fuel or other energy resources.
Let's first step back and think purely theoretically.
You have a fairly strong adobe house lined on the outside with bricks set on edge, which was done to make it more beautiful on the outside. Most likely there is no insulation between the adobe and brickwork. As a result, the walls form an array that accumulates the temperature regime that is dictated mainly by the external temperature background.
It is clear that heating the internal space slightly increases the temperature of the walls, but not sufficiently. In addition, the temperature inside the room is significantly influenced by the surfaces of the ceiling (indirectly both the attic and roof) and the floor.
Based on these tedious theoretical conclusions, it follows that in order for the temperature inside the house to be bearable for living even in the very cold season, it is necessary to insulate, or rather isolate the flow of cold on all these surfaces. Including windows and doors, which are conductors of cold.
You write that the windows are made to last and the cold does not pass through them. The doors facing the street should also have thermal curtains, or in short, adapter vestibules or similar curtains should be built.
Therefore, all that remains is to insulate the walls, floor and ceiling.
Most often, when covering adobe walls with bricks in problem houses, insulation is placed between the adobe and the brick. Since you have not done this, you should insulate according to one of two options. Or outside the house. Or inside the house. The second option is most likely suitable for your case. Because if you do insulation from the outside, you will be tormented by heating the heating system.
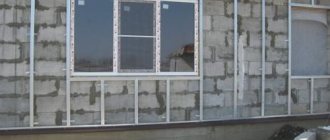
Ideally, insulation in such cases is done as follows. The walls are covered with clapboard, which is mounted on beacons (cranial block with a cross-section of 75/50 millimeters). Insulation 50 millimeters thick is laid between the beacons. Then an air gap of 25 millimeters is left between the insulation and the lining. The insulation is covered with a vapor barrier film on both sides. The distance between beacons is usually made 600 millimeters, a multiple of the size of most insulation.
That is, once again and in order, the whole technology of wall insulation.
A vapor barrier film is attached to the adobe walls. Beacons 75/50 are attached to the walls with self-tapping anchors and installed on the edge. Between the beacons, insulation is attached with “fungi” (screws with plates or special purchased ones). A second layer of film is mounted on the beacons. An air gap of 25 millimeters is obtained between it and the insulation. The clapboard is nailed down (instead, other materials such as plywood, various panels, slabs, etc. can be installed)
The insulation of the ceiling from the inside of the room is carried out using the same method as the insulation of walls. In addition, in the attic space the floor can also be insulated by laying insulation (from expanded clay to mineral slabs or rolls).
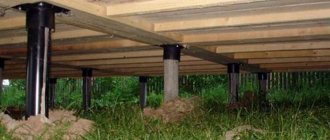
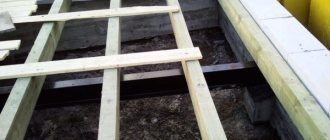
Floor insulation is a special matter. This insulation is sometimes more important than wall insulation, since there is not always a warm basement or underground under the house. If possible, then both the base and the ceiling above the basement are insulated approximately according to the same scheme as described above. If there is no trace of a basement or subfloor, then a radical alteration is not ruled out. When the entire old floor is exposed to a decent depth.
That is, floor boards and joists are dismantled, soil is removed to a certain depth. After which a new floor is installed in the form of a layer cake. The soil is leveled, waterproofing made of roofing felt or its analogues is laid. Approximately a 15 cm layer of expanded clay is poured. Then a reinforced concrete screed with a thickness of 5 centimeters or more is made. Floor joists are laid and antisepticized. Laying the floor.
It is clear that all this is quite a long process in terms of time and material costs. It is associated with many inconveniences in removing furniture or dragging it from place to place so as not to interfere with work. Possible dismantling of the heating system pipes and its batteries, since they need to be moved from the old walls by 75 millimeters plus the thickness of the wall material. The internal usable volume of the room will also decrease by double this size. It is also possible to reduce the height of the room by lowering the ceiling surface and raising the floor.
But ultimately, the thermal conditions inside the room increase and you will feel much better than before.
There are, of course, many other insulation options. But the one given is the most frequently used.
Other questions on the topic of adobe houses.
In order to protect from rain, houses made of wood or adobe (clay with chopped straw) are often sheathed with boards that rot rapidly. And plastering a wall containing organic matter is not only useless, but also harmful. The coating cracks, the wall stops “breathing” and fungus appears.
A more reliable solution is to use modern plastic lining (PV), plus proper wall ventilation. You can even lay insulation.
Here is a diagram of such a design (Fig. 1). Air penetrates through the ventilation hatch into the space between the sheathing and the wall (or insulation), rises up and exits near the roof. It is important that the ventilation gap is at least 1-2 cm.
We cover it on top with a fiberglass façade plaster mesh and nail it in with nails and plastic washers (cut from 4×4 cm containers). We place copper wire under the washers, tying the fabric.
We nail plaster shingles in the center. Caring for the wall is very simple: in the spring we open the hatches so that it dries out properly, and close it in the winter.
Attention!
You cannot use polystyrene foam, pressed glass wool slabs and mineral wool on aluminum foil for insulation - these are airtight coatings.
Insulating a frame house with straw
Frame houses can be insulated with pressed straw blocks and light adobe.
The blocks are placed between the frame posts and fixed in the center using vertical rods made of metal or wood. The material is inexpensive, practically does not shrink, and installation takes a matter of days.
Light adobe technology involves the construction of walls from a mixture of clay and straw and takes a lot of time. The principle is based on compacting straw soaked in liquid clay into a sliding formwork.
Preparatory work
Before insulating walls with clay with sawdust or other filler, it is necessary to prepare their surface, stock up on the necessary tools, materials and mix the insulating solution of the required consistency.
A properly prepared clay mixture has good adhesion to any wall material, but for reliability it is recommended to make their surface rough. After all, clay is not gypsum; it has quite a lot of weight. You can ensure adhesion to the masonry by shallowly cutting its seams; they will serve as a good relief for the sticky clay mixture. If the walls are made of lumber, shingles can be installed on them.
To make a clay mixture, its components must be properly prepared. The clay must be plastic, otherwise it will not make a good coating. When it dries, it may crack or simply not stay on the walls for long.
Testing the plasticity of clay is easy. To do this, you need to knead a small amount of it in water, and then roll it with your hands into a clay ball about 5 cm in diameter. Then you need to squeeze it. If at the same time an even miniature saucer is obtained from the flattened ball, it means that the plasticity of the clay is sufficient. Cracks and breaks at the edges of the sample indicate that it has particle sizes larger than what is needed to form a strong film when making the mixture.
After determining the quality of the clay, it must be filled with water and left for several days. The material can absorb liquid for quite a long time. This depends on its condition, especially if the clay was originally dried to a solid state. Soaking continues until it acquires the consistency of thick porridge.
Sawdust for preparing the clay mixture also needs to be prepared. They must be well dried and treated with special substances - fire retardant to protect against fire and lime to protect against pests. Lime must be mixed with sawdust and taken at the rate of 10% of the total mass of the insulating mixture.
To prepare a clay mixture from the prepared components, you need to have a concrete mixer, water, clay and sawdust, a convenient container for mixing, wooden boards, nails and a hammer, cardboard and glassine, a spatula and a construction stapler.
The clay mixture is used in wet and dry form. In the second case, slabs are produced from it, using special molds for casting them. The ratio of mixture components in each option is different.
If you plan to use the insulating mixture in a wet state, then you need to take 2/3 of the same bucket of sawdust per bucket of clay. The clay diluted to the desired state must be placed in a concrete mixer and sawdust should be added as the solution is mixed, thereby adjusting its density. The result of this procedure should be a homogeneous and easy-to-work clay mixture.
To make heat-insulating boards, clay and sawdust are taken 1:1. In this case, you should first prepare forms into which you need to pour the clay mixture. The forms are a lattice with a cell size of 500x500 mm or more. It is made from bars with a larger cross-sectional side of at least 150 mm. The finished grid must be laid on a sheet of plywood. This will allow you to conveniently pour the insulating mixture into its cells. In addition, plywood will help to form one smooth side surface of the slabs.
After pouring, the finished mixture of clay and filler should be leveled on top with a spatula and left to dry. Do not dry the panels in bright sunlight, as this may cause cracks to appear on them. To naturally dry the material, you can build a canopy over the forms or simply cover them with grass, creating sufficient shade for the storage area.
Recipe
If you are interested in clay with sawdust as insulation, the proportions here are simple. For three buckets of clay, take two buckets of wood shavings, mix it all and fill the space between the joists with the resulting mass.
You can easily not only walk on such insulation, but also dance, but you can’t call it too effective. Of course, the proportion of wood material can always be increased, but then the insulation will lose strength, which means that some kind of floor will have to be invented on top of it.
Clay with sawdust as insulation: insulating the ceiling
It is well known that clay is widely used as insulation, mainly for walls and ceilings. In order for the insulation to be of high quality, sawdust is added to the clay. This composition can, for example, be used to insulate a veranda made of boards, etc.
Insulation for walls and ceilings made of clay and sawdust is very easy to manufacture, has good heat resistance, light weight, fire-fighting properties and an affordable price.
Let's take a closer look at the simple process of insulation using clay and sawdust using the example of a ceiling.
To insulate the ceiling, you should first purchase clay and sawdust. Purchasing sawdust is not difficult, since it can be obtained free of charge through pick-up at woodworking enterprises. Even if you have to buy sawdust, their cost will be negligible in comparison with other insulating materials. Clay will cost a little more, but since very little of it is needed, you can dig it yourself.
Surface preparation
First you need to prepare the ceiling. Since the mixture will turn out to be liquid, you need to lay something waterproof on the ceiling boards. It is best to take the film and attach it to the tree with a regular construction stapler. You can put cardboard under the film, which will provide additional thermal insulation, but will also increase the fire hazard of the ceiling.
Mixing proportions
To mix a solution of clay and sawdust, you need to fill the barrel with water and pour four to five buckets of clay into it. It should be well soaked. Stir the clay in the barrel until it dissolves as much as possible. Pour two or three buckets of the resulting mixture into a concrete mixer and add sawdust. Clay water should be added as the mass is mixed. The consistency of the mass should be neither liquid nor thick.
Application of the solution
The resulting solution is applied to the ceiling in an even layer of five to ten centimeters, depending on the required thermal insulation, and smoothed. While smoothing, you can lightly tamp the mixture. After a few days, the material should dry out, and if there are small cracks, then you just need to rub them with raw clay, although you don’t have to do this, since the cracks will be insignificant.
It should also be noted that clay with sawdust as insulation is not the only way to use it in construction. It is used in the production of expanded clay, and it is also a good insulation material. In general, clay is a universal building material and this article is another confirmation of this.
Don’t your windows need insulation?...Read
An important component is bedding
Let's start with the fact that when ordering manure (and most often we negotiate with private traders who bring it to us from nowhere), immediately clarify what kind of manure is available - with or without litter? Bedding is straw or hay with manure mixed with it, and in this form it is preferable. When brought without bedding, pieces of clay, stones, wood chips and all sorts of rusty metal objects often end up with it. In addition, manure cannot be used in its pure form, but mixed with straw, sawdust or hay, it burns out and composts much better.
Some useful tips from experts
Even though some insulation materials may not seem so cheap, experts recommend not saving on purchasing high-quality and environmentally friendly material, because only in this way can the goal of a comfortable atmosphere and temperature in the house, and the health of all household members, be achieved. Properly selected materials for roof insulation will help extend the service life of all structural elements of the house.
Even the highest quality insulation may not be effective if it is installed poorly. Therefore, it is best to trust people with relevant experience to carry out roof insulation work. In addition, installation work may differ slightly depending on the material from which the house is made; for example, the insulation of the roof of a frame house and a wooden or brick one may have some differences.
When choosing insulation with the optimal ratio of cost and quality, remember that you and the people closest to you will live in the house where it will be used.
Insulation technology
Let's look at the main stages of insulation work with clay and sawdust or other fillers for walls and ceilings.
Everything must be done to ensure that the clay mass is well located on the surface and demonstrates its effectiveness. In most cases, wood bases are insulated with a clay mixture.
A waterproofing material is laid on the surface to protect the ceiling from penetrating water. If the ceiling surface is flat, it is recommended to install small joists. A certain step between them will allow the prepared mass to be laid more correctly.
Clay with sawdust
The process is quite responsible, because violations of proportions can result in serious problems:
- We prepare a metal barrel in which to carry out the batch. We put the required amount of clay into it (maximum - five buckets);
- pour in a little water, leave the clay to soak;
- perform periodic stirring until the material acquires the consistency of sour cream;
- transfer half of the mixture into a concrete mixer, add sawdust based on each bucket of clay - about 2/3 of a bucket of sawdust. The proportional ratio can be changed slightly, but the mixture should be dense.
Stages of insulation
The work is performed in the following sequence:
- Glassine is spread on the surface and secured with a stapler. If the base is concrete, you can use construction tape;
- We fill all empty areas with the prepared mass. It is best to arrange a layer up to thirty centimeters thick. Just remember that clay is a very heavy material, and the ceilings must have sufficient strength. It should be noted that too thin a layer will not bring much results;
- It will take at least two weeks for the clay to dry completely. Then you can carry out the remaining construction work.
As you can see, you can insulate your home well with clay. Natural material is environmentally safe; it can be mined independently, saving money.
Characteristics
You can find a lot of non-standard solutions for using straw raw materials.
Modern straw building materials have the following characteristics:
- Most often this is a compressed rectangular block measuring 500x400x1000 mm;
- The weight of a dry block is 15 - 20 kg, an increase to 25 kg is permissible. Further weighting indicates excess moisture, which will negatively affect the quality of the product;
- The density of the compressed raw materials is about 120 kg/m³;
- Raw materials are treated with fire retardants, which reduce the flammability of the material, and antiseptics, which prevent rotting. Antibiotics kill microflora and fungal spores;
- Compressed and plastered straw burns worse than wood. It's really hard to light it, it just chars and sometimes smolders;
- The energy consumption of a house made of straw blocks or panels does not exceed 37 - 40 kWh/m² per year;
- The main problem with straw is rodents. To combat them, it is treated with slaked lime, and quicklime is added to the plaster solution;
- Another problem is rot and mold. To combat these enemies, antiseptics and antibiotics are used, as well as increased block density, which does not allow moisture to accumulate;
- The fragility of thatched buildings is a myth;
- Double-glazed windows are often used in combination with straw, and plastic windows are insulated using standard methods (Find out in more detail how to insulate plastic windows for the winter).
Such masterpieces are built from straw bales.
Adobe as insulation
Another interesting option for using clay is adobe. Previously, it served as the main structural material for the construction of walls, but today it is used only as insulation.
Here the filler is no longer sawdust, but straw. Again, an environmentally friendly product with excellent thermal insulation properties and, again, the purchase of which will not ruin your budget.
To acquire adobe, you only need to have a wooden mold and the desire to work. Kneading (clay and straw are kneaded with feet) is usually done right next to the clay quarry, where the resulting mass is filled into molds, and the blocks dry there.
The whole process is quite labor-intensive, but if this point doesn’t bother you, you can get a material with a thermal conductivity of 0.1 W/m°C, and this is already a pretty good indicator.
Insulation of the ceiling and roof with straw and clay
Insulating the ceiling and roof with straw will also not cause any difficulties. The floor of the attic is covered with glassine or coated with clay with a layer of up to 5 cm. Straw is poured on top with a layer of 20 - 50 cm. Then it is coated with clay again to prevent the straw from burning.
Bathroom ceiling insulation
It is known that warm air can move upward. Consequently, without insulating the ceiling it will not be possible to retain heat inside the room. Let's look in more detail at what layer of clay is needed to insulate the ceiling of a living space.
We suggest you familiarize yourself with: Insulation of wooden floors using joists
Ceiling insulation occurs as follows:
- after the walls are built, beams of great strength are placed on them;
- a sublattice is placed on the underside of these beams;
- Next, the clay is diluted with water and thoroughly mixed with fine straw, the finished solution is placed on the grate;
- in the middle of the layer of clay with filler, a plaster mesh is placed to protect this layer from cracks.
Thus, it completely covers the ceiling of the future room. A layer 20-30 cm thick is recommended. After 100% drying, this structure will take on a solid appearance, and the filler and reinforcement will maintain the integrity of the layer.
You will need to pre-install supports, which will be removed after the structure has completely dried.
When building a bathhouse, the same principle is used. It should be taken into account that the bathhouse contains a large amount of evaporating moisture, which can soften the clay ceiling.
When insulating a bathhouse ceiling with clay, you must perform the following steps:
- it is important to take care of the integrity of the future clay structure in advance; for this, a vapor barrier material is placed under it;
- a high-quality hood is installed that can remove excess evaporation outside;
- Humidity must be controlled by using forced exhaust after using the bath.
Clay is widely used for insulating bathhouse ceilings. After using it, you must thoroughly dry the interior.