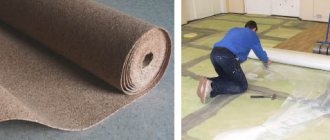
Taking plywood as a base is an excellent solution; this will make it possible to quickly and efficiently level the floor. And installation will not take much time. As with any technology, there are some features that we will look at.
Preparatory work
As you know, laminate and parquet, even of very good quality, must be laid on a perfectly flat and durable surface.
The base can be leveled with concrete screed or plywood. If the first method is quite problematic, requiring special skills and abilities, then leveling the floor with plywood is accessible even to beginners in the construction business and is relatively inexpensive. Otherwise, if this work is not carried out, the service life of the coating is significantly reduced, and it can quickly lose its aesthetic appearance and lose its external qualities. In addition, if you lay the coating on an uneven surface, it can make unpleasant and irritating sounds in the form of squeaks and crackles, which are unlikely to give anyone pleasure.
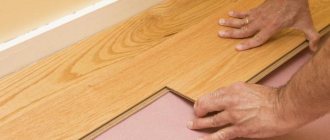
Laying plywood on the floor can be divided into several types. This directly depends on the method you decide to use. For example, you can lay plywood sheets directly on a wooden floor by screwing them into place. However, for this technique, plywood no thinner than 10 mm should be used as a material, and the wooden base itself must be of high quality and durable.
You can also lay a plywood floor on joists, which will be of higher quality, but will require more labor effort from the craftsman. But after this technique, you can lay one or another type of coating on your floor without any fears: it will be flawless. The materials used for coating after leveling are very diverse. Here everyone has their own tastes and preferences.
Even a perfectly laid wooden floor can become deformed over time and lose its original properties and appearance. And if you decide to make repairs and lay a modern coating, you will have to face the problem of leveling the base. Everyone knows that any modern coating is very demanding on the base on which it will be applied.
If you have little experience in construction work, and also if you have little money, then the ideal option for you in this case would be to level the wooden floor with plywood.
The next pressing issue will be the choice of material. It depends on what kind of coating you plan to use. For soft ones, not very thick plywood is quite suitable, but it may not give the effect of complete leveling.
If you are going to lay laminate or parquet, then you should choose denser and thicker sheets that can reliably hold your covering, preventing it from sagging and deforming.
To perform work on leveling a wooden floor, plywood of the following classification can be used:
- first grade, which is considered to be the highest quality, with almost no visible external defects;
- second grade, which may have minor external defects, manifested in glue or sawdust oozing out, as well as minor dents, etc.;
- third grade, which may contain both fallen knots and wormholes;
- fourth grade, which has many different defects and is the lowest class of all those listed above.
In any case, even if first-class material is used, it is recommended to treat it with an antiseptic immediately before installation. Further, everything again depends on the chosen coating. For example, under linoleum you will need to apply several more layers of varnish, and for laminate you first need to sand the surface and then apply a protective varnish to it.
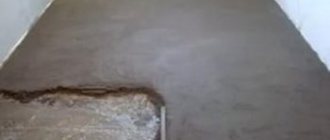
Using plywood you can level not only a wooden floor, but also a concrete one. To begin with, you should understand such an issue as the degree of wear and the presence of cracks in concrete. If there is any damage or cracks, they must be repaired immediately.
Leveling a concrete floor with plywood is not only an inexpensive, but also a fairly simple method. It is available for use by almost everyone. Work is carried out with or without the use of logs.
Leveling a concrete floor without the use of joists can only be used when there are no significant defects or damage, and there are no differences exceeding 1.5 cm. In this case, it is enough to glue the plywood with a special compound to the concrete surface, and then secure it with dowel nails.
If the condition of your foundation leaves much to be desired, then you should resort to leveling using lags. They are sold in building materials stores. During the purchasing process, you should pay attention to the fact that high-quality logs are made from coniferous wood, which must be dried well. When laying, you should maintain a distance of 40-50 cm.
Instructions for leveling the base using plywood are as follows.
- First of all, we determine the level to which we want to take our floors. To do this, we will need to install beacons over the entire surface to be leveled, which can be self-tapping screws. They need to be screwed directly into the floor at the same level.
- Then you can start installing the logs, on which we will lay our plywood sheets. If the joist does not have sufficient strength in any place, you can always place pieces of plywood under it. But under no circumstances should the possibility of sagging be allowed. You can also make logs yourself by using pieces of plywood, the width of which does not exceed 5 cm.
- When the glue has dried, you can begin directly laying our plywood sheets. To make it easier to work with the material, you can cut the sheets into smaller pieces. At the same time, you should pay attention to the absence of delaminations inside. If this is discovered, it is considered a defective material, and it is not recommended to use it in the future.
- After all this, we inspect the laid sheets and if we find any bumps on them, we clean them with sandpaper. Then we carefully remove all debris and clean the surface.
- The next step is laying the prepared sheets on the logs and combining them with each other. Here you need to control the moment so that the joints are smooth and do not form protrusions. If you are planning to lay any utility lines, now is the time to cut out recesses for them.
- Finally, we start attaching our plywood sheets to the joists. For this purpose, self-tapping screws with a countersunk head are used. In the future, to avoid their protrusion, the screw-in points are countersunk.
During the production of these works, there may be a need to check the degree of dryness of the concrete. This is easy to do using a simple and accessible method.
We place a piece of polyethylene on the concrete surface for several days and press its edges.
If it remains dry, then you can continue to work with the concrete, but if condensation is found on the inner surface, the concrete is still too wet and it is too early to carry out further operations with it.
Plywood, like wood, is susceptible to mold and mildew. To avoid such troubles, which can cause further damage not only to the sheets, but also to the coating, be sure to treat it with an antiseptic before laying it.
Leveling a plank floor with plywood does not have to be done using expensive material; class IV is quite suitable.
Moreover, this type of material is initially treated with compounds that prevent the penetration of moisture; it is completely safe and inexpensive.
For final coatings, it is better to take higher-class material with higher characteristics and much less waste.
To ensure good sound insulation of floors, you should put, for example, mineral wool or sound-proofing material in the void formed in the space between the joists. After this, you will be able to enjoy not only the warmth of the floors, but also complete silence and comfort in the room.
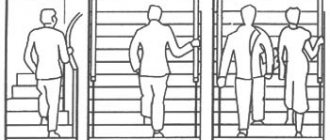
If plywood is laid on joists in rooms such as an entrance hall or corridor, they should be placed in such a direction that people in this room move across. This nuance helps ensure that the floor is durable and reliable, and will last a long time and well.
Carrying out work on leveling the floor with plywood on your own is quite difficult, especially if you are new to this business and do not have the relevant experience and a certain amount of knowledge.
This may be due primarily to the fact that the materials can be very bulky and inconvenient, so you should enlist the help of one of your family members or acquaintances in advance, who will be nearby and will be able to quickly play the role of an auxiliary worker at the right time.
We invite you to familiarize yourself with: Concrete blocks for foundations: types, classification, sizes
Otherwise, there is a risk of spending many times more effort and time, and the result may not only not bring the expected joy, but also bring disappointment.
Only then, upon completion of the work, you will receive not only moral satisfaction, but also tremendous experience, praise from your family and that long-awaited comfort in your home.
All photos from the article
https://www.youtube.com/watch?v=
To figure out how to attach plywood to a concrete floor, first of all, you need to know for what purpose this is being done - whether you will insulate or level the floor, or maybe you just need a wooden base. By and large, there are two ways to lay such sheets - rigid and “floating”.
Hard is divided into two more subtypes - gluing and screwing. It will also not be superfluous for you to learn about the geometric parameters of such panels so that you can select their optimal thickness and area. About all this below, where else you will find a video in this article.
“Dry” fastening of plywood to a concrete floor (using screws and dowels)
Note. Plywood is a structural sheet material glued together from veneer, where the number of layers is at least three and they are all located perpendicular to each other.
Relation of variety to surface
Assortment:
- The instructions from GOST 3916.1-96 classify such products according to the presence of wood defects and defects on the surface of the sheet;
- in total there are grades I, II, III and IV, but there is also category E, which is beyond competition - this is the highest or elite quality;
- if each of the categories allows or does not allow a certain (limited or unlimited) number of vices and defects, then grade E does not allow them at all, in any quantity.
Try to get as few pieces of plywood as possible.
- Leveling materials
- Some characteristics
- Glue selection
- Recommendations for work
- Preparing the base
- Fixing plywood
- Floor repair
Floor preparation
Sanding plywood
Plywood thickness
If you decide to level the floor with plywood under the laminate, then first of all, you must decide on the thickness of the material. The minimum thickness of plywood laid under a laminate is 1 cm, however, plywood of this thickness can only be laid on a concrete screed (more details: “What is the optimal thickness of plywood under a laminate”).
Laying plywood on joists under laminate flooring requires thicker material. For such installation, 1.6 cm of plywood thickness is enough, but it is better to use two sheets 1 cm thick, placed on top of each other, which will save your effort, because you won’t have to carry heavy sheets of material, and will also improve the final result of the work (more details: “Which there should be a thickness of plywood for the floor along the joists ").
The solutions given are not completely suitable for all types of floors, because they are different in each apartment. The final thickness is measured by the user, who must rely on the size of the room, the distance between the joists and the total load on the floor.
Selection and preparation of plywood
Plywood for linoleum must be chosen responsibly so as not to get negative surprises in the future. The thickness of the plywood must be at least 20 mm. It is desirable that the plywood be moisture resistant and treated with antifungal antiseptics. If you purchased untreated material, be sure to saturate the sheets yourself with drying oil or moisture-resistant stain.
Related article: Kitchen design 9 sq. m with access to the balcony
Scheme of fastening a sheet of plywood.
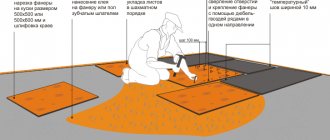
For ease of installation, plywood sheets are cut into squares based on the size of your room. This can be done using a special jigsaw or buying ready-made squares. Then the squares must be placed on the floor without fastening in order to adjust them to size and number them. Before this, we get rid of old baseboards and debris on the floor. The plywood is placed in a shear position, using the principle of laying a brick wall, to increase the strength of the covering. It is imperative to leave technical gaps under the walls up to 2 cm and between squares up to 0.5 cm, so that during expansion there is no friction between the sheets of plywood.
Plywood grades
To make a high-quality leveling of the floor with plywood for laminate, you need to choose the right brand of plywood. Each brand has distinctive properties, for example, moisture resistance, toxicity, elasticity, strength, etc. The properties that you should pay attention to when choosing plywood for laying under laminate are moisture resistance, toxicity and strength.
- FSF brand plywood has the highest moisture resistance, but is completely unsuitable for leveling floors in an apartment. The whole problem with this brand of plywood is the adhesives used to glue the veneer together during its production. The glue is made on the basis of formaldehyde and has high toxicity, which is undesirable in residential areas. FSF plywood is used to construct formwork during the construction of foundations, roofs and wall cladding in garages and other non-residential buildings.
- BS grade plywood is a high-quality material that no alternative can compare with. Plywood is flexible and elastic, has very high strength indicators, and is also resistant to various external influences, for example, moisture and wind, and perfectly retains its size and shape. Despite all its qualities, it is not used for construction purposes, because the price of such material is very high. Plywood is used only for the construction of water and air transport.
- BV brand plywood has good strength indicators, but the veneer that makes it up is glued together with water-soluble glue, which negatively affects its moisture resistance, which is completely absent. Even with a small amount of water, plywood begins to disintegrate, so the question of whether laminate can be laid on BV brand plywood immediately disappears.
- FBA grade plywood is made from veneer glued with an albumin-casein composition. Plywood is absolutely harmless to health, has good moisture resistance and strength.
- FK plywood is used for the manufacture of furniture, architectural structures and other structures that exclude prolonged contact with water, because plywood has a low moisture resistance due to the use of urea glue. The main advantage of this plywood is its naturalness.
Having considered all the options for plywood brands, you can choose the option with which laying plywood on the floor under the laminate will last a long time. The best option is FBA plywood, which is often used in the construction of any floors. You can also use FK brand material, but it should only be laid in rooms with a complete absence of water, for example, in a nursery or bedroom.
Pros of using plywood as a subfloor
The structure of household linoleum
Linoleum is a soft covering; over time it takes on the shape of the base, so if you do not use a continuous solid flooring underneath it, the finished floor may become uneven with significant differences.
Laying plywood on a wooden floor in this case has the following advantages over other leveling methods:
- creation of a continuous flooring that will not acquire relief over time; no need to dismantle the old covering; reduction in the cost and labor intensity of work (follows from the previous one); availability of material; the possibility of using moisture-resistant types of plywood, which allows you to additionally protect the wooden floor in rooms such as the bathroom, bathroom and kitchen; minimum number of seams between elements, which are the weak point of any design.
How to lay plywood on a concrete screed
the system chose this answer as the best
add to favorites link thank
Laminate flooring can be laid on almost any hard, flat surface.
In your case, the screed must be completely dry.
You are writing about a new house, at least a month must pass after the screed was made, you also need to take into account the thickness of the screed, in some cases even a month is not enough.
Especially if the house is not heated and it’s not summer outside.
It is not necessary to lay plywood.
Everything here is at your discretion, it won’t get worse, but if there is a need to save money, then laying laminate flooring on a screed is quite common.
A special backing is placed under the laminate and secured with construction tape.
If the laminate is laid on a “bare” screed, then a polyethylene film should be laid under the substrate with an overlap on the walls.
Now look at what kind of substrate you have, there is a substrate with vapor insulation, in this case, no film is needed.
Be sure to check the floors for integrity and evenness.
The screed must be free of cracks, differences no more than 2 mm per meter.
If there are cracks and they can be repaired, then self-leveling mixtures can be used.
If there are problems with the screed, then you will have to make a new one, or lay down plywood.
Working with plywood is not difficult; you cannot attach whole sheets of plywood; usually the sheet is cut into 4 parts.
The thickness of plywood for laminate is at least 6 mm, it all depends on the load.
The best option is 12 -15 mm; it is better to take moisture-resistant plywood.
As you can see, this is both right and wrong, the choice is yours.
Laminate, in its properties, is a completely independent material and does not require any additional base (the main thing is that the floor is level). So, if funds do not allow, then you don’t have to lay plywood down, but limit yourself to a special backing. But a problem arises: the floor made of only laminate is still a bit cold.
I have thick chipboard plywood laid, and I honestly admit to you, I’m just happy that the builders themselves thought of it, and also put thick chipboard sheets on the screed. As a result, together with the underlay, the floor turned out to be very warm and durable. It’s a pleasure to walk on it, but I only regret one thing: at the time when all this happened, inexpensive options for heated floors were not yet available for free sale. And then the happiness would truly be extraterrestrial.
Laminate can also be laid on concrete, but often it requires additional finishing, at least leveling or laying a thermal insulator. Of the entire range of building materials, plywood is best suited for these purposes.
- Affordable price compared to analogues. This is a prime example of value for money.
- Application does not require preparation and is accessible to anyone. To install it yourself, you do not need professional tools, and the installation process takes minimal time.
- Despite the mixtures used for production, plywood is considered one of the most environmentally friendly materials.
- It retains heat well, is easy to process and, if used correctly, can last for years.
We invite you to familiarize yourself with: U-shaped bracket for joists – Fasteners for floor joists
When starting work, it is important to make the right choice. Four grades of plywood are produced:
- First. The best. Almost free of flaws. Has an excellent appearance.
- Second. The quality is almost as good as first grade, but the price is more affordable. Has knots. Best suited for preparing and insulating the floor before laying laminate flooring.
- Third. For indoor use only, not for flooring.
- Fourth. Often called rough, the lowest quality grade for auxiliary work.
Four grades of plywood
Also, when choosing, you need to pay attention to moisture resistance. For work inside residential premises, slabs marked FC or FSB are used. In industry, the FOF brand is used.
Important! Incorrectly selected material can lead to damage to the finish over time.
The process of laying plywood on a concrete floor under laminate flooring involves several basic steps that must be followed.
Important! If the height differences on the future floor exceed more than 3 mm, then it is advisable to install the slabs with a cement screed or use quick-fill mixtures.
Leveling a concrete floor
Work on laying sheets begins with preparatory work. For convenience, standard sheets (size 1250 by 1250 mm) are recommended to be cut into four parts measuring 60 by 60 mm.
For cutting, you can use a hand saw or jigsaw. Working with a jigsaw greatly simplifies the process. In addition, the edges of the plywood are neat and even, which is very difficult to achieve when working with a hand saw.
Important! It is advisable to thoroughly clean the edges after cutting.
Afterwards, the sheets begin to be adjusted for the selected room. The sheets are laid in a checkerboard pattern to avoid the formation of one seam line. If there are protrusions or niches, the plywood is cut to size.
Important! The thickness of the seam should be about 10 mm, at the wall about 20 mm.
After laying out the sheets, they should be numbered, and then draw up a plan on which to reflect all the prepared elements. This will simplify further work. The fitted sheets are temporarily removed.
An example of cutting plywood before laying
Before laying plywood, be sure to check the moisture level of the floor. To do this, you can use a proven method. A small piece of film is placed on the surface and fixed at the edges. If after a few days no condensation has formed in the center, the floor can be considered suitable. Otherwise, the surface must dry out for a few more days.
Debris, dust and dirt are removed from the dry surface. The best way to do this is to use a vacuum cleaner.
Padding
Applying a primer solution is mandatory and has several advantages:
- The surface is best cleaned from dirt and dust.
- An additional layer is formed on the floor, which makes the surface stronger.
- The binding properties of the floor and coating are increased.
- Prevents the appearance of moisture residues.
- Reduced glue consumption.
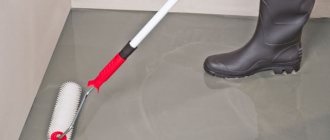
The primer mixture is made from plywood glue, which is diluted with a solvent. Application is carried out with a wide brush or roller.
Important! It is recommended to prime the surface before laying the plywood to prevent re-entry of dirt.
Primer of concrete floor before laying plywood
Fastening plywood to a concrete floor is done in the following order:
- The adhesive is applied with a notched trowel in an even layer over the floor surface over an area slightly larger than the size of the slab.
- For precise installation, a plan for the location of the slabs is used.
- To prevent the accumulation of residual air, a roller with a large weight must be passed over the surface of the sheets.
- Self-tapping screws or dowels are used to finally secure the plywood sheet. Their length should be several times longer than the thickness of the plywood.
Important! Fastening is carried out 20 mm from the edge in increments of 150-200 mm. The head of the screw must be recessed into the surface of the sheet.
Attaching plywood sheets to the floor
Finishing
The final stage is cleaning the floor surface. For this, it is best to use household grinding machines, for example, vibrating ones. Manual processing will be less productive and longer.
During the grinding process, in addition to obtaining a smooth surface, in some places it is possible to eliminate possible height differences.
The finished floor can be checked using a rule or level. The permissible gap is 2 mm.
This is where you can save your money. Quality and grade do not play any role. You can choose plywood with chips on the edges and rotten knots, because all these flaws have almost no effect on the strength of the plywood, and it will still withstand the intended loads.
Before you begin laying the plywood on the screed, you need to prepare the concrete floor. First of all, check the quality of the floor - the difference in height of the screed over its entire area should not exceed 2 mm. Tap the concrete surface: if you hear a dull sound, then this indicates internal voids - a defect that the builders made.
- Remove the top layer of screed over the void.
- Clear the recess of debris and vacuum.
- Prime the surface, however, if you don't have a floor primer, you can skip this step.
- Mix a solution containing cement and sand in a ratio of 1:3.
- Fill the hole.
After this, you need to make sure that the concrete is dry. There are two ways to do this:
- Professional. This method assumes that you have a special device in your inventory - a moisture meter, which determines the moisture content of concrete, wood, etc. in a few seconds with high accuracy. If you do not have a moisture meter, then you should not buy one, because the price for them is quite high. It’s easier to rent this device, or use the second method.
- Amateur. For this concrete moisture test, you will need a piece of ordinary plastic film. Lay it on the floor and press it firmly with some objects. The film left overnight will quickly cool down, and the concrete, if it is wet, will begin to evaporate moisture, which will condense on the surface of the polyethylene. If in the morning there are no traces of moisture on the polyethylene, then you can safely proceed with installation
If the screed is in order and the concrete is dry, then we proceed to the preparatory work:
- Scrape any exposed cement from the floor and vacuum. It is recommended to scrape them off with a spatula.
- Prime the surface. Don’t skimp on the primer, because a high-quality primer only needs to be applied once, which will save time. If you bought a cheap primer, then apply a second coat after the first has dried, as in the photo.
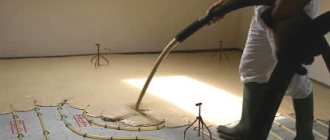
Installation of plywood on a concrete floor is done using glue and dowels, which is what professionals recommend, but some use only dowels.
Fastening plywood to concrete using glue and dowels:
- To attach the plywood, you will need a partner, because this work certainly cannot be done alone. Apply glue to the floor surface and remove excess with a comb.
- After the glue has cooled to a consistency similar to a putty solution, place a sheet of plywood on top.
- Using a pobedit-tipped drill bit, drill holes through the plywood into the concrete at a distance of 30-40 cm.
- Insert the dowels to a depth of 3-4 cm. If the screed is made of high quality from reliable materials, then you can save money at this stage, but if you are fixing plywood on a low-quality screed, then you should use more expensive dowels with spacers. Carefully recess the heads of the dowel nails so that they do not stick out. Fasten the corners first, and then the entire surface of the slab.
- The next slab should be laid leaving a small gap. To do this, you can use thin (2-3 mm) cardboard. Level the bottom edges of the slabs with a level, straight edge or straight stick so that later when laying the remaining slabs there will be no problems.
- Sew up the cracks in the walls, leaving a gap.
Floor preparation
Layout option for sheet plywood
Stages of plywood production
Some characteristics
Plywood laying diagram.
In modern construction, plywood is used not only for leveling floors, but also in general for all elements of premises - walls, ceilings, partitions.
Experts say that in order for such a material to easily cope with any loads, its average thickness should be from 9 to 12 mm. In addition, the following indicators in the product are also needed:
- moisture tolerance;
- long service life, during which no damage will appear on the plywood;
- high level of insulating properties (sound conductivity, heat conservation, etc.);
- strength and reliability of the completed structure.
We suggest you familiarize yourself with: Do-it-yourself ventilation in the bathhouse
If you choose the right brand of plywood with the appropriate characteristics, you can be sure that the product will be reliable and functional.
Glue selection
Two-component plywood adhesive
When laying plywood on a concrete floor, it is necessary to choose the right adhesive. Special compounds, as well as two-component glue, are suitable for this work.
It is advisable to purchase a water-based adhesive composition, which compares favorably with other types by being odorless, but takes a long time to dry. Therefore, it should be combined with special dowel nails. Solvent-based glue will dry faster, but in this case the plywood will have to be additionally fixed.
The fastest drying option for laying plywood on concrete is a two-part adhesive. It securely fixes the material and dries completely after 24 hours. This is especially convenient when various communications are installed inside the concrete floor. Moreover, in this case, you can begin installation work even while the screed is still wet, if the glue is supplemented with an epoxy primer.
At this stage you have little choice, but remember that if you have done your prep work well, any glue will hold the plywood.
Types of glue for plywood:
- Water based glue. This glue is environmentally friendly and odorless, but it is only suitable for plywood with good moisture resistance, for example, it can be used to secure FBA plywood. The disadvantages of water-based glue are that it takes a long time to dry, and you will have to additionally attach the plywood to dowels.
- Single-component solvent-based adhesive. This glue has many disadvantages: smell, flammability, it needs to be secured with dowels, the glue takes 3-5 days to dry. Despite all the disadvantages, glue is used to secure plywood, which has low moisture resistance.
- Two-component adhesive. This glue has a high level of toxicity, so personal protective equipment must be used. Bonding occurs due to a chemical reaction between the components. The glue is superior to its analogues in strength and drying speed.
When visiting a hardware store and purchasing plywood sheets, the birch option will be considered optimal. It is perfect for 2nd grade laminate. With average moisture resistance, plywood for a concrete floor is marked FN, which indicates its intended use for individual construction.
When it comes to plywood sanded on one side, it is designated as Ш1. Also, when choosing, you look at its safety from an environmental point of view, its emission class. Typically, in the latter case, E1 will be acceptable, when there is no more than 10 grams of formaldehyde per 100 grams of material. The sheet thickness should not be less than 12 mm.
Plywood varieties
Residential premises require the purchase of FK and FSF plywood. It is best to choose the first option, since, despite the lower moisture resistance, such sheets have increased environmental friendliness and lower cost compared to the FSF class.
Laying plywood on glue is done with a notched trowel.
- If there are small children or people who suffer from allergies in the house, then it is best to choose water-based glue. This type is odorless and easily diluted with water. It can also be used as a primer. But when using such glue, plywood boards require dowel nails. However, this glue takes a long time to dry.
- There are solvent-based adhesives. But when choosing this type, you should remember that the cement screed requires auxiliary opening with a soil solution. The drying time for this glue is only three to five days. In this case, dowel-nails are also required. The glue has a rather pungent and unpleasant odor.
- The “fastest” glue is a two-component one; it takes a day to dry. The biggest advantage of this glue is that it does not require “assistants” in fastening. This advantage can be appreciated if plumbing or electrical systems are embedded in the concrete foundation. When time is running out, two-component adhesive using a special epoxy primer makes it possible to work with damp screed.
Fixing plywood
Scheme for laying plywood under parquet.
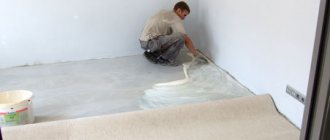
- Using a notched trowel, apply a layer of adhesive (2 mm) onto the screed.
- Next, numbered sheets of plywood are laid. To prevent air bubbles from forming underneath, they are “smoothed” using a roller.
- To fix the squares, self-tapping screws with plastic dowels are used, the length of which is 3 times the thickness of the slab. The distance between the fasteners along the entire perimeter is 15-20 cm. Pre-drilled holes should have such a diameter as to hide the screw head.
In order for the surface of the plywood to have an even appearance, it must be sanded when finished.
For this purpose, you can take a sanding machine with sandpaper designed specifically for parquet flooring. This treatment removes burrs, the smallest differences between squares.
Once the plywood has been installed, the concrete floor is ready to work with any floor covering you choose. The evenness of the resulting plywood covering can be checked using a building level or a two-meter strip. The rake will show how large the gaps are, and if they do not exceed 2 mm, then the plywood was laid on the concrete screed with high quality.
The same question often arises before leveling the base for laminate flooring, related to how to attach plywood to a concrete floor. Laying sheets should be done exclusively on a dry and clean surface. In addition, it is necessary to increase the level of waterproofing. Here you can choose a special substrate, which you can purchase in a store, or use a regular polyethylene film of appropriate thickness. The film should be laid overlapping, connecting the seams with tape.
It is rational to lay large sheets of plywood directly at the entrance to the room due to the presence of a greater load. Next, the already measured and prepared sheets are distributed. Only now can you think about how to lay plywood on a concrete floor.
The work will not be possible without a hammer drill, with which sheets of plywood will be nailed to the concrete floor under the laminate. In this case, a carbide drill is used. To prevent the heads of the screws from falling through the plywood, you should choose their diameter larger than the diameter of the drill. Self-tapping screws are placed in plastic dowels, which are placed in the drilled holes.
Fastening should be done not only along the edges of the prepared sheets, but also in their central part. The self-tapping screws used in the work must be at least three times as long as the plywood sheet. So, if a sheet of plywood has a thickness of 16 mm, then the self-tapping screw used is 50 mm in length. Exactly the same parameters are provided for inserted dowels.
Even if in this case, after fastening, an excess length of plywood sheets is discovered, it can be cut off using a jigsaw. When all sequential actions are completed, the quality of embedding of the screw heads is checked. This is necessary so that the laid laminate is not damaged during operation.
Another very important tip after laying plywood on a concrete floor under laminate is to tap each sheet. To do this, you can use a wooden hammer or a prepared block. The sound should be extremely uniform, since everything else indicates separation of the material from the concrete base. Such sheets should be replaced immediately before laying the laminate, so as not to have to repair it later.
There is one subtlety when laying plywood as a substrate for laminate flooring - the use of glue, which is applied to the base before spreading over the entire plane of the sheets. It is necessary to fill the available space when there are uneven concrete floors.
Installation on concrete floor
Laying plywood is a fairly simple undertaking that requires great care and some skills from the craftsman. Professionals perform work in strict sequence. This ensures high quality installation and helps eliminate most errors.
You can lay the floor in a few simple steps:
- Preparatory work for cleaning the old surface.
- Waterproofing the floor.
- Preparing plywood for laying.
- Leveling the surface.
- Carrying out all necessary measurements and calculations of the amount of material.
- Preparing the tools that will be needed during work.
- Selection and purchase of all necessary materials.
- Cut out sheets and mark them.
- Installation work.
- Sanding and finishing.
Humidity check
Before starting work, professionals recommend checking the moisture content of the concrete base. If this is not done, a situation may arise in which the laid plywood becomes wet, delaminates and becomes unusable.
This entire process is best carried out using special devices. However, if you don’t have them, then you can use the traditional method. For it you need to find a suitable size plastic film and several heavy weights.
The check is done as follows:
- A polyethylene film is placed on the concrete base.
- Then its edges are pressed down with weights. In this case, the middle of the film should not be stretched.
- It is left in this form for several days.
- After the specified period of time, the condition of the film is checked. If droplets of moisture have formed on it, then further work can be carried out only after waterproofing the concrete floor.
Cleaning the base
It is very important to prepare the concrete floor and make it as level as possible. This will not only simplify the further installation of plywood, but will also help get rid of even minimal curvature. To carry out this procedure, you can use a grinder with a special attachment. The work is done like this:
- All visible irregularities are removed.
- Remains of old paint and putty are removed.
- If there are depressions in the floor, they are removed with special solutions for concrete floors.
- Small cracks are sealed. This work can be done using a cement and sand based mortar.
- Use a vacuum cleaner to remove small particles and dust.
The right primer
This stage of work is no less important than all the others. To carry it out, special means are used. They are applied to the concrete base using a roller and distributed evenly over the entire surface.
Floor primer helps:
- Remove any remaining dust from the surface of the base.
- Increase the strength of the concrete layer and prevent its wear.
- Increase the adhesion of materials to the floor.
Sheet cutting and laying
Before laying plywood on the floor, it is important to cut it correctly. Experts advise cutting the material into small squares. Their width should not exceed 60 centimeters.
The edges of such workpieces are checked for defects that could lead to delamination. If they are detected, the part is rejected and is no longer used for the floor.
Laying plywood blanks on a concrete floor is carried out in the following sequence:
Floor repair
Plywood is such a versatile material that it is also used in floor repairs. It saves time and money, since with the help of such slabs it is possible to replace a deformed area, which means there is no need to dismantle the entire floor covering.
To carry out this type of repair work, you only need a certain amount of material and a grinding machine. Accordingly, the sheets are attached to the problem area, and then the machine smoothes out all the roughness and unevenness. As in laying plywood on a concrete floor, the replacement and fastening of sheets occurs using self-tapping screws.
Experts recommend that, in order for the plywood covering to last longer and be more durable, after completing all work, open the floor with a special antiseptic composition. Since plywood is still a wooden material, such impregnation will protect it from rotting, fungi, delamination, etc. And to make the floor have a more respectable appearance, it can be covered with varnish or the same linoleum.
Technology for laying plywood under linoleum
The plywood is fixed to the base of the floor using self-tapping screws or dowels. To lay the plywood slabs, they are cut into small pieces. This is necessary for better fixation, as well as reducing the load on the area and the risk of deformation of the plywood in the future. After fitting the parts of the slab, they are leveled, then fixed and polished (if necessary).