It's no secret that the basis of any structure is the foundation. In order for a house or any other building to last for decades, a high-quality and reliable foundation is necessary. To do this, it is worth taking the issue of reinforcement seriously. The most reliable option would be to construct foundations made of reinforced slabs. Despite many stereotypes, you can do the reinforcement of the foundation slab yourself.
Such slabs, made independently or with the help of a contractor, are perfect for building a conventional foundation, as well as for the foundations of houses with several floors. In addition, it is reinforced slabs that are recommended to be used when forming the basement floor. With the right approach, such a foundation will become a worthy foundation for any home.
What is a reinforced foundation slab?
Do-it-yourself reinforcement of a foundation slab essentially turns easily destructible concrete into a strong and durable product. This is ensured by a good connection between the metal elements and the cement mass. However, all metal elements must be properly connected to each other. For this purpose, they can be welded or tightly tied with wire - it all depends on the structure being designed: the larger it is, the better the quality of the reinforcement should be connected.
Reinforcing mesh
Reinforced slabs are a single foundation of the house, which is monolithic. By and large, this is a large reinforced concrete structure on which the structure is installed. It is this kind of foundation that can withstand weak soil and soil prone to deformation. Due to the fact that the slab passes under the entire structure, even when the soil moves, cracking of the walls and destruction of the foundation itself do not occur.
Thus, if the construction region has fairly loose soils, this is the only correct solution. Although the use of foundation reinforcement will be appropriate in every case when the developer wants to get a high-quality structure for many years.
Independent calculation of the floor slab: we calculate the load and select the parameters of the future slab
Even for classical structural materials, such as steel, aluminum alloys, etc. To describe random variables, various probabilistic characteristics are used, which are determined as a result of statistical analysis of experimental data obtained during mass testing.
The simplest of them are the mathematical expectation and the coefficient of variation, otherwise called the coefficient of variability. The latter is the ratio of the root-mean-square spread to the mathematical expectation of a random variable. Thus, in the design standards for reinforced concrete structures, the variability coefficient of heavy concrete is taken into account by the reliability coefficient for concrete.
In this regard, no design scheme will be ideal for reinforced concrete, however, let’s not get distracted, but return to the design prerequisites for this scheme. Thus formula 6.
Stage 2. Determination of slab dimensions, reinforcement and concrete class
And now, if you have not yet drowned in this sea of formulas, let’s see what are the benefits of these calculation premises and formulas: We determined all other parameters and loads for our slab earlier. First, we determine using formula 6. This value is less than the limit for a given class of reinforcement according to table 1 0. Then, according to formula 6. Thus, to reinforce 1 linear meter of our floor slab, you can use 5 rods with a diameter of 14 mm with a pitch of mm.
The cross-sectional area of the reinforcement will be 7. It is convenient to select reinforcement using the table. Also, to reinforce the slab, you can use 7 rods with a diameter of 12 mm in increments of mm or 10 rods with a diameter of 10 mm in increments of mm. Thus, to reinforce 1 linear meter of our floor slab, you still need to use 5 rods with a diameter of 14 mm in increments of mm or continue selecting the section.
However, you don’t have to strain yourself too much, since this slab, considered as a simply supported beam, most likely will not pass the calculation for deflection and therefore it is better to immediately begin calculations for the limiting deformations of the second group; an example of determining deflection is given separately.
What is needed to reinforce a foundation slab
To construct a foundation based on a reinforced slab, you will need:
- Fittings, with a diameter of 12 mm;
- Cement mass;
- Waterproofing material;
- Sand for backfilling the base of the slab;
- Gravel. It is the second layer in the base backfill;
- Formwork.
Now it’s worth examining each of the elements separately; they all have a number of requirements when pouring the foundation.
Reinforced plate
The reinforcement must correspond to the structure being designed.
If the structure is small and the load on the slab is quite low, then the diameter of the reinforcement can be 12 mm. However, if the structure is large and involves several floors, then the thickness of the reinforcement should be much greater. The same is true with the number of rods; it can be calculated based on the area of the structure.
Here, too, a lot depends on the building itself and on the foundation soil - they determine the size of the cell in the frame grid.
In addition to thickness, the reinforcement must meet one more requirement - to be ribbed. This is a very significant point, since it is the rods with a heterogeneous texture that are firmly bonded to the concrete and ensure maximum stability of the foundation.
The cement mass is used in standard proportions.
The brand of cement for such a structure should be chosen at least M350, and better, if this is a large-scale construction, M400. It is also worth paying attention to moisture resistance indicators - no less than W8, and frost resistance - no less than F200.
Waterproofing materials also largely depend on the region of construction.
In normal soil with deep groundwater, it is sufficient to use special roll waterproofing. Its size can be calculated by multiplying the area of the slab by two, not forgetting to add a margin for the thickness of the structure. But if there is a large amount of water in the ground, it is worth using a more reliable method. These methods today include two types of waterproofing – coating and penetrating. The first ensures high moisture resistance of the slab through the use of bitumen mastics. The second is due to chemicals that, when confronted with moisture, repel it, preventing it from penetrating into the concrete.
Foundation reinforcement
The remaining materials do not require selection according to special criteria; simply good quality of the products and their suitability for construction are sufficient.
Calculation of slab thickness
The calculation is carried out according to the joint venture “Design and installation of foundations and foundations of buildings and structures” and according to the manual “Guidelines for the design of slab foundations of frame buildings and tower-type structures” in two stages:
- load collection;
- calculation based on bearing capacity.
Collection of loads includes work to calculate the total mass of the house, taking into account the weight of snow cover, furniture, equipment and people. Values for houses made of various materials can be taken from the table.
| Load type | Meaning | Reliability factor |
| Walls and partitions | ||
| Brick 640 mm | 1150 kg/m2 | 1,2 |
| Brick 510 mm | 920 kg/m2 | |
| Brick 380 mm with insulation 150 mm | 690 kg/m2 | |
| Beam 200 mm | 160 kg/m2 | 1,1 |
| Beam 150 mm | 120 kg/m2 | |
| Frame 150 mm with insulation | 50 kg/m2 | |
| Plasterboard partitions 80 mm | 30-35 kg/m2 | 1,2 |
| Brick partitions 120 mm | 220 kg/m2 | |
| Floors | ||
| Reinforced concrete 220 mm with cement-sand screed 30 mm | 625 kg/m2 | 1.2 - for prefabricated and 1.3 - for monolith |
| Wooden on beams | 150 kg/m2 | 1,1 |
| Roof on wooden rafters | ||
| Metal coated | 60 kg/m2 | 1,1 |
| Ceramic coated | 120 kg/m2 | |
| With bitumen coating | 70 kg/m2 | |
| Live loads | ||
| Useful for residential buildings | 150 kg/m2 | 1,2 |
| Snow | Depending on the construction area according to clause 10.1 of the SP “Loads and Impacts”. The snow region is determined by SNiP “construction climatology”. | 1,4 |
Important! The table already takes into account the thickness of the structures. To calculate the mass, all you have to do is multiply by the area.
In addition, each load must be multiplied by a safety factor. It is necessary to ensure a reserve for the load-bearing capacity of a concrete structure and to prevent problems in the event of minor errors by builders or changes in operating conditions (for example, a change in the purpose of the building). All coefficients are accepted according to the joint venture “Loads and Impacts”.
For different loads, the coefficient is different and ranges from 1.05-1.4. The exact values are also given in the table. For a concrete foundation using monolithic technology, a coefficient of 1.3 is taken.
Important! If the roof slope is more than 60 degrees, the snow load is not taken into account in the calculation, since with such a steep slope, snow does not accumulate on it.
The total area of all structures is multiplied by the mass given in the table and the coefficient, after which, adding, the total weight of the house is obtained without taking into account the foundations.
The basic formula for calculations is as follows:
P1= M1/S,
where P1 is the specific load on the ground without taking into account the foundation, M1 is the total load from the house obtained when collecting loads, S is the area of the concrete slab.
Next, you need to calculate the difference (Δ) between the obtained value and the number given in the table above, depending on the type of soil.
Δ=P-P1,
where P is the tabulated value of the bearing capacity of the soil.
M2 = Δ*S,
where M2 is the required mass of the foundation (it is impossible to build a foundation greater than this mass), S is the area of the concrete slab.
The following formula:
t = (M2/2500)/S,
where t is the thickness of concrete pouring, and 2500 kg/m3 is the density of one cubic meter of reinforced concrete foundation.
Next, the thickness is rounded to the nearest larger and smaller multiple of 5 cm. Afterwards, a check is performed in which the difference between the calculated and optimal pressure on the ground should not exceed 25% in any direction.
Advice! If the calculation turns out that the thickness of the concrete layer exceeds 350 mm, it is recommended to consider such types of construction as a strip foundation, columnar or slab with stiffeners.
In addition to the thickness, you will need to select the appropriate reinforcement diameter, as well as calculate the amount of reinforcement for concrete.
Important! If, as a result of the calculation, you get a slab thickness of more than 35 cm, this indicates that the slab foundation is redundant in the given conditions, you need to calculate strip and pile foundations, perhaps they will be cheaper. If the thickness is less than 15 cm, then the building is too heavy for the given soil and accurate calculations and geological studies are needed.
Stages of construction of a reinforced foundation slab
The construction of a foundation slab is a rather complex process, since the entire structure is responsible for the strength of the entire structure in the future. Let's look at how to make quality reinforcement for a foundation slab, point by point.
So, the whole process can be divided into the following stages:
- Construction of a pit (with a buried slab structure);
- Laying and compacting sand bedding;
- Laying and compacting gravel backfill;
- Pouring a thin layer of concrete;
- Installation of a waterproofing layer;
- Installation of reinforcing mesh;
- Installation of formwork;
- Pouring the main slab;
- Top waterproofing of the slab.
- The construction of a pit is required only if the foundation is deepened, or the creation of a basement floor is planned.
A slight recess of the slab also adds strength to the structure. However, the need for this method directly depends on external factors and individual wishes. DIY reinforcement - Laying and compacting sand and gravel bedding is necessary to prepare the foundation base. This approach avoids the adverse effects of groundwater and structural deformation. Both layers should not just be filled in, but compacted well. This will give the structure additional strength.
- Pouring a thin layer of concrete is necessary for high-quality construction of the waterproofing layer. This layer of concrete can be about 10 cm thick.
- The design of the waterproofing layer, as mentioned above, directly depends on the availability of groundwater. However, no matter what method is chosen, you should approach this stage very seriously, since the presence of moisture in the foundation can lead to irreversible damage, even to the highest quality structure.
- Installation of reinforcing mesh is the most important stage in the entire foundation construction. The strength of the structure depends on the quality of this work.
Here it is worth correctly calculating the cell size in the reinforcing mesh, since the larger the scale of construction, the smaller the cells should be. Having decided on the frequency of laying the rod, you can begin to create the gratings themselves.
The rods can be welded or tied together with wire, but here it is necessary to take into account the class of the reinforcement. If the reinforcement has a class marked C, then it can be welded; if not, then it is better to tie it, since the properties of metal of other classes are lost during thermal intervention. It is also worth paying attention to the quality of the reinforcement; it must be clean - without traces of dirt and dust, since the presence of contamination significantly impairs the adhesion of the metal to the concrete mass.
The foundation slab must be reinforced using two ready-made gratings, which must be fastened together at a certain distance. It is worth noting that before starting the installation of reinforcing mesh, it is necessary to provide places for communications, since, without providing for them right away, you may encounter the problem of connecting them after the foundation is completed.
The option discussed above describes the reinforcement of a monolithic foundation slab, however, there is another way to construct a foundation using slab reinforcement. This method involves creating a foundation in parts and is called strip.
Reinforcement of the strip foundation slab is carried out using separate sections of reinforcing mesh. However, it is better to pour them all at once to obtain monolithic concrete.
- Installation of formwork can be done both before and after installation of the reinforcing material. The main requirement for this stage is a good fit of the formwork elements to each other, since concrete milk can flow out through existing cracks, which is important for the concrete bond. The formwork must be installed very efficiently to avoid displacement of its parts and deformation of the foundation slab.
- The foundation slab should be poured only after all parts of the reinforcing mesh and formwork are properly secured. This process is very important because the quality of the monolith depends on it. The entire pouring, even if the area is large enough, should be done continuously, otherwise there is a risk of getting a layered slab, which will greatly affect the quality. A break in pouring for more than one hour can negatively affect the condition of the slab.
- Top waterproofing of the slab is the final stage in the construction of reinforced foundation slabs. This stage guarantees insulation from moisture not of the foundation, but of the building itself.
Construction of a monolithic foundation: constituent elements
A monolithic foundation in the form of a slab is a massive reinforced concrete structure that does not require penetration into the ground, unlike other types.
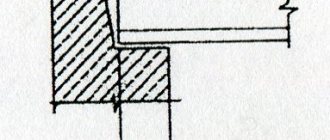
Figure 1. Structural diagram of a classic slab base
- Compacted soil is a well-compacted bottom of a pit (usually excavation work only involves removing the top fertile layer of soil).
- Pillow - traditionally made from sand or its mixture with crushed stone or gravel. It serves to dampen vibrations and minimize loads acting from below on the base, as well as to drain groundwater.
- Geotextile fabric - dornite is more often used, which protects the cushions from silting and reinforces it. Additionally, it can be laid between layers of sand and crushed stone to increase strength characteristics.
- Concrete preparation is also called a leveling layer. It is made of concrete, the thickness usually does not exceed 50 mm. Serves for better waterproofing and proper installation of the reinforcing frame.
- Waterproofing layer - a waterproof membrane protects the foundation from capillary suction of moisture. The classic material is rolled bitumen canvases laid in several layers.
- Reinforcing frame - provides high load-bearing capacity of the base and resistance to bending loads, preventing cracking of concrete.
- The concrete base is the base itself, the thickness of which is determined depending on the expected loads, the height of the building and the wall materials used.
However, the “pie” may include other elements - it all depends on the type of base. Thus, the construction of a USHP type foundation (insulated Swedish slab) requires the use of extruded polystyrene foam, on top of which a concrete base is already constructed.
Figure 2. “Pie” of an insulated Swedish stove
Popular mistakes in reinforcing foundation slabs
Quite often, due to lack of experience or knowledge, mistakes are made during the construction of reinforced foundation slabs. This can lead not only to the formation of cracks, but also to the complete collapse of the structure. In order not to repeat the mistakes of others, we will consider the most popular of them.
- Deepening the reinforcing mesh into the ground. This should not happen, since the reinforcement that is buried in the ground will not be covered with concrete and will be subject to corrosion, which will spread along it to the inside of the slab.
- Large cells of reinforcing mesh. For high-quality adhesion and durability, the cells of the reinforcing grids should not exceed 40 cm. And in the case when the slab is made for the first time and independently, it would be better to reduce it to 20 cm.
- Lack of thermal insulation of the foundation in seasonal buildings. Such buildings include a dacha. Since during the cold season the dacha is not heated, or is heated irregularly, in addition to waterproofing, it is worth providing thermal insulation. It will protect the building from temperature changes, which, if there is even a small amount of moisture in the concrete, can destroy the entire structure.
- Lack of a protective concrete layer on the sides of the slab. If the formwork was placed close to the reinforcing structure, then it is quite possible that some of the metal elements will be on the surface, which will lead to corrosion and destruction of the slab.
Related publications:
- Foundation options for a corrugated fence and construction stages
- Technology for pouring strip foundations: stages of construction
- Pouring a foundation slab with your own hands
- Laying floor slabs on the foundation: materials, installation, recommendations
Click to cancel reply.
What types of monolithic concrete slabs are there?
- a continuous slab of equal thickness over the entire area;
- with upper ribs;
- with lower ribs.
A monolithic structure with the same thickness is the simplest to construct, but the close location of its upper edge to the ground causes constant exposure to moisture on wall materials (especially important for wooden or stone walls, but without finishing). Increasing its thickness over the entire area leads to significant additional financial costs, which can be eliminated by installing a slab with ribs extending downwards or upwards.
A rib-top or monolithic “bowl” structure has a flat base with a protruding monolithic reinforced concrete strip around the perimeter and under the internal load-bearing walls.
Photo 5. Reinforced concrete slab foundation with upper ribs
Do-it-yourself slab foundation: step-by-step instructions
Many people hire contractors to lay the foundation, but you can make a monolithic foundation yourself. For a person familiar with construction, this will not be difficult. The main thing here is to plan all operations step by step, stick to the plan and follow the technology.
Initially, the site is cleared of debris, bushes and trees that will interfere with the work. Then the place for the pit is marked - during the work it is important to ensure perfectly even corners. Straightness check is performed by measuring the difference between the diagonals.
According to the markings made, the top layer of soil (fertile) is removed. Traditionally, this is done taking into account the expected thickness of the sand and crushed stone (if provided) cushion, concrete preparation and the design depth of the slab.
Photo 8. Ready pit for a slab base
The pit should have a perfectly flat bottom relative to the horizontal plane. Next, the soil must be thoroughly compacted. To avoid siltation and sand washing out, it is necessary to lay a geotextile sheet at the bottom of the pit, covering the walls of the pit and ensuring an overlap of 300 mm between the individual sheets.
Photo 9. Geotextile flooring in the pit
Sand is poured into the bottom of the pit in uniform layers of 100-120 mm, moistened with water and thoroughly compacted using a special vibrating plate. The minimum thickness of the pillow is 200 mm.
Photo 10. Compacting sand with a vibrating plate
Usually, when constructing slab foundations, the sand cushion is covered with a layer of crushed stone (gravel can be used) 100-150 mm thick - it allows you to cut off the capillary suction of moisture from the soil. You can also separate sand and crushed stone cushions with geotextiles - this will prevent them from mixing with each other.
Photo 11. Crushed stone cushion under the slab
Also, at the stage of installing the cushion, it is necessary to install all the necessary utilities that will be routed through the thickness of the slab base (sewage, water supply, etc.).
Waterproofing
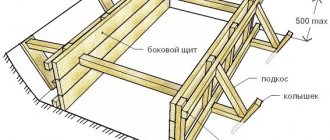
In accordance with the markings along the contour of the future foundation, formwork panels are installed, the rigidity of which will be ensured by spacers mounted on its outer side.
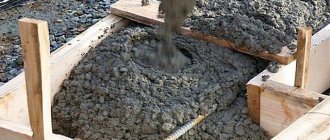
After installing and securing the formwork, a footing is made - a thin (50-70 mm) layer of low-grade concrete (M100 is enough) to level the horizontal surface and better waterproof the base.
Photo 12. Concrete preparation of the base
Then the waterproofing material is laid. For these purposes, a specialized polymer profile membrane or classic bitumen roll material, laid in 2-3 layers, is often used.
Photo 13. Waterproofing the slab base
Since winters in our country are cold, insulating the foundation is a standard procedure. High-density extruded polystyrene foam (EPS) is used to insulate the slab base.
- Flat – EPS is laid in an even layer.
Photo 14. Laying insulation in an even layer
- With lower ribs (USR) - polystyrene foam is laid out in “islands” to provide a kind of pits along the contour of the base and under the internal load-bearing walls.
Photo 15. EPS layout with “islands”
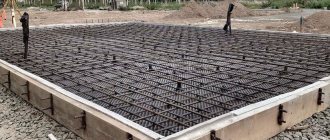
Reinforcement
The manufacture of the reinforcing frame begins from the bottom row; the rods are connected to each other using knitting wire. To provide a protective layer of concrete of 30-50 mm, special plastic stands are installed under the reinforcing mesh.
Photo 16. Mounted 1st row of frame
To ensure the required distance between two rows of the frame, special “spider” stands are used, which are made independently from scraps of reinforcement. Their quantity is 2 pieces per 1 sq. m.
Photo 17. Finished reinforcing 2-row frame