SNIP requirements
Work on reinforcing the corners of the strip base is carried out in accordance with SNiP 52-01-2003. The standards indicate how much reinforcement should be used in each individual case.
For calculations, you need to take the total cross-sectional area of the entire foundation and calculate 0.1 percent of it . The resulting figure is the minimum cross-sectional area of the rod that must be used.
All calculations regarding the strengthening of structural elements must be made at the design stage. If this has not been done, before starting the construction of the foundation, you need to think about its reinforcement, decide on the type of reinforcement and the number of belts.
SNiP dictates the distance between the longitudinal elements of the reinforcing belt (25-40 cm) and the minimum pitch between the transverse jumpers (1/2 of the working section, but not more than 30 cm).
Materials
The heaviest load falls on the longitudinal part of the frame. For its manufacture, profile reinforcing bars are used.
Knitting reinforcement with wire
Diameter - 13-21 millimeters, depending on the planned load on the foundation, wall material, weight, number of floors, type of roof.
Basic tools, materials:
- a grinder that works on metal. Easily replaced with a reinforcement cutter;
- smooth anchor with a diameter from 7 mm to 1.3 cm - depending on the height and weight of the foundation walls;
- wire for tying the anchor. Diameter - 0.6-1.2 millimeters;
- "stars". Provide a gap of 5 cm between the reinforcing frame and the formwork;
- templates for tying frame parts. Thick plywood is usually used, the use of boards is allowed;
- parts called “frogs” for raising the reinforcing belt 5 centimeters from the bottom edge of the waterproofing layer. It is allowed to use pieces of bricks of the required sizes;
- hooks Easily replaced with a gun - equipment for mating;
- device for angular bends of reinforcement, production of rectangular clamps (vertical). Pipes, channels, metal corners;
- elements to strengthen the foundation.
Knitting reinforcement or welding?
Reinforcement bars can be connected by knitting or welding . Both options have their own characteristic differences. To choose a more suitable technology, you should compare their characteristics.
Welding
Connecting segments of reinforcing wire using welding is much faster. But during the process, the metal is subjected to strong heating, which reduces its rigidity and strength. This means that the welded frame is less reliable. Therefore, many builders do not use this method.
There is another opinion, according to which welded frames are not much weaker, since welding is carried out only at the intersection of segments. At the same time, it saves time and materials.
In addition, it is believed that if welding is performed correctly, it will have very little effect on the properties of the reinforcement .
Qualified specialists know how to reduce the negative impact of welding on the material. It is important to select the correct electrodes and current value, after completing the work, allow the product to cool under natural conditions, and ensure that cracks do not form on the welded surface.
In addition, you should ensure that the elements being connected have a good fit and do not use butt connections.
Recommended options for connecting rods:
- overlap;
- T-bar;
- cross
Mating
Knitting is carried out using a special wire. This connection method is simpler and more reliable, but requires more time to complete.
Material consumption increases due to the binding wire. It is worth noting that some brands of fittings are not intended for welding at all. When using them, only knitting can be used. The wire must be sufficiently flexible and strong.
Typically the bond material used is low carbon annealed steel. Diameter may vary. Wire that is too thin can be folded several times.
When knitting, the reinforcement is connected to a reserve of mobility . During the process of shrinkage, which occurs in almost all new buildings, this allows the frame to “adapt” to the deformations of the foundation.
At the same time, a welded frame with rigid joints can cause microcracks in the concrete during shrinkage. Therefore, when constructing on a site with difficult soil, you should use a tie that ensures the mobility of the fastening.
Preparation and pouring of the foundation
In the process of making the solution, it is necessary to observe all proportions so as not to obtain a mass that is too viscous or too liquid. The first option will lead to the fact that the foundation will not be poured well enough and will have voids. The second option will lead to the settling of the connecting elements to the bottom, which will greatly affect the strength of the foundation. Do not forget that each poured layer should be carefully compacted to avoid unwanted voids.
Scheme
There are several types of angles:
- Direct ones are the most common. Can be T- or L-shaped.
- Blunt - arbitrary (bay windows). Those rotated from 160 degrees are quite easy to work with - the reinforcement is laid from the outside to the inside, increasing the frequency of the crossbars by 2 times in comparison with the rest of the base length, and then tied up. Angles from 90 to 160 degrees require the installation of vertical reinforcement.
- Sharp ones are very difficult to work with and are rare in private low-rise construction.
When strengthening corners, it is important to adhere to one of the generally accepted schemes.
With L-shaped anchorage
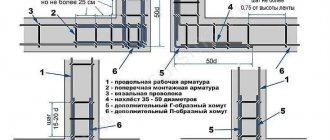
The simplest and most common method . L-shaped elements are installed in the corners, which are attached by crossbars to the main reinforcing frame. The length of the arm of the L-shaped element must be no less than the diameter of the main reinforcement multiplied by 50.
Using this part, the external reinforcement of two converging walls is securely connected to each other. All internal longitudinal rods are connected through an L-shaped fastening to the external one.
When strengthening the corner, there are three such parts for each longitudinal level of the reinforcement frame. Strengthening at the junction of walls requires the use of two parts for each level.
1. The rigidity of the connection of the external longitudinal reinforcement (1) in the corner area is provided by an L-shaped clamp (6). 2. The internal longitudinal reinforcement (2) is rigidly attached to the external longitudinal reinforcement (1) with an overlap. 3. The pitch of transverse reinforcement (L) is no more than ¾ of the height of the foundation strip. 4. The internal and external longitudinal reinforcement are connected by additional transverse reinforcement (5). 5. The length of the lap joint is 50 times the diameter of the horizontal reinforcement.
Using U-shaped clamps
To maximize the strength of the foundation structure, U-shaped clamps are used in the corners and joints of walls. Their width must correspond to the width of the entire reinforcement frame. The length is at least 50 times the diameter of the main reinforcement.
They are attached to the main reinforcement in the direction of the open part of the element from the corner . In the corner areas of the foundation, two U-shaped elements are installed on each horizontal level of the frame. When reinforcing connections, you need one such element for each horizontal level.
The most commonly used mounting option is with L-shaped elements. It is suitable for fixing a standard right angle, while providing it with fairly reliable and durable reinforcement. Unlike the use of U-shaped elements, this option is more economical and simple to implement.
1. When using U-shaped clamps (5), the corner connection of the external and internal horizontal reinforcement of the strip foundation (1) receives a rigid coupling like a lock. 2. The anchoring of U-shaped clamps involves vertical (2), transverse (3) and additional transverse (4) reinforcement.
Obtuse angle
Obtuse corners of strip foundations are rare, only with complex building architecture. For example, a house may have a corner bay window or veranda. In any case, the corners must be strengthened.
Reinforcement of obtuse angles is carried out in two ways . The first is that the external longitudinal reinforcements are simply bent to the desired degree.
The internal longitudinal whips are also bent at the same angle, intersect, and are connected to the external ones. The length of each bent part must be no less than the diameter of the main reinforcement multiplied by 50.
The second option differs in that it is not the main reinforcement that is bent at the desired degree, but additional corner clamps. Their length must also be at least 50 times the diameter of the main reinforcement.
1. To reliably connect the reinforcement cage when rotating the strip foundation at an obtuse angle (1), a rigid overlapping connection scheme is used between the free ends of the internal horizontal reinforcement (4) with the external horizontal reinforcement (5). 2. Vertical (2) and horizontal (3) reinforcement in the overlap joint area should be installed 2 times more often than on flat sections of the tape. 3. The length of the lap joint must be at least 50 times the diameter of the longitudinal reinforcement.
Stages of construction of a strip reinforced foundation
The construction stages are as follows:
- Digging a pit or trenches. The depth should take into account the depth of the foundation body and the anti-heaving cushion.
- Marking. (see the article “How to mark a strip foundation with your own hands”).
- Pour a sand cushion into the trench and compact it, then crushed stone.
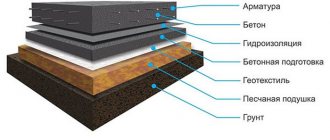
- Install and secure the formwork panels. Place a layer of waterproofing in the form of plastic film on the bottom and walls.
- Tie and prepare longitudinal pieces of reinforcement cages. Install them in the formwork and check that the distances from the formwork to the frame are equal on both sides. Use pre-prepared concrete blocks or special plastic “chairs” as spacer elements. Provide the same distances in the lower part of the frame. Do not use pieces of brick.
- Correctly connect the corner parts of the frames and intersection points with load-bearing walls.
- Check the installation of frames - protective distances, height, horizontality, correctness and completeness of linkage, and other requirements set out in the foundation drawing.
- Pour the concrete solution in one go and vibrate it thoroughly. Wait 10 - 15 days and you can remove the formwork.
- The foundation of the house will be ready 10–15 days after pouring; it can be gradually loaded with the construction of walls. Full readiness will be 28 - 30 days after the end of concreting.
How to knit correctly?
The corners of the foundation are reinforced simultaneously with strengthening along the entire line of the foundation base. This is done according to this scheme:
- The bottom of the trench under the foundation is leveled, and a waterproofing film is laid on it.
- Tying the frame can be started in the trench itself or next to it if it is too narrow.
- Cut elements for the frame. Vertical rods should be 10-15 cm shorter than the height of the trench.
- The bottom layer is laid out with a distance of 30 cm.
- 2 longitudinal reinforcements are laid on top.
- The connections are connected using knitting technology.
- A vertical jumper is installed and tied above every second crossbar.
- The required number of tiers of the frame are still tied with a height distance of approximately 40 cm.
- The frame is lowered into the trench.
- Corner L-shaped or U-shaped elements are installed in the corners and places where walls adjoin.
- The corner elements are connected to the main frame with wire.
- After completing the installation of the frame, the trench is filled with concrete.
Only strict adherence to reinforcement technology will ensure the foundation, and therefore the entire building, strength, reliability and durability.
Necessary tools and equipment
To knit the reinforcement you will need:
connecting wire;
- measuring tape;
- pliers;
- Bulgarian;
- wooden elements to maintain gaps between rods;
- wire cutters;
- hammer;
- a device for bending rods at the desired angle;
- a tying gun or a regular tying hook.
If the frame connections are made by welding, to strengthen the corners you need to have:
- connecting wire;
- grinder;
- welding equipment.
Execution technology
The technology of knitting rods is very important when creating any reinforcement products. In the process of strengthening the corners, it must be especially accurate and correct, since the technical characteristics of the entire building depend on this.
Traditionally, knitting is done using a metal hook with a wooden handle. Recently, a special tying gun has been increasingly used for this purpose.
But the technique of knitting knots does not change from changing the tool:
- To connect the elements, take a wire about 20 cm long and bend it in half.
- Now you need to bend it again, but not all the way, but to make a hook.
- This hook is inserted under the rod that needs to be tied.
- Next, the hook tool is inserted into the loop, catches the free end of the wire, and with the girth of the rod pulls it through the loop.
- The free end is made one turn around the hook of the wire.
- The loop is pulled all the way, and the free end is wrapped around it several more times.
The corners of the clamps are tied with a “dead knot”:
A wire with a length of 20 to 40 cm (depending on the diameter of the reinforcement) is folded in half.
- The wire hook is looped forward under the reinforcement, to the left of the clamp, and extended 2-4 cm so that the knot can be completed.
- The wire is bent through the top of the clamp under the reinforcement.
- A hook is inserted into the wire loop and its free end is pulled through.
- Use a crochet hook to pull the loop and wrap the free end around it until it breaks.
Errors when constructing a strip foundation
When performing concrete and reinforcement work, you cannot make mistakes:
- The protective layer of concrete must be maintained. If it is not specified in the project, you can determine it by the diameters of the reinforcement and the size of the aggregate. It would not be a mistake to take a protective layer of 50 mm, and in the lower part - 70 mm, if there is no concrete preparation. It is possible to use mortar or crushed stone for fixation from below, but inexpensive and comfortable plastic “chairs” are, of course, more practical. Pieces of brick, especially silicate brick, are not suitable for this purpose. These "scourers" will suck too much water out of the concrete, which is needed for hydration, and even from the concrete, which will work in the most loaded lower zone.
- prevent loss of cement laitance through the cracks of the formwork
- If you do not put waterproofing under the sole of the tape, then not a single concrete specialist will vouch for the fact that the concrete will withstand freeze-thaw cycles in a water-saturated state without erosion and destruction for ten years. At first, the destruction proceeds slowly, but when the freezing and expanding water opens microcracks to the depth of the protective layer of concrete and reaches the reinforcement, the destruction process will greatly accelerate; the reinforcement simply “tears” the concrete in the process of rusting.
- — crushed stone of fraction 20-40 is suitable for the pillow. If you use a very coarse one (80; 100) and do not waterproof the cushion under the concrete base, the concrete will collapse from both water and point uneven forces
- corners and joints need to be reinforced only according to the design, with bent clamps and reinforcement elements - hooks, legs, L- and U-shaped parts, according to a specific project. It is impossible to cross, rotate and tie load-bearing rods in the corners, even with overlap, and ultimately have the given load-bearing capacity of the structure. It will end with cracks in the corners, then layer-by-layer chipping, then destruction of the tape.
- Even an ideal concrete mixture can be killed by improper installation and maintenance technology. Air from concrete must be removed by vibration. You can bayonet it with reinforcing bars, a shovel, a hoe, or any available means, the main thing is to expel the air from the mixture. When laitance appears on the surface of the concrete and bubbles stop appearing, you can rest assured that the concrete will compact.
- it is necessary to take all measures to avoid interruptions in laying concrete, the strength of the future structure directly depends on this
As for the cold seams that appear in the structure when the break in pouring on a hot day was forty minutes to an hour, it is often not enough to simply clean them, remove the cement film, notch them and continue pouring. If the working seam falls in an area with maximum load, you need to reinforce this area with reinforcement, and for this you need a specialist to calculate and suggest a reinforcement scheme. If force majeure occurs, then this option is worth accepting, because the strength of the foundation is the key to the life and safety of the house and its residents, not to mention comfort!
As for fiber-reinforced concrete, its use in a strip foundation as a replacement for reinforcement is at your own risk and risk, and the risk is serious. Reinforcing concrete with propylene and even steel anchor fibers will not replace the tape reinforcement frame and will not prevent its destruction, although it will have a very positive effect on the quality and durability of concrete.
Features for shallow strip foundations
Shallow foundations are usually used for the construction of light or temporary buildings. It is also used in the construction of residential buildings on particularly strong, sedentary soils.
All of the above options put forward less stringent requirements for the characteristics of the foundation . It may not be recessed, but shallow, and it may not be so carefully reinforced.
That is, the reinforcement can be of a smaller diameter, with installation with a large step between the crossbars. However, the corners are strengthened according to all the rules, otherwise they will become a weak point in the building.
For which buildings is strip foundation suitable?
The strip foundation is suitable for houses with and without basements, for brick and stone buildings, with walls and ceilings made of reinforced concrete. That is, the tape is suitable for any buildings and structures of private construction. Again, it’s a matter of price – for light houses, a less expensive columnar foundation is sufficient.
If you need basements or a ground floor, then you can’t do without a strip foundation, only in the case of waterlogged soil, serious drainage and waterproofing are needed.
Common Mistakes
Most often, the following mistake is made - deviation from the main principles of corner reinforcement. In such cases, the main longitudinal rods simply overlap at the corners and are tied together.
But such fastening does not work under load. The ligament quickly breaks down, and without fixing the corners, the structure will inevitably fail.
Builders also make other mistakes:
lack of connecting elements between the external and internal contours of the frame;
- when welding parts, angular joints are allowed;
- knitting is carried out not by technology, but by simple twisting with ordinary wire;
- the base of the foundation is not connected to the reinforcing frame;
- the frame is created without an internal contour.
Mistakes made when arranging the foundation cannot be corrected without dismantling the building. They can only be avoided by preparing a competent project in advance and inviting qualified responsible builders.
You will find all the most important things about strip foundation reinforcement in this section of the site.
How is reinforcement performed?
There are 3 types of strip foundations: shallow, shallow, and recessed.
It is necessary to calculate the frame
The shape of the frame is calculated based on the cross-section of the future foundation. The concrete mixture must completely cover the reinforcement bars by at least 50 millimeters.
Typically, a 40/40 foundation is laid for frame houses. The frame section is 30/30. The diameter of the auxiliary wire is 6-8 mm.
The wire can be made of any metal.
The wire helps bend the “ribs” - reinforcement elements. “Ribs” are made to cover the entire volume of the foundation. One step is 30-50 centimeters, depending on the load.
The diameter of the reinforcement depends on the total weight of the structure. For example, for light buildings - 8-10 mm. For heavy, multi-story buildings, more rigid reinforcement is required, the diameter of which is 2.4 cm. The diameter of the reinforcement is calculated individually and indicated in the design documentation.
Having prepared the “ribs”, taking into account the distribution along the length of the frame in increments of 300-500 millimeters, you need to begin assembling the reinforcement frame.
First, metal “ribs” are placed on a bundle of reinforcement. It is necessary to fasten at the corners of each “rib” with twisting. The result is a reinforcement frame with a quadrangular cross-section.
The number of rods depends on the type of base
The number of paired rows of reinforcement is selected based on the distance between them. If the distance is more than 80 centimeters, you need to add another row.
In a buried foundation it is necessary to “throw” 3 cores. In other types of base, 2 cores are needed.
The reinforcement rods are connected with knitting wire, this will prevent breakage during welding.
In the lower part, an indentation of 5 centimeters is made from the frame. To avoid sagging, you need to lay a layer of stone and crushed stone on 3-4 sections of vertical wire harnesses.
How to increase the strength of obtuse angles
The tape base has a complex geometry. Some angles are greater than 90 degrees.
Strengthening obtuse angles
Obtuse angles are reinforced according to patterns that increase the strength of the frame.
There are 2 ways to strengthen reinforcement.
Method No. 1
Instructions:
- The outer ends of the rods are bent at a set angle.
- The internal parts are bent according to the same principle.
- The longitudinal outer part is knitted.
Each section of all rods must be at least fifty times the diameter of the main rods.
Method No. 2
Additional bent rods are used. Preliminary preparation is required - the bend angle must correspond to the angle of the foundation frame. The bend must have a minimum of 50 diameters of the longitudinal rod.
Consider overlap. The range for anchor cross-sectional values is 36-49. The specific figure depends on the brand of material.
