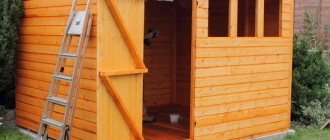
You cannot find a more traditional material for building a fence than wooden beams. And even today, in times of new building materials and construction methods, every third fence is built on wooden posts and slats. There are many reasons for this popularity, first of all, a very attractive appearance and relatively easy to process and install material. Wooden fence posts can reduce the time it takes to construct a fence and at the same time make it much cheaper, which is important for owners of summer cottages and suburban areas.
Advantages and disadvantages of a fence on wooden posts
Among building materials, wood stands apart and is in a privileged position:
- The use of special mastics and protective impregnations allows you to reveal the beautiful texture of the wood;
- Wooden posts, with the correct choice of cross-section of supports and completed installation, can provide high strength of the fence at relatively low cost;
- Wooden posts can be easily combined with metal, corrugated sheets, wooden slats and any other material for cladding the fence.
Wooden poles, unlike concrete or steel poles, can be easily installed with your own hands, while the light weight and good workability of wood allows you to manufacture and process the poles almost at home.
Important! Wooden posts are extremely sensitive to excess moisture and putrefactive microflora, so the quality of the material processing determines how long the posts will last in the ground.
There are many ways to treat the material, but not all recipes provide a stable and long-lasting effect, so the method of applying a protective coating must be selected in accordance with the composition of the soil and the type of wood.
How to Protect Wooden Fence Posts from Rotting
The durability of a wooden support depends primarily on the type of wood. The wood that is most resistant to rotting is larch, oak, and walnut. Pine, spruce, and fir withstand putrid environments worse. Poplar, birch, and aspen are considered unsuitable for use as poles. Experts recommend that before installing poles, provide protection against the development of putrefactive microflora by the following means:
- Impregnation in two or three doses with antiseptics based on organic solvents;
- Treatment with salts of iron, copper, chromium, nickel, lead, creosote;
- Coated with protective waterproof compounds, for example, epoxy or pentaphthalic varnishes.
Advice! Processing is usually carried out in several stages, with each layer drying. To install wooden posts in the most aggressive peaty soils, the lower part of the support can be wrapped in sealed plastic bags.
All kinds of drying oils, organic oils, impregnation with used machine oil, kerosene, and diesel fuel are considered ineffective for protection.
How to fix a wooden pole on concrete: concreting the pole and mounting it on the base
All photos from the article
In the process of performing various construction works, sometimes it becomes necessary to attach a wooden pole to concrete. As a rule, this operation raises many questions among novice masters. In this article we will look at how to attach wooden poles to a concrete base in several ways.
Wooden pole mounted on concrete
General information
The need to install wooden poles on concrete can arise in a variety of situations, for example, when installing fences, building gazebos and other wooden structures on a strip foundation.
At first glance, it may seem that installing a wooden pole on concrete is very difficult, but in reality, professionals have some tricks that allow them to cope with this operation without any difficulties. Below you can see for yourself.
Installing a wooden post on concrete
First of all, it should be said that installing pillars on concrete often means different operations:
| Type of transaction | Peculiarities |
| Concreting | The post is installed in a hole that is filled with concrete |
| Fixing on a concrete base | The pillar is fixed on a flat concrete surface using special devices. |
Below we will take a closer look at each of them.
Concreting the support
Pillar concreting
Many novice home craftsmen doubt whether it is possible to concrete wooden poles, since wood in concrete can quickly rot. In fact, if you follow a certain technology, the wooden support can stand for quite a long time.
Instructions for performing this operation look like this:
- The first step is to make a hole to the depth of soil freezing. In different areas this depth may be different, but on average in our country it is 1.2 m. If you make the hole shallower, then there is a possibility that the pillar will be pushed out as a result of soil heaving. The easiest way to dig a hole is with a garden drill, but if it is missing , you can also use a regular shovel.
- Next, you need to fill the bottom of the hole with crushed stone or gravel and compact it well. The layer thickness should be about 15 cm.
Treatment of timber with impregnation
- Before concreting a wooden post, it is necessary to treat the wood with a protective compound. Currently, specialized stores sell special impregnations that protect wood from moisture penetration, exposure to microorganisms and other negative factors.
- After processing, the post must be installed in the hole and secured with spacers. In this case, its position should be checked with a building level to prevent deviation from the horizontal.
- Next, the space in the hole is filled with concrete.
- Protruding concrete must be smoothed down with a slope away from the post to prevent water from accumulating near the wood.
- Then the concrete must be covered with damp burlap. It must be moistened periodically throughout the week. This procedure prevents concrete from cracking during the drying process.
In the photo - treating the joint with sealant
- After the concrete has completely hardened, you need to treat the area where it meets the wood with a sealant. This will prevent moisture from entering the joint space, which will form during the freezing/thawing process.
Advice! The durability of a wooden structure largely depends on the type of wood. For example, pine and larch have good moisture resistance.
Moreover, the price of pine is the lowest among other species.
This completes the process of concreting the pillar. It should be noted that there is another way to install a wooden pole in the ground. Its meaning lies in the fact that a small column (concrete stepson) is concreted, to which a wooden beam or log is attached on the surface using wire tying.
Securing the support with a concrete stepson
Advice! Before concreting, it is advisable to perform waterproofing.
To do this, place roofing felt rolled into a tube into the hole.
In addition, you can securely fix the support directly into the ground without concreting it.
According to this technology, the work is performed as follows:
- After treating the support with an antiseptic composition, its area that will be in the ground is covered with bitumen mastic for wood and wrapped with a layer of roofing felt.
- Then the bottom of the hole is covered in the same way with a layer of crushed stone and gravel.
- Next, the support is fixed with spacers in a vertical position.
- After this, the pit is backfilled and compacted. To do this, the space needs to be filled with stones, broken bricks or large crushed stone. Every 30 centimeters, the stones must be compacted with a crowbar, sprinkled with a layer of sand and then spilled with water, which will improve the quality of compaction.
- When about 15-20 cm remains to the top of the pit, the space needs to be filled with concrete. In this case, the concrete ring will provide stability to the support and prevent it from warping.
Fastening for wooden support
Installation on concrete base
Installing wooden posts on a concrete base can be done in several ways.
- Using a special fastener mounted into concrete - in this case, during the pouring process, a device is inserted into the concrete, which is a pin with a U-shaped fastener at the end. During installation, the beam is inserted between the two “tails” of the device and secured with bolts or screws. It should be noted that the U-shaped fastening must correspond to the cross-section of the beam so that it fits tightly into the space. The disadvantage of this method is that it can only be used when pouring concrete, and only the beam can be installed as a support.
Example of timber fixation
Using reinforcement - if there is no special fastening at hand, you can use reinforcement, which is inserted into the concrete so that the pin rises about 20 cm above the surface. When installing the support, a hole is made at its end with a diameter corresponding to the pin. Before installing the support, a waterproofing layer must be laid on the concrete.
Installation of wooden fence posts
Any construction of wooden fences begins with the installation of supporting elements. For fencing up to 2 meters high, square or round beams with a maximum transverse dimension of 90-100 mm are used. Higher fences of 2.5-3.0 m must be installed with concreting of the base; the cross-section of supporting elements for blind fences must be proportionally increased by 25-30%.
To fence a dacha or country house, the following pole installation schemes are most often used:
- Concreting in a well drilled with an auger drill to the installation depth;
- Fixing wooden poles by filling the well with crushed stone, rubble, broken bricks, and gravel screenings;
- By driving a wooden support into the ground. Such schemes are often used as temporary ones, with subsequent replacement with metal or concrete supports;
- By installing a wooden beam inside a steel glass or pipe section driven into the ground.
For your information! The small specific gravity of wood makes it relatively easy to install wooden poles even alone; it is much more difficult to solve the problem of how to align the supports in one plane without resorting to the help of neighbors.
We install wooden fence posts in concrete with our own hands
If you have to install wooden supports yourself, without helpers, then the easiest way would be concreting or filling with rubble stone. This method allows you to easily align the pillars using a marking cord and a couple of building levels.
Along the marked contour of the fence, you will need to drill the required number of holes, with a diameter of 10-15 cm larger than the maximum size in the cross section of the support. The easiest way is to use a garden auger with a diameter of 15-20 cm. Before drilling, stretch a steel or paper non-stretch rope or twine and hammer in pegs 20-25 cm high. After drilling, the bottom of the well is covered with fine gravel screenings, the layer thickness is 5-7 cm. The screenings must be well compacted and leveled to form a flat bottom. Next, install the corner or outer fence posts.
Before concreting the well, the outer supports must be leveled most carefully, since all the other pillars of the wooden fence will have to be placed on them. To align the position of the support, three main parameters are used:
- The distance from the marking cord to the head of the post, so that there are no errors in height, the stretched thread must be leveled horizontally using a building level;
- Indications of two building levels in mutually perpendicular planes.
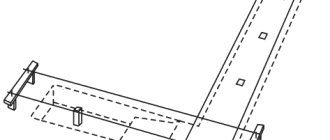
If possible, it is better to use the device shown in the photo. If this is not available, you can take two building levels and secure them to the planes of a square beam with an elastic band. After aligning the pillars, the position is fixed with wooden spacers or pieces of building material. Concrete is poured into the well in small portions so that the mass does not hit the wooden beam of the support.
Leveling is performed in the same way when using a layer of gravel or rubble material instead of concrete. The fastening mass is poured and compacted in small portions, 5-6 kg each.
How to hammer and level a wooden post
For low wooden fences, it is easier to drive the supports into the ground than to fool around with drilling and concreting. When using oak beams, you only need to sharpen the lower end by symmetrically chipping, and you can hammer in. In order not to break or split the top of the support, it is necessary to attach a board made of soft wood, linden or poplar to the head.
As the timber is hammered and settled, the position of the support must be periodically monitored using a building level. Until the fence post is buried more than a third into the ground, the tilt can be corrected by simply knocking out the side surface; after this, the soil around the post is compacted with blows of a sledgehammer.
Wooden posts made of larch cannot be driven directly, like oak ones, due to the high tendency of the wood to split. In this case, a steel pipe or crowbar is first driven into the ground, and thus a thin guide hole is obtained, after which the larch fence post can be installed and driven in.
Types of poles and installation methods
The base for the fence can be wooden or metal posts. Sometimes asbestos or concrete bases are used, and brick pillars are also erected. It all depends on what material the fence will be made of and the material capabilities of the owner of the site.
Wooden pillars
Wooden poles have long since given way to leadership in the construction of barriers. After all, although wood is considered very affordable, today it cannot be called the cheapest material. Typically, wood is used when installing temporary fences with your own hands, which are subsequently planned to be replaced with a more durable material. Or for arranging a front garden or courtyard.
Installation diagram of wooden fence posts
Wooden poles are significantly inferior to other materials in terms of durability. As practice and usual calculations show, such a pillar can last no more than 20 years. Before installing wooden poles, they must be thoroughly treated with an antiseptic. Copper sulfate can be used for this purpose.
After drying, the wood must be covered with a layer of drying oil: this will prevent the wood from excessively absorbing moisture, and, therefore, will extend its service life. The base of the pillar, which will be in the ground, must be well tarred. Only such measures will prevent the destruction of wood under the influence of the environment.
How to properly install wooden poles with your own hands
Such bases are installed in a hole made in advance in the ground, on a bed of sand and crushed stone.
The hole can be carefully dug with a shovel to the required depth, but it is unlikely that it will be possible to accurately adjust its dimensions to the diameter of the post. As the ground around it is disturbed, the pole may become askew over time.
It is best to use a regular garden drill to drill a hole. There is a sufficient range of these tools on sale in order to most accurately match the diameter of its auger to the dimensions of the post. Having drilled a hole, the post is lowered there with the tarred end and installed strictly vertically.
For control, it is best to use an ordinary level.
After this, the pit is filled first with crushed stone, and then with soil previously removed from the pit. To further compact the soil, you can water it and finally compact it thoroughly at the base of the post. Wooden posts are most often used to construct wood fences or chain link fences.
Detailed diagram for installing a mesh fence and wooden posts
Metal poles
When installing fences, metal posts are used more often than other materials. These pillars come in a wide variety of diameters and can withstand heavy loads. At the same time, they are durable and reliable. Such foundations can serve for half a century or more. They are almost universal in purpose; they are used for installing fences made of wood, metal profiles, flat slate, mesh and other materials.
As a rule, metal poles are hollow, so you need to think about plugs on top in advance to prevent water from getting into the middle. Firstly, this will prevent corrosion of the metal in the hollow pipe, and secondly, the rainwater collected inside when freezing will not be able to damage the pole.
Installation methods
The base is a box for installing supports.
After completing the preparatory work, we proceed to installation. We mark and prepare the place for the supports. Options for installing poles are determined by the design features and the nature of the work. Installation means concreting a support or fixing it to concrete. There are main methods:
- universal concreting of the base;
- use of concrete stepson;
- installation on concrete;
- use of frame;
- special connection;
- platform with a box.
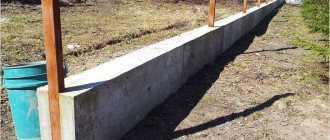
Versatile method - concreting
Installation of wooden poles using concreting is well suited for soils with low humidity. The installation method involves preliminary preparation of holes for the base, installation of pillars in them and filling the remaining space with concrete.
To increase efficiency when digging holes, the ground is watered; the ground becomes soft and easy to work with. When the height of the pillars is 1.5 m, the depth for the hole is 0.5 m; for higher ones, the depth is increased to 0.8 m. The pillar is deepened by 1/3 of its length.
When the groundwater level is high, the supports are deepened below the soil freezing level and the bottom of the holes is covered with a layer of crushed stone up to 15-20 cm, which acts as drainage. The bottom of the supports is wrapped with roofing felt, fired, and treated with resin to better protect the wood.
Having completed the preparation, they begin to compact the holes. The holes are filled with crushed stone, pieces of brick mixed with soil, and compacted tightly. We leave 15-20 cm to the top of the hole, and the empty space is filled with concrete. After the solution dries, the pole holds tightly and will not bend under the load. The joint between concrete and wood is treated with a sealant, which prevents moisture from getting between them.
Fastening a wooden post into concrete
Wooden building material, despite its fragility, is constantly used in buildings. Used as a base for fences, decoration of extensions, as foundation parts. During work, the tree must be periodically attached to the concrete. Many questions immediately arise: how to properly install wooden poles, how to extend their durability? Answers to them require preparation.
general information
At first glance, the situation is complicated, but there are tricks that help you cope with the work without much difficulty. Before you begin installation, you should choose what kind of wood the future base will be made of and carefully process it. Wood processing is an important process, because when exposed to the environment, it deteriorates.
Processing is carried out on the prepared post. The support is divided into two halves, each of them is treated with a different chemical. The part that is underground is more susceptible to moisture; it is treated with bitumen-based solutions twice, maintaining an interval of a day. The second part of the post is usually coated with varnish, protecting the wood from wind, sun and moisture.
Important! Before processing, the wood must be dried, and careful sanding will help save bitumen impregnation.
Installation methods
The base is a box for installing supports.
After completing the preparatory work, we proceed to installation. We mark and prepare the place for the supports. Options for installing poles are determined by the design features and the nature of the work. Installation means concreting a support or fixing it to concrete. There are main methods:
- universal concreting of the base;
- use of concrete stepson;
- installation on concrete;
- use of frame;
- special connection;
- platform with a box.
Versatile method - concreting
Installation of wooden poles using concreting is well suited for soils with low humidity. The installation method involves preliminary preparation of holes for the base, installation of pillars in them and filling the remaining space with concrete.
To increase efficiency when digging holes, the ground is watered; the ground becomes soft and easy to work with. When the height of the pillars is 1.5 m, the depth for the hole is 0.5 m; for higher ones, the depth is increased to 0.8 m. The pillar is deepened by 1/3 of its length.
When the groundwater level is high, the supports are deepened below the soil freezing level and the bottom of the holes is covered with a layer of crushed stone up to 15-20 cm, which acts as drainage. The bottom of the supports is wrapped with roofing felt, fired, and treated with resin to better protect the wood.
Having completed the preparation, they begin to compact the holes. The holes are filled with crushed stone, pieces of brick mixed with soil, and compacted tightly. We leave 15-20 cm to the top of the hole, and the empty space is filled with concrete. After the solution dries, the pole holds tightly and will not bend under the load. The joint between concrete and wood is treated with a sealant, which prevents moisture from getting between them.
Concrete stepson
The second way to install a wooden pole is to use a concrete stepson. The essence of the concreting procedure is to use not the entire log, but a small column. The sequence of the procedure is as follows:
- before installation, the support is treated with an antiseptic, the part of the stepson that will be in the ground is covered with bitumen and wrapped with roofing felt;
- crushed stone is poured onto the bottom of the hole;
- vertical fixation of the support with spacers;
- Be sure to fill the wooden post with crushed stone, gravel and compact it well. Maintaining a compaction interval (every 30 cm), adding sand and water will help increase the density of the backfill;
- 15-20 cm to the top, the hole is filled with a concrete solution, which ensures stability.
After the concrete has hardened, it is necessary to secure the log with wire to small posts.
Concrete base
Installation of a wooden support using a concrete base can be easily done in several ways:
- Special mount embedded in concrete. By special fastening we mean a pin with a special fastening in the form of the letter P at its end. The cross-section of the beam must correspond to the dimensions of the fastening so that the tree fits easily into the device. The inserted beam is attached with screws and bolts. The method has its drawback - only timber is used as a wooden support.
- Fittings. In the absence of a specially prepared connection, ordinary reinforcement is used. The inserted iron pin into the concrete should protrude 20-25 cm above the surface. A hole is drilled on the support, the diameter of which corresponds to the diameter of the reinforcement. A seal is applied to the concrete to protect the structure from water penetration. The size of the seal is smaller than the wooden support. The joints between the pillars and concrete are covered with mortar. If necessary, the upper and lower frames will help connect all the pillars into a common structure. This option is more often used on a strip foundation.
- A box with a platform is used for hardened concrete. The wooden material is placed in a specially made box, to which a platform is welded from below. Dowels are screwed into the holes on the platform, with the help of which the box is attached to the concrete.
Fixing wood to concrete is not difficult if all technologies are followed. It is worth taking care not only of reliable fixation of the material, but also of minimal environmental impact on the wood. Then the wooden supports will serve you for many years.
Source: https://kladembeton.ru/tehnologija/inye/derevyannye-stolby-v-beton.html
Concrete stepson
The second way to install a wooden pole is to use a concrete stepson. The essence of the concreting procedure is to use not the entire log, but a small column. The sequence of the procedure is as follows:
- before installation, the support is treated with an antiseptic, the part of the stepson that will be in the ground is covered with bitumen and wrapped with roofing felt;
- crushed stone is poured onto the bottom of the hole;
- vertical fixation of the support with spacers;
- Be sure to fill the wooden post with crushed stone, gravel and compact it well. Maintaining a compaction interval (every 30 cm), adding sand and water will help increase the density of the backfill;
- 15-20 cm to the top, the hole is filled with a concrete solution, which ensures stability.
After the concrete has hardened, it is necessary to secure the log with wire to small posts.
Concrete base
Installation of a wooden support using a concrete base can be easily done in several ways:
- Special mount embedded in concrete. By special fastening we mean a pin with a special fastening in the form of the letter P at its end. The cross-section of the beam must correspond to the dimensions of the fastening so that the tree fits easily into the device. The inserted beam is attached with screws and bolts. The method has its drawback - only timber is used as a wooden support.
- Fittings. In the absence of a specially prepared connection, ordinary reinforcement is used. The inserted iron pin into the concrete should protrude 20-25 cm above the surface. A hole is drilled on the support, the diameter of which corresponds to the diameter of the reinforcement. A seal is applied to the concrete to protect the structure from water penetration. The size of the seal is smaller than the wooden support. The joints between the pillars and concrete are covered with mortar. If necessary, the upper and lower frames will help connect all the pillars into a common structure. This option is more often used on a strip foundation.
- A box with a platform is used for hardened concrete. The wooden material is placed in a specially made box, to which a platform is welded from below. Dowels are screwed into the holes on the platform, with the help of which the box is attached to the concrete.
Fixing wood to concrete is not difficult if all technologies are followed. It is worth taking care not only of reliable fixation of the material, but also of minimal environmental impact on the wood. Then the wooden supports will serve you for many years.
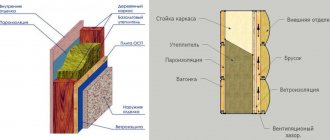
Wooden beams are a practical building material. Low price, low heat loss, light weight and ease of installation of a house made of timber make this material very popular. However, securing the beam to the foundation is not so easy, because wood cannot be glued to concrete or welded to metal. In this article we will talk about how timber is attached to various foundations, what they pay attention to and what mistakes are made.
Selection of support
Power poles, or simply poles, vary in material and purpose. In most cases, the choice of type of support based on material depends on the wishes of the owner; the choice of type of support depends on the location of the house in relation to the power line. The types of supports are divided into intermediate, anchor, corner, etc. About brands of supports in the article How to choose the right wooden support for power lines up to 0.4 kV.
The choice of materials includes wooden and concrete supports. Metal supports for lines less than 35 kV are usually not used.
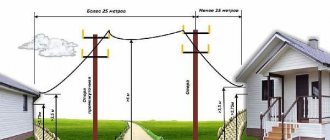
The type of support is selected based on the location of the entrance to the house in relation to the power line. For example, if the support can be placed in a straight line from the outlet post to the house, then an intermediate support, type PD (intermediate wooden), is suitable. If the line from the highway to the house turns out to be at an angle, you should choose an UPD (angular intermediate wooden) support. All this should be in the project.
Related articles: How to climb a pole
Essentially, the type of supports indicated above has implications for the selection of linear reinforcement. Standard wooden support of any type, marked C1 (top thickness 18 cm) and C2 (top thickness 22 cm). The length of the wooden pillars is 9.5 meters. Pine is usually used, the post is impregnated with an antiseptic, and I wrote about them in detail in an article here.
It is worth remembering the rules for the drainage device, which are described in detail in the PUE. There is also a separate article about them: Air power supply to a wooden house, regarding the distance from trees, neighboring houses, etc.
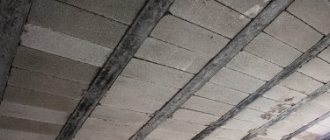
Waterproofing
The bottom beam, as well as the wooden grillage, must be properly protected from water and dampness, but it is not always possible to use creosote or other equally effective (and most often unpleasant-smelling) substances. If it is not possible to treat the grillage or lower beam with heavy fractions of oils, then it is necessary to use less effective substances, and at least 2 layers of roofing material must be laid between the foundation or iron/concrete grillage and the beam. This is material that falls out due to temperature changes. After all, in the morning the air temperature rises, but the temperature of the foundation or grillage remains unchanged. If you use a wooden grillage, then waterproofing must be laid both under and above it. This will protect the wall from dampness and prevent mold and rot.
Which mounting method is better?
When choosing a mounting method, consider the following factors:
- timber moisture;
- climatic conditions;
- seismic activity;
- the strength of the most frequent winds.
To attach damp (over 16%) timber to a wooden grillage, you must use only shrinkage compensators. All other fastening methods are ineffective.
After all, timber with high and especially natural humidity gives very strong shrinkage, so ordinary anchor bolts will not be able to provide high-quality fixation. To fasten timber with high or natural humidity to a wooden grillage, it is necessary to use an analogue of a shrinkage compensator, only made not from a screw, but from an anchor bolt. The same method can be used when installing timber on threaded rods. Instead of a nut and washer, you need to use a nut, two washers and a spring. The same fastening method should be used in those regions where there are heavy and long rains in spring and autumn.
In regions with high seismic activity, it is necessary to use a bottom beam with a moisture content of no higher than 12%, treat it with the most effective waterproofing and install it on the most rigid fastening (regular and anchor bolts). This will ensure sufficient strength of the entire structure. The same approach must be applied in those regions where wind speeds often exceed 20 meters per second. Neglecting rigid fastening in seismically active or windy regions will lead to the fact that the fastening will become loose under the influence of external factors and the house will begin to sway. Neglecting shrinkage compensators when working with timber of natural and high humidity, as well as in regions with frequent and heavy seasonal rains, will lead to the appearance of gaps between the flashing crown and the foundation or grillage.