Calculations
First, you need to decide on the scale and layout of the future fence and its pillars. The calculation must be meticulous. It is worth considering what bricks you will use. For this task, of course, any bricks are suitable.
Advice! Experts recommend standard fired masonry bricks with a large number of defrost and freeze cycles.
Parameters of each brick: 12 x 25 cm. Deviations of 1-2 mm are acceptable. There should be bricks in one pillar with minimal discrepancies. A simple, non-facing brick, the price of which is one of the most budget-friendly: regions from 5.5 rubles. per piece (Moscow and Moscow region from 6 rubles per piece).
The most common laying of such bricks is as follows: one and a half bricks are laid on one side of the pillar, and one row implies the presence of four bricks.
Scheme:
With this type of masonry, the parameters of one side of the pillar, which is square in cross-section, will be: 25 x 12 x 1 x 38 cm. 1 cm. Here, this is the thickness of the seam.
Scheme:
6.5 cm – brick thickness. Taking into account the seams between the masonry lines, one two-meter pillar requires 108 bricks .
Principles of calculation: 6.5 + 1 = 7.5 cm (line thickness taking into account the seam).
Advice! It’s easier to do detailed calculations using a calculator!
200: 7.5 = 2.67. This is the number of lines. It can be rounded to 27.
How many bricks are needed in total? Since 4 bricks are needed for one row, 4 is multiplied by 27, resulting in 108.
When making calculations, keep in mind that the bottom 3-4 lines must be laid only from solid bricks. Because the lower part of the support must have significant mass and excellent stability.
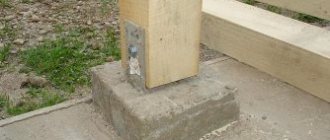
You can then center a metal pipe in the cavity of the post. You will thoroughly implement it into the foundation. The number of pipes corresponds to the number of pillars created. The pipes should exceed the height of the pillars by 4-6 cm. They will sink into the foundation by these centimeters.
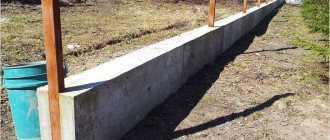
Stone foundation base
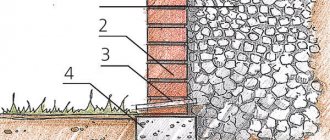
This type of base is laid like a strip base. The difference is that in this case no reinforcement is needed; stones will serve as the base. And also, you can do everything yourself.
The work order is as follows:
- First you need to properly dig the trench. Its depth will be from 15 cm and deeper, depending on the height of the fence.
- The height of the foundation can be selected individually (meaning the above-ground part). If you raise it higher above ground level, then in this case the base will also serve as a decorative element of the fence.
- First, a cushion of crushed stone or gravel is placed in the trench. After compaction, stones (rubble) are laid out and everything is filled with concrete mortar. Outside, on the above-ground part, you need to try to carefully align everything, make everything beautiful.
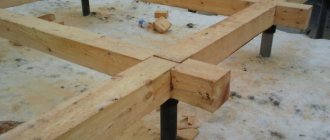
Foundation work
When choosing a foundation for future brick pillars, you need to take into account the following factors: filling material, type of soil. If corrugated sheeting or other lightweight material is used to span a fence with brick pillars, then a pile foundation .
The pile is placed at a certain depth. It is determined by the types of soils and the height of their waters.
If the soils swell in winter and groundwater is high (for example, clay), then the pile is placed 15-20 cm below the freezing point of the soil.
If the soils have good drainage (for example, different sands), then the pile can be buried at 80 cm.
Scheme:
How to make a foundation of this type? It is constructed using traditional technology:
- A name is created to the required depth by drilling. Its diameter: 25 – 5 cm.
- The bottom is filled with 1-2 buckets of crushed stone. It is thoroughly compacted.
- The internal cavity of the hole is covered with 2-3 layers of roofing felt. Here they act as formwork.
- A pipe is inserted into this formwork. The pillar will then be laid around it. The required length of pipes was indicated above.
.If your region has significant wind loads, then it is better for you to give preference to a full strip foundation .
A composition of cement and sand is prepared. Their ratio: 1:5 or 1:6. Suitable sand is sand with a fine fraction. The required cement is grade M400 and higher. For plasticity, 20-30 liquid soaps are introduced. It is important to achieve a certain consistency here. The composition should be neither dry nor liquid. Therefore, the addition of water here is gradual.
Construction of houses
112 votes
+
Vote for!
—
Vote against!
Every area needs fencing. At the same time, the fence not only serves the function of protecting the house from outside intrusion, but also provides the aesthetic appeal of the site. A brick fence looks great next to a house made of both brick and other materials. However, the construction of brick pillars has a rather complex technology. To obtain high-quality fencing, you must adhere to certain rules. We will learn about them further.
Table of contents:
- Brick pillars: types and features
- Brick pillars brick - preparation for work
- Posts for a brick fence - preparing the mortar
- Laying brick pillars with your own hands
- DIY brick pillars
Brick pillars: types and features
The appearance of a brick fence is quite simple, but the internal structure of the post involves the connection of several engineering structural elements. The technology for erecting pillars involves marking, constructing a foundation, protection from moisture and the use of additional finishing materials. If this is not done, the duration of operation of the fence will be several years.
When choosing a brick for a fence, you need to pay attention to its quality and technical characteristics. Also, pay attention to its appearance, color and texture. Also consider the compatibility of this brick with the external characteristics of the site.
There are two options for pillars for a brick fence:
- pillar made of 1.5 bricks;
- two brick pillar.
These options are the most popular, although in some cases other pillars are also built. Its functional purpose is determined in relation to the thickness of the pillar. The posts are mounted as fencing elements or to hold gates with a wicket.
Fences are also made from different materials - brick, wood, corrugated board, concrete, etc. In order to lay a pillar of brick, you need to divide the work into several stages:
- designing a fence, creating drawings and performing calculations;
- selection and acquisition of materials for work;
- preparing the site for work, creating a foundation;
- execution of masonry and installation of protective caps.
The first stage is the most important; it is here that the type of structure, the dimensions of the pillars and spans between them, and the materials from which the fence will be made are determined. When choosing materials for work, pay attention to the quality of the brick, its size and resistance to weathering, since the pillars are located on the street. Next, you need to clear the area of vegetation, dig a trench and build a foundation that will securely hold the supports.
Brick pillars brick - preparation for work
When making calculations for the construction of brick pillars, first of all, pay attention to the optimal span width, which is about two meters. If you choose the option of building a pillar of one and a half bricks, then its size will be thirty-eight centimeters.
When building a fence only on the front part, the number of posts will be smaller, since most of the fence will be occupied by gates and gates. In addition, you will need to make markings depending on the length of the section. If the fence is built on the side or rear parts, then two corner posts must be erected. Subtract the length of two corner-type pillars, the length of each span and the gate from the length of the span; if necessary, divide the resulting value by the length of the pillar. Thus, it is possible to calculate the number of intermediate-purpose pillars.
In order to lay one pillar, the height of which is 200 cm and the width of one and a half bricks, you will need about one hundred and ten bricks. In this case, the minimum grade of material should not be lower than 100. The first three rows are laid on solid bricks, and the rest on hollow bricks. This value is multiplied by the number of support pillars. In this way, it is possible to calculate the total amount of material required for the work. Add about ten percent of the reserve to compensate for defective material.
Brickwork is done around a certain plane on which the bricks rest. Particular attention is paid to pillars designed to secure gates. A steel pipe with a diameter of about eight centimeters is installed on such poles. Five reinforcing bars can replace a steel pipe. Intermediate structures are laid around three reinforcement bars. Such supports will have good performance characteristics. They are not afraid of rain, temperature changes, or hurricane winds.
After determining the number of pillars and drawing up the project, you should proceed to marking the site. To do this, a cord is pulled over the location of the pillars. Mark along the cord the locations for drilling trenches for the foundation. If a strip foundation is constructed, then during the construction of the fence, it is necessary to concrete the pillars.
Brick pillars photo:
To build a foundation for brick pillars, follow these steps:
1. Using a drill, build a hole whose width is 200 by 400 mm. The depth of the hole is determined by the depth of soil freezing in a certain region, another twenty centimeters is added to this indicator. The optimal pit depth is 120-150 cm.
2. Sand is placed at the bottom of the pit, compacted thoroughly. This pillow acts as a shock absorber and protects the base from moisture.
3. Next, the column core is installed, which is subsequently concreted. When pouring concrete, install reinforcement on the core to increase the strength of the finished structure.
4. Concrete grade two hundred is used to fill the base. To settle the foundation you need to wait about ten days. Only after this, proceed to further work.
Posts for a brick fence - preparing the mortar
In order to build brick pillars, you will need a concrete mortar of grades from 150 to 25. These mortar options differ in the number of components included in their composition. Increasing the grade value means a higher quality solution. Most often, masonry is done using mortar grade 100 or 75.
In order to make the solution more elastic, you need to add a little lime to it. This simplifies the installation process and reduces the overall cost of the work. However, too much lime in the mortar reduces its strength and leads to the loss of attractiveness of the joints between the bricks.
The sand for making the solution must be high quality, fine and free of foreign inclusions. To prepare the solution, follow these steps:
- prepare a container in which the components will be combined;
- you will also need containers for measuring components;
- Using a bayonet shovel, all components are mixed together.
If you have a concrete mixer, then preparing the solution is greatly simplified. First, prepare the dry ingredients, mix them together, and then gradually add water to the solution. The time to use the finished solution is no more than 90 minutes. After this period, it loses its characteristics. Therefore, prepare the solution in small portions.
Laying brick pillars with your own hands
For the construction of the first three rows of brickwork, high-quality solid bricks are used. Next, to achieve an economic effect, the facing material is installed. To do the masonry yourself, prepare the following tools:
- a trowel, with its help the mortar is distributed on the brick;
- shovels - a solution is thrown onto it;
- level - to control the evenness of the laying of the material.
To build a brick pillar, two or one and a half bricks are used. In this case, the brick is laid on a wide base. Apply mortar to the foundation surface and brick and install the first row. The pillar is formed from one brick laid along the length, and the second along the end edge.
To ensure that the seams between the bricks remain even, purchase additional plastic spacers or make them from improvised materials. After laying the first row of bricks, check the levelness using a level.
If there are the slightest irregularities, eliminate them by adding or removing solution. In order to increase the durability and strength of the structure, the pillars containing the steel pipe are completely filled with concrete. For these purposes, place the solution in a prepared container, for example a bucket, and add crushed stone to it. After the core of the support is filled, install rods between the bricks that will allow you to maintain the same distance between the horizontal seams. Place the mortar on the flat part of the row, not exceeding the height of the frame structure.
Using leveling devices, lay down subsequent structural elements. The joints between bricks should not coincide on adjacent rows. Thus, the procedure for laying bricks is repeated until a pillar of the required length is erected.
Upon completion of the bricklaying, the seams between the bricks are aligned using mortar. In order to achieve a black color for the mortar between the bricks, soot is added to it. When sealing the seams between bricks, place colored pebbles on them, which will become an excellent decoration for the pillar.
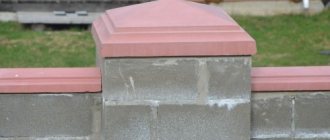
Caps for brick pillars will prevent damage to the material due to moisture. There are many options for caps made of metal, wood, plastic and other materials.
DIY brick pillars
The cost of a brick pillar is influenced by the following factors:
- quality of the material used;
- building size;
- pillar shape;
- type of masonry chosen.
After choosing the type of brickwork, you can easily calculate the amount of material for the pillar. After this, calculations are made for the total cost of the fence.
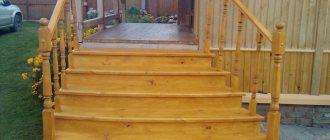
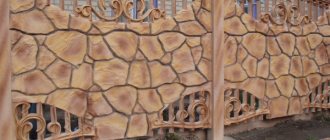
Doing the work yourself significantly reduces the cost of erecting pillars. Brick pillars have an attractive appearance and give the site solidity and reliability. They are perfectly combined with inserts made of wood, metal, forging, polycarbonate, picket fence, profiled pipes and even concrete.
Particular attention in the process of constructing concrete pillars is paid to caps. They are the finishing touch to the design of the fence. Also, the caps protect the fence from the effects of precipitation. There are many options for caps made of wood, metal, and ceramics.
When building brick pillars with your own hands, special attention is paid to the foundation of the building. If a particularly heavy material is used as filler between the posts, then it is necessary to make a strip foundation along the entire perimeter of the fence. If the region is characterized by the presence of constant and long-lasting winds, then a strip foundation is constructed in any case.
If wood or corrugated sheeting is used as the material for filling the fence, then it is enough to build a pile foundation only under the pillars. The depth of the foundation is determined by the type of soil on the site.
To construct a standard pile foundation, it is necessary to drill a hole to a previously determined depth. At the bottom of the pit, crushed stone is poured, and then sand. This technology helps prevent soil heaving due to exposure to moisture.
In addition, additional waterproofing in the form of roofing felt or bitumen mastic is installed on the finished, already hardened foundation. When a brick is exposed to moisture, it gradually deteriorates. The surface of the waterproofing is covered with an additional layer of mortar, the thickness of which is about 1.5 cm. According to the diagram, the laying of bricks begins. A rubber hammer is used to level the brick on the foundation surface. To prevent moisture from being absorbed from the mortar, it is recommended to immerse the brick in water for several minutes before starting work.
Use a wet rag to remove mortar from the brick. The second row is laid in the same way as the first, only the bricks must be tied together. Next, the bricks are leveled and the laid row is checked for evenness. The brick must be installed in a perfectly level position; if there are minimal displacements, they must be eliminated.
To maintain an even seam between the bricks, reinforcing bars are used. It is first recommended to connect them together and install them on the surface of the first laid row. The area is filled with mortar and bricks are laid on it. The rod prevents the brick from sagging and allows it to be positioned in the desired position.
Brick pillars video:
Masonry technologies
As a rule, brick pillars are laid in one and a half or two bricks . The cross-section here is: 38 x 38 and 51 x 51 cm. Maximum height is 3 m.
When laying, the seam of the bottom line must be covered with the “body” of the top brick. Seam thickness – 8-10 mm.
Scheme:
Cut-off waterproofing material is spread over the created foundation . roofing felt (2-3 layers) was indicated here You can also use bitumen waterproofing . Such protection will prevent the brick from drawing moisture from the soil. If this happens, the brick will crack and collapse.
According to the parameters of the pillars, a cement composition must be applied to the waterproofing. The required layer is a little more than 1 cm. Bricks will be laid on this layer. The bricks themselves are aligned vertically and horizontally. To do this, you need to tap them with a rubber hammer.
The second line is placed in the same way. The composition spreads onto the bricks. Only here a dressing is already arranged to cover the seam. Leveling up again. Using a tape measure, the dimensions of the laid lines are checked. Any deviation, even 1-2 mm, is eliminated. The end part of the brick is tapped (with the same hammer), the bricks are moved closer. If the side planes were not coated, it is necessary to fill the vertical seams. The laying of subsequent lines follows the same method.
Having discovered a void between the internal reinforcing pipe and the masonry, it is necessary to fill it. It is too big, it can be filled with crushed stone, compact it well and pour liquid concrete onto it.
When performing these operations, the following dilemmas may arise:
- it is difficult to maintain an even seam;
- the composition comes out of the seam.
A square metal rod will help here . Its side has parameters of 8-10 mm. It is cut into pieces that exceed the length of the column by 10-15 cm.
Scheme:
After laying the initial line, a rod is placed on it along the edges of the bricks. This section is filled with a train with some reserve. Closer to the pipe, its layer is formed more. Then you need to run a trowel along this rod. This removes excess solution. But his bias remains. A brick is placed and leveled. Significant subsidence of the brick is not allowed by the rod, and the position of the other end must be maintained with a level.
After this, a piece of rod is used for the seam vertically. Its length is about 10 cm. It is located along the poke. Using a trowel, coat the side of the laid brick with the compound. Also remove any remaining solution from the rod. Next comes the laying and leveling of the second brick. After setting the level, press the seam with a trowel from above and remove the vertical rod.
This method is used to lay all the bricks in a line. Such actions allow you to monitor the seams and create them neat . Poor joint control can lead to curling and changes in masonry parameters.
Brickwork on video. Full technology and nuances
The video, judging by the likes, comments and number of views, is one of the best in this topic.
All about pitfalls and minor misunderstandings. For a novice mason, this is a video instruction from a professional master. It's nice to watch, listen and take note of something for yourself.
Strip view of the foundation
This type is considered the simplest and is suitable for the construction of any fence.
To lay the strip foundation, we will need:
- reinforcement with a cross section of 0.8 - 1.4 cm;
- crushed stone (20 – 40 mm);
- sand;
- cement grade M 400;
- water;
- concrete mixer;
- shovel;
- container for mixing all ingredients.
We will need crushed stone, sand, cement and water for the mortar with which we will fill the reinforcement, for the strength and rigidity of the foundation.
Before laying the strip base, it is necessary to emphasize several important points:
- First of all, you need to decide where the fence will go. Then prepare this place: for this you need to take wooden pegs and rope. The pegs must be driven parallel to each other and the rope must be pulled over them. The perimeter of the stretched rope will be considered the location of the trench. Its width is usually 40 cm.
- You need to dig the trench correctly. Its depth will depend on the density of the soil and the quality of the soil. If the soil is dense, then the average depth can be from 30 to 50 cm, but if the soil is saturated with water, then you need to take at least a meter.
- At the bottom of the trench you need to lay a cushion, which will consist of coarse sand, then moisten it and compact it well. Cover the top with crushed stone.
- The next stage is to organize such a device as formwork. It is usually built from boards along the perimeter of the entire trench and it should look upward by 10 - 40 cm.
- Then comes the installation of reinforcement. You need to lay two rods down and up.
- Afterwards, everything is filled with mortar and at the same time compacted using a rod or vibrator so that there is no air left inside and the foundation does not crack over time.
- The drying time for concrete is at least a week. Only after complete drying can the formwork be removed.
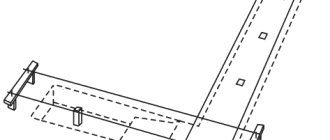
Embedded components
When creating brick pillars, think about the method of attaching the span to them . You will need to attach horizontal guides to the pipes located in the pillars. They will fill the fence. But first, you need to weld embedded parts to these pipes: corners, studs, parts for attaching wooden plates, etc. They are welded at the same height. All attached crossbars should be strictly horizontal.
Scheme:
A brick pillar needs protection from moisture. Therefore, its top should be covered with a cap. Caps can be purchased. Sales include products made of metal, concrete, and composite options. You can make the caps yourself.
Installation of brick pillars: tips
If you place brick pillars on top of the foundation, they will eventually collapse under stress. The crossbars placed on the fence spans do not save the load-bearing part from deformation. Brick pillars holding gates and gates are especially dangerous in terms of rapid destruction. For the construction of pillars, it is recommended to use only red bricks or facing ones.
The pillars are fastened using a metal support, the role of which can easily be played by iron pipes, angles or fittings. Fasteners for sections and transverse joists are connected to the support. The hollow pillar, when immersed in the foundation, is filled with concrete and lowered to a depth of 90 cm.
In the process of laying the load-bearing part under a brick fence, the voids between the iron support and the base material are carefully sealed with mortar, the recipe of which, if necessary, is improved with crushed stone or brick fragments. The installation of sections begins after about 3 weeks, when the columns have hardened thoroughly.
False - pillars
Today you can also imitate brickwork. To do this, it is worth purchasing special finishing panels - “pix panels”.
Their advantages:
- Convenient options. The weight of one panel is 500 grams. Dimensions (cm): 38 x 15 x 30.
- Highest resistance to weathering, sunlight and fading
- Huge range of colors and shades.
- Ease of installation.
- Huge savings in finance, time and effort.
- Operating temperature range: - 40 to +60C.
- The minimum service life is 5 years.
Minuses:
- Weak resistance to mechanical stress.
- Lack of products for corner posts. It is required to trim the panels at an angle of 45 degrees and join them along the installation site using strips.
Preparation
Such panels can be mounted to the fence on one or both sides. They can only be used to decorate the front part.
To work you need:
- Corners. Parameters: 2 x 2 x 0.1 cm. The length is affected by the height of the fence.
- Screw screws (for one panel - 4 pieces).
- A screwdriver for screwing them in.
- Construction tape.
The work starts with marking the installation areas for the pillars themselves. Their distance from each other is 3 m. Place two corners there with an external dimension equal to the width of the panel.
Installation
- The corners are attached to the fence canvas (screws are used) and to wooden posts.
- A decorative canopy is placed on the top panel. This panel is attached to the corners located along the height of the fence.
- When gradually lowering down, connect other elements with special locks, and fasten them to the corners with self-tapping screws.
- Wipe the panels with a damp cloth.
Columnar foundation for brick pillars
The construction of a columnar foundation for a brick fence is the most affordable option for self-construction, which reliably holds marker posts, spans of mesh fencing and sheets of corrugated sheets. Support posts are placed at equal distances in pre-dug wells. Digging holes is done manually or using a garden auger. The holes should be distributed along the entire perimeter of the working area. A slight expansion is made at the bottom of the pits and the wells are cemented.
An additional way to create a foundation for a brick fence is to combine a columnar and strip foundation. The principle of operation is the same, only under the supports when arranging a strip-and-pillar foundation, holes are made and filled with liquid mortar. The lower part of the structure is reinforced with reinforcement.
Necessary tool
Tools necessary for work: hammer, tape measure, construction level, mallet, grater, plumb line, spatula.
To build a columnar brick foundation you will need the following equipment:
- shovel;
- Master OK;
- grater;
- construction mixer;
- measuring bucket;
- putty knife;
- hammer;
- mallet;
- knife;
- sieve;
- metal scissors;
- plumb line;
- construction level;
- roulette;
- paint brush.