Concrete parking
This method of solving the problem of parking lot equipment can be classified as a budget option in comparison with paving stones, which also require base preparation. In addition, over time, street tiles can crack, and weeds grow in the seams between them, which disrupts the appearance of the site and the yard at the dacha looks sloppy.
At first glance, it may seem that doing such work with your own hands will not be easy, but as practice shows, even an inexperienced beginner can fill a car parking lot. The concrete platform for the car is installed in several stages:
- Preparing the site for concrete and laying the “cushion”.
- Installation of lighthouses and wooden formwork.
- Reinforcement of the working base.
- Preparation of mortar mass.
- Pouring process.
Beginning of work
Before concreting the site begins, it is necessary to outline the boundaries of the area where the solution will be poured. It is important to take into account that all surface irregularities (pits, bumps) will disrupt the dense structure of the screed and increase material consumption - therefore, the territory must be leveled.
If a parking space is adjacent to a driveway for a car, it must be laid at a certain angle. This is done to ensure that rainwater flows outside the site and does not stagnate on the screed.
Materials and tools
At the first stage, it is necessary to remove all debris, clean off the grass and compact the soil thoroughly. Then you will need to prepare the materials and tools necessary for the work. To complete all the work correctly, we will need:
- water;
- sand;
- frost-resistant cement (F200);
- fittings;
- boards;
- metal profile (beacons);
- level;
- concrete mixer (optional).
Do-it-yourself concreting of a platform for a car
For many owners of country houses and summer cottages, the issue of concreting a site for a car is very relevant, especially in rainy weather. Not every motorist will like parking the car on the lawn or parking in the garden. That’s why it’s worth figuring out how to properly equip a parking space in the courtyard of your dacha with your own hands.
Preparatory work
Even at the initial stage, it is necessary to mark the boundary where the cement mortar will be poured. But it is worth considering that any unevenness in the form of pits or, conversely, tubercles will disrupt the screed, thereby increasing the consumption of material. That is why the soil surface is pre-leveled and compacted.
If you plan to arrange a special entrance to the parking lot, then you should do it at a slight angle so that rainwater does not accumulate in the parking lot, but goes outside the site. In this case, the site will always be clean and dry.
At the preparatory stage, you also need to calculate and purchase the required number of materials and tools, so that during the work you do not get distracted and do not waste time purchasing them. To concrete a site for a car with your own hands you will need:
- water;
- sand;
- reinforcement bars;
- boards;
- metal profile;
- building level;
- unit for mixing concrete.
READ Concreting the yard of a private house: pouring technology
Many beginners ask what grade of concrete is needed for a car area. Experts recommend taking frost-resistant compounds, for example, cement F 200. After everything is prepared, the dimensions of the future parking lot are determined, you can begin construction work.
Base reinforcement
Before starting the reinforcement process, it is necessary to lay crushed stone on the sand cushion (it will be enough to make a layer of 5-8 centimeters), and then compact it thoroughly. Reinforcing bars will strengthen the concrete structure, so it is not recommended to ignore this stage.
This important procedure can be performed in two ways. In the first, it is supposed to knit metal rods using wire according to the honeycomb principle. The second technology is much simpler - it is the installation of a special grille, which can be purchased at any hardware store.
The use of the second option is suitable for sites where it is planned to park no more than two cars, that is, in a parking lot that will not be subject to heavy loads. Actually, this is why reinforcement and wire can be used to fill the foundation. It is advisable to make the frame directly on site.
The rods are laid crosswise, and at the junction they are tightly tied with wire. As for welding work, experts do not recommend doing this, since during welding the structure loses its mobility. This may cause deformation, which in turn will damage the reinforcing base.
READ How to prepare and pour concrete for a garage floor with your own hands
Pouring the solution
After the reinforcing mesh has been laid, they begin pouring the concrete solution. If crushed stone was not placed under the metal rods, then you can add it to the cement at this stage. In this matter, everything depends on the preferences of the builder himself. As soon as the cement is prepared, they begin to concrete the area for the vehicle.
The concrete solution for the construction of the site is prepared in compliance with certain proportions. For the ideal composition you need to mix 1 part cement, 3 parts crushed stone and 2.5 parts sand. Since the mixture turns out to be quite dense, it is recommended to mix it using special equipment - a concrete mixer.
First, pour one bucket of water into the apparatus (twice as much cement is spent per bucket of water). Afterwards all other components are added. The mixture is kneaded until the sand is evenly distributed in the total mass.
After this, you need to use a shovel to evenly distribute the concrete between the marked beacons and remove all excess. To do this, you need to install a rail on the beacons and stretch it along the entire poured mixture , “pulling” the excess solution towards you. Repeat the manipulations several times to ensure the surface is perfectly leveled.
To prevent cracks from appearing on the concrete surface during sudden temperature changes, experts recommend leaving small grooves. You can make them using a grinder after the solution has dried.
During the hardening period of the mixture, it is necessary to cover the concrete area with plastic film so that the water does not evaporate and the coating does not crack. If the weather is sunny, then, on the contrary, you should water the stove with water from a hose.
After the surface has completely dried, the uneven surfaces are cleaned. This can be done with a regular construction spatula. At this point, the construction of a concrete platform for a vehicle can be considered complete.
Formwork installation
Without formwork, it is impossible to pour quality concrete on a flat surface. This special design creates the shape of the screed as it dries. On a horizontal section, wooden walls fixed with pegs will prevent the construction mixture from spreading, and concreting will be reliable.
For an optimal platform for a car, a layer of mortar of 15 cm is enough, and such an amount of material will not create much pressure on the formwork, so it does not need additional strengthening.
Beacons
According to the technology, it is necessary to concrete a horizontal surface using beacons that fix wooden boards. Drywall profiles (UD) are usually used as beacons. It is attached to a cement-sand mortar (proportion 1:4), which is laid out in slides and a metal profile is pressed into them. It is better to do this kind of work under the level.
Installation of formwork beacons is carried out in a certain sequence.
First of all, pins made of round metal rods are installed in the corners. A thread is stretched between them and lowered to the notches previously applied to the pins.
The first thread is knitted randomly, and the next one is secured in relation to the previous one using a level. A pair of transverse threads are knitted between the stretched guidelines. Beacons will be installed in the places where they touch. It should be remembered that the optimal distance between beacons is 0.5 m.
Proper concreting of a platform for a car with your own hands: technology, step-by-step instructions
When landscaping the local area of a private house, the question arises of creating a parking space for a car. The most accessible, inexpensive and fastest solution would be to concrete the area for the car.
Creation of a parking space.
Types of car platforms
Do-it-yourself parking spaces can be made from various materials, they are:
- crushed stone or gravel;
- lawn;
- ecotextile;
- tiled;
- concrete.
Crushed stone, gravel or pebbles can be taken in medium fractions. The main thing is that pebbles do not get stuck in the tire treads. Such parking lots are constructed quite simply: a sandy base 15 cm high is poured onto the area marked out for cars, and geotextiles are laid on top.
A crushed stone embankment is laid on the material, the height of the layer should be at least 15 cm, after which this “cushion” is leveled and compacted. The parking lot is ready; to mark its boundaries, you can line the embankment with sides made of brick or curb stone. It is advisable to use crushed stone.
Eco-textiles will look more aesthetically pleasing than lawn grass, which will develop wheel ruts over time.
The construction of such a parking lot is also simple: a sand-gravel mixture with a total layer height of 15-20 cm is laid on a marked area, covered with geotextiles, and lawn honeycombs are attached on top.
You only need to fill these forms with soil mixed with lawn seeds. By periodically spilling the soil backfill, you can have a cheerful parking lot with a neatly marked lattice of turf grass.
It is more difficult to build a parking lot from paving slabs than previous types of parking lots, but the laboriousness of the process is paid off by the durability of the parking lot and the increased service life of the site.
The tiles are laid on a dry cement-sand mixture, pre-compacted, the boundaries are fenced with curbs.
The aesthetic appearance of such a parking lot can only be spoiled by grass growing in the joints between the tiles.
A concrete parking lot for a car is considered the most difficult to construct among the above types of parking lots, but its reliability and durability are worth it. A monolithic foundation, poured with your own hands using the correct technology, will last longer than other parking lots.
Making a concrete parking lot
The concrete platform is built in several stages:
Making a parking lot from concrete.
- Preparatory work.
- Construction of the bottom for the platform.
- Construction of formwork.
- Reinforcement.
- Preparation of the solution and pouring.
To construct a parking lot, it is necessary to know the weight of the car in order to create a concrete structure with the required strength.
It is needed so that the monolithic base can withstand the distribution of the load from the machine.
Tools needed for making
The set of tools for constructing a concrete parking lot includes:
- boards or metal sheets for formwork;
- metal profiles for the construction of lighthouses;
- building level;
- pegs and rope for marking;
- solution container;
- shovel, fittings;
- steel wire.
Selecting a location, taking measurements and calculating the area
A parking space must be selected based on accessibility criteria. It is advisable to use part of the entrance area to the house in front of the gate or in the yard for the site.
The size of the future parking lot will depend on the number of cars parked. For example, for a car up to 4 m long, the optimal dimensions of the site will be 2.5 x 5 m.
It must be remembered that it is undesirable for the parking lot to be adjacent to the foundation of the house, because...
the connection of the blind area and the concrete parking lot can lead to deformation of the buildings due to the expansion of the concrete structure due to the effects of temperature changes.
After determining the parking space, you need to mark the area. To do this, pegs are driven into the corners, between which a rope is stretched - this is how the boundaries of the foundation to be poured are indicated.
Surface preparation
After marking, debris and weeds are removed from the construction site. Then a layer of soil is removed to a depth of at least 20 cm. Excavation is necessary to remove the rhizomes of weeds, which can subsequently rot and destroy the concrete structure.
After preparing a small pit, you can begin constructing a sand cushion:
- Sand is poured onto the bottom with a layer thickness of 10-15 cm. It should be leveled, slightly moistened and compacted tightly.
- Crushed stone of the middle fraction is laid on top of the sand layer; the thickness of the crushed stone bedding should be at least 10 cm. It is also leveled, moistened and thoroughly compacted.
It is recommended to lay a layer of geotextile or agrofibre on the crushed stone - the material will perform a restraining function and will not allow the cushion to creep under the weight of the concrete solution.
To ensure that precipitation and water do not linger on the concrete platform after washing the car, it is recommended to form it with a slight slope and provide a place for drainage.
Installation of formwork
Before pouring the parking lot, it is necessary to install a removable formwork structure - it helps to form smooth edges of the site. For this purpose, fences are installed at right angles into the pit. They can be fastened together using nails or self-tapping screws.
After installing the formwork, it is recommended to install beacons - with their help, the evenness of pouring the concrete mass will be monitored. As beacons, a metal profile is used, cut into the required number of pins. Notches are cut on the beacons, which can be used to guide them to level the surface.
The pins are fastened to slides made of a sand-cement mixture in a 4:1 ratio (sand-cement) , prepared in a solution. A cord is stretched between the beacons, which is secured along the marked notches; it is recommended to check the evenness using a level. The step between the beacons should be no more than 0.5 m.
Filling the parking lot
Upon completion of the preparatory work, the concrete mass is poured. The site needs to be filled at one time, so it is necessary to mix the solution in such a volume that it will be used immediately. The thickness of the concrete layer should be from 20 to 25 cm.
The standard mixture for filling the site should contain:
- river sand - 3 parts;
- cement M500 - 1 part;
- crushed stone of the middle fraction - 2 parts.
Water is added in the amount necessary to mix a thick solution, but not more than half the volume of the binder material.
After pouring, the surface should be left for 2 days until it hardens, after making punctures in several places to release air from the mass.
Then it is advisable to cut the platform, leaving grooves in several places - this is necessary to prevent deformation of the building due to expansion of concrete due to temperature changes.
After 2 days, you can sand the surface, leveling it if necessary.
Calculation of cement mortar
Some builders believe that crushed stone need not be added if it has already been poured onto a sand bed as a base.
Then, to prepare the concrete mass, it is enough to use sand and cement, calculating the composition of the mixture in a 1:1 ratio, and dilute it with water until a homogeneous mass of medium viscosity is formed.
The density of the mass should be such that it can penetrate through the crushed stone layer.
sand cushion
In order to properly concreting a parking space, a sand cushion must be created. It can be formed both before and after the installation of the formwork; there are no strict restrictions here, and the sequence of this procedure is carried out at the discretion of the master.
The only difference is that when laying agrofibre, which holds sand and allows moisture to pass through, it is better to do this with ready-made formwork. It is more convenient to spread the fiber like a “pillowcase”, which will prevent the sand from moving under the weight of the concrete.
Before you start laying agrofibre, you need to thoroughly compact the sand and spill it with water. Level the sand embankment with any available device, which is usually used when installing paving slabs.
Base reinforcement
Before reinforcement begins, a 5 cm layer of crushed stone is poured on top of the sand cushion and compacted. The reinforcement strengthens the concrete structure, so when constructing a parking area for a car, you cannot do without it. The reinforcement procedure is performed in one of two ways. You can knit metal rods with wire, creating a kind of honeycomb. An easier way to strengthen the solution is to purchase a special grid.
The second option is suitable for places that will not be subject to heavy load. For pouring foundations, exclusively metal rods and wire are used. Concreting the area for the car is carried out using reinforcing mesh with rods, the cross-section of which ranges from 8.5 mm to 10.5 mm.
Knitting mesh
The reinforcement frame is made directly at the installation site. The rods are placed crosswise and tied with wire at the joining points. It is strictly not recommended to use welding to connect the reinforcement, as it will deprive the frame of mobility. This, in turn, will lead to deformation and damage to the reinforcing base.
Concreting a site for a car - how it's done
Having a specially equipped parking space will protect your vehicle from dirt and water. Concreting a site for a car on which the car is to be parked is one of the budgetary types of territory development.
Figure 1. Concrete platform for a car
Types of sites
There are a considerable number of varieties of concreting a site for a car. The simplest possible area for a car is a completely open area. It is made slightly elevated above the soil level. In addition to the construction of concrete platforms, the storage location of the machine can be different:
- grass;
- crushed stone;
- paving slabs.
You can also simply concrete the area. This design is the most durable, since it is made of high-quality monolithic concrete. Correct implementation of technological work and the use of high-quality materials can increase the service life of the coating.
Primary requirements
Before you start concreting a site for a car, you need to familiarize yourself with the requirements for parking lots. Their dimensions in a private courtyard depend on the number of vehicles. The main thing is that cars can be placed freely on the territory. A concrete platform serving as a place to store one car must have the following minimum parameters: 5 * 3 m.
The parking area should be located next to the gate. To prevent the accumulation of water in the parking lot, the base must be raised above the ground. Concrete is laid at a slope of 2-5°. This prevents water from stagnating. During installation, gutters are made along the edges of the site through which rain will flow into the designated area.
Tools and materials
To concrete a site for a car with your own hands, you will need the following tools and materials:
- materials from which formwork is made;
- rope for marking with pegs;
- metal profiles for installing beacons on the site;
- building level;
- wire and fittings;
- solution tank;
- shovel;
- components for the solution.
Selecting a location and calculation
Before a platform for a car is built, it is necessary to determine its location and the dimensions of the base. Dimensions depend on the number of vehicles that are supposed to be placed in this zone. For each car with a length of up to 4 m, a platform measuring 2.5 * 5 m is required.
Important! You cannot concrete the area directly adjacent to the foundation of the house. When temperature changes occur, concrete can cause deformation of the foundation under the building.
When the place is determined, pegs are placed, marking the selected area. A rope is stretched between them, establishing the boundaries of the parking lot.
Calculation of cement mortar only
If you provide the required thickness of concrete for the site under the car, it is not at all necessary to add crushed stone to the mixture. But it certainly must be present, like a layer poured on top of sand.
To ensure the connection of the liquid solution and the crushed stone layer, only cement and sand, taken in equal proportions, are used for preparation. When diluting the composition with water, it is necessary to obtain a homogeneous mass with an average viscosity.
Its thickness is brought to a state that allows the liquid to seep through the layer of crushed stone.
Pouring concrete solution
After laying the reinforcing mesh, concrete begins to be poured. As mentioned earlier, in some cases the solution is mixed with crushed stone, and sometimes the crushed stone is placed under the reinforcement independently, and only then they begin to pour concrete.
Pouring mortar with crushed stone
The concrete mixture for pouring a car platform must be prepared in accordance with the proportions. According to the technology, cement, crushed stone and sand are mixed in a ratio of approximately 1:3:2.5 (to obtain concrete of a grade not lower than M300). It is worth taking cement grade M400. To facilitate the labor-intensive process, it is better to use a concrete mixer. First, pour a bucket of water into it (water should be 2 times less than cement) and fill in the remaining components. You need to stir until the sand is evenly distributed in the total mass.
Next, the concrete is unloaded onto the ground and, using a shovel, distributed between the installed beacons. Now all that remains is to remove the excess mass that was used to concrete the dacha parking lot.
To do this, the rail is installed on the beacons and pulled along the poured mass, pulling the excess solution towards itself. For better effect, this procedure is repeated several times until the surface becomes perfectly smooth.
Cement-sand mortar
If crushed stone was poured in front of the reinforcing mesh, then there is no need to add it to the solution. Cement and sand (1:1) are poured into a concrete mixer, and then water is added until the required consistency is obtained. In this case, the solution should not be as thick as in the first option, otherwise it will not seep through the gravel layer. The entire filling procedure is identical to that described above.
In order to prevent the concrete from cracking due to temperature changes due to expansion, it is necessary to leave grooves.
They are cut through with a grinder after the concrete has dried or done with a tool until the solution has hardened.
Concreting a site for a car with your own hands: video
For many metropolitan residents, the concept of “home” rarely goes beyond the staircase or entrance. The improvement of the yard is mainly carried out by municipal organizations or management companies.
For those who live in a private house, the yard is considered not just the territory adjacent to the house. This is the face of the house, which can sometimes tell a lot about the summer resident.
For example, a hard-working and, at the same time, clean owner’s yard, as a rule, is concreted.
Laying the area with concrete pavement
Reasons for concreting a yard
Let's consider the most striking and obvious reasons for concreting a yard at a summer cottage:
- Such areas are easier to keep clean - much less dirt will accumulate on them, there is no need to mow weeds from time to time, and it is easier to clear snow in winter.
- You can create a smooth and at the same time hard surface on which puddles will not accumulate, bumps will form, and much more. In particular, this is relevant if not only cars, but also trucks come into the yard.
- It's definitely the look. Through these works, it is possible to improve the area, while providing space for flower beds, benches and other decorative elements intended for decoration.
Layers of concrete cover
But in order for concrete to maintain its integrity and appearance for a long time, it is necessary to strictly follow all the features of laying the concrete surface.
works
The video below demonstrates in detail the process of pouring concrete onto the area for your car:
- First you need to level the area and get rid of the top layer of soil with grass roots.
- Then we prepare a cushion of crushed stone, which we then compact with our own hands - to do this, we put a layer of sand on top for decluttering. The thickness of the crushed stone layer should be about 18 cm. Often this layer is made much thicker, in particular if, in addition to crushed stone, construction waste is used in it - broken bricks, remnants of old concrete, and so on. There are other cases - if the soil in the yard is hard, compacted, without grass, then you may not use crushed stone at all.
- Most summer residents lay plastic film on top of the crushed stone. It will serve as a water-repellent layer and also prevent grass from growing.
- We install formwork made of metal strips along the edges of the site. If you plan to leave free areas inside the site for flower beds, we install formwork in these areas as well.
Stages of work
Let's consider the main stages of work on such an important issue as concreting a site for a vehicle, while all the work can be done with your own hands:
Display of beacons
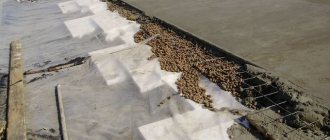
Already at the preparatory stage of the crushed stone cushion, it is better to use a horizontal level to maximize leveling of the site. After this, beacons need to be placed throughout the area, which should then be used as a guide when pouring the yard. Here it is best to use ordinary plaster beacons and a system of thin twine, which is pulled between the pegs.
Filling with crushed stone - the first stage
Reinforcement
We definitely lay reinforcement between the beacons. It is best to use a special reinforcement mesh made of thick wire. All sharp edges of the reinforcement must be bent downwards. Reinforcement is considered the main way to ensure the integrity of a concrete platform and minimize the creation of cracks.
Preparation of the solution
The most critical stage.
In this case, it is not worth saving on raw materials: if you buy poor quality cement or mix it in insufficient quantities, this will affect the condition of the yard within a few years.
It is better to buy concrete grade M 300, in a ratio of one to one with water and 1 to 2 with sand and crushed stone. An important point: mix the concrete thoroughly until a mass of homogeneous color and consistency is formed.
Laying out concrete
We spread the solution with a shovel between pairs of prepared beacons, so that the concrete slightly hides them - almost by a few millimeters. Then we remove the excess concrete with a spatula. To do this, we install the rail perpendicular to 2 parallel beacons and slide it along them, as if on rails, leveling the concreted area.
Installation of reinforced grating - second stage
Finishing the site
At the request of the summer resident, he can also apply another layer to the concrete - a strengthening polymer-cement coating, which is also commonly called topping. It is especially important to treat the most stressed areas with topping – the edges along with the corners.
You can process it using 2 methods. We pour the dry hardener mixture along the edges of the area immediately after laying and leveling the concrete surface. The mixture itself will be absorbed into the wet concrete over time.
Or after the concrete hardens, we remove small strips about a centimeter deep from its surface, and in their place we fill in the same mixture as in the first option, however, diluted with water.
After the concrete coating has completely hardened (about a day), all that remains is to clean the area from traces of the spatula and other roughness.
Surface care
Despite the fact that concrete becomes hard very quickly, it can take a long time to gain its final strength. Therefore, in the first few days we do not subject the concrete surface to heavy loads - for example, to prevent a car from driving over, especially with a load.
Pouring concrete - stage three
The main element of caring for a concrete surface is maintaining the required level of humidity. In particular, on the first day. The strength gain of concrete directly depends on the presence of water in it.
For a couple of days after such an important process as concreting, it is necessary to keep the concrete surface moist at all times, ideally under a thin layer of water. This is very important if the installation was carried out in hot weather, since the temperature at which the concrete hardens is also of great importance.
At temperatures above 30 degrees, the strength of concrete based on alumina cement is almost halved.
Water is also of great importance during the further use of concrete pavements. In hot weather, it is better to occasionally spray the surface with water from a hose. The rest of the time it should have enough moisture, which comes from precipitation. In addition, for additional protection of the concrete site, various protective agents are provided that are sprayed on its surface.
Features of concreting a yard with your own hands
The quality of sand also greatly affects the quality of concrete. It is better to use coarse sand with a minimum clay content. To find out the quality of the sand, place it in a plastic bottle with clean water, shake it a little and wait. If the water turns out to be cloudy and does not brighten for a long time, the sand contains a high clay content.
Ready concrete pavement
To further strengthen the concrete surface with your own hands, you can use the ironing method. To do this, pour a little clean cement onto the already hardening concrete and rub it into the surface using a trowel.
In order to maintain the moisture level of concrete, in some cases coatings containing special hygroscopic salts are used that absorb moisture from the air. But it must be remembered that with fairly low air humidity characteristics, these salts absorb moisture from concrete.
Painting the concrete surface white can be used as a protective measure. Then the concrete will heat up less under the sun's rays. Cracks in concrete mainly form at the junction of areas that were poured and hardened at different times. Therefore, if possible, it is better to lay out concrete with your own hands over the entire surface in the shortest possible time.
Concreting scheme
If you use reinforcing mixtures - toppings - to strengthen the edges and corners of the area, then pouring water into these areas immediately after the concrete coating has hardened is not recommended. This may cause the topping to peel off.
During preparation, it is also necessary to make a slight slope of the entire territory and grooves for water drainage. Concrete pavement prefers moisture, but the yard is not concreted so that puddles form on it all the time.
An easy and also good method for making grooves is to place iron pipes on a hardening concrete surface and press them down with something heavy.
After the concrete coating has hardened, we remove the pipes, but traces of them will remain.
S. Diana