Electrical wiring installed in the premises must provide quick and convenient connection of household appliances, instruments and equipment. Safe connection of sockets to the power cable involves concrete socket boxes installed at the beginning of installation. For example, a socket box made of durable, non-flammable plastic in reinforced concrete not only ensures reliable fastening of sockets, but also protects users from electric shock. In addition to their main name, these products are also known as mounting or installation boxes.
Functions of mounting boxes
Many owners doubt the advisability of using a socket box for concrete and believe that it is quite possible to do without it. They cite the fact that many sockets installed directly in a concrete wall serve well for a long time. However, in such cases there is always a certain risk and there is no complete guarantee of electrical and fire safety.
To resolve this issue in favor of mounting boxes, it is necessary to consider the purpose of these products and the functions assigned to them:
- The mounting box, fixed into concrete or into a brick wall, in turn, firmly holds the socket fixed in it.
- Ensuring electrical safety. Socket boxes, which must be installed in concrete, brick and plasterboard, have dielectric properties, preventing voltage from the socket contacts from reaching the metal wall structures.
- The socket itself is also protected from dust, moisture and small foreign objects getting inside the housing.
- A possible fire inside the socket is localized in the socket box and does not spread beyond the boundaries of the product.
- Standard sizes make installation of socket boxes more accurate. As a result, the socket cover comes into contact with a completely flat surface, without cracks or gaps.
Technical requirements for socket boxes
With regard to mounting boxes, there are no separate rules for their selection, installation and operation. There are only general provisions affecting electrical and fire safety enshrined in the PUE. In accordance with them, the installation of socket boxes in concrete is carried out in the same way as the installation of distribution boxes. Locations and distances are determined by building codes and regulations (SNiP).
However, all socket boxes must be installed and meet certain technical requirements to avoid problems during operation:
- The strength of the material must be sufficient to counterbalance the effort required to remove the plug from the socket. The box itself is firmly held in the wall and does not pull out along with the socket. For better fixation, the outer surface of the products is equipped with special grooves, ribs and hooks. For the same purpose, technological holes are used, through which wiring is inserted into the socket box.
- The best solution for fastening is considered to be alabaster or building gypsum, used in a paste-like consistency. After complete drying, the box body cannot be removed without damaging the plastic or the structure of the wall itself.
- The plastic used to make boxes must not only be durable, but also have dielectric properties and be resistant to moisture and other aggressive influences.
- The inner side of the walls is also equipped with ribs that strengthen the fastening of the sockets. Old metal structures were installed smooth, and the sockets quite often fell out of their seats due to the weak grip of the spacer legs.
- Many socket boxes have special holes for screw fastening.
- For the manufacture of mounting boxes, only non-flammable plastics are used. This requirement is relevant even for brick and concrete, since a flame from an outlet can easily spread to walls and furniture located nearby.
- A useful requirement is the presence of special elements for fastening the clamps. This makes it possible to assemble blocks with any number of socket boxes, including double configurations.
Criteria for selecting an installation box
The socket box is a plastic niche with a seat inside. It is designed for quick and convenient fixing of sockets or switches; for this purpose, its body is equipped with threaded holes for screws. It also provides several places for power wires to enter. To open them, just remove the small plugs.
When the socket box is installed correctly. devices mounted in it are securely attached to the walls of the housing. If previously, sockets installed on bare concrete would become loose over time, now this is completely eliminated. Now that we’ve figured out the purpose, it’s time to get acquainted with the types of socket boxes.
The socket box for the hidden wiring power point is a plastic box that resembles a wide and short glass. On its walls there are perforations marking hatches for entering wires into the device. There are devices for fixing the socket box in a solid or hollow wall and screws for attaching the socket mechanism.
The design is simple, but a future electrician selecting a socket box for the upcoming installation should take into account:
We suggest you familiarize yourself with How to sheathe walls with plasterboard on bars
Experienced electricians strongly advise stocking up on twenty cm of wire in case of repairs, replacements and other electrical installation operations. The minimum, but not very desirable margin should be at least 10 cm. Every time any work is carried out on the socket mechanism, the wires will be trimmed and their ends will be stripped. As a result, the stock gradually “melts”.
Due to the lack of length, the wire will have to be extended: twisted, soldered, welded, etc. Extending the wire using any of the above methods not only strains the performer and takes time, but also changes the characteristics of the current-carrying component at the connection point.
The supply of wires must be formed into loops or “soft” folds. The formation of sharp creases is extremely undesirable. The loops should be placed at the bottom of the installation box so that the wire sections stripped of insulation do not touch.
The current-carrying cores of wires with a cross-section of 2.5 square meters or more of the specified size are quite rigid. Rolling them up and laying them in loops under the socket block will be very problematic if the internal depth of the socket box is 15-30 usable cm. This means that to install an socket connected to a source with a thick cable, a deeper socket box will be required.
Such situations are rare, but can bring a lot of difficulties if they are not taken into account. If non-modular sockets or switches (which do not fit into a common frame) are installed in one row, then a minimum distance must be maintained between them. Otherwise, further installation will be impossible!
As an example of such a scheme, you can take a cheap thermostat for an electric heated floor - this product is not modular and does not fit into a common frame with other sockets. Of course, there are thermostats suitable for general frames, but they are more expensive and are tied to a certain collection of installation electrics. Therefore, if you use a device without a common frame, it is imperative to maintain the distance!
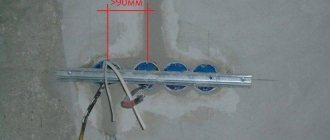
So, the vast majority of sockets, switches, thermostats and others, in their finished form, have a width of 86 mm. Accordingly, between boxes for non-modular sockets there must be a minimum distance (along the axes) of 86 mm. But this is if it’s “grinding in” and not exactly, what if the switch turns out to be wider? Therefore, it is better to make the minimum distance between the axes of the installation boxes 90 mm. or more.
Well, the article has come to an end. It is more than enough for installing socket boxes in concrete and other materials.
As an example of such a scheme, you can take a cheap thermostat for an electric heated floor - this product is not modular and does not fit into a common frame with other sockets. Of course, there are thermostats suitable for general frames, but they are more expensive and are tied to a certain collection of installation electrics. Therefore, if you use a device without a common frame, it is imperative to maintain the distance!
So, the vast majority of sockets, switches, thermostats and others, in their finished form, have a width of 86 mm. Accordingly, between boxes for non-modular sockets there must be a minimum distance (along the axes) of 86 mm. But this is if it’s “grinding in” and not exactly, what if the switch turns out to be wider? Therefore, it is better to make the minimum distance between the axes of the installation boxes 90 mm. or more.
Well, the article has come to an end. It is more than enough for installing socket boxes in concrete and other materials.
Design of products for installation in concrete
There are special criteria for choosing socket boxes installed in concrete walls. Among them, the following are of particular importance:
- Overall dimensions of the product, including the diameter of the socket, planting depth and distance between the axes.
- Installation boxes can be polypropylene or polyamide, made of PVC. Metal products are not used in concrete because they are conductive.
- The configuration can be round, oval or rectangular. Square products are often used.
- It is possible to use single, double or row structures, depending on the number of sockets installed. The triple option is very often used.
- The type of installation can be vertical or horizontal.
Please note that mounting boxes installed in concrete cannot be mounted in structures made of wood and plasterboard. This is due to the lack of fastenings in such elements, so fixation in hollow walls will be unreliable.
Dimensions of socket boxes for concrete walls
The overall dimensions of the mounting boxes should be discussed in more detail. These parameters should be taken into account when choosing products for installation in concrete.
In practice they are defined as follows:
- Outer diameter of the box. This indicator can be found by measuring the distance between two elements located at the maximum distance from each other.
- Inner diameter. Determined by the maximum dimensions of the socket mechanism that can be placed inside. The most popular sizes are diameters ranging from 60 to 68 mm.
- Installation depth. Selected depending on the thickness of the wall and the possibility of drilling a hole for the box.
- Internal depth of the socket box. Determined by the maximum depth in the internal space of the box. This parameter determines the possibility of placing a certain number of components inside and creating a reserve for connected cables and wires. Many modifications are produced with a depth of 25 to 80 mm, but most often not very deep products of 40-45 mm are used.
How to choose the right one
Before purchasing this or that model, you need to decide on some features. Firstly, in which wall you plan to install it:
- Solid walls (concrete, brick, gas, foam blocks). For such floors, the most ordinary concrete socket box is suitable, without any additions.
- Hollow walls (plasterboard, chipboard, plywood, etc.). They will require socket boxes with special clamping claws.
There are also universal models that, if necessary, can be used for any walls.
Secondly, you need to calculate how many sockets will need to be installed at one point. In addition to single socket boxes, you can buy double, triple, etc.
Third, choose the desired shape and size. The standard shape is round, but square ones are also available. You need to know the following about sizes:
- Diameter of the outer part. There are 60 and 68 mm.
- Installation depth. There are also two types - 40 and 45 mm.
The most popular dimensions are 68x45. They accommodate most manufactured sockets and switches.
Preparation for installation
In some cases, it is necessary to carry out special preparatory work before installing a socket box in a concrete wall. Most often this concerns blocks of installation boxes designed for mounting several sockets.
Therefore, during preparation it is necessary to perform the following activities:
- Plugs are cut out in each socket box through which the wires are inserted into the housing; in some cases they need to be drilled out.
- It is necessary to get rid of all unnecessary parts that could create obstacles during installation.
- The assembled block is pre-fitted to the prepared hole in the wall. This way, their compatibility is checked and they are installed correctly. The installation performance directly depends on the results of the inspection. The block must be placed straight into the hole, without tilting in any direction.
- The location of the installation box is determined in advance; special attention should be paid to the distance from the floor to the socket box. For residential premises this figure is 30 cm, for kitchens, above the desktop surface - 120 cm, under washing machines - 100 cm. Mounting boxes for light switches are located at a height of 90 cm from the floor. These are approximate standards recommended for implementation.
Common mistakes
Common mistakes made when installing socket boxes:
- Installation of socket boxes before the walls are finished, which makes subsequent leveling of the surfaces difficult. When installing parts that are skewed, you will have to remove the mounted boxes and then seal the parts again. An additional layer of plaster reduces the likelihood of contact between the crown and the reinforcement during drilling.
- Installation of socket mechanisms in walls without transition elements. This installation method is strictly prohibited, since it does not provide insulation of the wall material from the power cables.
- Horizontal skew of the socket block and erroneous determination of the distance between the centers of the mounting boxes. Incorrect positioning leads to the formation of gaps between the wall surface and the decorative frame of the socket module.
- It is prohibited to use foam for fixing socket boxes, since the material does not meet fire safety requirements. There are non-flammable foams of class B1, but the strength of the material is inferior to gypsum or alabaster mixtures.
Marking the seat and drilling
After selecting a location for installing socket boxes in a concrete wall, it is necessary to mark and drill holes.
Wall marking is performed in the following order:
- Use a bright marker or pencil to mark the locations of the boxes.
- Holes for socket boxes of the required size are drilled in the wall according to the appropriate dimensions. It is better to cut through concrete with a diamond-coated crown or carbide teeth. Drilling must be done carefully so as not to damage the supplied cable. Drilling stops after the nozzle is completely immersed in concrete.
- Next, before installation of the socket boxes begins, they are fitted to the finished holes. Ideally, the box is recessed approximately 5 mm deep. If necessary, the hole dimensions are adjusted manually. If the box fits in with difficulty, then the diameter of the hole for the socket box needs to be slightly increased.
- After checking the dimensions of the hole, the supplied cable is inserted into the box. To do this, you need to make a groove at the top of the wire. The cable is placed inside the socket box freely, does not put pressure on the walls and does not come into contact with the socket body.
Installation and fixation of the mounting box
Installation of the installation box has its own procedure.
Wall sockets are installed in several stages:
- First you need to cut out the hole plug for the cable according to the appropriate markings. In some models, it is simply pressed through with the force of a finger. If necessary, the hole can be enlarged to fit the cable size.
- After entering the cable into the socket, it is inserted into the finished hole. It is necessary to control the free space so that the margin is at least 2-3 mm. This gap is necessary for pouring the fixing solution.
- Next, the final adjustment of the hole and the box to each other in size is performed. Then the niche needs to be cleared of debris and dust.
- For pouring, it is better to use alabaster or medical plaster. The solution must be prepared very quickly, since it has a very short hardening time, and it should be covered within 5-7 minutes.
- Before fixing the socket box in the concrete wall and starting to fill it with mortar, the hole is moistened with water, after which it should be absorbed for 3-5 minutes. This measure allows you to do without a primer.
- The mixture is placed inside the hole with a spatula, after which it is necessary to put the socket boxes in their place as tightly as possible. The solution seeps through the holes in the body and flows into the product. Next, secure the installation box in place.
- After this, nothing can be done with the box until the solution has completely dried, otherwise it may become skewed. At the very end, the gaps around the socket box are processed, which also need to be sealed. The dried solution is easily removed from the plastic from inside the case.
Installation of a socket box
Required tools and materials:
- a construction pencil, but you can also use a clerical one;
- ruler;
- impact electric drill;
- electric hammer drill;
- Victory drill;
- chisel;
- hammer;
- a crown for drilling concrete, the diameter of which is larger than the diameter of the socket;
- grinder with dense concrete;
- putty knife;
- building plaster, medical plaster, alabaster;
- paper knife;
- DIY level or water level.
1. Before starting installation, use a pencil and a ruler to mark the location for the socket box (two lines at right angles to each other - a cross). If the floor is not covered, then add a few more centimeters (3-5 cm) to the distance to the marking site. Most electricians adhere to the following standard rules when marking:
- in the room the socket is located at a distance of 30 cm from the floor (the floor is already covered);
- in the kitchen above the countertop the socket is located at a distance of 110-120 cm;
- the socket is located at a distance of 1 m above the washing machine;
- the switch is located at a distance of 90 cm from the floor (the floor is already covered).
However, you can deviate a little from these rules and apply markings adjusted to your requirements.
Attention! If you cannot buy a hammer drill or grinder or you do not need such an expensive purchase, then you can rent them for a few days.
The location of the switch can be determined by the human hand. Stand with your back to the wall and lower your arms down. Mark a point at palm level - this will be the location of the switch. If there are several users, then calculate the average of the arm lengths of all users.
2. There are three ways to make a hole:
1) Install a concrete bit on a hammer drill (you can use an electric drill). The diameter of the crown (for example, 70 mm) must be larger than the diameter of the socket, which must fit freely into the recess. The depth of the crown is taken to be slightly greater than the depth of the socket box (4-5 millimeters more).
We place the center of the crown against the center of the mark for the socket box and drill a hole. When drilling, be careful not to damage the electrical wire. We drill until the crown sinks into the wall. Next, after finishing drilling, take out the crown and use a hammer and chisel to level the bottom of the hole.
2) Place the center of the socket box to the center of the mark and trace it with a pencil, creating a circle. Using a drill with a Pobedit drill bit, we drill holes along the line of the resulting circle. Drill more holes to make it easier to make a recess for the socket box. It is necessary to drill to a depth slightly greater than the depth of the socket box (4-5 millimeters more). Next, using a hammer and chisel, we hollow out and level the hole.
3) Take the socket box, apply its center to the center of the mark and trace it with a pencil, getting a circle. Using a pencil, inscribe the circle into the square so that the sides of the square touch the circle at four points. We take a grinder with a disc for concrete and cut a square along all the lines. When cutting, the electrical wire must be moved to the side to avoid damage. Next, use a hammer and chisel to hollow out and level the hole to the required size. The depth should be slightly greater than the depth of the socket box (4-5 mm).
3. Next, we check the resulting hole for compatibility with the socket box. The socket box should sink 4-5 mm deeper than the edge of the hole and fit freely into it. We bring the electrical wire into the hole we made: we gouge out a groove in the upper part of the hole using a hammer and a zublio. On the back of the socket box there are stencils of holes for the wires. Using a construction knife, cut out the fool in the right place.
4. Clean the resulting recess in the wall
5. Prepare a solution for attaching the socket box. We take construction and medical plaster, alabaster, partially fill it with water and stir with a spatula. As a result, we get a “porridge”.
Attention! The solution dries quickly. Therefore, you will have a few minutes to complete the final work.. 6
Wet the hole with water. Using a spatula, apply a layer of “porridge” into the hole. We put the socket box on the wire and fix it in the hole so that the edges of the socket box are 2-3 mm below the edge of the wall. Using a building level, we align the horizontal position of the screws at the socket box relative to the floor. Cover the edges of the hole with “porridge” and level it. We remove excess and clean from debris
6. Wet the hole with water. Using a spatula, apply a layer of “porridge” into the hole. We put the socket box on the wire and fix it in the hole so that the edges of the socket box are 2-3 mm below the edge of the wall. Using a building level, we align the horizontal position of the screws at the socket box relative to the floor. Cover the edges of the hole with “porridge” and level it. We remove excess and clean from debris.