Decorative plaster, as a finishing material, appeared recently, but immediately won recognition among many professional builders and people renovating an apartment or house. The Bark Beetle plaster spread very quickly. It is easy to apply, does not require additional finishing, and can also be painted with acrylic paint with the addition of color. This is very convenient, since it is possible to radically change the design of the room without high costs. Many private developers are wondering whether it is advisable to apply bark beetle to drywall? Let's try to understand this issue.
Plaster "Bark beetle" in the interior of the room
Plaster "Bark beetle"
This decorative material can be divided into two types:
- ready-to-use material: silicone, acrylic - silicone, acrylic; it can be painted;
- dry cement mixture, which is diluted with water, cannot be used in color.
The plaster mixture received this name because of its appearance. After applying the plaster, the walls look as if they were eaten away by a bark beetle. You can apply decorative plaster to walls made of plasterboard and any other material, and it does not matter whether it is the internal surfaces or the façade. Bark beetle plaster has proven itself well in damp rooms.
"Bark beetle" on the kitchen walls
The design of this mixture is so diverse that even the most picky person can choose a design and color. Granite or marble chips are used as an abrasive component in the plaster, which creates a unique effect. A variety of patterns is achieved through different directions when plastering and smoothing. Fine-grained material is mainly used for interior work; a deeper and coarse-grained pattern is applied for façade work.
Application of bark beetle plaster for finishing the facade of a house
Decorative plaster has several types of patterns:
- classic - vertical;
- horizontal;
- chaotic;
- mixed, combines vertical and horizontal.
This material has one drawback - you need to prepare the walls before applying it. This type of decorative coating is applied only a few millimeters thick, so it is necessary to level the surface.
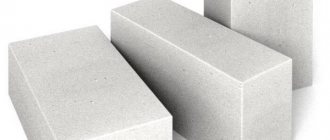
Plastering foam concrete with your own hands - tips
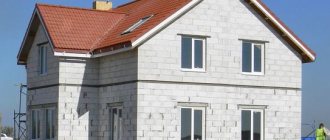
Finishing a house made of foam blocks with plaster is carried out according to the standard scheme, but is somewhat different from plastering aerated concrete or brick. The difference is not significant, but it is there. Therefore, let’s look at the distinctive features.
When is it possible/needed to plaster a house made of foam blocks?
Finishing with plaster is carried out in dry weather, only at positive temperatures (from +5 to + 30 ° C). You can start plastering no earlier than 3-4 months (ideally a year) after the completion of construction of a house made of foam blocks. During this time, the walls will shrink.
Materials and tools
To plaster plasterboard walls with the Bark Beetle mixture, you should prepare:
- decorative composition, can be used ready-made or mixed. You can find out how to make decorative plaster from putty at the link:
- putty for finishing seams;
- serpyanka, to prevent the appearance of cracks at the joints of gypsum boards;
- containers for putty and plaster;
- spatulas for sealing joints of material;
- trowel for applying decorative plaster “Bark beetle”;
- grater for forming a pattern;
- priming roller;
- sponge for removing milk from the wall;
- primer for gypsum boards.
A set of necessary materials and tools
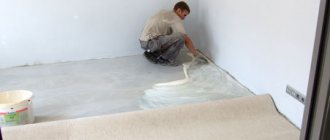
Primer of foam block walls
Due to the characteristics of foam concrete, its surface has poor adhesion, so preparation of the base for plaster is required. The binding capacity can be increased by applying a primer.
How to prime foam blocks before plastering?
Any deep penetration primer is suitable for foam concrete, for example, Ceresit ST-17 (53 rubles/l), Prospectors (38 rubles/l), Yunis (27 rubles/l), Optium (40 rubles/l) or others.
How to properly prime foam concrete walls?
Craftsmen recommend applying the primer solution in three layers. The requirement is due to the fact that foam concrete has a smooth structure, which has poor adhesion to the finishing material. Thus, the first layer penetrates the structure of the cellular concrete, the second consolidates the action, and the third binds the lower layer and the plaster.
The purpose of the primer, in this case, is similar to the function performed by the foundation for a house. The primer is designed to create a base for applying the surface layer of plaster. The quality of the primer and the correctness of its application determine how firmly the plaster layer will adhere to the surface of the masonry. The primer is applied over the entire surface of the wall without gaps. Further work can be started only after the primer has completely dried (dries quickly).
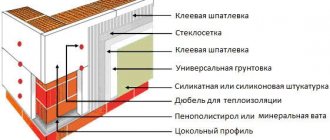
Pie of facade plaster for a house made of foam blocks
Layers:
- primer. According to reviews and advice from practicing builders, the best primer for foam concrete is Ceresit ST-17. Diluted with water, for the first layer 1 to 6, the second 1 to 3-4, the third – 1 to 2-3. Approximate primer consumption is 0.4-0.5 l/m2;
- layer up to 30 mm without mesh – plaster for cellular concrete Ceresit ST 24;
- primer for decorative plaster Ceresit ST 16;
- decorative plaster (silicate-silicone) Ceresit ST 174 or ST 175.
If the wall has a perfectly flat surface, after priming, you can make a base reinforcing layer of Ceresit ST 85, ST 190 (using a 165 g/m2 fiberglass mesh with a 5x5 cell).
Then layers 3 and 4.
Material prepared for the website www.moydomik.net
Preparing the surface for applying “Bark Beetle”
The algorithm for performing the work is as follows:
- The first step is to properly seal the drywall joints. To do this, you need to embroider the seams at an angle of 45 degrees. Then treat them with a primer for plasterboard surfaces;
- dilute the putty mixture and apply it to the seams after the soil has dried;
- stick the serpyanka onto the still wet mortar and, using an additional layer of plaster, level it as much as possible with the plane of the wall;
- treat the entire drywall with a double layer of putty, keeping in mind that each subsequent layer is applied to a dry surface.
Important! The primer should be special, with quartz sand, but only of a fine fraction. This primer should not be confused with concrete contact, as it cannot be used in this situation.
Vertical application of primer before puttingtying with decorative plaster
The primer must be applied to a clean surface. If dirt gets on a wet wall, it must be removed, and sagging must also be avoided. Allow the putty to dry thoroughly.
Plastering and surface reinforcement technology
After the primer layer has completely dried, begin applying the plaster solution.
Application can be done using two methods:
- Thick layer . This method consists of applying plaster in one layer, after which it is leveled and grouted.
- Thin layer . It is characterized by applying the material in thin layers several times. The advantage of this method is the ability to prepare the surface for applying a decorative type of plaster, namely a leveling layer. It is also possible to apply special compounds that provide sound insulation properties.
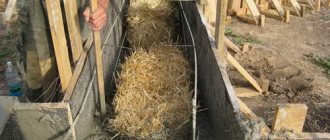
But, before starting to apply plaster, it is necessary to carry out the reinforcement process using a metal mesh. Due to this, you can achieve the maximum level of adhesion between materials and the wall. The mesh is fixed after applying a thin layer of plaster . And after that they are covered with the same layer of material.
Reinforcement
After the plaster has dried, the surface becomes monolithic. In some cases, it is permissible to attach the mesh to self-tapping screws . The mesh is attached with an overlap of up to 50 cm.
IMPORTANT!
Reinforcement is used regardless of the chosen method of applying plaster, but there is no need for it if the thickness of the layer of material for plastering is no more than 2 cm.
Otherwise, reinforcement occurs depending on the application method:
- If a thick-layer application method is chosen, then the reinforcing mesh should be under the primer layer , after which the plaster is applied. The reinforcing mesh is covered with a layer of primer, which is leveled and dries, after which a layer of plaster is applied. Then they wait 2 days and start painting the walls.
- If a thin-layer application method is chosen, then after attaching the reinforcing mesh, apply a leveling solution and wait for it to dry completely . After this, the surface is primed and a finishing layer of decorative plaster is applied. When it dries, begin painting or processing with any other selected material.
Plaster
Sectional diagram
Which plaster is not suitable for aerated concrete and why
Cement plaster is not suitable for working with aerated concrete
One of the most popular types of plaster is a cement-sand mixture. However, it is completely unsuitable for working with gas blocks. Regardless of what material the blocks themselves were laid on (adhesive mortar or cement), the use of this finishing material is unacceptable for the following reasons:
- The vapor permeability of cement is lower than that of aerated block . This is the main reason why you should avoid using this type of plaster.
| Among professionals, there is one rule: the finishing must correspond in terms of vapor permeability to aerated concrete blocks. This allows us to ensure an optimal microclimate for such a building. Therefore, it is extremely undesirable to use insulation materials such as polystyrene foam and polystyrene foam for aerated concrete walls. |
- Moisture content is also an important indicator for aerated blocks . In cement-sand mortar it is increased, since mixing it requires the addition of a fairly large amount of water. Since aerated concrete is characterized by high moisture absorption, it will absorb water from the solution, which not only can destroy the structure of the blocks themselves, but also reduce the quality of the plaster solution.
- Cement mortar is characterized by low adhesion rates . This is explained by the large weight of the solution and the presence of large impurities in its composition.
Gypsum plaster is a good option for plastering aerated concrete walls. But at the same time it has a number of disadvantages over the façade:
- The vapor permeability of such compositions leaves much to be desired.
The appearance of a white coating - efflorescence
- When it snows or rains, such compounds get wet quite quickly.
- On such a surface, spots may appear that need to be painted over.
- Contains more water than specialized plaster mixtures for aerated concrete.
How to plaster foam blocks according to technology
The mixture should be diluted according to the manufacturer's instructions. Before plastering, a deeply penetrating primer for absorbent surfaces is applied to the walls. If the finishing of foam blocks is done using an inexpensive sand-cement mixture, then you should be prepared in advance to overcome some difficulties: To solve this problem, before starting finishing work, apply a liquid solution of cement and sand to the wall: Attention: Properly applied plaster will help protect foam concrete blocks from the destructive effects of atmospheric phenomena and give the facade an attractive appearance.
Now you decide for yourself whether it is necessary to plaster the foam blocks.
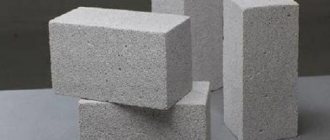
Requirements for plaster on aerated concrete
The products have high moisture absorption and vapor permeability. Therefore, the main requirements for plaster are excellent protection of aerated concrete from moisture penetration. With all this, the mixture must also be vapor-permeable so as not to disturb air exchange. Then condensation will not accumulate.
Plaster for gas silicate blocks must meet the following parameters:
- High adhesion rates - about 0.4 MPa.
- Vapor permeability indicators are from 0.17 to 0.2 mg (m*h*Pa).
- Moisture absorption is less than 5% by weight.
- Frost resistance indicators – 50 cycles or more.
- Minimal shrinkage after drying.
- Density after drying is from 500 to 1 thousand kg/m3.
- Strength after drying is about 0.29 mPa.
- Compressive strength class CS1.
When wet, it should dry quickly. The minimum number of drying and wetting cycles is 250. By choosing the right plaster for the surface of an aerated concrete wall that meets most of the requirements, you can be sure that it will last for decades.