Video description
What are the features of a hard and thick blind area in the video:
This size must be multiplied by the slope, multiplied again by the width of the tape, divided by 100. This will be the height difference between the outer edge and the base. And now you need to add the difference in heights to the thickness of the edge to get the thickness at the base.
If the thickness of the edge is 70 mm, the slope is 5%, the width of the blind area is 1000 mm, then the height of the covering at the base is 120 mm.
This might be interesting!
In the article at the following link, read about the foundation area.
Technology for manufacturing concrete blind area
Step-by-step instructions on how to make a blind area around the house look like this:
- Preparing a trench (“trough”) for the blind area. The fertile layer is removed over the entire width (from 20 to 30 cm). Compact the bottom of the trench and form a slope. The area near the foundation with backfill is especially carefully compacted, while adding local soil - the thickness of the compacted layer in this place is at least 15 cm. The depth of the trench should be sufficient for the underground part of the hard covering, the thickness of the cushion (minimum 10 cm, recommended 15 cm) and insulation for the blind area around the house on heaving soils. If the trench after excavating fertile soil turns out to be deeper than the calculated one, then the difference is compensated by backfilling with compaction of either local soil or a layer of clay (the second option is preferable).
Trench for a blind area with a slope from the foundation
- Pillow. For weak soils, it is recommended to create a crushed stone base as the bottom layer. First, crushed stone of the middle fraction (40-70 mm) is filled, leveled and compacted. Then - fine crushed stone (5-10 mm) to fill the voids of the previous layer. When compacting the crushed stone, it is watered. Sand is poured in next, which is also leveled, watered and compacted. According to the standards, it is sand that serves as the basis for constructing a blind area. The level of crushed stone preparation should have a maximum deviation of 15 mm per 2 m, sand – 10 mm per 3 m.
- Waterproofing. A waterproofing film is laid on top of the sand. It does not serve to protect the soil, but protects the concrete from loss of moisture during its maturation. In the regulations, this layer is called “separation layer”. For this, a geomembrane or polyethylene film with a thickness of 200 microns is used.
Basement and foundation blind area - some points
Personally, I know how to make the foundation blind area as efficient and economical as possible. I am ready to share my experience with you and offer several solutions. Of course, many of you, home builders like me, have already seen or applied these solutions.
However, there are also our comrades who are still thinking about how to make a foundation and its components. It was precisely for them that I wrote this material.
Let's think together about why a foundation blind area is needed, what functions it performs, and what would happen if it was not done.
The first thing a foundation blind area is needed for is to protect the entire underground part of the house from precipitation. Rain or snow, flowing down the walls of the house or simply flowing off the roof, if a drainage system is not made, ends up on the ground next to the house.
Moisture is absorbed into the soil and gradually reaches the concrete base of the building. And then everything is as in the saying “a drop wears away a stone.” Moisture affects the concrete base, freezing during frosts and thawing during thaws.
Through the smallest capillaries, moisture penetrates into the concrete of the foundation and every day, millimeter by millimeter, it widens the cracks in the foundation and destroys it. To prevent this from happening, builders build a blind area around the house.
To understand how to make a foundation blind area, let’s take the very first purpose of this node and see how it can be implemented. Protection of the foundation from external water can be implemented as follows:
- Waterproofness of the blind area.
- Moisture removal by drainage.
This means we need to make a waterproof strip around the house and remove moisture from it using a drainage ditch. What this simple unit looks like can be seen in the diagram.
The blind area can be made from any waterproof material, or any waterproof material can be included in its composition.
You can make a blind area from concrete, or you can make a blind area from paving slabs, and under it put a layer of PVC banner fabric, which does not rot in the ground and does not allow moisture to pass through at all.
We suggest you familiarize yourself with How to make a concrete blind area yourself
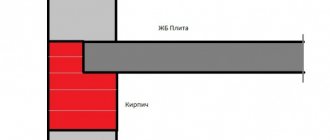
In the place where the base and the foundation blind area touch, our house has one weak node - the place where they connect. If you make a rigid fastening in this place, fill it with concrete or fasten it, then sooner or later there will still be a crack, and this unit will still be destroyed.
This happens because a heavy house with a foundation and the unloaded soil around it move differently depending on the seasons or the filling of the soil with water. To ensure that there are no cracks in this unit, builders make an expansion joint from any plastic material that can undergo limited deformation. Previously, this knot was covered with plastic clay. Nowadays the expansion joint is made of penoplex.
Penoplex does not allow water to pass through and is a highly effective insulation material. Thus, this material prevents water from penetrating between the base and the foundation blind area and prevents the base of the house from freezing along this node.
We have already discussed how to make an insulated soft blind area. Now let's discuss how to make a concrete foundation blind area.
In regions where there are low temperatures for a long time in winter, a continuous rigid belt around the house is not the best option. However, it also has the right to life with proper execution and high-quality insulation of both the blind area and the base.
- So, to begin with, we remove the soil around the base of the house to the depth necessary for arranging a cushion for the blind area.
- Then we backfill, but with clean sand - we form a pillow. A sand thickness of 15 cm will be sufficient. Next, we put PVC banner fabric, which will remove moisture from the walls of the house into the drainage ditch.
- After this, we make another 10 cm layer of sand to protect the PVC fabric from damage. Then we lay the reinforcing mesh and make formwork for pouring concrete.
- Next, we pour concrete - a 15 cm screed will be enough to make the blind area strong and withstand not only the movement of an adult, but also small garden equipment such as a motor plough, etc.
The question arises: is it possible to save money on this unit and make the blind area cheaply? It turns out that it is possible.
- Firstly, you can not buy new PVC banner fabric for water drainage at 400 rubles per 1 sq.m., but buy old banners from advertising agencies. It's up to you to agree on the price. I managed to buy 1 banner 6 by 3 meters for 100 rubles, which is 18 square meters - without holes or scuffs. As you can see, you can save several thousand rubles on banner fabric alone.
- Secondly, you can use for the cushion not pure sand, but used ASG, which is removed during the repair of city roads. A clean sand machine costs 7,000 rubles, and a used PGS machine costs 1,500 rubles. The savings are obvious.
- And finally, it is not necessary to hire a professional team of builders in order to make a foundation blind area. This is not a roof or the foundation itself - it is quite possible to make a blind area with your own hands. To do this, you only need accuracy and patience, as well as a correct understanding of the diagram that is published in this material.
So we’ve figured out why you need a foundation blind area and how you can do it economically.
Video description
You can also use built-up waterproofing - example in the video:
- Insulation. When creating a blind area on heaving soils, the structure is insulated with extruded polystyrene foam. If two layers are laid, then the seams of the upper sheets are shifted relative to the seams of the lower ones.
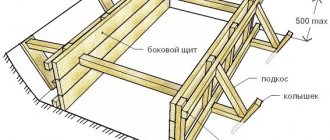
- Formwork. It is made from edged boards and bars. At the same time, slats for transverse expansion joints are laid. Typically, these slats are mounted at the design level of the surface of the blind area with a given slope angle, and concrete is poured along them, like beacons. The width of the slats is 20 mm, the height in section is more than 25% of the thickness of the blind area. The approximate distance between the seams is calculated by multiplying a factor of 25 by the thickness of the concrete at the base. Typically, for concrete pavements, expansion joints are combined with technological joints (one portion of pouring between the slats). The expansion joint at the base is formed from folded strips of roofing material with a total thickness of about 5 mm.
Everything is ready for pouring concrete
- Reinforcement. The easiest way is to lay a road mesh with a cell of 100x100 mm and a rod diameter of 4 mm. Adjacent cards (strips) are overlapped by one cell (or more) and tied with wire. The distance from waterproofing or insulation is at least 30 mm. This size must be maintained in relation to all surfaces - the front, at the ends of the edge and in relation to the base.
- Concreting. M200 concrete is used. After pouring, within four hours, the concrete must be covered. And for 14 days - moisturize.
- Protection from destruction. To improve the wear resistance and strength of the surface, ironing is carried out. There are two types: dry - after pouring, wet - simultaneously with filling expansion joints with sealant. After removing the slats (14 days after pouring the concrete), the seams are filled with bitumen mastic with the addition of a mineral filler.
- Note. To enhance the surface and give an attractive decorative look, you can use stamped concrete technology.
Stamped concrete from the blind area to the walkway
Expansion joint in the blind area
Expansion joints in the blind area of a house
The foundation is the main structure of the entire house, and the time that the house will last depends on the level of its quality. When installing any foundation, it is important to arrange expansion joints in the blind area as correctly as possible.
An expansion joint is a specially made section that acts as protection and allows the foundation to withstand temperature and soil fluctuations. An expansion joint is a popular construction technique in seismically active areas, and the strip base needs protection most of all.
All expansion joints existing in construction can be divided into several categories:
- sedimentary;
- temperature;
- shrinkage;
- seismic.
The selection of a specific type of joint is carried out taking into account the land type and climate characteristics of a particular region, as well as the nuances of the underlying layer.
The nuances of proper creation
It is advisable that the number of seams be calculated by an experienced surveyor. To correctly make a seam that will protect the foundation from deformation, you need to follow some rules. So, the height of the seam should be equal to the height of the foundation, and the distance between each of the seams can be determined based on calculations. But in general, there are average standards for the location of seams; for houses that are made of wooden materials, the seam spacing will be 0.6 meters, and for buildings whose walls are made of brick - 0.15 meters.
Expansion joints in the blind area
The structure of the building itself is also important. For example, if the house has an extension, then along the corner boundaries it will also be necessary to create expansion joints, which should have an average width of 10-12 cm. You need to choose thermal and waterproofing for foundations in different ways - for example, a slab-type foundation will be better protected using tarred tow, and a tape-type base will require separate thermal insulation and waterproofing.
When creating a blind area, wooden slats are used, which must then be filled with bitumen. A seam located between the blind area and the base of the house will not be needed if the base is already insulated from moisture and cold.
The above tips can be called universal and suitable for all types of expansion joints. Following them will help you create a strong and durable foundation that will last for decades.
Types of seams
Slight differences in the types of seams are determined by the area in which they are used, and the peculiarity of their work will depend on this. Thus, a seismic seam would be appropriate in areas with an increased risk of earthquakes. It will take on the load in case of ground vibrations and will prevent the building from deforming. If the seam needs to be placed between the extension and the main building, then the bases of these two structures need to be separated by a layer of penoplex, styroform, or use armoflex with a thickness of 2 cm.
Expansion joints in the blind area are used mainly in regions where the air temperature varies greatly throughout the year. To smooth out soil shifts as much as possible after temperature changes, the foundation area is divided into sectors using wooden slats. Similar types of seams are used in buildings that do not have heating.
Shrinkage-deformation type joints are made between the base blocks and the concrete poured on top. The reason for such measures can be attributed to the peculiarity of concrete, which shrinks when water evaporates.
Installation of a sedimentary protective seam can be found when laying the foundation for a house with many floors. This makes it possible to redirect the entire load as evenly as possible and eliminate the risk of destruction. Installation of expansion joints is carried out using different profiles. Professional craftsmen simply select the most preferred profile and create an expansion joint in the blind area from it.
Seam filling
If the seam is not constructed correctly, it may collapse. It is important to use only high-quality sealants, the elasticity of which is suitable for sealing such seams. Sealants are made from polymers, which provide the necessary properties to the product.
The most popular sealant for filling the cavity of an expansion joint can be called the polyurethane type, which gives greater endurance and ensures a long service life of insulated structures. The price of such a material will be higher than other sealants, but its properties are an order of magnitude higher.
Sealing expansion joints
Preparation for sealing involves cleaning the seam from various contaminants. A seam treated in this way will be of high quality and will last a long time. Polyurethane sealants, in addition to their high level of elasticity, adhere well to the surface, they are also heat-resistant and can withstand temperature fluctuations of -100-+100 degrees.
Seam insulation
The entire structure of the house under construction is divided into separate sections of the drawing - nodes in which expansion joints will be placed in the blind area. An unconditional condition for creating such seams is their protection from water, especially if there is a basement or ground floor.
When selecting a waterproofing material, you should be guided by the size of the seam, the possibility of deformation, the pressure on it and the maximum load, as well as the nature of the influence on the seam; the water pressure indicator will also be an important nuance.
When designing a seam protection from water, the best option would be a self-made loop that will collect moisture. You also need to make moisture-collecting pads by placing them directly in the concrete. After the seams have been protected from excessive moisture, it is imperative to examine all points of contact for leaks. An expansion joint in the blind area made in accordance with the rules and regulations will make the foundation of the house durable, which is especially important on unstable lands. At the design stage of houses and other construction projects in seismically active regions, the creation of expansion joints is one of the most important sections of design documents. The correct arrangement, sealing and protection of seams from water directly correlates with the strength of the foundation of the house.
stroykarecept.ru
If the blind area requires repair
If the concrete begins to deteriorate, then, depending on the degree of damage, the restoration technology takes the following form:
- if the cracks are local (up to 30% of the surface) and not wide, they are filled with cement paste (the proportions of cement and water are 1:1);
- for local repairs and wide cracks - they are expanded, the visible reinforcement is treated with an anti-corrosion compound, and sealed with a repair polymer cement mortar;
- in case of crumbling and delamination, weak areas are cleaned and a layer of cement-sand mortar screed is poured around the entire perimeter of the house (with the preliminary installation of a new curb and the installation of a reinforcing frame).
When performing each type of repair, the surface of the blind area must be cleaned of dirt and debris and treated with a deep penetration primer.
As a result. It is important to remember that the blind area is only part of the water protection measures. The most effective blind area is in conjunction with storm drainage, when water is collected in special receivers and piped away from the foundation.
Storm drainage system
As a result, the foundation will receive reliable protection not only from rain or melted snow, but also from groundwater.
m-strana.ru
Design features of the blind area
- if the groundwater level is high or the soil is predominantly clayey, it is recommended to install a drainage system around the perimeter of the building;
- the purpose of the protective concrete strip is to drain water from the building, therefore it is necessary to slope the strip from the foundation to its outer edge;
- If the climate is predominantly cold, then insulation is recommended. This can be done using polyurethane foam or polystyrene foam;
- for any blind area, it is necessary to have a waterproofing layer, which is made of roofing felt in 1-2 layers with a mandatory overlap of sheets of 15-20 cm. It is laid on the pre-leveled and compacted bottom of the trench;
- any protective tape around the perimeter of the building consists of 2 layers: underlying and facing;
- if a concrete blind area is being made, then a layer of crushed stone 10-15 cm thick is poured onto the waterproofing material and compacted. Next, either insulation or reinforcing mesh is laid, after which concrete is poured;
- if it is decided to make a protective strip with a facing layer of paving slabs, then only sand is used, which is poured out layer by layer, spilled with water and compacted;
What is a blind area and what is its purpose?
Blind area
- a strip created from materials laid in layers, together forming a moisture-resistant coating. It runs at a slope along the entire perimeter of the building.
Important! The design and installation of the blind area should be planned in advance, when developing and creating a house project. This approach will ensure the integrity and completeness of the architectural ensemble of the site.
What is the purpose of setting up a blind area, what is its functional purpose? Let's consider the main points solved using this design:
- Retains and removes moisture
to the side.
- Prevents soil swelling
. If the freezing of the latter is reduced, since the saturation of the soil with moisture was minimal, then swelling of the soil will be insignificant. This means that the foundation is not affected by any impacts or shifts and there is no threat to its integrity.
- Thermal insulation
. Due to the fact that the level of freezing of the soil surrounding the foundation is reduced, the impact of cold on the foundation of the house is minimized. At the same time, heat loss from the building is reduced.
- The destructive effects of rain and melt water
, which can cause serious damage to the foundation, are limited.
- The decorative design of this zone
gives the home a noble, complete look. The following materials are used as finishing: paving slabs, stone, pebbles, concrete, clinker bricks, etc.
Design features of the blind area
When calculating the width of the strip, it is necessary to take into account the dimensions of the eaves of the roof. The blind area should extend beyond its boundaries by 20-25 cm. The minimum width is 60-80 cm, optimal - 100 cm
.
Such dimensions of the strip will ensure dryness of the soil that is in contact with the foundation, therefore, the foundation of the house will be protected from freezing and moisture. The sufficient width of the blind area allows it to be used as a convenient path around the house
. When determining the size, you should take into account the type of soil. On subsiding soils, the width of the blind area should exceed 90 cm.
Important! The creation of the blind area begins at the final stages of construction, when the house has already been erected. If it is planned to line the above-ground part of the foundation, then the construction of the blind area should be done no earlier than the finishing work is completed.
It is necessary to observe the slope angle of the protective strip, which depends on the coating used. So, if it is made of cobblestones or crushed stone, then the angle will be 5-10%. This means that for 1 m of strip width the slope from the house is 5-10 cm. For concrete (asphalt) - from 3 to 5%. A decrease in these indicators will lead to poor water flow and stagnation near the foundation.
It is recommended to install a drainage gutter on the outside of the blind area. It can be a recess in concrete or a pipe sawn lengthwise and laid on a concrete base.
Attention! The created drainage grooves and storm drainage should be covered with a lattice metal shield, which will prevent clogging of the drainage system with falling leaves and other debris.
The thickness of the blind area is determined by the types of materials chosen for its installation. You will have to go deeper by about 25-30 cm.
The design consists of two functional layers:
- Substrate (underlying layer)
- serves to create a strong, compacted base for the coating, preventing it from breaking and cracking. The components of the substrate are clay, crushed stone and sand.
- External covering
. Made from paving slabs, small cobblestones, asphalt, concrete. An important criterion when choosing is water resistance, strength, and resistance to erosion by water.
Technology for constructing a concrete blind area
There are different options for making a blind area using different materials. Let's look at the most common one - concrete.
You should prepare your working tools and necessary materials in advance:
- hand rammer, shovel, wheelbarrow;
- hydraulic level;
- clay;
- crushed stone or fine gravel;
- sand;
- mesh for reinforcement with 10x10 cells or reinforcement rods with a diameter greater than 6 mm;
- waterproofing material;
- insulation;
- boards for formwork;
- cement M400.
To avoid getting a crooked fill, be sure to make markings. Wooden or metal pegs with a cord stretched between them mark the uniform distance from the walls of the building (the width of the blind area). In accordance with the markings, remove a layer of soil to a depth of 20-25 cm. It is recommended to treat the trench with a herbicide to destroy plant roots in order to subsequently avoid their destruction of the blind area.
The preparatory work has been completed, we proceed to the manufacture of the structure itself:
- We install formwork from boards.
- We lay the clay on pre-compacted soil
. Level the layer and compact it. At the same time, we form the desired slope. It should be noted that all layers that make up the structure must be compacted. Only after this do they begin laying the next material. A less labor-intensive option can be used, in which roofing felt or double polyethylene is used instead of clay.
- For greater reliability, sometimes polyethylene or, for example, geotextiles are laid over the clay layer
.
- Then pour a layer of sand
approximately 10 cm thick. For better compaction, it can be moistened with water.
- A layer of crushed stone (gravel) 6-7 cm thick is laid
as drainage . If necessary, a reinforcing mesh is placed on top.
Important! The connection between the blind area and the plinth should not be rigid. An expansion joint is required. It is worth remembering about transverse expansion joints every 2.5-3 m of the blind area.
- The expansion joint protects the blind area and base from deformation and destruction. So, if subsidence of the blind area occurs due to temperature fluctuations or for other reasons, this will happen along the prepared seam, without affecting the base. A 1-1.5 cm wide seam is filled with bitumen, mastic, sealant, or several layers of roofing felt are used
. Expansion joints, placed across the blind area in increments of 2-3 m, protect the concrete coating from cracking and tearing. Wooden slats, observing the required slope, are installed on the edge so that their upper plane is flush with the concrete surface. During the pouring process, they will be a guideline by which it is convenient to monitor the correctness of the work.
Why do you need a damping seam and how to make it correctly?
Practice has shown that any solid base tape made without expansion joints is destroyed after the first winter. Therefore, every 2-2.5 m when installing the underlying layer, installation of damping joints is provided. The first of them is located at the junction of the blind area itself and the wall of the house, its base. It will protect its lining from destruction during seasonal soil movements. The remaining seams are placed across the tape at a certain distance, perpendicular to the wall of the building. The width of each of them is 1-2 cm. They will allow the concrete to contract and expand under the influence of ambient temperatures without causing damage to either the building or the blind area itself.
Wooden blocks, pre-treated or tarred, are used as expansion joints. You can also use modern water-repellent impregnations. The thickness of the boards (bars) should be 15-20 mm. Such a seam is not afraid of either moisture or cold. For a damping effect, special vinyl tapes are also used, which will also prevent concrete from cracking. The standard width of the tapes is 1-1.5 cm. The installation step depends on the width of the protective strip being constructed. The larger it is, the more often the laying of bars or tape is required.
Expansion (compensation) seam in the blind area: types, how to make
To protect the foundation of the building from premature destruction, a blind area is constructed around the perimeter of the building. The installation process involves creating an expansion joint that performs a specific function. The rules for performing work and other nuances will be discussed in the article.
What is an expansion joint
In order to prevent the destruction of the foundation structure as a result of soil vibrations or under the influence of temperature changes, specialists use a construction technique such as an expansion joint on the blind area.
This technology is especially relevant in regions where seismic instability is observed.
Types of expansion joints
Expansion (compensation) seams are conventionally divided into several groups:
• shrinkage;
• temperature;
• sedimentary;
• seismic.
Each type has design features, so before choosing an option, the following factors should be adequately assessed:
• climatic features of the region;
• soil type;
• degree of mobility of earth layers;
• materials used to create the blind area.
All necessary data is removed from the documentation of survey work carried out before laying the foundation of the building. If the house was built many years ago, it is better to order geodetic surveys to determine the condition of the soil and the level of groundwater. This will help create reliable protection for the foundation, thereby extending the life of the entire structure.
When to lay expansion joints?
- Marking is carried out and the soil is removed using the bayonet of a shovel;
- the bottom of the trench is leveled and compacted;
- if possible, the waterproofing layer is made using clay. If it is not there, then roofing felt is laid;
- then an underlying layer of sand and crushed stone is arranged, each of which is carefully leveled and compacted;
- after which formwork is installed (for a concrete strip) or curbs are installed (for a blind area made of paving slabs);
- material intended to act as expansion joints is placed in the formwork: bars or vinyl tape;
- the first layer of concrete is poured;
- After this layer has hardened, a reinforcing mesh is installed on it;
- further pouring of concrete is carried out taking into account the required slope towards the outer edge of the blind area;
A practical owner will certainly make sure that his home looks fresh and good for many years. Therefore, it is so important to take into account all the technological nuances, which include laying damping joints, during the construction of the blind area.
moifundament.ru
Vertical temperature-shrinkage joints of buildings
In long buildings, as well as buildings with different numbers of floors, SNiP stipulates mandatory arrangement of vertical deformation gaps in individual sections:
- Temperature - to prevent the formation of cracks due to changes in the geometric dimensions of the structural elements of the building due to temperature changes (average daily and average annual) and concrete shrinkage. Such seams are brought to the level of the foundation.
- Settlement joints that prevent the formation of cracks that can form due to uneven settlement of the foundation caused by unequal loads on its individual parts. These seams completely separate the structure into separate sections, including the foundation.
The designs of both types of seams are the same. To create a gap, two paired transverse walls are erected, which are filled with heat-insulating material and then waterproofed (to prevent precipitation from entering). The width of the seam must strictly correspond to the design of the building (but be at least 20 mm).
The spacing of temperature-shrinkage joints for frameless large-panel buildings is standardized by SNiP and depends on the materials used in the manufacture of the panels (class of concrete compressive strength, grade of mortar and diameter of the longitudinal load-bearing reinforcement), the distance between the transverse walls and the annual difference in average daily temperatures for a particular region . For example, for Petrozavodsk (the annual temperature difference is 60°C), temperature gaps must be located at a distance of 75÷125 m.
In monolithic structures and buildings constructed using the prefabricated monolithic method, the spacing of transverse temperature-shrinkable joints (according to SNiP) varies from 40 to 80 m (depending on the structural features of the building). The arrangement of such seams not only increases the reliability of the building structure, but also allows for the gradual casting of individual sections of the building.
On a note! In individual construction, the arrangement of such gaps is used extremely rarely, since the length of the wall of a private house usually does not exceed 40 m.
In brick houses, the seams are arranged similarly to panel or monolithic buildings.
Appendix E (recommended) Requirements for reinforcement of the facing layer of masonry
at the corners, each of the masonry layers must be reinforced with L-shaped welded mesh for a length of at least 1 m from the corner or to the vertical expansion joint, if it is located closer. On straight sections it is allowed to lay mesh overlapping. The overlap length must be at least 15 cm.
Requirements for the construction of expansion joints
D.4 Horizontal joints are installed in load-bearing multilayer walls with a middle layer of effective insulation - in the facing brick layer, in non-load-bearing walls - along the entire thickness of the wall.
Horizontal expansion joints in the inner and outer layers of non-load-bearing multi-layer walls should be made at the level of the supporting structures (between the overlying structure and the top row of masonry).
D.5 Horizontal joints along the height of the building in the cladding of load-bearing multi-layer walls with a middle layer of effective thermal insulation can be arranged as follows:
the first seam is under the ceiling of the 2nd floor;
further floor by floor, under a monolithic reinforced concrete floor slab and under a cantilever beam installed under a prefabricated reinforced concrete floor slab.
D.6. Vertical temperature expansion joints are installed in the front layer of multilayer external walls, separated from the main layer of insulation.
D 7. The recommended maximum distances between vertical expansion joints for straight sections of walls are 6 - 7 m. Vertical joints at the corners of the building should be located at a distance of 250 - 500 mm from the corner on one side. With a facing layer thickness of 250 mm, the distance between the seams can be increased.
If it is necessary to increase the distance between expansion joints, it is necessary to carry out calculations of temperature deformations taking into account the design features of the walls, the structure of the building, its orientation to the cardinal points and climatic conditions.
SP 14.13330.2018 Construction in seismic areas
6 Residential, public, industrial buildings and structures
6.1 General provisions
6.1.1 The requirements of Section 6 must be met regardless of the results of the calculation in accordance with Section 5. The requirements of Section 6 should be applied depending on the calculated seismicity, expressed in integer points of the MSK-64 seismic intensity scale. If, as a result of geological surveys during seismic microzoning, fractional values of seismic intensity are obtained, the calculated values of seismic intensity should be taken by mathematical rounding to a whole value. 6.1.2 Buildings and structures should be separated by anti-seismic joints in cases where: the building or structure has a complex plan shape; adjacent sections of a building or structure have height differences of 5 m or more, as well as significant differences from each other in rigidity and (or) weight. It is allowed to install anti-seismic joints between the high part and 1-2 storey attached parts of buildings by hinged support of the extension ceiling on the console of the high part. The depth of support must be no less than the sum of mutual movements plus the minimum depth of support with the obligatory arrangement of emergency connections. For cases where the installation of a sedimentary seam is not required, it is allowed not to install anti-seismic seams between the building and the stylobate when calculating the compatibility of their work and carrying out the corresponding constructive measures. It is not allowed to install anti-seismic joints inside premises intended for permanent residence or long-term stay of people with limited mobility. In one-story buildings up to 10 m high with a calculated seismicity of 7 points, anti-seismic joints may not be installed. 6.1.3 Anti-seismic joints must separate buildings or structures along their entire height. It is allowed not to create a seam in the foundation, except in cases where the anti-seismic seam coincides with the sedimentary one. 6.1.4 The distances between anti-seismic joints should not exceed for buildings and structures: made of steel frames - according to the requirements for non-seismic areas, but not more than 150 m; from wooden structures and from small cellular blocks - 40 m with a calculated seismicity of 7 - 8 points and 30 m - with a calculated seismicity of 9 points. For buildings with other design solutions given in Table 7 - 80 m with a calculated seismicity of 7 - 8 points and 60 m with a calculated seismicity of 9 points.
6.1.6 Anti-seismic joints should be made by constructing paired walls or frames, or frames and walls.
The width of the anti-seismic joint should be determined based on the results of calculations in accordance with 5.5, and the width of the joint should be no less than the sum of the vibration amplitudes of adjacent building compartments. When the height of a building or structure is up to 5 m, the width of such a seam must be at least 30 mm. The width of the anti-seismic joint of a building or structure of greater height should be increased by 20 mm for every 5 m of height. 6.1.7 Designs for the junction of compartments of a building or structure in the zone of anti-seismic joints, including along facades and in places of transitions between compartments, should not interfere with their mutual horizontal movements. 6.1.8 The structure of the transition between building compartments can be made in the form of two consoles from mating blocks with a design seam between the ends of the consoles or transitions, securely connected to the elements of one of the adjacent compartments. The design of their support on the elements of another compartment must ensure the mutual calculated displacement of the elements, eliminating the possibility of their collapse and impact under seismic influence. The passage through the anti-seismic seam should not be the only means of evacuation from buildings or structures.
6.4.1 Staircases are usually arranged closed with natural light through windows in the external walls on each floor. The location and number of staircases is in accordance with regulatory documents on fire safety standards for the design of buildings and structures, but not less than one between anti-seismic joints in buildings with a height of more than three floors.
6.5 Partitions 6.5.3 To ensure independent deformation of partitions, anti-seismic joints should be provided between the vertical end and upper horizontal edges of the partitions and the load-bearing structures of the building. The width of the joints is taken according to the maximum skew value of the building floors under the action of design loads, taking into account the deflection of the floor during the operational stage, but not less than 20 mm. The seams are filled with elastic elastic material.
6.14.13 In the junctions of walls, reinforcing mesh with a cross-section of longitudinal reinforcement with a total area of at least 1 cm2, a length of 1.5 m must be placed in the masonry every 700 mm in height with a calculated seismicity of 7 - 8 points and after 500 mm - with 9 points. Sections of walls and pillars above the attic floor with a height of more than 400 mm must be reinforced or reinforced with monolithic reinforced concrete inclusions anchored in an anti-seismic belt. The walls along the top must have a reinforced concrete band connected to vertical reinforced concrete cores. Brick pillars are allowed only with a calculated seismicity of 7 points. In this case, the grade of mortar should be no lower than M50, and the height of the pillars should not be more than 4 m. The pillars should be connected in two directions by beams anchored into the walls.
SP 52-110-2009 Concrete and reinforced concrete structures exposed to technologically elevated and high temperatures
6.27
The distance between temperature-shrinkage joints in concrete and reinforced concrete structures made of ordinary and heat-resistant concrete must be established by calculation. The calculation may not be performed if the accepted distance between temperature-shrinkage joints does not exceed the values indicated in the table. 6.3, in which the largest distances between temperature-shrinkage joints are given for concrete and reinforced concrete structures with non-prestressed and prestressed reinforcement, at a design winter outside air temperature of minus 40 ° C, a relative air humidity of 60% or higher and a column height of 3 m.
Temperature joints of floors
In reinforced concrete building structures, the dimensions of floors, as well as the dimensions of other elements, can vary depending on temperature changes. Therefore, when installing them, it is necessary to arrange expansion joints.
The materials for their manufacture, dimensions, locations and installation technology are indicated in advance in the design documentation for the construction of the building.
Sometimes such seams are structurally made to be sliding. To ensure sliding in those places where the floor slab rests on the supporting structures, two layers of galvanized roofing iron are laid under it.
Temperature expansion joints in concrete floors and cement-sand screeds
When pouring a cement-sand screed or arranging a concrete floor, it is necessary to isolate all building structures (walls, columns, doorways, etc.) from contact with the poured mortar throughout its entire thickness. This gap performs three functions simultaneously:
- At the stage of pouring and setting the mortar works as a shrinkage joint. The heavy wet solution compresses it; as the concrete mixture gradually dries, the dimensions of the poured canvas decrease, and the material filling the gap expands and compensates for the shrinkage of the mixture.
- It prevents the transfer of loads from building structures to the concrete surface and vice versa. The screed does not put pressure on the walls. The structural strength of the building does not change. The structures themselves do not transfer the load to the screed, and it will not crack during operation.
- When there is a temperature difference (and they necessarily occur even in heated rooms), this seam compensates for changes in the volume of the concrete mass, which prevents it from cracking and increases its service life.
To create such gaps, a special damper tape is usually used, the width of which is slightly greater than the height of the screed. After the solution has hardened, its excess is cut off with a construction knife. When shrinkage joints are installed in concrete floors (if a finishing floor covering is not provided), the polypropylene tape is partially removed and the groove is waterproofed using special sealants.
In rooms of a large area (or when the length of one of the walls exceeds 6 m), according to SNiP, it is necessary to cut longitudinal and transverse temperature-shrinkage joints with a depth of ⅓ of the thickness of the fill. Expansion joints in concrete are made using special equipment (gasoline or electric joint cutter with diamond discs). The pitch of such seams should not be more than 6 m.
Attention! When filling heated floor elements with mortar, shrinkage joints are installed to the entire depth of the screed.
How are they performed?
Thermal and shrinkage (as well as seismic and sedimentary) types of seams can be combined in a design - a shrinkage-temperature (and seismic-sedimentation) seam is obtained. The first runs along the width and length of the building from the top of the foundation to the roof, while the second involves the complete division of the structure into blocks independent of one another.
In this case, the reinforced concrete box is divided into vertical joints 2-3 centimeters wide, filled with a hydrophobic elastic sealant. Proper release can be ensured by installation in adjacent areas of adjacent parts of paired beams and columns.
In buildings of different heights and on different soils, even if they are combined with an inset span, sedimentary joints are made. Thermal expansion in the blind area made of reinforced concrete is compensated by dividing it into two-meter squares by installing bitumen-impregnated wooden blocks in the formwork. The connection of the formwork to the walls must be movable and airtight.
Concrete floors deform if their area exceeds 30 square meters, causing cracks to spread. The surface of the screed is cut to a depth of a quarter to half the height so that the material breaks under the seams. Screed areas can be up to 6 meters in size and not only square, but also with an aspect ratio of 1:1.5. Joints of different materials and screeds poured at different times are made with dampers.
Insulating seams separate the screed from the walls to the full height along the perimeter of the building; they are filled with elastic materials. Columns and flights of stairs are also insulated from the floor screed. Monolithic floor slabs are separated by cuts from the supporting frame of the structure, the optimal width is calculated individually.
Interfloor ceilings are filled with fragments of a certain size. All voids are filled with sealant and sealed. They are divided along the entire height into separate blocks and strip bases, which compensate for stress and load.
Foundation cutting step: 30 meters on weak soils and 15 meters on heaving soils. The seams are filled with durable sealants. Vertical structures of external/internal walls create horizontal sections dividing the building into compartments. The height of the compartment for the interior wall is 30 meters, for the front wall – 20.
- In driveways/aisles, seams are made at a distance identical to the width of the screed (in the case where the passage is more than 3.6 meters, a longitudinal seam can be made in the center).
- The distance between seams in open areas is a maximum of 3 meters in all directions.
- Expansion joints are made using forming laths, otherwise the cuts are made after the final processing of the concrete.
- Standard screed joints are cut into 6x6 meter blocks one third of the thickness of the concrete layer.
- The location and number of seams are determined based on concrete shrinkage, thermal expansion coefficient, probable deformations at the junction of walls and floors, foundation and columns, etc.
- All seams must be sealed, based on operating conditions and requirements.
- Special rails can be used that fit into the frame at the pouring stage.
Reinforced concrete structures during operation can be subject to various loads and influences, which can be compensated for by making expansion joints.
Expansion joints in foundation blind areas and concrete paths
Foundation blind areas, designed to protect the foundation of a house from the harmful effects of precipitation, are also susceptible to destruction due to significant temperature changes throughout the year. To avoid this, seams are installed to compensate for the expansion and contraction of concrete. Such gaps are made at the stage of construction of blind area formwork. Transverse boards (20 mm thick) are attached to the formwork around the entire perimeter in increments of 1.5÷2.5 m. When the solution has set a little, the boards are removed, and after the blind area has completely dried, the grooves are filled with damping material and waterproofed.
All of the above also applies to the arrangement of concrete paths on the street or parking spaces near your own home. However, the step of deformation gaps can be increased to 3÷5 m.
How to cover the cracks between the blind area and the foundation?
The manifestation of such a defect occurs due to the weak blind area of the house. In the process of making an incorrect blind area, which was not soldered to the base of the house, that is, the foundation of the house. Or vice versa, when they were making the blind area, they made thermal joints, breaking the concrete along the entire length of the blind area. When making blind areas using outdated thermal joint technology, they immediately become very vulnerable. The blind areas begin to float, diverge from each other, and also move away from the junction with the house. In this case, after a few years, the blind area becomes deformed, they diverge even more, float away from the base structure itself, fall through, burst, or individual slabs become one higher than the other, as a result of which grass begins to sprout. We do not lay paving stones on such blind areas, as they will soon crack at the thermal joints. The production of such blind areas is prohibited in our company. See how the soldering of the blind area with the junction of the base of the house takes place. Holes are drilled and the fittings go into the base of the house. After concreting, the blind areas are soldered to the base and create a single concrete structure without any movement. Note!
Soldering, production of concrete blind areas for the base of the house and construction
If you are ready to lay paving stones on floating blind areas, then as a result of the use of the paving, thermal cracks will appear on the paving stones themselves. You can familiarize yourself with thermal cracks in article no. Paving on such a concrete base exposes the coating on the very base of the house, on which clinker tiles or natural stone or any other coating is laid, to deformation. When temperatures change, the soil begins to create pressure on weak blind areas on which paving is applied. Since the blind areas are not tied and have thermal joints, they begin to rise and rest, along with the paving, on the last, bottom row of laying tiles or stones on the base of the house and create unrealistically colossal pressure. The laid tiles on the base of the house cannot withstand the pressure load from the blind area and begin to burst and squeeze out. In the end, the laying of tiles or stones collapses, and the coating on the base of the house becomes inflamed, as it becomes unprotected from cracking and moisture. If you have already formed gaps between the concrete blind area and the base of the house, but the slabs do not have a thermal joint, and the tiles on the base of the house have already been laid, try to seal them with a special professional compound.
Hydraulic seal between the base of the house and the blind areas
Well, if your slabs float along with the paving stones, since they have thermal joints, and the laid tiles or stone on the base of the house begin to suffer, then before it’s too late, make a cut for the seam of the bottom row of tiles adjacent to the paving stones and apply a special expansion sealant. This will be called joining the base of the house and the paving stones using a thermal seam in emergency cases.
But, if you have fully complied with our technologies, then you only need to grout the junction using AMB-bruslandshaft manual molding technology, as we do. This connection is considered professional, has no movement and completely protects against moisture. Recommendations: grout should be used only if the blind areas are soldered to the foundation of the house without thermal joints with the production of a professional base using AMB-bruslandshaft technology.
Proper connection between the base of the house and the paving stones
Materials for arranging seams
Materials intended for arranging seams (regardless of type and size) are subject to the same requirements. They must be resilient, elastic, easily compressible and quickly recover their shape after compression.
Damper tape
It is designed to prevent cracking of the screed during its drying process and compensate for loads from building structures (walls, columns, etc.). A wide selection of sizes (thickness: 3÷35 mm; width: 27÷250 mm) of this material allows you to equip almost any screed and concrete floors.
Sealing cord
A popular and easy-to-use material for filling deformation gaps is a cord made of foamed polyethylene. There are two types of it on the construction market:
- solid sealing cord Ø=6÷80 mm,
- in the form of a tube Ø=30÷120 mm.
The diameter of the cord must exceed the width of the seam by ¼÷½. The cord is installed in the groove in a compressed state and filled with ⅔÷¾ of the free volume. For example, to seal 4 mm wide grooves cut in a screed, a Ø=6 mm cord is suitable.
Sealants and mastics
Various sealants are used to seal seams:
- polyurethane;
- acrylic;
- silicone.
They come in either one-component (ready-to-use) or two-component (they are prepared by mixing the two components immediately before use). If the seam is of small width, then it is enough to fill it with sealant; if the gap width is significant, then this material is applied on top of the laid cord made of foamed polyethylene (or other damping material).
A variety of mastics (bitumen, bitumen-polymer, compositions based on raw rubber or epoxy with additives to impart elasticity) are used mainly for sealing external deformation gaps. They are applied on top of the damping material placed in the groove.
Special profiles
In modern construction, expansion joints in concrete are successfully sealed using special compensation profiles. These products come in a variety of configurations (depending on application and joint width). For their manufacture, metal, plastic, rubber are used, or several materials are combined in one device. Some models in this category must be installed during the process of pouring the solution. Others can be installed in the groove after the base has completely hardened. Manufacturers (both foreign and domestic) have developed a wide range of such devices, both for outdoor use and for indoor installation. The high price of the profiles is compensated by the fact that this method of sealing gaps does not require their subsequent waterproofing.
Seam filling
If the seam is not constructed correctly, it may collapse. It is important to use only high-quality sealants, the elasticity of which is suitable for sealing such seams. Sealants are made from polymers, which provide the necessary properties to the product.
The most popular sealant for filling the cavity of an expansion joint can be called the polyurethane type, which gives greater endurance and ensures a long service life of insulated structures. The price of such a material will be higher than other sealants, but its properties are an order of magnitude higher.
Sealing expansion joints
Preparation for sealing involves cleaning the seam from various contaminants. A seam treated in this way will be of high quality and will last a long time. Polyurethane sealants, in addition to their high level of elasticity, adhere well to the surface, they are also heat-resistant and can withstand temperature fluctuations of -100-+100 degrees.