If you are planning a major renovation, you will most likely need new wiring, sockets and switches. In any case, electrical work includes the installation of electrical points. Drilling devices help speed up the process, but it is worth noting that ordinary drills for metal or wood cannot be used if the house has concrete or brick walls. They will quickly become dull and impossible to use. This is why installing an outlet causes a lot of problems. However, if you have special tools and equipment, the work will not be too difficult.
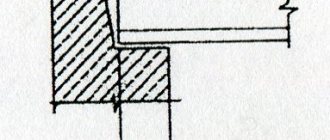
Crown for socket boxes on concrete.
An electrical outlet or switch is sometimes not located where we would like it to be. Installing them in a new place means doing a whole range of work. And if the electrical part of moving the socket can only be carried out by an electrician, then anyone can carry out the preparatory work of arranging a hole in the concrete wall for the socket box and crushing the grooves for the wires, if there is a hammer drill. Moreover, it is not at all necessary to spend a lot of time and effort, as well as the nerves of your neighbors, making a lot of holes with an ordinary drill in concrete and then knocking out pieces of mortar; you can simply take a tool such as a crown for socket boxes in concrete and greatly simplify your task.
Crown for concrete contractors: what it is and what it is needed for.
A bit is an attachment tool that has an SDS-plus shank for use with most rotary hammers and a cutting metal pipe head.
This tool allows you to make grooves in concrete in the shape of a circle. The middle of this circle is subsequently knocked out with a hammer or impact socket, ultimately forming an almost perfect round recess for installing a socket box.
Varieties.
Crowns can be all-metal or dismountable. Both options have a tip in the form of a pipe of the required diameter, at the end of which cutting tips made of carbide material or industrial diamond are fixed.
The difference lies in the fact that the collapsible version can be divided into component elements: a base with an SDS-plus shank, a guide drill for concrete and the main cutting part, which allows one tool to have several main attachments of different diameters, and, if necessary, replace the pilot drill.
A non-separable tool, as the name suggests, is made as a single unit and cannot be disassembled, therefore, if the guide drill breaks, even if the main part is intact, it will not allow the job to be done efficiently.
As for the tips, most of the bits available for sale today at the end of the cutting pipe have carbide (pobedite) teeth, which allow cutting concrete. This is a so-called mass product. However, such a design may be powerless against the reinforcement of a concrete wall. Thick reinforcing bars can break off the teeth of the head, rendering it useless for further work.
More expensive “professional” crowns for concrete sockets have wider cutting edges made using industrial diamonds. These types of crowns are more durable, therefore, their service life is much longer.
Dimensions.
When choosing a crown, in addition to its type, you should also pay attention to its size. Most crowns are designed to make holes for standard socket boxes with a diameter of 68 mm. The cutting head in such crowns, as a rule, has a diameter close to 70 mm. However, you can also find crowns of large diameters on sale.
For those who for the first time want to work independently with a hammer drill with a crown for a socket box on concrete, it is worth choosing attachments with a diameter of 75-80 mm. This reserve will allow you to more accurately position the socket box in the finished hole, and this is very important for a non-professional. This is especially true when the task is to make holes for the socket block. A displacement of a couple of millimeters from the horizontal axis of the block when drilling with a hammer drill by a novice is inevitable, which then will not allow the formation of a single line of the block if the crown is equal to the diameter of the socket.
How to use a crown for socket boxes on concrete?
When working directly with a crown on concrete, it is worth taking measures to protect the respiratory system from concrete dust and the eyes from flying solid particles. When drilling, the crown itself must be monitored for overheating, giving it time to cool. To ensure that the work intervals are as long as possible, it is recommended to moisten the concrete with water during drilling.
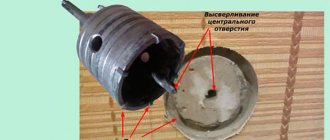
The marking for the future socket box should be made in the form of a mark of its center on the wall. Pressing the guide drill perpendicular to the wall at the marked point, we begin working with a hammer drill. When the required depth is reached, the crown is removed from the wall. The center is knocked out separately with a hammer or punch.
At the end, you will have a ready-made recess for subsequent installation of the socket box. Further work on gating walls for wiring and electrical installation work deserves to be included in a separate article.
Video.
I recommend reading:
podmasterij.ru
Preparation
Before starting work, you should decide on the installation time of the socket boxes:
- before rough finishing work or after its completion;
- pre-lay the cables or install plastic boxes first.
Which of the listed options is more suitable for brick walls is decided by each specialist independently, relying on individual experience and practice.
Before starting installation work, you should prepare the necessary tools and equipment:
- Measuring instruments: tape measure;
- ruler.
- diameter - 68 mm;
- ordinary;
Return to contents
Crown for socket boxes on concrete (foam concrete)
Diamond drilling of holes in concrete using special crowns is much more convenient and faster than carving holes for socket boxes with a grinder or using a hammer drill. This material is dedicated to the tools used for diamond drilling of concrete - diamond and pobedit bits.
Metal bit for drilling concrete with pobedite inserts
From this article you will learn what types of concrete crowns exist and how to choose the right size. Diamond drilling of concrete and correct installation of socket boxes in concrete or in a plasterboard wall (80 and 100 mm) using a concrete drill and a hammer drill will also be fully discussed.
Types of crowns
Crowns for socket boxes for concrete are classified depending on the standard of fastenings (triangular, hexagonal, SDS Max, and SDS Plus), and according to the material of manufacture.
Based on the materials of manufacture, the following tools are distinguished:
- pobedit crowns made of hard-melting steel;
- diamond bits for reinforced concrete;
- crowns made of tungsten-cardium alloys.
The simplest and cheapest option is a metal crown for concrete for Hegel sockets in a plasterboard wall (80 and 100 mm), onto which pobedit tips are soldered.
This tool is well suited for domestic use: it copes with drilling holes in foam concrete and brick, but with regular drilling of concrete surfaces it quickly wears out and becomes unusable.
Due to its small operating life, such a tool is poorly suited for professional use.
Optimal for drilling concrete is diamond drilling of reinforced concrete with crowns coated with industrial diamonds and a hammer drill.
Types of crowns for concrete
Diamond crowns for concrete, in comparison with metal pobedit tools, have the following advantages:
- accuracy of drilling in the wall - you will receive a hole in the wall made of plasterboard or concrete of the correct geometry, without chips, cracks and other defects;
- the equipment has any penetration depth - while metal equipment and tools may lose their effectiveness when deeply buried in concrete, diamond core bits have the same efficiency throughout the entire thickness of the concrete slab being processed;
- versatility - in addition to concrete, diamond equipment can be used without problems for drilling any materials with similar strength characteristics;
- the equipment has a low level of vibration and noise - this is not the last factor that should be taken into account when installing a large number of Hegel sockets in apartment buildings;
- drilling with a diamond core is not accompanied by a large amount of dust generated;
- speed - due to the high functional characteristics of diamond coating, such a tool performs drilling much faster than installing a similar hole with a metal nozzle.
In fact, all high-quality equipment from trusted manufacturers are produced with an SDS Plus standard shank mount. This shank technology is suitable for all modern lightweight rock drills. The diameter of SDS Plus shanks is 100 mm.
The depth of immersion of the shank into the hammer drill chuck is 40 millimeters. The SDS Plus standard for tools was proposed by Bosch about 20 years ago, and most leading manufacturers today produce crowns for this type of fastening.
Bit with SDS Plus shank
What size crowns should I use?
The diameter of the crown for the socket boxes will be determined based on the dimensions of the socket box body on which installation will take place. As a rule, all socket boxes are standardized in sizes of 68 and 100 mm, and most of the crowns on the market are suitable for this type of installation.
Concrete equipment for 68th and 100th socket diameters from different manufacturers have, oddly enough, different diameters. In general, the depth and spread of the actual diameter of crowns for 68 mm cases ranges from 69 to 74 millimeters.
The increased diameter of the crown in relation to the size of the body is due to the fact that the s3m3 socket box itself, in the holes drilled in the concrete, sits on a gypsum or alabaster mixture, for which it is also necessary to make free space.
There are also crowns for concrete and foam concrete for 80 and 100 mm socket boxes. Recently, 100 mm socket boxes have become increasingly popular, a wide range of crowns for which has appeared from all leading manufacturers, such as Bosch, Makita, SDS, Kraftool.
In general, the key rule when choosing a concrete crown to make a socket box with 3m3 100 mm is that its actual diameter should be 3-4 mm larger than the diameter of the box box body.
Do not neglect this, since it is much easier to make a hole with an additional amount of gypsum mortar than to buy a new socket that fits an incorrectly chosen crown. If you have already purchased a socket box and did not ask what its diameter is, then measure it with a caliper.
Tips for choosing a crown
When choosing a concrete crown, you need to base it on what exactly it is needed for and what it needs to do. If you need a crown for one-time drilling in concrete or aerated concrete, for example, for installing sockets when renovating an apartment, then you can, without much hesitation, take an inexpensive product made of ordinary hard-melting steel from a domestic manufacturer - its capabilities will be more than enough.
Drilling a hole in a concrete wall with a diamond bit
Such crowns, as a rule, are not particularly durable, and the pobedite teeth on them can fly off quite quickly, however, with intermittent use in everyday life, the service life of such crowns is quite long.
The main thing is to adhere to the basic rules of operation - do not drill for too long, allow the bit to cool normally, and process only those materials for which this tool is intended. Good budget manufacturers include domestic and “Stayer”
If you need a concrete crown for professional work for a long time, then preference should be given to tools of the SDS Plus standard with diamond coating, which have much greater efficiency and service life than pobedit crowns.
Moreover, high-quality diamond bits for concrete can be restored, so if the tool wears out, you will not need to buy it again. Manufacturers of high-quality crowns of the SDS Plus standard include Makita, Bosh, and Hilti.
Installation of socket boxes
You can install socket boxes in a concrete wall without any problems yourself, you just need to get a hammer drill and a high-quality concrete crown.
It is not recommended to save on crowns, since good products from trusted manufacturers have a very long working life and will serve you for many years, while consumer Chinese tools, although they are less expensive, become unusable after just a few weeks of regular use.
In general, the installation of 68x45mm socket boxes can be divided into five stages: preparation, marking, drilling, installation of the socket box, and finishing work.
The sequence of installing a socket box in a concrete wall
Installing socket boxes in concrete will require the following tools and materials:
- pencil;
- ruler;
- building gypsum or plaster mortar;
- putty knife;
- hammer drill or electric drill;
- crown for concrete;
- level;
- stationery knife;
- container for mixing gypsum mortar;
- Master OK;
- chisel;
- hammer.
Preliminary work
Often, trimmers are installed in the place where open-type sockets were previously installed, which requires preliminary dismantling of the old sockets.
Before you begin dismantling, turn off the power to the house, unscrew the plugs and turn off the circuit breaker on the electrical panel, and check whether there is voltage in the outlet using a low voltage indicator (an electrician's screwdriver). When you are sure that there is no voltage, unscrew the screws that secure the socket cover and remove it.
Next, unscrew the screws that secure the wires supplying current to the outlet and disconnect them. After the wires are disconnected, unscrew the screws that attach the plastic housing of the socket to the wooden base.
The wooden base is usually attached to the wall with one or two dowels that you need to pull out. Use pliers or a screwdriver for this.
Marking
Using a construction or clerical pencil in place, draw two perpendicular lines so that they intersect in the place where the center of the future hole for the socket box should be located.
Wall with pre-marked sockets
There are basic rules that electricians follow when determining the location where the socket box will be installed:
- the minimum height of the hole above the floor is 30 centimeters (take into account the height of the future flooring if you are drilling concrete in a room with unfinished repairs);
- in the kitchen, the Hegel socket should be placed above the countertops (approximate height 110-120 centimeters);
- if you are drilling concrete for an outlet in the bathroom, then keep in mind that the hole must be at least 1 meter away from the washing machine.
Drilling concrete
Install the concrete drill bit on the hammer drill and connect the tool to the electrical outlet. To make drilling a hole easier, if you are not sure of the quality of the tip used, you can drill single holes around the perimeter of the socket box in increments of 5-10 millimeters.
To do this, attach the block socket box to the wall, outline it with a pencil, and along the resulting contour, using a small diameter Pobedit drill, make holes to a depth equal to the length of the socket box.
Next, along the same contour, holes are drilled according to the dimensions. The bottom line is that the crown will not go through monolithic concrete, but only its individual sections, which will significantly simplify the work and reduce drilling time. The hole for the socket box should be such that the dimensions of the body are recessed into it by 5-10 mm, since it will be necessary to sit the socket box on the gypsum mortar.
Installation of the socket box and completion of work
This is what properly installed sockets should look like
Installation of the socket box into the drilled hole is carried out according to the following algorithm:
- In the upper part of the hole, using a chisel and a hammer, a groove is made for supplying power wires.
- If the concrete cannot be processed manually, you can use an impact hammer.
- If you are working on foam concrete, then it will crumble very easily; to create a groove, an ordinary chisel will be enough.
- Take the socket box and, using a utility knife, cut holes for the wires on the back of its body (there are special slots there).
- Thread the wire into the socket box.
- Prepare a gypsum solution. Its consistency should be approximately like that of sour cream. Since the gypsum solution hardens very quickly, immediately begin installing the socket box.
- Wet the hole in the concrete wall with water and, using a putty knife or trowel, fill it with plaster mortar until the back wall of the hole is completely covered with plaster.
- Insert the socket and lock it into position (use a level to check that you have immersed the housing to the correct depth, it is important that it does not protrude beyond the wall).
- Fill all the side gaps with mortar and coat the concrete around the socket.
- Remove excess solution only after it has completely hardened: you can use sandpaper for this.
Features of drilling holes for socket boxes using concrete crowns (video)
popenobloky.ru
Installation of boxes for non-modular devices
Such situations are rare, but can bring a lot of difficulties if they are not taken into account. If non-modular sockets or switches (which do not fit into a common frame) are installed in one row, then a minimum distance must be maintained between them. Otherwise, further installation will be impossible!
As an example of such a scheme, you can take a cheap thermostat for an electric heated floor - this product is not modular and does not fit into a common frame with other sockets. Of course, there are thermostats suitable for general frames, but they are more expensive and are tied to a certain collection of installation electrics. Therefore, if you use a device without a common frame, it is imperative to maintain the distance!
So, the vast majority of sockets, switches, thermostats and others, in their finished form, have a width of 86 mm. Accordingly, between boxes for non-modular sockets there must be a minimum distance (along the axes) of 86 mm. But this is if it’s “grinding in” and not exactly, what if the switch turns out to be wider? Therefore, it is better to make the minimum distance between the axes of the installation boxes 90 mm. or more.
Well, the article has come to an end. It is more than enough for installing socket boxes in concrete and other materials.
Review of crowns for drilling socket boxes in concrete
Making large holes in the walls with a drill with conventional drills and attachments does not give a good result, the edges are uneven, and the process is labor-intensive. You have to do more than a dozen drillings, then gouge out the pieces. Therefore, for drilling for installation of electrical sockets, hammer drills or installations with special crowns for socket boxes on concrete are used. Less often they are used with a powerful drill (at least 800 W).
Table of contents:
General information about crowns
These are devices in the form of a piece of cylindrical pipe with a segmented cutting edge consisting of 5-16 teeth. The more segments, the more efficient and faster the drilling. The composition also includes a flange (chuck adapter) for attaching to the tool and a centering drill, which is the first to penetrate the wall and sets the direction of the main cutting edge.
Due to the design features, the crowns easily and quickly penetrate the surface. Using them, in 5 minutes a cavity with smooth edges is obtained. Nozzles for socket boxes for concrete work well not only with this material, but also with artificial or natural stone, ceramic tiles, and brick.
Drilling methods:
- Shock. This method requires a powerful hammer drill and a special attachment. The core of the hole crumbles and falls out completely. Not suitable for reinforced concrete walls, since the crowns suitable for it cannot cope with cutting reinforcement.
- Unstressed. Using a drill or a hammer drill with a crown, operating in drilling mode. It differs from the impact hammer in the absence of noise and vibration, and allows cutting reinforcing bars. You will learn about the types of crowns for concrete and reinforced concrete products from this article.
Types of crowns
1. Dimensions.
To achieve a good result, it is necessary to choose the correct size and diameter of the crown for the sockets. The length of the working part varies - from 60 to 550 mm. It is selected depending on the required depth (at least 40 mm, optimally 60-65). The standard diameter is 68, the maximum diameter is 74 mm (for nozzles used for other purposes, it can be much smaller or larger). Before purchasing, it is recommended to check the size of the socket boxes for which you need to drill. If you have doubts about the diameter, it is better to choose a larger one. In case of an error, the gap can be easily sealed with cement mortar, but it is impossible to insert a socket box into a smaller hole.
2. Classification by material.
- Made of carbide steel with pobedite edges. On the cutting edge of this type there are solderings made of an alloy of tungsten and cobalt (pobedit). Due to its low price, this is the most popular type of crown for drilling for sockets, especially for one-time work. Disadvantages - soldering is often separated from the cutting edge; it is undesirable to use it on reinforced sections of the wall. But if you follow the rules of safe operation, take breaks, change attachments, the product will last a long time. It is important to let it cool before removing, this prevents the solder strips from coming off.
- With diamond coating (for non-impact method). The cutting edge is coated with industrial diamond chips, so they can also be used on reinforced concrete. The hole turns out perfectly smooth, without defects around the edges. There are no restrictions on drilling depth for diamond core bits. The level of noise and vibration is significantly lower, there are no shock loads. The drilling speed is much higher, and the amount of dust is less. The advantage is that the products are self-healing and wear-resistant. To extend the service life of areas with reinforcement, it is better to avoid them.
- Made from tungsten carbide alloys. They are not suitable for reinforced concrete walls. If they come into contact with reinforcing bars, they immediately fail. Advantages: affordable price, can work with a conventional drill. Disadvantage - they wear out relatively quickly without the possibility of restoration, often requiring sharpening.
3. Classification by type of fastening.
Varieties by shank:
- 3-sided.
- 6-sided. This type of fastening, like the previous one, is most often found in household drills.
- SDS Plus. The most applicable option, corresponding to the connectors of all modern household models of rotary hammers that work with nozzles equipped with a shank with a diameter of 10 mm.
- SDS Max. Used only in powerful professional equipment for crowns with a shank diameter of 20 mm or more.
- SDS Top.
Selecting the right shank depends on the type of tool.
Recommendations for selection
Some tips:
- Begin by determining the required diameter and depth of the holes. They depend on the size of the mounting boxes for sockets and must be the same with them. The drilling is 1-2 mm wider, which allows the socket box to be tightly inserted into it.
- The amount of work needs to be taken into account. If it is large, then only diamond-coated options are suitable; carbide-alloy ones may only be enough for 3-4 times.
- It makes more sense to purchase products from well-known manufacturers (Bosch, Makita). To avoid buying a fake, it is recommended to check with the seller documents confirming the origin and quality of the goods.
- Before purchasing, be sure to thoroughly inspect the nozzle for defects or burrs. Spraying should be uniform, durable, and not crumble.
- Wood crowns cannot be used on concrete.
- Options with different shanks are suitable for drills and hammer drills. In the first case it is usually a hexagon, in the second it is an SDS type connector.
Step-by-step instructions for drilling a socket box in a concrete wall
Procedure for drilling in walls:
- Select tools and crowns.
- Apply markings.
- Remove furniture and other things from the room, as the work involves a lot of dust. Cover heavy objects that cannot be moved with film.
- Be sure to use personal protective equipment: goggles, respirator, gloves, overalls.
- Set the hammer drill to drilling mode.
- Make holes according to the markings. During the process, do not put pressure on the hammer drill or distort it.
- Knock out the remaining concrete fragments with a hammer and chisel.
If drilling is difficult, the tool has little power, then first use a regular drill to make several small holes along the entire diameter of the socket box. After this, the crown is put on and the main work is done.
Price
The price depends on the material, type of cutting edge, manufacturer. If you need a device for one or two socket boxes, then you can buy a cheap Chinese drill. Products from domestic manufacturers are more durable. For repeated use, it is better to purchase attachments from well-known foreign brands.
| View | Price, rubles |
| Diamond coated | 2000 |
| Carbide with pobeditovy tips | 620 |
| Tungsten carbide | 260 |
For one-time work, it is better to buy a tungsten carbide nozzle, for small volumes - a carbide nozzle with a pobedit edge, for professional equipment - with diamond coating.
stroitel-lab.ru
Choosing a tool
Now let's move on to choosing a tool. Drilling holes in concrete for sockets can have varying degrees of difficulty, depending on the surface. For this reason, the tool should be selected properly.
Let's consider all possible options:
- The wall is no more than 30 cm thick. In this case, a drill with a power of 350 W or more with an SDS chuck will be sufficient. In this case, the diameter of the shank must be at least 1 cm.
For monolithic walls you will need a powerful tool
- Concrete monolith made of cement grade 400 and higher. In this case, the tool should be more powerful, for example, SDS Max. The diameter of the shank should be about 18 cm.
- Professional drilling of reinforced concrete (and other heavy structures). Here you will need a hammer drill with a power of at least 1 kW.
- Finally, if it becomes necessary to make a hole more than half a meter deep, the most powerful tool in this field will come to the rescue. We are talking about a motorized drill, a tool with a power of 5–8 kW. Absolutely any walls lend themselves to him.
Important: due to its high power, the motor drill cannot be connected to a standard network (1-2 phase). Therefore, it is practically not used in domestic conditions.
Probably, many may think that they should just purchase the most powerful tool and that’s it. However, not everyone knows that the price of such devices is very high. Of course, if you have the means, you can give preference to such a tool, and it will significantly speed up the process of completing the task.
This is what the tip of a motor drill looks like
electrical safety
- Work in a dry environment; if moisture is present, use protective shoes and gloves.
- In the process of preparing for work, you need to make sure that there are no live electrical connections at the drilling site in the wall.
- While working, be careful not to get on the wires in the wall, since the previous owners could have done the wiring according to some of their own standards.
- When operating a cutting power tool, care must be taken to ensure that the power cord does not get caught in moving parts.
Famous manufacturers
Almost all installation boxes are manufactured in accordance with GOST and have similar parameters. For a craftsman, it often doesn’t matter whose products to buy. And yet, Russian consumers prefer to use installation cups from such manufacturers:
- Hegel. The products of this brand appeared on the market in 2006. Electrical installation elements are manufactured in Russia from high-quality raw materials purchased from foreign partners.
- Legrand. French company producing a quality product. The cost of socket boxes of this brand is significantly higher than the price of domestic products.
Legrand Hegel
Types and types of products
Concrete socket boxes are classified according to several parameters - material, shape, design, dimensions. Sometimes craftsmen choose an element based on shade and design. The last two criteria do not affect the functionality of the installation box.
Material
All electrical installation elements are divided into three types:
- Plastic. Most often, non-flammable polymer is used for their production. The plastic socket box has all the technical connectors for convenient fixation of the socket in the wall. The installation box for drywall is additionally equipped with special claws.
- Metal. This is an outdated version of socket boxes. Today they almost never appear on sale. But if the master has one lying around, it can be used no less effectively.
- Wooden pads. These are more likely not installation boxes, but simply a piece of strip on which the socket is then fixed.
Plastic box for concrete Metal glass Wooden socket boxes
Shape and design
Oval concrete socket for two points
Based on their geometric shape, the following socket boxes are distinguished:
- Round. The most common.
- Oval. Suitable for installation of double socket boxes for concrete.
- Square. They have maximum capacity.
- Composite. With their help, you can easily mount triple socket boxes for concrete or on a larger number of power points. They are also called block ones.
- Invoices. These are outer glasses, often square, less often round. Used for laying wiring on wooden walls.
Read more: Do-it-yourself monolithic concrete septic tank for a summer residence, construction of a concrete septic tank
There are also separate types of glasses for installing sockets for the Internet, telephone, cable TV, etc.
Dimensions
The dimensional grid of the installation cup implies the presence of the following parameters:
- Diameter. Marked with the letter “D”. The most common indicators are 60, 64 and 65, 68, 70, 75 mm.
- Depth of the glass. Marked with the letter “N”. Here the sizes vary from 25 to 62 mm. The deepest socket box has a parameter of 80 mm.
All installation boxes have a center-to-center distance of 71 mm.
Understanding the types and types
Plastic, which are the most convenient and practical, since the base is made of non-flammable material, which increases the safety of the wiring and makes it possible to use it on wooden surfaces.
Metal boxes are more durable, but due to their ability to heat up and conduct electricity, they fade into the background, giving way to safer and more practical options. However, these models have not been discontinued, since the installation of hidden sockets in wooden houses is only possible with a metal socket box.
Wooden pads were previously often used when setting up open-type wiring, providing a convenient intermediate base for attaching an outlet directly to the wall. Nowadays they practically never occur, only when installing homemade wiring in bathhouses, garages and other outbuildings.
Models also differ in design features:
- The presence or absence of fixing tabs (in hollow plaster walls they are necessary, and socket boxes for plasterboard, concrete, brick and aerated concrete are secured with a layer of alabaster).
- Open or hidden.
- Single and composite (composite ones have special fastenings that allow you to assemble up to five glasses into one block).
- Standard and advanced.
The sizes of socket boxes may also vary. A round model with a diameter of 65 cm and a depth of 40 cm is considered standard, but there are narrow options with a height of 25 mm or recessed by 80 mm. The dimensions of square boxes are most often 70 by 70 mm, but there are also deviations from the standards.
Safety regulations
The first and most important thing we will talk about is safety. Remember that diamond drilling into concrete is a very dangerous procedure.
Therefore, to implement it, you must follow certain instructions:
- When working, do not forget to wear special protective equipment (helmet, goggles, respirator and overalls). Remember that concrete dust is very harmful to health.
- Special instructions state that before starting work it is necessary to remove people from the work area (within a radius of 2.5 meters from the object).
- It is prohibited to work at a height (more than 1.5 meters) with a concrete hammer without a solid foundation. This is stated in the PTB and PPR. Therefore, you will have to build trestles or scaffolding.
This photo shows a device that will protect your respiratory organs from various caustic substances.
- Before starting work, carefully study the communication plan. This is necessary to avoid bumping into wiring or gas pipes. For safety (the plan does not always correctly reflect the location of communication lines), use the “dialing”.
Tip: Most detectors cannot pinpoint the exact location of wiring hidden under decorative materials. Therefore, it is extremely undesirable to drill in this case.
- It is extremely dangerous to drill through the seams in a block house. Very often, builders hide wiring between blocks. For this reason, cutting reinforced concrete with diamond wheels is prohibited in such places.
- Use a two-handed tool only. In this case, the speed must be increased as smoothly as possible. Otherwise, there is a high probability of an accident.
Hole for socket using a grinder
Sometimes it may turn out that you don’t have a hammer drill at hand, but you need to make a hole for the socket. In this case, you can use a grinder. Of course, this is far from the best option, but, in extreme cases, it is quite applicable.
The hole for the socket is made with a grinder
So:
- To use this option, you first need to outline the outline of the future outlet. For this you can use a regular pencil.
- The next step is to prepare for working with a grinder on concrete. The instructions advise wearing glasses, a respirator, or at least a gauze bandage. It is also better to protect your head with a hat.
- After this, using a grinder, with a concrete circle of the appropriate diameter, we make cuts at the extreme points of the future hole. The cuts must be of appropriate depth. The minimum number of cuts to obtain a square is four, but you can also make a figure closer to a circle.
Note! When performing work, under no circumstances should you change the position of the angle grinder relative to the wall. This may cause the disc to break and cause fragments to fly out. This, in turn, can lead to very disastrous injuries.
- After this, using a regular chisel and hammer, we begin to knock out the concrete in the center of the cuts. The work is painstaking, but there are no other options.