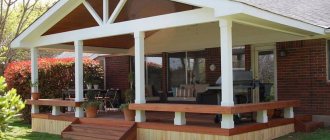
In order to effectively organize the adjacent space and combine the spa area and the relaxation and entertainment area, it is convenient to combine open extensions to the house with the main building. There are many possibilities for creating such multifunctional objects, for example, projects of bathhouses with a terrace and barbecue; photos of various interesting solutions indicate the increasing demand for such a solution.
Bathhouse projects with terrace and barbecue
Meeting friends, conversation and relaxation are closely associated with barbecue. Where there is a barbecue, there is a grill. And the only thing better than a portable barbecue is a stationary barbecue. So they often plan bathhouses with a terrace and barbecue.
Large terrace and outdoor barbecue area
In this bathhouse project, the terrace covers the bathhouse on three sides. A decent area will allow you to sit comfortably for any campaign. If desired, part of the terrace can be made closed. You can relax in it on cool days. You can install a barbecue on a separate stand or do it in one of the blind corners.
According to the internal layout of the bathhouse project. Pay attention to how the stove is installed. It heats four adjacent rooms at once. If you plan to house a bathhouse in winter, you will have to provide additional heating for the rest room, so more power will be required. But the rest room will require a separate heat source: it is of decent size, and is not heated by a sauna stove.
Read about how to choose a wood-burning sauna stove here.
In the case of an all-season bath, it will be necessary to fence off part of the rest room as a vestibule or hallway. So that the cold air does not interfere with your rest after the bath.
Bathhouse with barbecue and terrace
This bathhouse project has two entrances - one from the porch, the second from the terrace. The building has a separate bathroom and a fairly spacious kitchen, but the area occupied by the entire building with extensions is considerable: 14 * 7 m. At the entrance from the porch there is a separate vestibule. This entrance was planned as a winter one. In summer you can open the wide sliding doors, making the terrace even larger.
Corner bathhouse project with terrace and barbecue
The layout option for a corner bath is quite functional. It occupies a minimum of space, having all the necessary premises. The shower room is spacious enough to accommodate a double wooden bathtub. The stove is heated from a steam room, which is possible given its dimensions. By moving the doors, you can install the stove closer to the corner and embed it into the wall. This way it will be heated from the shower, which in some cases is more convenient. For the remaining rooms, it will be necessary to think through the heating system (if the bathhouse will be used in winter).
Project of a small bathhouse with a porch and terrace
This layout has a “disease” of many projects: there is no vestibule for winter use. But there is a locker room here, which is undoubtedly good. The only problem is that humid air will come from the washroom, and wet clothes are unacceptable. Therefore, this room must have very good ventilation. It is imperative to provide an inlet and outlet ventilation hole, as well as install an exhaust fan at the outlet. Only in this case can rapid removal of moisture be ensured.
Read more about what the dimensions of the rooms should be and the layout of the steam room here.
Bathhouse with a gazebo under one roof: design options
According to the type of construction, sauna gazebos can be:
- Open.
- Closed.
The first are lighter structures that have a combined floor with a bathhouse and a single roof. The roof is placed on supports, which, if desired, can be combined with curbs or connected with railings. In this way it will be possible to mark the boundaries of the territory. This is the most financially profitable project, since it does not involve the construction of capital partitions and walls.
Construction of a single complex is most profitable
There will be no glazing work here either. An open gazebo is simply a platform under a roof. There is no escape from the wind in such an extension, but the rain will not interfere with your rest. Looking at the above, it becomes clear that open structures are a seasonal prerogative.
Bathhouse with an open gazebo
The second ones can be confidently classified as permanent buildings, since they have real walls and large panoramic windows. A bathhouse placed with such a gazebo under one roof will look like a monolithic structure.
f4809eea68facb64a189b5aba5c4e794.jpe
fa0bffd7616dd28f98a81e12729a9b76.jpe
acb8daeeef36ecb358c9fc038982f0e6.jpe
5dfa4df81151299a22fe9bd1681502ae.jpe
a402c435d8f3ad5e5886a0204c74391b.jpe
Bathhouse with glass gazebo
If such an extension is also equipped with a fireplace or barbecue, then, even without being particularly insulated, it will receive a fairly comfortable atmosphere. It will be pleasant to be in it even in severe frosts, not to mention the spring-winter period.
Bathhouse with a cozy gazebo and fireplace
A closed gazebo is considered a full-fledged room in the layout of a sauna house. You can draw up a development project in such a way that a couple of walls of the veranda will be removable or sliding, which will allow it to be actively used in the summer, transforming it into an almost open structure with a slight movement of the hand. A very practical and versatile option that is worth thinking about seriously.
A practical option is a gazebo with removable glass
There is another compromise way to build a bathhouse with a gazebo under one roof. The extension in it is made in a semi-open type. In this case, only two main walls are added to the structure, mainly on those sides from which the prevailing winds in this area blow. This approach will make you feel more comfortable in the gazebo, because there will be no room for drafts. You can take an original step and build one of the walls along with a fireplace built into it.
Bathhouse with semi-open gazebo
The floors in the attached veranda are correctly assembled on joists and made of natural wood so that it is always warm and dry. When laying flooring boards, you need to leave large gaps between them. The purpose of these gaps is to provide ventilation in the gazebo and allow moisture from hot bodies to freely drain to the ground. Naturally, the board used must be perfectly processed and not injure your feet with splinters and sharp edges.
It is recommended to make the gazebo field from natural wood
The priority choice should be larch; pine will also do, but the first type of wood will have a very important advantage. Larch is incredibly resistant to rot, although this does not mean that it does not need to be additionally treated with antiseptic water-repellent impregnation
Larch wood is resistant to rotting
Larch also has an equally serious drawback. The fact is that this tree is considered “cold”. As an alternative, during construction you can use a decking board made from a wood-polymer composite as a flooring.
Terrace board is an excellent alternative to larch
A practical solution would be to use lightweight aluminum profiles in the arrangement of the gazebo. If you want to hide from prying eyes, instead of glass, opaque, but easily transmitting daylight, colored cellular polycarbonate is inserted into them.
Cellular polycarbonate will help hide from prying eyes
Mosquito nets will provide protection from annoyingly buzzing midges. Yes, all these techniques will increase the cost of construction, but will expand the possibilities of using the gazebo. It's probably not worth saving on them.
A mosquito net will protect your holiday from insects
Which project to choose
The terrace can be located very close to the bathhouse - adjacent to one or more sides of the walls of the building, or it can be placed at some distance from the house. Another option is to make a large area close to the house and a small extension, connected by a path, for installing a barbecue - so that the smoke does not interfere.
The terrace with barbecue is located some distance from the yuan. Connected to the building by a path
The roof of the terrace and the house can be common, but the foundations must be independent. Between the base of the house and the site, if they are very close, a layer of insulation is laid. It serves as a separator. Thanks to this option, shrinkage of the bathhouse and terrace can take place independently.
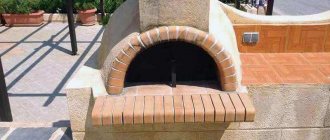
Ready-made version of a terrace with a barbecue: one and a half walls are lined with bricks, the rest are open. Under such a terrace you need a reinforced slab
Since shrinkage can be uneven, when planning a house and a barbecue under one roof, the rafter system is made floating. It has the ability to compensate, to a certain level, for the unevenness of the changes occurring.
Bathhouse with a gazebo: assessing the benefits
A staircase with beautiful railings, a balcony, terrace or gazebo will not only add individuality to the structure of the bathhouse, but will also significantly add functionality to it. From the outside, the bathhouse with a gazebo looks like a very spacious and large gazebo. A combined building will take up less space than two separate buildings. In addition, there will be no need to lay garden paths to connect all the buildings on the site - this is an additional cost saving plus freeing up the site area. In addition to saving space, there are other advantages of combining a bathhouse with a gazebo:
e635de52a1fe3bd301123bdbd0d2535a.jpe
0543bb9542254c536557e9401089d48b.jpe 3059ae3abc5856dd84ce6b04cfbc0cd2.jpe
8591b95cd2824acbfbb265d9dfa0f711.jpe
- the duet building will be decorated in a single style
- reduction of construction costs due to the arrangement of a common roof, framing and walls, and a solid foundation. In addition, such an architectural solution will provide additional strength to the structure.
- In summer, the gazebo can also be used as a summer kitchen, and there is no need to lay additional communications and utility networks
- You can install a barbecue or barbecue oven in the gazebo
- the opportunity to continue outdoor recreation by simply leaving the locker room, but for this you need to choose a place wisely - it should be quite well hidden from prying eyes, providing enough privacy for vacationers
Combining a bathhouse with a gazebo has a number of advantages.
The roof for a bathhouse with a gazebo is usually built in the form of an envelope, the floor is raised to a level and made of natural wood (this floor is very comfortable, it is pleasant to walk on it with bare feet). To install the floor in a gazebo combined with a bathhouse, a special board is used - a terrace board, which is laid with small gaps. Make sure that it is thoroughly polished and has no sharp edges.
According to their design, gazebos are divided into three types:
open gazebo - such structures have a common floor and roof with the bathhouse, and the gazebo itself has supports that can be combined with curbs or railings, marking the boundaries of the gazebo. This is the most cost-effective type of gazebo, since there is no need to erect permanent walls and glazing; at minimal cost you can get a fairly large area protected by a roof. True, an open gazebo will not save you from the wind and will not protect you from rain very effectively, so this option is more suitable for a seasonal bathhouse
Bathhouse with an open gazebo
a closed gazebo - in fact, this is already a capital structure, with walls and, as a rule, large glazing. If such a veranda has a fireplace (barbecue), then even with minimal insulation it will be quite comfortable even in winter, not to mention the spring-autumn period. The closed veranda practically becomes another full-fledged bathhouse room. At the same time, the design often stipulates that one or two walls are made removable (opening), so in the summer a closed gazebo can easily be converted into an almost open one - this creates a fairly universal option
A closed gazebo, as another full-fledged bathhouse room
Closed gazebo with panoramic glazing
a semi-open gazebo is a compromise option in which one or two main walls are erected. Often walls are installed on the side of the prevailing winds in order to feel more comfortable and protected on the veranda. Another option is to build the wall together with the fireplace.
Semi-open gazebo as a compromise option
In Fig. 1. The project of a compact bathhouse with a gazebo is given. To further save bath space and increase fire safety, the furnace firebox is placed outside. The windows in the steam room and washroom are small to reduce heat loss. The semicircular gazebo also looks attractive.
Rice. 1. Project of a bathhouse with a veranda under a common roof
In Fig. 2 shows another solution for a bathhouse with a gazebo
Rice. 2. Bathhouse with gazebo
Figure 3 shows the design of a bathhouse with a glazed veranda and an open terrace
Rice. 3. Project of a bathhouse with a closed veranda and an open terrace
The video shows the original version of a bathhouse with a gazebo and a swimming pool:
What kind of foundation will be under the terrace?
For terraces with wooden flooring, a columnar foundation is often made - it is easier to manufacture and cheaper. For areas finished with tiles or porcelain stoneware, an insulated slab is needed; if the finishing is paving slabs, they can be laid on a profiled membrane and a backfill of crushed stone and sand. This is perhaps the most inexpensive and fastest option.
A pile foundation for a wooden terrace is not very expensive and labor-intensive
A pile foundation requires less expense, but only requires the installation of wooden support posts on which the roof will rest. Such barbecue terraces often have a low wooden fence. These projects “fit” well into the traditional style: they are attached to walls made of logs or timber.
Bathhouses designed in a modern style often have open terraces with tiles (ceramic or paving) lined with finishing stone. But for brick or stone pillars, it is necessary to make a shallow slab foundation with insulation. In winter, on heaving soils without insulation, not a single finishing material will hold up, and the slab may crack (and, most likely, it will). Without insulation, you can make a foundation for a terrace only on dry sandy loam soils that are not prone to heaving.
What would such a terrace look like?
Material selection
The complex includes swimming pools, a sauna and a spacious relaxation area
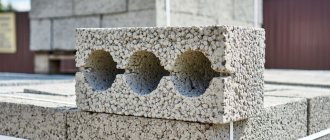
The most popular and economically feasible material for building a bathhouse with a terrace is wooden beams. On the one hand, it retains heat well, so the bathhouse will not require additional insulation. In addition, wood is the traditional material of the Russian bathhouse; it allows you to create a unique “bathroom” atmosphere. An additional plus is that wood, as a “breathable” material, independently regulates humidity, but will require additional protection from mold and fire.
Brick baths are more reliable in terms of fire safety, but they take longer to warm up, requiring more fuel. In addition, brick baths will require the mandatory installation of a ventilation system, otherwise condensation will begin to accumulate inside the bath, provoking the development of mold and bacteria.
The most common options are baths made of timber
Traditional Russian bathhouse made of timber
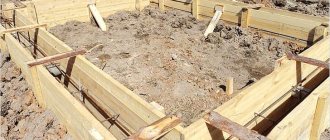
How to build a slab for a terrace with a barbecue with your own hands
The construction of any foundation begins with earthworks. First, select soil to the width of the planned terrace, plus fifty centimeters. This half a meter is used to create a protected insulated blind area. It covers the side of the stove and prevents it from freezing.
This is what a slab base for a terrace looks like schematically
The depth of the pit depends on the region, the degree of heaving of the soil, and the thickness of the finishing.
It is recommended to use high-density extruded polystyrene foam (EPS) (at least 35 kg/m3) as insulation for the slab base. It has excellent heat-insulating properties, does not rot, does not absorb water, is not damaged by rodents and insects, fungi and mold do not develop on it, and it is also resistant to mechanical stress. For central Russia, the thickness of polystyrene slabs should be about 100 mm.
Connecting the terrace to the house
How to connect the base of the terrace to the foundation of a bathhouse or house is shown in the figure. Please note that SPA anchors are not a required part. If the slab insulation is properly carried out, there will be no shifts or movements. Even if the entire terrace is covered with bricks. But for your own peace of mind, you can install them.
Option with drainage pipe for areas with high groundwater levels
Bedding
In the pit for the terrace, the remaining soil is leveled and compacted. A substrate of crushed stone (middle fraction) 10-15 cm thick is poured and compacted. It’s better not to do it manually, but with a vibrating plate - the result will be better, there will be less shrinkage. At this stage, the formation of the slope begins to create a blind area. From the edge of the terrace, at that same 50 cm, the crushed stone is leveled so that its layer becomes thinner towards the edge.
Crushed stone is necessary to create a drainage layer
If the groundwater level is high, a drainage pipe is laid in the crushed stone. It should be located at a distance of 20-30 cm from the foundation of the house. Its function is to drain water that has fallen under the slab. 10-15 cm of sand is poured onto the compacted crushed stone, leveled, spilled, and also compacted to a high density (when no trace of the boot remains). Here the slope for the blind area is also preserved.
Waterproofing and insulation
This is a modern waterproofing material - a profiled membrane.
It has high reliability, and at the same time, due to the uneven surface, it compensates for heaving forces. Waterproofing material is pricked on top. In a budget option, this is a dense polyethylene film (density 200 microns higher), but it is advisable to use other waterproofing materials, in particular, polymer membranes. They are much stronger and more durable, and due to their uneven surface they partially compensate for the loads of winter heaving.
The width of the waterproofing should be decent: one edge should extend approximately 10-15 cm onto the wall of the building, the second should cover the entire width of the blind area (the second edge is not fixed, then sprinkled with soil).
Expanded polystyrene insulation boards are laid on the waterproofing. If the insulation thickness is 10 cm, it is better to take five-centimeter thick slabs and lay them in two layers, overlapping the joints of the lower row with sheets of the upper one. Expanded polystyrene is also laid in parts of the blind area, but here the thickness of the insulation is 50 mm (in this area the slope “from the foundation” is maintained).
Another layer of waterproofing is laid on the insulation, its width is the same, one edge is placed on the foundation of the bathhouse. Both films are fixed together with a clamping bar.
Reinforcement and filling of the slab
Now formwork is placed around the perimeter of the terrace (exactly along the perimeter of the terrace, excluding 50 cm for the blind area) - a board more than 100 cm high, reinforced with posts or jibs, you can sprinkle it lightly with soil. The reinforcement is laid out on the brick halves. They will provide a distance of 5 cm from the edge of the concrete slab.
When creating a reinforced frame, do not forget that reinforcement is required for each column or post. It is bent with the letter “G” and two such rods are tied in the right place
For reinforcement, rods with a diameter of 6 mm are used. They are laid in increments of 100 mm both lengthwise and crosswise. They are tied at the intersections with knitting wire. Having finished making the reinforcing frame, concrete mixture is poured into the formwork. The thickness of the mortar layer is 10 cm. It can be made standard: 1 part cement, 2 parts sand and 3 crushed stone, less water than cement.
How to make slab reinforcement and what you need for this, read the article “How to knit reinforcement with your own hands: devices and methods.”
To increase the frost resistance of the slab, it is advisable to treat it with a concrete vibrator. Since the depth is shallow, you will need a surface model (you can rent it for a few hours).
Curing
After setting, the surface is covered with film. If the weather is hot, the stove is sprayed with water for several days. The next day after pouring, wetting is abundant, and on all subsequent days it is moderate. In addition to the film, you can cover the stove with something that does not allow light to pass through - uneven heating can cause cracks to form. If additives that accelerate the setting of cement were not introduced, then finishing can begin in three to four weeks.
The formwork can be removed a week after pouring. After this, soil can be poured over the blind area (extreme 50 cm) and leveled. If you wish, you can then sow grass or plant flowers - that’s up to you as you wish.
Types of verandas and features of their layout
Depending on its location, the veranda is divided into several categories:
- Frontal - attached from the facade.
- Side - built from the side of the bathhouse, attached to the outer wall.
- Circular - encircles the house, surrounding it on all sides.
- Corner - located at the junction of capital walls. In this case, the veranda will act as a defensive redoubt for the bathhouse, protecting it from cold and gusts of wind.
- Semicircular - this option is not recommended, since the veranda will not have direct access to the street.
In the classic version, a rectangular or square veranda is used, since it has the correct appearance and is much more convenient to use than rounded options. Both parts of the building must be erected from the same material to create the impression of a single structure; the best option is wood. This is an environmentally friendly and safe option, the advantages of which are invaluable. The only nuance that needs to be taken into account when creating a building is that you need to leave a gap of one centimeter between the bathhouse and the veranda to avoid distortion.
If ordering an individual plan and construction is expensive, but you cannot build it yourself, then you can use a ready-made factory project, the assembly of which can be completed in a week. When combining a bathhouse and a veranda, you need to immediately find a project that involves combining them.
Pile foundation for the terrace
If you plan to make a terrace with wooden flooring, you can get by with an easy-to-make pile, drilled-rammed foundation. One note: this foundation will perform well in areas with low groundwater levels. If groundwater is close to the surface, it is better to make a shallow columnar one.
It is most convenient to use pipes. Metal ones are expensive, and they also need to be carefully treated to prevent rust; asbestos-cement ones are the most acceptable option. Some people install plastic sewer lines. Despite the low strength of such formwork, it can be a good option. After all, the plastic is smooth, and it will be difficult for the emerging lateral forces of heaving to “catch” it. And they are the most difficult to deal with: they are almost not calculated.
In any case, the diameter of the pipes is about 20 cm. The pitch of installing the piles depends on the type of soil and the load on the terrace. On average it is 1-1.5 meters.
This is what a pile foundation for a terrace and its piping looks like schematically
Wells are drilled in the ground below the freezing depth of the soil. Approximately 15-20 cm of crushed stone is added and the crushed stone is compacted. Insert the pipes, placing their upper edges at the same level. To make installation easier, you can throw a couple of shovels of crushed stone inside the pipe.
Vertical installation is checked with a plumb line; alignment along planes is easier to do using stretched threads. To do this, reinforcement bars are driven in at key points, they are also positioned vertically, then cords are tied to mark the lines for installing the pillars.
Schemes for reinforcing pillars under the foundation
Two or three reinforcement bars (diameter 8-10 mm) need to be driven into each pipe. They must first be connected to each other. You can use any sufficiently flexible and strong wire that will allow you to hold the rods in a given position. The reinforcement must be positioned so that each rod is at least 5 cm from the wall. This way they will be inaccessible to moisture and oxygen, which is why they will not rust.
After installing the reinforcement, you can fill the piles with concrete mortar. To give the structure increased density, it is necessary to achieve homogeneity of the solution. In this case, you need to use a submersible vibrator for concrete, with a flexible shaft and mace length of 1.5-2 meters. As a last resort, you can pierce the concrete. They take a thick rod of reinforcement, pierce the concrete right through, and then shake it a little. This removes air bubbles. Do this immediately after pouring. As a result, the solution settles a little, you have to add a little. Another option is to knock on the pipe, but preferably either with a rubber mallet or a wooden mallet (so as not to break the asbestos, since it is quite fragile).
How to attach the harness
After the concrete has set, wooden blocks of the lower frame are attached to the posts. It is better to take timber 150*50 mm or 75*150 mm. Before laying, they are treated with impregnations and antiseptics, if desired, tinted with stains and always covered with varnish or paint. Paint and varnish products are used for outdoor work. It will reliably protect the wood from atmospheric influences.
Joist mounting options
To prevent moisture from penetrating through the concrete to the wood, a layer of waterproofing (regular or euroroofing felt in two layers) can be laid on the tops of the piles under the bars. There are no problems with attaching the joists to the concrete. You can do this in several ways:
- when pouring piles into concrete, drown the studs, and then “string” logs on them; Such plates are used to attach logs to the timber.
- fasten with steel corners using large dowels;
- they use U-shaped galvanized plates (there are two models - one is attached with dowels to the pile, the second has a pin that needs to be sunk into the concrete when pouring).
More difficulties arise when attaching the joists to the building: this operation is not often required. A reliable option is the following: attach the beam to the wall at the required level (do not forget to process it). They are fastened with studs (for example, M12*1000), wood grouse or anchor bolts (with a diameter of at least 10 mm). The installation step of the fasteners is 50-60 cm. To make the fastening more durable, they are installed in a zigzag pattern - one higher, the other lower. To prevent water from flowing between the wall and the timber, seal the joint with silicone sealant.
The logs and all other elements are attached to the beam with special fastenings made of galvanized iron (see photo).
The height of the terrace flooring should be slightly lower than the floor in the bathhouse or house. Approximately 25 mm. This will prevent water from flowing into the house. To make it easier to navigate, you can measure the height of the window sill in the room from the floor. Then, on the outside, mark a level 25 mm lower, then lower the level even lower, but this time by the thickness of the board (if you are using a board 25 mm thick, then in general the support beam should be nailed below the floor level in the house, not 50 mm).
Therefore, they begin to install the harness by attaching the support beam to the wall, and they are already guided by it when installing the harness and joist. The same block can be used when setting the level of piles (the piles are placed along the lower edge of the beam).
The terrace flooring should be located 2.5 cm below the floor in the house
To two bars - one on the wall, the second on stilts - transverse bars - logs - are attached. Their installation step is 40-60 cm. After fixing the logs, you can nail the flooring to them. It can be made from edged boards, or from a special terrace. It differs in that a wave-like profile is formed on one side. This surface is not so slippery even when wet.
Features of the construction of a common roof for a bathhouse and a gazebo for some projects
First of all, it is worth paying attention to the consideration of the features of the most popular project - a bathhouse with a gazebo under an elongated gable roof. The gazebo in this version rests on the walls of the building and vertical supports
In this case, experts recommend paying special attention to the process of building the foundation, since it is best to use different types of foundations.
Usually, a reinforced strip foundation is laid directly under the building, which copes well with heavy loads. But under the gazebo it is best to make a columnar one. However, they will not be interconnected and each of them will function on its own.
8828603be84a9166914a795196384b89.jpe
988ee6a85b5ddec4047e5158573a825a.jpe 83339dd336ee6eb79b354990ea27efee.jpe 78ecb61f3b3b83fc3c9796df883aa57b.jpe
It is also worth paying attention to the fact that the gable roof in this case will have quite large dimensions. Its length above the gazebo alone will be about 4 m.
And this is a serious load on the supports and, therefore, the risk of displacement of the rafter system
It is important to understand that even minor, at first glance, distortions (3-4 cm) can have a serious impact on the condition of the structure. Therefore, even at the stage of laying the foundation, it is worth trying to eliminate such risks.
Before building a roof, it is necessary to carefully carry out all calculations and prepare materials
Helpful advice! Both strip and column foundations will be more reliable if they are laid below the freezing level of the soil in winter. At the same time, it is recommended to use bored piles for a columnar foundation.
Despite all the recommendations, some owners still prefer shallow foundations
In this case, it is important to strictly adhere to all building codes:
- the thickness of the sand cushion should be at least 20 cm;
- the depth of the tape cannot be lower than 80 cm;
- the diameter of the construction reinforcement that will be used to reinforce the tape should not be less than 10 mm;
- It is important to allow the finished foundation to settle to avoid settling after the building is built.
Do not forget that for a columnar foundation it is necessary to have anchors that will allow you to fix vertical posts, the width of which will be at least 40x40 cm.
Laying the foundation for a bathhouse is a very important stage of construction.
In addition, it is important to understand that almost any material undergoes shrinkage and wood is no exception. In some cases, this figure reaches 0.7 cm per 1 m of height
But the racks that hold the roof over the gazebo will not shrink. Therefore, it is best to give the entire building time to shrink. As a rule, this period is one year, but it is better to take more time to avoid troubles in the future.