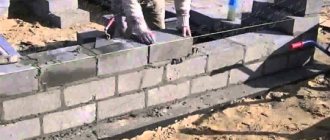
After erecting the walls of a house from piece materials (bricks or blocks), the next important operation is usually pouring the reinforced belt. This element of the overall design acquires particular importance when building houses from gas silicate blocks - such an upper frame is needed both to give rigidity to the entire “box” and to attach the Mauerlat, that is, as a kind of “strip foundation” for the subsequent installation of the roof.
It happens that land owners who conduct independent construction, trying to save on everything, are looking for ways to do without an armored belt, what technologies are available for attaching the mauerlat directly to block or brickwork. And although, yes, such methods theoretically exist, it is very difficult to call them absolutely reliable. Therefore, good advice: never give up a reinforced belt, especially since in some cases it will not require too much financial and labor costs.
And to estimate the scale of the upcoming work, use the calculator for the amount of concrete for pouring the armored belt - it will not only show the amount of solution, but also give a “layout” of the initial ingredients for preparing it yourself.
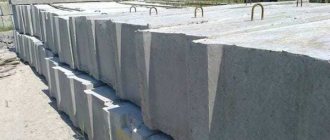
Prices for a concrete mixer
concrete mixer
Some explanations on the calculations will be given below.
Without exception, any structure made of any block materials will be constantly exposed to natural phenomena - soil swelling, building settlement, and other ground movement. In addition, increased winds and rain can also affect the integrity of the entire building. It is to eliminate various movements of the building that a concrete reinforced belt is installed over the walls. We’ll talk about how to make an armored belt with your own hands in this article.
Armored belt device
A reinforcing belt, or as it is sometimes called a seismic belt, makes it possible to improve strength
the entire house, and also helps
prevent cracking of walls
as a result of soil movement with the foundation and under the influence of atmospheric phenomena.
In addition, if the armored belt is made correctly, it allows you to evenly distribute the loads
from the roof or concrete floors located above it.
Please pay attention! Even if the floors in the house are made of wood, the need to make an armored belt does not disappear. The type of overlap does not determine whether to make an armored belt or not. In any case, the belt should close all the walls.
Everything is clear about the purpose of the armored belt. Now a few words about its design. An ordinary reinforced belt has two standard elements - a rigid volumetric frame made of reinforcement, as well as the concrete in which it is located. In general, everything is quite simple, but making an armored belt with your own hands without studying your features will probably be difficult.
How to make an armored belt - sequence
In order to determine the complexity of the work, as well as for a more detailed analysis of how a reinforced belt is made, we will break down the manufacturing technology into several stages. We can say that we will provide specific instructions for making an armored belt.
Metal frame made of reinforcement
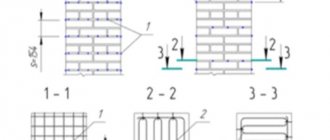
It is necessary to begin assembling the frame by installing pieces of reinforcement at the top of the wall. To do this, you either need to simply drive in pieces, if the density of the material allows it, or drill holes and insert pieces into them. The reinforcement is installed at the intersection points of the walls and along the entire perimeter of the structure every 1-1.5 meters. The segments are installed in squares of four pieces; they will determine the dimensions of the entire frame. After this, you need to secure the lower longitudinal row of reinforcement at a height of 3-4 cm from the top edge of the wall. To do this, longitudinal rods are tied to vertically mounted pins using knitting wire. In this way, two parallel rods are secured.
After the longitudinal reinforcement is installed, it must be connected with short jumpers every 2.5-3 cm. For jumpers, you need to use pieces of reinforcement.
Vertical sections are also installed in a similar way. The upper longitudinal row of reinforcement will later be attached to them. The top row will be attached in the same way and with the same pitch as the horizontal one. The length of the segments will depend on the total thickness of the armored belt. The recommended thickness of the armored belt is 200 – 250 mm.
From these dimensions it is necessary to determine the length of the vertical segments. Longitudinal reinforcement bars are again attached to the vertical sections, which are then secured with transverse sections. In general, everything is exactly the same as with the lower level of the longitudinal rods.
Formwork
At this stage, you can proceed in two ways: either install permanent formwork, or make a collapsible one from boards. The best option would be a collapsible design. It is assembled from almost any boards or sheet materials. During the construction of the formwork, it is necessary to monitor its upper edge - the difference should not be more than 1 cm.
The ideal option would be a combined system, in which on one side it will be non-removable, and on the other, it will be removed once the poured solution has hardened. If the facade will be finished with some kind of material or insulated, then permanent polystyrene formwork can be installed on the front side, which will later become one of the elements of the insulating layer. On the inside you can place a regular board or OSB, which can be fixed with improvised hardware and fasteners. The same cannot be said about working with foam concrete, which has its own.
The most difficult moment here will be connecting the two parts of the armored belt formwork. Here you need to approach it with all responsibility and think about how to connect two opposite parts in such a way that the poured concrete does not crush them on the sides. To do this, you need to secure wooden spacers along the upper edge of the formwork in increments of 30–40 cm, and you can also tighten it with wire. To fasten with wire, you need to drill holes in the boards and thread the wire through, which will tighten the two parts of the structure. After the solution hardens, simply bite off this wire with side cutters and it will remain inside the armored belt. After screeding, you can proceed to the next stage of construction of the reinforcing belt.
Pouring concrete
Everything here is not difficult enough, except for lifting the concrete inside the formwork from above the wall. But this issue can be easily sorted out when ordering. Companies providing concrete delivery services have the opportunity to order a concrete pump, which pumps the solution to any point of the reinforced belt being poured.
Let’s also say a few words about the quality of the concrete mixture and the method of preparing it if you prepare it yourself. When ordering, the brand must be at least B15. But if you cook on your own, the composition will be as follows: one bucket of cement and two buckets of crushed stone and sand
. It is best to prepare the concrete mixture thicker, because... it will not crush the formwork too much. However, such a solution has its own nuance - the mixture in the formwork must be carefully compacted and compacted. Ideally, a deep vibrator is used for this, but it is not often found in domestic construction. For compaction, you can use either a piece of reinforcement or a piece of wooden block, which carefully compacts the entire solution in the formwork.
Completion
The final stage of making an armored belt with your own hands is to control the hardening of the concrete. Immediately after pouring the concrete mixture, it is best to cover it with cellophane film. This is necessary to reduce moisture loss and the appearance of cracks in the armored belt. After a few days, when the initial strength has been gained, the formwork can be removed (removable). By the way, we advise you to read the article ““.
That's basically all. Let us clarify only one detail, which concerns the waterproofing of the armored belt. Usually a mauerlat is laid on the armored belt for further installation of the roof. To do this, roofing felt or other modern bituminous material must be laid on the concrete surface to provide waterproofing. In this way, you can protect the base of your roof from incoming moisture from the walls.
Reading time ≈ 3 minutes
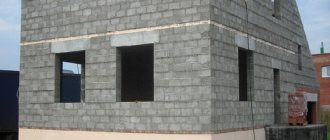
The reinforced belt is considered one of the most important stages in the construction of a block house. It is done at the end of each floor. The armored belt on aerated concrete gives rigidity to the entire surface of the house, “gluing” the entire structure together and strengthening the entire house.
If you doubt your own strengths and skills, you can invite specialists for these purposes, but those who are more or less versed in the construction business are quite capable of filling the armored belt, following the step-by-step instructions.
How to make an armored belt for aerated concrete?
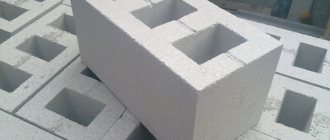
To do this, you need to buy additional blocks 10 cm thick. The blocks are laid on the outside of the house using glue, then a thermal circuit is made from extruded polystyrene or mineral wool. Then, 5 cm thick blocks or formwork in the form of plywood are placed from the inside of the house. The result is a homemade block, inside of which the reinforcement for the armored belt is placed, from 8 to 12 in diameter.
It is laid in the form of a rectangle, while frames are knitted - two rods at the top and bottom. In any market you can purchase special fastening sprockets that are used in the work. This is done so that the reinforcement does not lie on the block itself, but is in the air - a so-called protective layer of concrete is created, with a gap of 3 cm at the top and bottom.
After this, concrete is poured, carefully leveled, and a ready-made reinforced belt for the floor slabs is obtained. A more detailed description can be seen in the video; the photo also shows drawings, diagrams and step-by-step instructions for manufacturing the structure.
If you look closely, you can see studs around the entire perimeter, to which the ceilings will subsequently be attached so that the roof is kept as level as possible and does not move to the sides. The length of the studs depends on the thickness of the overlap. As a rule, meter-long elements are taken and cut in half.
How to properly fill an armored belt with your own hands? This question worries many, especially novice craftsmen. Probably, many are familiar with the picture when concrete is poured from a hose - a special concrete pump that supplies the material to the desired location. But in most cases, the installation of an armored belt does not allow this task to be completed, since concrete under pressure will fall from a great height, and the formwork can simply fly apart. Therefore, it is often necessary to use manual labor, no matter how hard it is.
When pouring an armored belt in a house made of aerated concrete, the subsequent load should be calculated. If it is not supposed to be too large, you can save money. The volume of the structure can be made smaller, but not by narrowing it, but by reducing the thickness. Experienced craftsmen know how to correctly calculate the dimensions of an armored belt and reduce the cost of its production, without losing the quality of the entire structure, which is very important.
Regarding pouring, there is one more important tip. This process should be performed one-time, and not in several passes. If this is not possible, then it is recommended to first install special wooden jumpers. When the time comes to pour a new part, the ceiling is removed, the joints are thoroughly moistened, and only then can a new portion of concrete be poured.
At the end of laying, it is necessary to compact the concrete mixture to eliminate voids. To do this, take a piece of reinforcement and pierce the concrete with it. If the work is carried out in the summer, at high temperatures, then it is recommended to cover the armored belt under the Mauerlat with polyethylene so that the moisture does not evaporate and cracks do not form on the surface.
Any developer, planning to build a house from aerated concrete, is faced with the need to manufacture an armored belt (it is also called a seismic belt). The armored belt on aerated concrete is a monolithic reinforced concrete strip poured along the entire perimeter of the walls (between the first and second floors, etc.). This element is necessary to evenly distribute the load and connect the walls together. This reduces the risk of cracks due to uneven shrinkage of the building. The armored belt is also placed under the Mauerlat when installing the roof.
Maxim Pan User FORUMHOUSE, Moscow.
You cannot attach timber (mauerlat) directly to aerated concrete using studs. If this is done, then over time, under the influence of wind load, the fastenings will become loose. When installing an attic floor, an armored belt on aerated concrete with a wooden floor will redistribute the point load from the beam to the entire wall.
An illustrative example is a forum member with the nickname mad-max,
which comprehensively answers the question of when an armored belt is needed in a house made of aerated concrete
.
He did not have time to fill the armored belt under the Mauerlat, and the house went into “winter.” Already during the cold weather, the arched openings under the windows in the house cracked exactly in the middle. At first the cracks were small - about 1-2 mm, but gradually they began to increase and for the most part opened up to 4-5 mm. As a result, after the winter, the forum member poured a 40x25 cm belt, into which he installed anchors under the Mauerlat before pouring the concrete solution. This solved the problem with increasing cracks.
mad-max FORUMHOUSE user
I would like to add to this that the foundation for my house is strip-monolithic, the soil is rocky, there was no movement of the foundation before I started building the house. I believe that the reason for the appearance of cracks was the lack of an armored belt under the Mauerlat.
An aerated concrete house, and especially a two-story house, needs an armored belt. When making it, you should remember this rule:
The main condition for the correct “operation” of the armored belt is its continuity, continuity and looping along the entire perimeter of the walls.
There are several options for installing an armored belt in an aerated concrete house. The production of an armored belt begins with the calculation of its cross-section and the choice of the type of formwork - removable or non-removable, as well as the “pie” of the entire structure.
Eyeonenow FORUMHOUSE user
I am building a house from aerated concrete 37.5 cm thick, with brick lining and a ventilated gap of 3.5 cm. I do not want to use special factory-made U-blocks for pouring the reinforced belt. I saw on our forum the following diagram when building a house, how to insulate an armored belt - a partition block 10 cm thick is installed on the wall block, then insulation is applied (EPS), and removable formwork is installed from inside the house. I also saw an option where the insulation is pressed close to the brickwork. With this scheme, a belt of greater width is obtained.
To understand which option to choose, let’s turn to the experience of FORUMHOUSE experts.
44alex FORUMHOUSE user
I built a house from aerated concrete 40 cm thick. In my opinion, a ventilated gap of 3.5 cm between the wall and the cladding is not enough; it is optimal to leave a gap of 5 cm. If you look at the “pie” of the armored belt from the inside out, it was as follows:
- removable formwork;
- concrete 20 cm;
- EPPS 5 cm;
- septum block 15 cm.
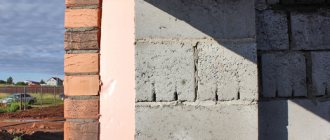
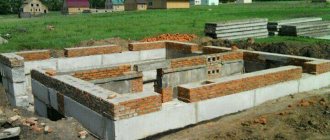
In the construction of private residential buildings made of block materials (brick, aerated concrete and others), an armored belt is always provided for additional protection against movement and deformation of walls and load-bearing structures. This reinforced concrete structure, installed along the entire perimeter of the building, reduces and redistributes external and internal stresses on the walls and foundation that arise as a result of seismic activity and ground movements, exposure to wind, and stresses from the internal structures of the house.
Due to probable changes in the soil and the internal structure of the building, walls in different areas of the house may receive different levels of loads, causing compression and torsion of the material. If the load reaches critical values, cracks form.
For low one-story houses, the foundation can serve as an armored belt quite well. But with a significant height of the walls (two or more floors), critical loads are created in the upper part, for the even redistribution of which a special additional structure is needed - a concrete belt with metal reinforcement. Its presence increases wind protection for the walls of the house and the bursting loads from the mass of the upper floor and roof.
Expert opinion
Sergey Yurievich
Existing practice in construction proves that the width of the armored belt is quite sufficient if it corresponds to the thickness of the wall. The height can vary in the range of 150-300 millimeters. Profiled metal (angle, single-T or I-beams, reinforcement) can be used for the structure. Note that the armored belt itself in such a house or in an extension made of aerated concrete performs the functions of an I-beam that can withstand stress more than anything else.
Design Features
Having received answers to the questions of what a seismic belt is and why it is needed, we will understand the features of its design. Unloading belts made of reinforced concrete to strengthen the perimeter of the walls can be made in various ways:
- based on u-shaped cellular elements placed along the perimeter of the upper level of the masonry. They are fixed to the walls with an adhesive solution. These elements are needed to create a thermal insulation layer. It is only necessary to place the pre-assembled parts of the frame from reinforcing bars. They need to be well secured, and then a monolithic structure will be formed, which will then be filled with concrete solution;
- using elements that act as partitions. Such blocks are fixed with a special glue solution. A reinforcement structure is installed along the entire perimeter, and then concreting is carried out. Partitions are used as formwork, which is necessary to create a reinforced belt. The glue perfectly holds the partition elements, which are subject to bursting force;
- using wooden formwork, which is removed after the concrete solution has hardened. This option is suitable for the construction of houses made of aerated concrete or foam concrete, which require additional thermal insulation. For the manufacture of formwork, thick sheets of plywood and boards, fixed with jumpers, are usually used. The design is quite strong and rigid. The thickness of the armored belt is the same as that of the load-bearing wall, and the height reaches 30 cm;
- with fastening the bottom of the wooden formwork using screws. Its upper part is reinforced with transverse parts, which are attached at the same distance from each other (no more than 1 m). This design can perfectly withstand thrust loads. Then a frame of steel rods is installed and concrete is poured.
If lightweight cellular concrete is used for the construction of an object, then a reinforced seismic belt must be made without fail.
Having become familiar with the design nuances, it is easy to understand how an armored belt is made and what is needed for it. The main thing is to choose the right way to perform the reinforcing reinforcing belt, and also to understand the order of the actions performed.
Armobelt under the Mauerlat
The functions of the armored belt under the Mauerlat are the same - ensuring the strength and reliability of the wall structure. Design features in its size. As a rule, the minimum cross-section is 250 x 250 mm, and the height should not be greater than the width of the wall. The main requirement is continuity of the structure and equal strength along the entire perimeter of the walls of the house: at a minimum, the armored belt must be monolithic. In order to achieve continuity, it is recommended to use concrete of the same grade (at least M250) for pouring.
Attaching the Mauerlat to the armored belt
Expert opinion
Sergey Yurievich
Construction of houses, extensions, terraces and verandas.
The easiest way to attach the Mauerlat to the armored belt is with threaded studs.
The diameter of the studs should be 10-14 mm. Cross members must be welded at the base.
When using raw concrete to fill the armored belt under the Mauerlat, care should be taken to place the studs in advance:
- they should be rolled in advance to the reinforcement cage placed inside the concrete;
- the distance between the studs must be the same;
- to prevent concrete from contaminating the threads in the outer part of the studs, they must be covered with cellophane and wrapped with wire;
- that part of the studs that will be inside the concrete should be protected from corrosion - paint is quite suitable for this (oil-based or nitro-based - it doesn’t matter, you can also use primer).
The outer part (length) of the studs must be sufficient so that, in addition to the Mauerlat itself, two nuts and a washer can be screwed to them. Ideally, the places where the Mauerlat is attached to the armored belt should be located as accurately as possible in the middle between the rafter structures. At the very least, the rafter legs should not coincide with the studs, otherwise you will get additional problems when installing the roof, so you should pay attention to the accuracy of marking and installation in advance.
The feasibility of strengthening reinforced concrete structures with a reinforced belt
What is an armored belt and what is its purpose? What contributes to the need for solid reinforced concrete reinforcement along the entire perimeter of the structure? Let's look at the answers to these questions in more detail. The reinforcing reinforced belt for the main walls has the form of a single concrete structure corresponding to the perimeter of the house and reinforced with iron rods. This design is capable of performing certain tasks:
- ensures the even position of the blocks in the masonry;
- takes on the thrust loads created by the rafter system;
- resists deformation of load-bearing walls;
- evenly distributes the loads acting on the walls;
- significantly reduces the possibility of cracks;
- reduces the number of negative factors that contribute to the shrinkage of the structure.
The reinforced concrete frame is made at several levels of the structure being built. Its design features help prevent the following negative factors:
- the parts of the rafter system are fixed to the load-bearing walls of the building using special anchors that damage the blocks of porous concrete. When fastening rafters to aerated concrete or foam concrete without a seismic belt, cracks appear, the integrity of the material is compromised, and the strength characteristics decrease;
- the rafter system is located at an angle relative to the walls, which is why it exerts thrust forces on them. This can cause deformation of the load-bearing walls of the building. A reinforced concrete contour around the perimeter of the house will significantly increase the resistance to these thrust loads, which will be evenly distributed over the entire height of the walls;
- reinforced concrete frame increases resistance to deformation of the main walls with openings for doors and windows, which unevenly absorb the loads.
A reinforced concrete contour reinforcing the perimeter of the house is especially suitable for the construction of buildings made of aerated concrete blocks or foam blocks. Bending loads can damage this type of building material. The armored belt forms reliable protection for such buildings. It takes on a significant part of the loads, which ensures high strength and stability of the walls.
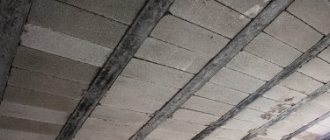
Reinforced belt for floor slabs
The presence of heavy floor slabs creates increased loads on the walls. To prevent wall materials from deforming under their weight, an armored belt is used at the height of the junction of floors. Such a reinforced concrete strip must be constructed under all floors along the entire perimeter of the house. The distance from the slabs to the reinforced belt should not exceed the width of one or two bricks when constructing brick buildings and other objects made of stone materials or with slag-filled walls (ideally 10-15 cm).
Expert opinion
Sergey Yurievich
Construction of houses, extensions, terraces and verandas.
Do not forget that there must be a reinforcement cage inside the reinforced belt under the floor slabs. We will dwell on its features a little later. It is important that there are no voids in the reinforced belt under the floor slabs.
Where are armored belts made?
Strengthening the house with continuous strips of reinforced concrete or brick is carried out on all sections of the walls: from the bottom (grillage, basement reinforced belt under the floor slabs of the first floor) to the top (belt between floors and under the mauerlat). In houses made of lightweight building blocks, rows under window openings and lintels above them are also always reinforced.
- jumpers, as an element of an armored belt
According to the rules for the construction of houses made of aerated concrete and similar materials, areas above window and door openings are always reinforced with monolithic lintels.
This requirement applies to both load-bearing walls and partitions. In this case, the width and height of the lintels coincide with the thickness of the walls and the dimensions of the blocks, the length depends on the parameters of the opening. Each edge extends onto the walls by at least 25 cm; for unusually wide openings this value increases to 40 cm.
Jumpers with a length of over 150 cm are reinforced with rods with a cross-section of 10 cm and higher, with 3 to 6 rods placed at the bottom and 2-4 at the top. To fill the lintels, thick concrete with a strength grade of M300 is used; long structures are always insulated from the outside.
An alternative to monolithic reinforced concrete are ready-made factory products or U-shaped aerated concrete blocks reinforced with metal and mortar, mounted on top of rigid supports. At least 4 metal rods are laid inside such blocks; the requirements for the solution remain unchanged.
Regardless of the installation method, the lintel is left unloaded for 7 days; ideally, the structure gains strength within the 28 days prescribed by the standards.
-between floors
An interfloor armored belt is laid along the perimeter of all load-bearing walls in order to strengthen them and redistribute the axial loads of the floor slab support onto the frame of the house. Its recommended height coincides with the width, provided that at least a 4-row volumetric frame made of rods with a cross-section of 12 mm is installed. According to the standards, a structure poured from concrete is left unloaded for a full 28 days; the requirements for insulation and concreting remain standard.
-in front of the Mauerlat
Reinforcement in front of the Mauerlat is carried out with the aim of leveling the horizontal of the upper row of walls, relieving thrust stresses from the rafter system and simplifying the work of securing the beam itself.
At the stage of constructing the belt, in addition to the mandatory horizontal reinforcement (2-6 rods in the bottom row, 2-4 in the top row), vertical metal studs are fixed inside, the outer wall is insulated with 50 cm of expanded polystyrene or laid out from a thin aerated concrete slab.
Unlike interfloor belts, such belts are poured or laid out from blocks only along the perimeter of the external walls, an exception is made only if the house is large, the weight of the attic floors is high, and the roof has a complex configuration.
Formwork for armored belt
To install the formwork, which is mandatory when pouring a concrete reinforced belt, you can use:
- factory structures (offered for rent by many construction companies);
- polystyrene (fine porosity foam);
- prefabricated panel formwork made of boards, moisture-resistant plywood or OSB.
Considering that the filling of the reinforced belt must be uniform and carried out simultaneously along the entire perimeter of the structure of the walls of the house, the formwork must also be installed in advance throughout the entire facility.
Expert opinion
Sergey Yurievich
Construction of houses, extensions, terraces and verandas.
It should be noted that the upper part of the formwork must ensure a perfectly horizontal position for the reinforced belt (this is especially important when it is necessary to correct flaws in the masonry of walls). Therefore, when constructing the formwork for concreting the reinforced belt, a water level should be used.
Stage 5. Armopoyas
A monolithic armored belt is an element of a building that takes on all the loads. If the reinforced belt is missing, filled incorrectly, and is not monolithic, then under the bursting load from the rafter system, as well as with the slightest movement of the soil, cracks will form on the walls made of expanded clay concrete blocks.
The armored belt can be made from U-blocks. The blocks are installed with glue, a reinforced frame is placed in the cavity and concrete is poured.
U-shaped block made of expanded clay concrete
Another way is to make removable formwork from boards, plywood or OSB, install 100 mm thick insulation, reinforced frame, and pour concrete.
To speed up work when knitting a reinforcing belt, clamps are used
Knitting reinforced frame
The formwork is knocked together from boards, and bars are vertically attached to the boards for structural rigidity. The manufactured formwork panels (in the object under construction in question) stand on the edges of expanded clay concrete blocks. The outer and inner walls of the formwork are tightened crosswise with pins, and bars - spacers - are fastened inside.
Armored belt formwork
The reinforcement frame is knitted with wire. In the corners of the walls, the reinforcement is bent and continued around the corner by 30-40 cm. To prevent the reinforcement frame from lying on expanded clay concrete blocks, plastic clamps are used.
Armopoyas
Reinforced frame at the junction of the interior partition and the load-bearing wall, plastic clamps are installed
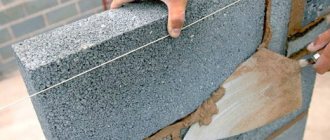
Concrete is supplied in buckets or a concrete pump, and the mixture is compacted with a vibrator. The surface of the poured concrete is leveled with a trowel and trowels.
The surface of the poured concrete is leveled
Important! The armored belt must pass between floors, if there is more than one, in front of the mauerlat, and not only along load-bearing walls, but also on internal partitions.
Cut-off horizontal waterproofing (roofing felt or glassine in two layers) is laid on the armored belt.
Armobelt under the roof
The functions of the armored roof belt can be formulated in the following points:
- ensuring strict geometry of the building box during shrinkage of the wall structure due to seasonal changes in the soil;
- rigidity and stability of the building;
- dispersal and uniform distribution of loads from the roof onto the frame of the house.
The armored belt under the roof also performs the function of providing the possibility of firmly fastening the mauelat and rafter system, installing a ceiling (including reinforced concrete slabs) between the upper floor and the attic of the house.
What is an armored belt, and how necessary is it?
Armopoyas is a reinforced concrete continuous tape. It is laid under any type of floor to evenly distribute the load from the support points. The reinforced belt also prevents the blocks from spreading, making the entire structure more rigid and resistant to aggressive environmental influences (winds, rains, seismic activity). It also prevents the masonry from deforming when the soil shrinks.
Expanded clay concrete blocks have a porous structure. They are made from a mixture of concrete, sand and clay. Thanks to these qualities, the material retains heat well, is environmentally friendly, resistant to environmental influences and chemicals. But for the same reason, it has one significant drawback: masonry made from such blocks tends to “creep” from a vertical load, as well as when soft soil shrinks. Therefore, even during the construction of the wall, it is additionally reinforced by placing metal rods between the expanded clay concrete blocks, and a special reinforcing mesh between the rows.
When building from this material, an armored belt is needed, as it holds the entire structure together. To make it, you can use both concrete and solid bricks for armored belts. The first option is preferable - in this case a monolithic tape is obtained.
Expanded clay is resistant to dampness and chemically aggressive environments; any material can be applied to it for finishing
Fittings for armored belt
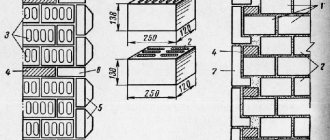
The reinforcing mesh (frame) for the reinforced belt is necessary to strengthen and give greater strength to the concrete structure. It can have a square or rectangular cross-section. Consists of four working longitudinal rods and intermediate jumpers.
To fasten the reinforcement together, electric welding or binding wire is used. The optimal diameter of the reinforcement is 10-12 mm. To increase rigidity, a separate rod is placed inside the reinforcement frame. Longitudinal jumpers are fastened together every 200-400 mm. To stiffen the corners of the armored belt, an additional bent rod is inserted at a distance of approximately 1500 mm in each direction from the corner of the wall.
Composition of concrete for armored belt
As we said above, concrete grade M250 and higher is suitable for the armored belt. The structure must be poured continuously, so it is more advisable to order the delivery of the required quantity in advance using mixers at the nearest concrete plant.
Otherwise you will need:
- two concrete mixers;
- sand;
- cement (recommended at least grade M400);
- gravel or crushed stone;
- water.
Two concrete mixers will be needed to ensure continuity of pouring the armored belt with fresh concrete. A specialist in preparing the concrete mixture and a number of auxiliary workers will also be needed to load concrete mixers and carry the finished concrete to the installation site of the reinforced belt.