Scheme of the sewer system in a private house
Regardless of the complexity, any sewer system is usually represented by several parts:
- internal part - any communications in the room;
- external part – communications outside the house;
- septic tank
It’s great if the process of building a cottage or house and installing a sewer can be carried out simultaneously. To do this, you need to carefully consider the details and nuances. Such projects need to be created taking into account the supply, the location of bathrooms, and wells. It is also necessary to provide access to any pipe for cleaning.
Visual diagram of the site
Schemes must be developed to suit existing conditions. Here it is necessary to find the most convenient solutions that will allow the pipeline route to be brought to the base of the building as optimally as possible, while preventing destruction, soil subsidence, and deformation.
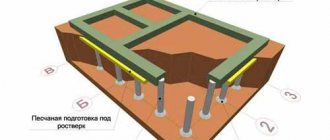
Laying a pipe under the base
Electricity can be supplied to the cottage from any location. But sewerage is something else. This will not work here and you will have to resort to serious construction tasks.
Steel or PVC materials are used to supply wastewater. To lay it, you should dig a ditch 2 m deep or less. Then this ditch must be brought under the supports of the house. The parameters of the ditch depend on the depth of soil freezing.
The pipeline itself must be installed under the base. For these purposes, you should punch a hole in the foundation. To ensure that everything turns out as beautifully and accurately as possible, you can use the advantages of a diamond tool. The pipe should be routed through a special casing.
Features of laying a sewer pipeline
The process of laying a pipe from a house to a septic tank or cesspool only looks so simple. In fact, it is quite complex. There are important rules for sewerage supply that must be taken into account during design and installation.
For example, most people install a sewer system under the foundation. This is relevant and can be done this way, but only in cases where the foundation is not too deep and the septic tank or pit is not too far from the house.
Give a simple example. The base of the cottage is located at a depth of up to half a meter. The septic tank is installed 3 meters away. Since the operation of the wastewater treatment system is due to the installation of a route with a slope, the entrance to the pit should be located no higher than 60 cm.
This applies if the hole is deep enough. The cesspool works effectively at depths that are below the sewer pipe. When drain levels rise, sewage can fill the drain pipe and cause a blockage.
Deeply located sewers can significantly reduce the risk of freezing. Snow in winter is also insulation. If you combine snow with a half-meter layer of soil, this will reliably protect the system from freezing.
If the foundation is deep, then it is not very rational, and sometimes even impossible, to lay a sewer underneath it. Here it is better to leave holes for the pipes even at the stage of pouring the base.
If for some reason it is not possible to use a cesspool, then the hole in the base of the house should be made as close to the edge of the ground as possible. To eliminate the risk of freezing, insulating materials can be used.
Methods for laying sewers
The choice of technique depends on the type of foundation of the building. With the right approach, it is possible to install a pipeline in an already constructed building.
Column and pile foundation
Carrying out work in buildings with similar foundations is easiest. Columnar and pile foundations allow installation of communications both before the construction of the main elements and after the construction of the house. When carrying out work, make sure that the trench is not dug too close to the pillars in order to avoid weakening the soil around them. This may reduce their load-bearing quality.
To lead the pipeline from the foundation space to the plumbing room, you will need to make a hole in the floor slab for the sewer line.
When running pipes under a columnar base, you must remember that the space under the floor is not heated. The main line is insulated with insulating materials or additional heating is installed using an electric cable.
Monolithic slab
Laying the sewerage system is possible only before pouring the monolithic foundation.
Here you will definitely need sleeves for sewer pipes. They do not allow the slab base to create a load on the pipe, and also prevent damage to communications in the foundation slab when pouring concrete mortar. If an emergency occurs, you can quickly dismantle the damaged section and replace it with a new pipe section. The sewer line, protected by sleeves, is laid in a pre-dug trench, which is then covered with soil and filled with concrete mixture.
Tape base
If it is possible to lay the system before pouring the concrete strip, two methods are used depending on the type of base.
We lay the pipe under the base
This process is quite complicated. And to make it as light as possible, you should use inclined drilling technology. This is an inclined well that will go to the lower level of the foundation. All systems will be connected through it.
The main thing here is the correct choice of angle for drilling. The channel should be drilled only after the drilling device is at the required point. Since drilling will be done at an angle, a constant angle should be provided. Drilling should be done very slowly.
Next, you should place a special case in this channel. You need to run a cable with a metal cable through the case. This will make it easier to pull the cable along the route.
How to make a hole in a concrete base
Any base, especially a slab base, is made of hard materials. During the drilling process, cracks may occur. Professionals often argue among themselves about how best to lay sewer holes in the foundation and have not come to a consensus.
For example, there were no technological spaces for the drain pipe in the base. How to do this yourself?
During the process of punching, various hard and rigid objects may be encountered along the way. Stones are easily destroyed with a jackhammer, reinforcement is easily drilled with a hammer drill. If there is no puncher, then punching should be done with a punch. Dust must be removed.
Basic rules for installing a sewer system
Sewage system diagram
When designing and planning installation work, you need to take into account some basic factors:
- Type and location of the collection tank or septic tank.
- Will the system be used all year round?
- Number of consumers;
- Service – professional or independent.
For small houses, the most compact system with a simple circuit is preferable. Such projects are inexpensive and often more effective. When all water intake points are nearby, then you can use one riser.
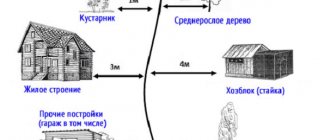
Installation of this system should be carried out according to sanitary and technical rules. Often the septic tank should be located no closer than 5 m from a residential building. If there is a spacing deficiency, it can cause the foundation to crack. If the distance is too long, the pipeline will often become clogged. The septic tank should be located 30 m from the water source. It is prohibited to install the system next to a neighbor’s fence.
Slope
Type of sewerage connection to the house
For a pipe measuring 110 mm, it will be 2 cm per meter. This slope value is guaranteed to ensure efficient movement of wastewater. If you make a hole in the foundation with a smaller slope, then the movement of water will be slow. A large slope will cause the water to drain too quickly, and the solids from the drain will remain in the pipe.
If the pipeline must turn, it is necessary to use smoother contours. If the length of the system is more than 15 m, then each turn must be equipped with a special inspection.
How to fill a trench
You probably think that there are no difficulties or peculiarities here? But no, it's not simple. Sewer trenches must be filled in according to special rules. These rules and regulations are regulated in SNIP.
Thus, it is possible to fill a trench only after all the necessary measurements have been completed and the readings fully correspond to the project.
You should fall asleep gradually. First, sand is poured on the side. This should be done in a small layer. Then you need to compact everything. Next, another layer is poured over the track.
They are finally filled with soil that remains from digging the ditch. To eliminate possible damage, check that there are no solid residues or frozen clods in the soil. This step must be performed in an even layer.
As you can see, the process of installing a wastewater treatment system is not that complicated. With the right amount of perseverance, the appropriate skills and tools, everything becomes possible. The main thing here is full compliance with the rules, design and safety precautions. And then everything will definitely work out.
In order for your stay in a private house to be comfortable, you need to take care in advance about equipping your home with amenities. This includes water supply, heating and sewage systems. The complexity of the work lies in the lack of centralized systems. Therefore, it is necessary to build local installations for water supply and wastewater disposal.

Before you begin installing pipes, you should carefully consider where exactly the sewer pipe will enter and exit.
Installing a sewer system into a private home yourself will save a significant amount of money. To get a high-quality result, you must follow certain rules and requirements that apply to such installation and construction work. The sewerage scheme will depend entirely on the layout of the house. It is ideal if the compact placement of all existing premises to which it is planned to organize a sewerage connection is provided in advance. This applies to the kitchen area, bathrooms, bathrooms and showers.
It will be cheaper to tie all the plumbing equipment to one pipe, which will lead to a septic tank or cesspool. If the house has a large area and it is planned to organize several rooms with water supply and drainage in opposite parts of the building, the sewerage system will have to have several cesspools or septic tanks. If the house is equipped with several floors, it is necessary to provide for the installation of a riser.
Sewage installation methods: advice from the master
Today there are 4 most popular ways to organize the sewer system of a private house:
Plastic pipes are ideal for sewer installation due to a wide selection of connecting parts.
- installation of a cesspool;
- construction of overflow settling wells made of concrete;
- installation of a deep cleaning station;
- construction of a septic tank.
Installing a cesspool when installing a sewer system is a rather outdated method. It has outlived its usefulness due to special antipathetic factors, among which a special place is occupied by an unpleasant odor, causing concern to residents of a private house. This problem annoys not only the owners themselves, but also their closest neighbors, and cleaning the pit is a rather unpleasant procedure. Installation of overflow concrete settling wells requires a lot of labor. Such introduction of sewage into a small house greatly pollutes the soil over a fairly large area. The construction of a sewer system through the installation of a deep cleaning station allows for high-quality cleaning and disinfection of wastewater. But to install it, it is necessary to create a complex sewer system to which electricity will need to be supplied.
Important! The most convenient way to create a sewer system is the installation of a septic tank. This system provides high-quality cleaning over a long period of time.
In addition, its installation does not require much effort, which allows you to install the system yourself.
Is it necessary to make pipes in the strip foundation in advance for drainage?
In principle, if the foundation is not deep, the external sewerage pipe can be laid later. To do this, you will need to dig a trench under the foundation, put a piece of iron pipe under the foundation itself for protection, and through it, let the external sewerage run under the foundation.
But, of course, it will be easier if, when pouring the funadem itself, a hole will already be provided (as well as holes for underfloor ventilation), for an example, see this article with a photo.
In this photo on the right is a sewer pipe that we laid under the strip foundation after it was ready. It can be seen that the pipe is insulated and there is a heating cable on it. Later, when the house was ready, a second part was added to the outlet of this pipe under the floor of the house, which was already connected to the vertical riser inside the building.
If there are not enough funds for this entire system, then when arranging the foundation, it makes sense to make at least a sewerage entry point into the house. Then it will be possible to erect walls and even lay floors without further problems, and lay the external sewer system and install the septic tank at any other time.
And one more important note. If you want to save money and effort on installing an internal sewer system, then you also need to think about this in advance. The simplest and cheapest thing would be to make sure that all sources for sewage are located on the ground floor of the house, with the bathroom (bathtub, toilet) and kitchen located nearby.
Then it will be possible to easily arrange a sewerage system according to this scheme: first, an external sewerage pipe is introduced into the house, which on the other side is connected to a septic tank. Then it is connected to a single riser of the internal sewerage system, and from it, branches are made in one direction or in different directions (at a short distance) to the toilet, shower and kitchen.
Nick Masterov, ELport.ru
Video on the topic of introducing sewerage into a house (how to avoid “jambs”):
Features of creating a sewer system
Before introducing sewerage into a country house, it is necessary to take into account the location of the bathrooms. If they are located nearby, the number of sewer pipes will be significantly reduced. Therefore, it would be better if all plumbing rooms are located in one place next to the exhaust ventilation. The sewage system consists of 3 main elements:
An initially well-thought-out sewerage layout will allow you to immediately install holes for pipes in the foundation.
- piping inside the building;
- external outlet circuit;
- sewage treatment plant or septic tank.
For work you will need the following materials:
- pipes with a diameter of 50 and 100 mm;
- tees;
- pump;
- turning angles.
- roulette;
- ruler;
- hacksaw;
- pencil;
- file;
- building level.
Introducing the system into a private house begins with laying pipes from the most remote point. At a slight slope they lead to the main pipe, which goes into the sewer well. An inspection is installed at the corners to clean them. If the house has a warm basement, pipes can be laid in it. If such a room does not exist, the pipes will have to be installed indoors. Throughout the entire length, from the house to the drainage pit, the pipe should have a slight slope. In addition, in no case should you allow knee-shaped holes in which solid waste accumulates, which can lead to severe blockage.
The drain pipe from the house to the sewer should be located at a slight slope - this will ensure complete flow of water.
The drain pipe must be installed above the groundwater level to prevent the water inside the drain from freezing. If it is laid above the freezing level of the soil, the pipe will have to be insulated using polystyrene foam. The introduction of the sewer system into the house should be done using silicone plumbing sealant. When joining cut pipes, the edges of the cut need to be sharpened to facilitate their assembly. At the points of their connection, which occurs inside the house, an exhaust riser is made.
Plumbing and a house on a columnar foundation
Entering a water supply system into a private house on a columnar foundation is the simplest: a trench for water supply pipes can be dug both before and after installing all the pillars. The main thing is not to dig a trench too close to the foundation pillar, so as not to weaken the soil around it and reduce its load-bearing capacity. The best distance is 1.5-2 m from the pillar, but if the distances between the nearest pillars do not allow such a distance to be maintained, the trench should be dug simply at an equal distance from the pillars.
The main problem when introducing water supply into such a house is that the underground space is not heated. The house, standing on stilts, has a well-insulated floor, but the space between the floor of the first floor and the ground is not insulated. The removal of a columnar foundation saves from through wind blowing, but not from freezing. Therefore, the entry point of the pipeline (namely its vertical section coming from the soil above the freezing depth) must be insulated and heated with a heating cable.
Carrying out sewerage into the house
The drainage pump in the installation diagram will allow you to pump out purified wastewater from the tank.
The sewerage installation begins after pouring the foundation and erecting the walls and roof. Internal wiring is carried out depending on the layout. All waste from consumers is discharged to a collector located under the floor or in the basement. This in turn is connected to an external drain pipe. The pipe should be removed from the house at a depth of at least 50 cm. After this, a trench is dug, which should lead to the place where the septic tank is planned to be located. Most often this place is located 5 m from the house. A plastic drain pipe is laid in the trench at an angle of 3 cm by 1 m. The trajectory of the trench must be calculated in advance, while avoiding sharp turns. After the trench is dug, the bottom is filled with sand and gravel to create a cushion. If the soil is loose, the base can be filled with cement mortar.
Important! When preparing a trench, you need to take into account the level of soil freezing. The pipe outlet to the septic tank should be located at a depth of approximately 1.5 m. To build a treatment station or septic tank, it is necessary to dig a large pit, the walls of which must be thoroughly compacted, and the bottom must be covered with a 20 cm layer of crushed stone and sand, and then filled with concrete. The tank must be installed so that its top is above ground level. This will make it possible to prevent the tank from overflowing as a result of flooding with melt water during the rainy season.
Particular attention is paid to insulating the external part of the sewer system. Introducing sewerage into a country house involves installing a drain pipe in a special wooden box. Its walls must be coated with used machine oil. If this does not seem sufficient, it will be possible to lay an additional layer of insulation. But, as a rule, freezing of the line occurs quite rarely and most often when a malfunction occurs in the drain system. This could be a leaking faucet or a toilet that is constantly running water. It can get into the pipe on the street and freeze on the walls, thereby narrowing the opening for drainage.
Water in the house
Some input features
- The level of soil freezing in different regions differs sharply, for example, it can be 30-40 cm, but perhaps more than one and a half meters, based on this, before laying water supply or sewerage, you need to determine these parameters for your area . The fact is that the depth of laying and insertion of the pipe into the building according to SNiPuP-G.3-62 should be 50 cm below this critical point. But the same applies to the installation of a buried foundation, especially if the house stands on heaving (unstable) soils.
- In some cases, if the building is built, but communications are not installed, they are brought into the house under the foundation, but this is sometimes quite difficult, especially if the base of the foundation is located below one and a half meters from the ground surface . Based on this, in most cases an option is considered that involves passing the pipeline through a cement or stone belt (it can be cast or prefabricated) and this also requires a lot of effort.
- In addition, introducing water into the house from a water supply system or a well (from a pump) is associated with another difficulty - the floors in the room are invariably higher than the ground level (in most cases, they are laid in line with the base) and you will also need to dig a hole with inner side . So, if a cement screed is poured into it, then you will need to overcome two significant obstacles - the foundation strip and the cement floor.
- When laying water pipes into a building without a basement, you will still need to insulate them , regardless of the depth of the trench - this is necessary in case of emergency situations, for example, wet ground and sudden cold snap.
Installation
Note. Below we will look at how to make an entrance through a strip cement (monolithic) foundation, where we will need to make a hole.
All installation work on laying and introducing water supply into the building begins with digging a trench, which must be at least 50 cm deeper than the freezing level of the soil.
If you want to fully adhere to SNiP P-G.3-62, then you will need to go deeper another 4-5 cm, since the pipe is not placed directly on the ground - for this you need a sand cushion at least 3-4 cm thick. But if a sewerage system is to be laid next to the water supply, then it is important to take into account that these same half-meters are counted not from the base, but from the surface of the pipe.
Digging a trench must be coordinated with the place where the pumping station will be located in the house, and if it is in another room, then with the place where you plan to make a water distribution unit and an inlet pit.
And after the trench has been dug from the well or public water main to the house, you will need to make a pit for entering the water supply so that you can make a hole in the foundation. In other words, it should be a place where one person with a hammer drill and a shovel can turn around.
If the foundation was laid without a reinforcement frame, and this is likely in prefabricated strips, then diamond drilling can be used to drill holes, in other words, a special electric drill with a diamond cutter is used for this, which can be completed in half an hour.
Drilling a poured cement tape is by and large unrealistic - such a foundation is poured on the basis of a reinforcement cage, therefore, it is impossible to penetrate it with a diamond. Not with a winning cutter. To do this, you need a good hammer drill with long drills and a chisel, where the minimum impact force is 4-5 joules and above.
So, let's imagine a conditional situation where a trench with a pit has already been dug and everything is ready on the side of the room - all that remains is to punch a hole in the wall. To do this, we will need to draw a hole into which it will be possible to insert a 50 mm pipe (provided that we will supply the water supply with a 32 mm polyethylene pipe).
Along the perimeter of this hole (from the outside of the line), drill as many holes as possible with a long Victory drill, after which all you have to do is knock out the core with a chisel.
As a result, you should have a passage like the one in the photo above, but before that, you still have to go a long distance & head;#8212; Most likely, you will stumble upon the reinforcement, so the hole at the edge of the tape will need to be made a couple wider so that you can get close to the reinforcement with a grinder with a cutting disc.
Exactly the same situation may turn out to be different tapes indoors, so you will need to make a spacious pit in the house in order to be able to turn around with a hammer drill and an angle grinder. In addition, if you do not stumble upon the reinforcement, but the width of the tape is more than 40 cm, then you will not be able to complete all the steps to drill a passage on only one side of the foundation - you will still need to work on it differently.
You will most likely introduce the pipeline through the foundation into your personal home in a straight line, in other words, the trench from a well or public highway will be dug either straight or with a smooth bend, which is completely normal for polyethylene pipes.
But when you bring the pipe into the room, you will immediately need to lift it up to go to the water outlet, and for this you will need to use an elbow compression fitting.
If you have a hydrophore in your room or a submersible pump in the well, then special fittings are provided in advance to connect the polyethylene pipe to such pumping stations. But if you run into a non-specialized water supply system, then you will need to switch from polyethylene to metal, metal-plastic or polypropylene, for which there are special transitional compression couplings, such as the one you see in the top photo.
Remember, in addition, that thermal insulation is needed not only for pipes in the trench, but also for entry through the foundation tape, despite the fact that it is possible to use polyurethane foam in the tapes.
As insulation, hard shells made of polystyrene foam, polypropylene and extruded polyethylene are most often used, and flexible materials are made of polyurethane foam, polyethylene foam, glass and basalt wool. The highest price here, of course, is extrusion, and the most inexpensive and accessible can be called mineral wool.
To prevent underground water from entering the room, you must seal the passage in the foundation. So, the pipe and the corrective hole must be sealed with cement-sand mortar, or, more optimally, with tile adhesive. The same applies to a polyethylene water pipe - it is sealed in the passage either with the same glue or with polyurethane foam.
Note. In most cases, the number of water supply connections into the building is one. In addition, in a huge house, where there are a large number of points, there is one water outlet, from which all other distributions depart.
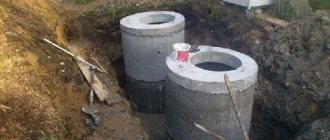
Sewage system made of concrete rings
Now on the market there are concrete rings with a bottom, which greatly facilitates the installation of the structure.
When installing an autonomous sewer system, a storage septic tank consisting of concrete rings is most often used. It works according to the following principle: wastewater flowing through the pipes passes into the first reinforced concrete well, after which it precipitates, where the fermentation process begins. As a result of this, delamination begins, that is, one part of the contaminants remains at the bottom, while the second rises to the top. When the top layer of the overflow pipe is reached, the water that has settled flows into the second well. This leads to the fact that all the sediment remains in the first chamber, and the contents of the second are pumped out using sewage disposal equipment. Most often this happens once during the entire season.
The number of reinforced concrete rings, chambers and the depth of the septic tank must be determined individually, since in each specific case these parameters are strikingly different from each other. In accordance with SNiP, the volume of the septic tank must be calculated based on wastewater flow rates for 24 hours.
The depth of the pit for the septic tank directly depends on the depth of soil freezing in the region.
When calculating the daily volume, 200 liters of wastewater per person is most often taken into account. If there are five people in a family, then approximately 1 cubic meter/day will be produced. This means that the volume of the septic tank should be equal to 3 cubic meters. The sewer system, which uses concrete rings, can be of three types:
- Single-chamber. In this case, wastewater flow should be up to 1 cubic meter.
- Two-chamber – 1-10 cubic meters.
- Three-chamber – more than 10 cubic meters per day.
The number of rings directly depends on their width. If you take a standard ring with a volume of 0.62 cubic meters, you will have to install 5 rings.
Construction of a septic tank
There are several types of septic tank:
- from concrete rings;
- metal;
- plastic.
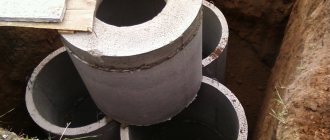
The first option is most often used when installing sewer systems. Due to the heaviness of concrete, such a septic tank will not be squeezed out by soil movement. In addition, it is highly reliable and durable. The construction of a septic tank from concrete rings is carried out in several stages: First, a suitable location is selected. Ideally, if it is located at some elevation, this will ensure its protection from the influx of spring melt water. However, in no case should it be placed too far and high so that the pipe does not end up at the bottom. After choosing a location, a hole 3 m wide is dug. The depth should be the same. In total you will need to dig three holes. At the end of the excavation work, three concrete rings are placed in the pit. This must be done using a crane.
If the water consumption is less than 1 cubic meter per day, then you can install a single-chamber septic tank.
After installing the rings, the pits are filled with earth and covered with special hatches. The bottom of two wells must be concreted to avoid leaks. A pipe is connected to the very first well, which should be located at a slope. Next, a drain is made from the first to the second well. The drain should be located 20 cm from the top. The second drain is made in the third well, 20 cm lower than the first two.
A septic tank built using concrete rings can be used even in the cold season. This is achieved through bacteria, which initially ferment and then settle the sewage. Upon completion of the septic tank installation, all parts of the sewer system are assembled together, after which they are connected and a test run is carried out. Once the sewer system is fully assembled and put into operation, clogs may occur over time.
To clean the sewer, you can use a special coiled wire that allows you to penetrate all pipes and even their elbows. You can buy such wire at any hardware store.
We are planning to build a septic tank
Where to start building a house?
The answer is clear, from the foundation. Although, strictly speaking, it would probably be more correct to start with electricity and water, however, people build without water and without electricity. But now I would note one more point, which is best considered at the very beginning - the installation of a septic tank. After all, we want not just a house, but a house with all the amenities. While considering this topic, I came across many articles about septic tanks and videos in which both professionals and private developers share their experience in installing septic tanks and sewers. Among the experience of private owners, the experience related to drilling foundations, introducing sewers into the house, laying sewer pipes under the floors, etc., especially stands out.
Judging by this experience, many begin to build a septic tank and introduce sewerage into the house after the house has already been built (as a rule, it is not yet completed, but the foundation, walls and roof are already in place). Is it correct? I think this is, let's say, the normal way. However, not the most rational.
In fact, it’s worth thinking about the septic tank (and the sewer system itself) even before building the foundation. Here are the arguments for this:
- for the location of the septic tank, you need to allocate a place on the site in advance, and so that in the future any sewer truck can easily drive up to the septic tank at least at a distance of three to four meters in order to lower the hose into the container without any problems (the usual hose length is up to 6 meters, which, if necessary, can be expanded by attaching additional sleeves, but this may entail additional costs);
— installing a septic tank along with laying an external sewerage system is one of the dirtiest tasks due to the large volumes of excavation work. To immediately finish with the dirtiest work on the site, it is convenient to install a septic tank immediately after building the foundation (and maybe even at the same time or earlier)
- to avoid the need to drill the foundation, it is better to provide a place where the external sewage system will enter the house before pouring it. If the foundation is supposed to be a shallow strip foundation, then it will not be difficult to lay a sewer underneath it. But if we are talking about a real deep foundation or a basement floor, then it is best to provide a hole in it for the entrance of the sewer pipe before pouring. Otherwise, you cannot do without drilling, which increases the cost of work and is a very labor-intensive task that requires special tools;
- a sufficient area must be provided for the septic tank, and in compliance with the necessary location standards (distance to the house, distance to neighboring plots, etc. - manufacturers and professional installers are aware of these requirements). At the same time, each septic tank will require its own area. Obviously, a septic tank a la cesspool in the form of a metal or plastic container of 3-5 cubic meters will require less space than a container of 10 cubic meters.
By the way, according to the experience of residents, when three people permanently live in a house, a 10-cubic-meter capacity requires calling a sewer truck every month and a half. A septic tank of the “Tank” type (and analogues) will require a lot of space and excavation work - mainly due to additional infiltrators that are installed along with the septic tank itself, usually up to two pieces (in the picture from the manufacturer’s booklet - installation of a septic tank Tank 2, Tank 2.5).
But the manufacturers promise that with such a septic tank, calling sewer trucks will be required much less often (once a year and even much less often when using bacteria), moreover, the “Tank” is a non-volatile septic tank , i.e. does not require electricity.
Ceteris paribus, energy-dependent septic tanks with aeration require even less area and excavation work (for example, Topas septic tank, Unilos Astra septic tank, Bionics, etc.). They will allow you to create a truly autonomous sewer system, although they require significantly higher costs at the purchase and installation stage. However, it is better to provide for the access of a sewer truck in this case as well.
So when is the best time to install a septic tank? In my opinion, it is best to make a septic tank immediately after pouring the foundation (when pouring, taking into account how the sewer pipe will enter the house) - that is, make the septic tank itself, the external sewer system and bring it into the house to the point of connection with the future internal system. At the same time, it is advisable to have at least a rough draft, sketches of this very internal sewerage system.
Another related question that is asked is
Basic rules for sewerage
When drawing up a layout of pipes and sewer outlets, the following factors are taken into account:
- Number of residents and frequency of their stay.
- Type of sewage storage facility.
It is necessary to carry out sewerage work under the foundation of the house or through holes made in it in compliance with certain rules:
- The laying of sewerage under the foundation is arranged taking into account sanitary and environmental requirements.
- Water intake points in the house should be placed in such a way that the waste liquid can be drained freely.
- The location of the storage tank should be convenient for regular pumping of sewage. At the same time, the septic tank is not allowed to be built close to the foundation and sources of drinking water.
- The sewer riser must have an inspection fitting for periodic inspection.
- Sewer pipes must be laid below the freezing level of the soil. This will help prevent the liquid inside them from freezing in the winter. If this is not possible, then the pipes are laid on a sand cushion arranged in a trench, and covered with heat-insulating material on top.
- Before filling the sewer with soil, it is necessary to check the tightness of the system connections and its strength.
Do-it-yourself plumbing
It is possible to save significantly on installing a water supply system if you do all the installation work yourself. First of all, it is necessary to draw up a diagram indicating the location of pipes and water intake points. When developing it, there is no need to strive for the heights of engineering; the most important thing is that the diagram is easy to navigate, and that it allows you to correct errors made during installation, if any.
The diagram indicates the terrain features, the presence of rocky or sandy soil on the site, and provides for the area required for pipeline interchanges. It must be taken into account that all installation work must be carried out on a pre-leveled surface, otherwise unpleasant surprises cannot be avoided.
We build a well at the connection point
A well must be installed at the point of connection to the main water main. It is needed when it is necessary to quickly shut off the water supply for repair work, so shut-off valves are installed in it. The well can be made of red brick or constructed of concrete rings.
The top of the well is covered with a lid. The latter can be made of plastic, but it must withstand the load of traffic that may pass over its surface. Of course, these worries can be avoided if a well already exists at the connection point.
Preparing for sewer installation
Before the actual installation of sewer pipes, a number of preparatory measures are carried out:
- Select pipe products and fittings. Sewage pipes can be made of plastic, metal-plastic, steel and galvanized. The cost of each type of product has significant differences, and pipe installation is also carried out differently. Polymer products are very popular because they are lightweight, durable and practical. They are practically not deformed or destroyed. When choosing sewer pipes, you should pay attention to the color of the material from which they are made. Pipes for indoor sewage systems are gray in color. External sewerage, from the house to the septic tank or storage tank, is made of brown or red pipe products.
- Calculate the optimal value of the diametrical cross-section of the pipe. In this case, the maximum volume of fluid passed is taken into account. In most cases it is sufficient to use a pipe with a diameter of 32 mm. However, in large private houses, it is better to lay proper sewerage under the foundation using pipes with a diameter of 100 mm.
- Determine the optimal slope of the pipes being installed.
Experienced craftsmen claim that in order for sewage to move under the influence of gravitational forces, each meter of pipes being laid must be lowered by 2 cm.
Laying sewerage under other types of foundations
If, when laying the foundations of columnar supports and piles, it was not possible to lay a sewer outlet under the foundation in advance, then installation is carried out by digging trenches between the piles and columnar supports. Methods for draining sewerage under columnar and pile foundations are not so complicated.
Watch a video of how to lay pipes with your own hands.
A trench is dug under the grillage for the sewerage system. Through a hole in the grillage at the base level, the riser is connected to the rest of the sewer pipeline.
When the distance between the columnar supports and the piles is less than or equal to two meters, the pipes are laid in the middle between the supports. The pipe inlet, like the entire pipeline, is laid on a sand or gravel bed with a slope of 1-2 cm per 1 meter of pipe length.
Laying sewer lines through a slab foundation can be complicated by the impossibility of driving through reinforced concrete. In such a situation, the sewer outlet is arranged near the edge of the slab. The entire length of the sewerage outlet from the building to a level below the freezing depth is carefully and reliably insulated.
All turns and bends of the sewer system must not cause blockages and stagnation of fecal water. For this purpose, rotary sections are equipped with fittings - inspection and inspection hatches.
Options for sewerage depending on the type of foundation
The complexity and method of laying sewer pipes largely depends on the type of foundation.
Sewerage and columnar base
The simplest method is to install sewer pipes through a columnar or pile-type foundation. Such a foundation allows communications to be carried out both before the installation of pillars and after completion of the construction process. When carrying out work, it is important to ensure that the trench is located at the optimal distance from the pillars. In this case, there will be no weakening of the soil around the supports, which can lead to a decrease in their bearing capacity.
Sewerage in a columnar foundation
However, when laying sewer pipes under a columnar foundation, it is worth remembering that the underground space in this case is not heated. Therefore, sewer pipes need to be provided with reliable thermal insulation or additional heating must be provided with cable heating elements.
Sewerage through a strip foundation
It is better and easier to plan and lay sewer pipes before the process of pouring the concrete base strip. In this case, the method of laying communications depends on the type of strip foundation:
- With a shallow foundation, the pipes are laid below the freezing level of the soil, directly under the foundation. It is recommended to dig a trench before constructing the belt. Moreover, it is recommended to place the piece of pipe that will be located under the tape base in a sleeve, which is a piece of metal pipe.
- A deep strip foundation requires actions of a different nature. A hole is cut into the formwork into which an asbestos-cement or steel sleeve is inserted. It is fixed in the formwork and filled with concrete mortar. Communication pipes are subsequently inserted into this sleeve.
A strip foundation allows you to lay sewer pipes after the foundation has been poured. Carrying out this type of work requires a lot of effort and expense, but everything can be done with your own hands. The process can be carried out in two ways: a tunnel is made under the foundation and pipes are passed through it, or a hole is drilled in a concrete strip.
Sewerage in strip foundation
The second method is done as follows:
- A mark is made on the foundation where the sewer pipe should pass. The hole must be large enough to allow the pipe protection sleeve to be inserted.
- Using a hammer drill, a hole is made in the concrete.
- Occurring reinforcement bars are drilled out using a drill.
- A sleeve is inserted into the prepared channel and the space around it is sealed with cement mortar.
- A sewer pipe is passed through the protective sleeve, and the gap between them is filled with foam. It serves as a good heat insulator.
Already 75,000 signatures for food for cats in basements.
Dear Vladimir Vladimirovich!
Currently, in large cities, there is a constant struggle between residents and public utilities for the lives of cats, due to the Decree of the State Construction Committee of the Russian Federation No. 170, issued in 2003, which contains paragraphs 3.4.1 and 3.4.7, which require closing the vents (ventilation holes in the base buildings) with nets to prevent rodents from entering. We ask you to quickly introduce new operating rules and remove the clauses about nets and not allowing cats into basements forever!
Despite the fact that the items were obviously designed to prevent rodents, stray cats have been suffering from it for many years now, for whom the basement is the only salvation from death in winter and the only way to survive! Utility services use this point in their fight against cats!
Cats are synanthropic animals, human companions, living in cities for tens of thousands of years, they live in all major cities of the planet!!
Cats are natural enemies of rodents and protect the city from them much better than rodent control programs. The urine of cats contains a substance called fellinine, which inhibits the reproductive function of rats. The populations of rats and cats are in equilibrium, a decrease in the number of cats will no doubt lead to an increase in the number of rats.
By sealing up the vents, utility services condemn animals to a slow and painful death from cold and disease in front of the elderly and children who care for them, which comes into direct conflict with Article 245 of the Criminal Code, as well as the President’s order to solve the problem of stray animals using humane methods. In addition, utility workers often wall them up in a way that interferes with the ventilation of the basement, tightly, accumulating dampness and humidity in the basements, preventing the ventilation of the basements, which is why radioactive gas - radon - accumulates there and mold and mildew appear.
Before closing the outlets, utility services still do not carry out the catching of cats as required in this case, but simply kick them out into the street, or, without noticing, leave them inside.
When we contact many authorities, including the Veterinary Committee, Rospotrebnadzor, we always receive answers - that there should be no cats in basements, but their number is comparable to the population of cities!!! This is impossible. Therefore we ask the following:
MINISTRY OF CONSTRUCTION OF THE RF:
1. The ONLY POSSIBLE SOLUTION is to LEAVE ONE AIR OPEN and make appropriate changes to Resolution 170 and other documents prohibiting cats from being in the basement. Adopt new operating standards to replace the outdated 170 Resolution of the State Construction Committee of 2003.
We are tired of seeing the pain and suffering of animals for many years!!!! Why can't we just leave these useful animals alone!!
_____________________________________________________________
To the Ministry of Justice of the Russian Federation
Dear Alexander Vladimirovich!
The Ministry of Justice has been coordinating new operating standards for a very, very long time, in which one open air outlet is legalized! We ask that all interactions and approvals of the document with the Ministry of Construction be carried out as soon as possible! The lives of animals that die every day depend on you!
https://www.change.org/p/%D0%B2%D0%B5%D1%80%D0%BD%D1%83%D1%82%D1%8C-%D1%81%D0%B8% D1%81%D1%82%D0%B5%D0%BC%D1%83-%D0%BE%D0%B4%D0%BD%D0%BE%D0%B3%D0%BE-%D0%BE% D1%82%D0%BA%D1%80%D1%8B%D1%82%D0%BE%D0%B3%D0%BE-%D0%BF%D1%80%D0%BE%D0%B4%D1 %83%D1%85%D0%B0-%D0%B4%D0%BB%D1%8F-%D0%BA%D0%BE%D1%88%D0%B5%D0%BA-%D0%B2- %D0%BF%D0%BE%D0%B4%D0%B2%D0%B0%D0%BB%D0%B0%D1%85?recruiter=531373298&utm_source=share_petition&utm_medium=vk&shareType=vk&use_react=false&utm_campaign=psf_combo_share_initial&utm_term=6 bfec93465974b5e8e56865321ba9eb8&recruited_by_id=b5700c10 -08b9-11**-b685-373354c4f1d9