Any construction project involves the construction of a foundation. If the site for the future structure has uneven or difficult soil, it is recommended to use a pile foundation. This allows you to save on materials. It happens that you simply cannot do without it, for example, if the building is located on peat bogs, in a swampy area.
The construction of such a foundation does not require special skills and is carried out in several stages.
What it is?
This is a prefabricated structure that includes some types of elements.
- Supports. They are immersed in the soil to great depths, right down to the level of freezing. The supports can be bored, screw, or reinforced concrete. Asbestos-cement concreted pipes are less commonly used. The pile heads must be cut in one plane to achieve horizontality.
- Grillage. Made from rolled metal or reinforced concrete. This structural element increases the level of resistance of the supports to soil deformations. The grillage also increases the load capacity of the finished foundation.
Features and scope of use
This type of foundation is erected on problematic soils (for example, peat bogs) and sloping terrain (hills, slopes).
When constructing it, be sure to take into account the type of soil for the correct selection of the type of piles. A pile foundation resembles a strip foundation in appearance and design. The main difference is that in a pile with a grillage, the grillage itself is much smaller and lies on the piles, and not in the ground. This feature perfectly protects the “tape” from moisture and heaving. In this case, areas of seasonal compression or expansion of the soil “pass” past the supports.
Application area:
- when constructing structures on weakened, swampy and peaty soils;
- on sloping terrain;
- in coastal areas of lakes, rivers and reservoirs;
- to reduce the cost of work;
- If necessary, quickly complete construction work.
Peculiarities:
- allows you to start building a house immediately after the piles are immersed;
- suitable for installation in any climatic conditions;
- has an increased safety margin and a high degree of reliability.
Kinds
There are three types of pile foundations, based on the type of supports used. Each option has its own characteristics, advantages and disadvantages.
Screw supports
It is a structure of round pipes with blades arranged in one or several rows. The internal cavity of the pipes after immersion is concreted to increase the load-bearing capacity of the finished base.
Pros:
- Independent execution of the process. Two people are enough to immerse the screw supports.
- Reducing time at work. The process takes up to 2 days.
- Continuation of construction the next day after the concreting stage. But on the condition that beams made of wood or metal will be used to tie the piles.
- Resistance to uneven loads. Piles typically deviate from the vertical axis by several degrees. But this is enough to distribute the loads evenly across all supports.
- Possibility of reuse. The support is unscrewed from the ground and installed in a new location.
Minuses:
- When screwing in screw supports, the rental of special equipment or appropriate equipment is required.
- The house needs to be insulated from below.
- Impossibility of arranging a ground floor or basement.
Screw piles are used on any type of soil. But they are not recommended for use in swampy areas. Also, the support must be made of high-quality steel, taking into account current standards. Afterwards it is checked by the quality control department using x-rays or ultrasound. Low-quality material is very common, so developers face serious problems when arranging a pile-screw foundation.
The screw foundation is divided into several more subtypes, based on the configuration and purpose of the blades. This:
- Wide-layer screw piles. They have one blade with 1-1.5 strokes. They are designed for the construction of lightweight buildings on stable soils.
- Multilayer. They have several blades and are used to improve the load-bearing capacity of the main support with compensation for its vertical movements. It is also permissible to use them for the construction of two-story and three-story heavy cottages.
- Narrow-bladed. They have a tip in the form of a screw for 5-8 turns of the screw. Used for constructing foundations on rocky soils.
Device technology stages
- Test screwing to determine soil strength.
- Calculations and preparation of a plan for placing supports. Be sure to contact the appropriate company.
- Site marking.
- Installation and cutting of piles to level.
- Concreting of support cavities.
- Tying the pile field.
Bored
They are manufactured on site by reinforcing and concreting drilled holes in the ground. The most popular foundation is TISE.
It copes with frost heaving of the soil better than other bases, and it also comes with a lifetime guarantee. Based on it, the main features of bored piles will be considered.
The foundation includes in its design bored piles with a hemispherical base in the lower part and a reinforced concrete grillage. This makes it possible to increase the load-bearing capacity of piles and increase their resistance to severe frost heaving of the soil. Typically, piles are buried in the soil below its freezing level.
Advantages:
- The cost of the device is much lower than that of a strip base.
- Minimum excavation work. Only wells with an expanded lower part are prepared and the top fertile soil layer is removed.
- Versatility. The supports can be installed on different types of soil. But it is not recommended to use them on swampy, waterlogged and spiny soils. Problems also arise when installing them on rocky and rocky areas.
Flaws:
- Restriction on device location.
- They require the creation of a wide blind area, at least 1 m.
- The need to rent a special drill in the form of a sliding rod with two handles and cutting edges.
Step-by-step instructions for doing your own work on a pile-grillage foundation:
- Development of a plan indicating the locations of supports and their load-bearing capacities. Here it is better to seek help from specialists.
- Marking the site according to the plan.
- Drilling wells, preparing expansions in the lower parts.
- Reinforcement using corrugated reinforcement with a diameter of 12-16 mm.
- Waterproofing. Location of rolled material in wells.
- Concreting.
- Creation of formwork.
- Tying of pile supports.
- Concreting a monolithic strip.
Driven reinforced concrete
To construct this type of foundation, square-section reinforced concrete piles with pointed ends are used. However, these piles cannot boast of reliability when compared with metal pipes with blades.
Reinforced concrete elements are manufactured in factories from high quality concrete, with preliminary reinforcement.
The supports come in different lengths, so they are suitable for installation on any type of soil. The exception is rocky soils.
Pros:
- Good resistance to adverse climatic conditions.
- Excellent endurance under vertical and horizontal loads. This is achieved through high-quality reinforcement.
- Easy installation process. But here you need to rent special equipment for driving piles.
- Performing minimal earthworks. There is no need to prepare wells or trenches.
Flaws:
- Heavy weight, which complicates transportation and installation. Heavy duty (for transportation) and lifting equipment is required;
- Requirements for the quality of piles. A low-quality pile may collapse when driven into dense layers of soil. Do not trust homemade piles;
- Not suitable for rocky soils and areas filled with construction waste.
Work plan for building a house
- Drafting of the project by specialists.
- Site preparation.
- Marking.
- Creation of access roads for special equipment.
- Driving piles using the impact or vibration method.
- Installation of grillage.
DIY pile foundation with grillage
Most often, the construction of houses is carried out on a bored pile foundation with a grillage in the form of a concrete strip, which is located above the ground at a distance of 0.2 meters or buried in the ground.
The construction of a pile foundation with a grillage is carried out in several stages.
Site marking
To build any foundation, correctly executed markings are required; a pile grillage foundation also cannot do without this stage. The site is marked as follows:
Marking the area
- Along the line of location of one of the long sides of the house, two pegs are placed, the distance between which is equal to the length of this side. These will be the two corners of the house. A construction cord or rope is pulled between the pegs.
- Two more cords are pulled perpendicular to the resulting line, on which the width of the house is marked, and pegs are set. Two other corners will be located here, they are also connected by a cord.
- You can check the correctness of the angles in the following way: make a mark of 3 meters on one side of the corner, and 4 meters on the other. If the angle is right, then the distance between the marks will be 5 meters.
- Then mark the places where the foundation supports will be located. It is important here that the piles are placed at the corners of the house and at the intersections of the walls.
Excavation
You can make holes for piles yourself using a hand drill. The depth of the wells is determined at the design stage, but most often it is 1.5-2 meters.
A layer of sand is poured onto the bottom of the drilled holes to create a cushion. The thickness of the layer must be at least 0.1 meters, it must be compacted very well.
An asbestos-cement pipe is installed on the cushion, strictly monitoring the vertical position of the support. You can use a building level to check.
Reinforcement of supports
To create a reinforcing frame, take four reinforcement rods with a cross-section of 12 mm and tie them with crossbars using soft wire. The height of the frame should be equal to the height of the support with a margin of 20 cm. This margin is necessary for further connection with the grillage.
Preparation and pouring of concrete
It is necessary to fill the piles with a high-quality concrete solution, for the preparation of which you will need 1 part of M400 cement, 3 parts of sand and 5 parts of crushed stone. More uniform and high-quality concrete is obtained by mixing it in a concrete mixer, but you can prepare the solution yourself. To do this, first mix the dry ingredients and then add water in small portions. The consistency of the solution should be medium thick.
Ready concrete is poured into reinforced pillars, constantly compacting it. This will help remove air bubbles from the solution.
Assembling the formwork for the grillage
Installation of formwork depends on the location of the grillage relative to the ground. If the grillage is located above the ground, then the formwork is built on supports, making a bottom of boards. Shields are made from wooden boards and the side walls of the formwork are made, connecting them with spacers inside the structure. The outside of the formwork should also be secured with supports.
When the grillage is recessed, the formwork is installed as follows:
Formwork for grillage
- Dig a trench and fill the bottom with a layer of sand up to 10 cm.
- Formwork is assembled from wooden panels installed vertically on both sides of the trench.
- The panels are secured with spacers on the outside and spacers on the inside.
It is best to use a grillage raised above the surface of the ground; you do not have to worry about seasonal heaving of the soil. But construction in this case must begin only a week after pouring the concrete.
Grillage reinforcement
The frame for the grillage is also knitted from reinforcing bars with a cross-section of 12 mm, only the reinforcement is connected in two rows and laid along the entire length of the tape. It is recommended to make stands for the frame from pieces of bars 5 cm thick. The grillage reinforcement must be connected to the rods of the supporting pillars.
Types of grillage
The choice of piping depends on the type of structure being built. The following types of grillage exist:
- Metal beams. Made from channels or I-beams. They are used for tying the foundations of wooden houses.
- Wooden beam. This grillage is used in the construction of houses made of timber, logs, and frames.
- Monolithic reinforced concrete strip. Suitable for building a house from any material. A prerequisite is that the width of the grillage must correspond to the thickness of the future walls. The tape is characterized by high strength, reliability, ability to withstand and evenly distribute loads.
Attention! Laying the grillage on the ground or some deepening of the grillage is unacceptable, because As a result of soil heaving, the grillage strip is often deformed, cracked, or completely destroyed.
Location of piles during grillage construction
The sealing of supports is usually installed vertically. But sometimes one or even several are placed at an angle. Such methods are usually used on areas with an inclined plane.
Under private low-rise buildings they are mounted in the form of a strip, placed in one or several rows. Also, if a large load is planned, then the cluster method is used. This usually happens at the corners of the proposed construction. It is advisable to choose piles with a round cross-section; it will be easier to deepen them using a construction drill.
Marking
First of all, it is necessary to remove the fertile layer of soil, then you need to level the site. Using cords and pegs, the boundaries of the house are marked. In order to mark the internal and external walls, 2 cords should be pulled. It is necessary to carefully check the geometry, comparing and re-measuring the diagonal in pairs. After marking is completed, the areas where the piles will be installed are recorded.
Is insulation necessary?
Insulation will be required in the following cases:
- A reinforced concrete grillage was poured. The base in this case becomes the main source of cold. There is a heat leak in the house, which will affect the increase in heating bills.
- The walls were installed on a wooden or metal grillage. Here there will be space under the house that will be blown by the wind. In winter, this will lead to damage to the floor of the first floor and the lower part of the walls.
- Utilities pass through the underground space. If you do not insulate the base, the pipes will quickly freeze and become damaged.
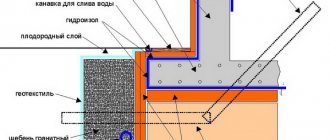
Conclusion: insulation is an important part in creating a pile foundation. The base must be supplemented with a gravel-sand cushion and a layer of insulating material. It is better to carry out the work before pouring the grillage.
You can choose extruded polystyrene foam as insulation.
Finishing work
To cover the pile supports and the space under the floor of the building, a false basement is formed. It happens:
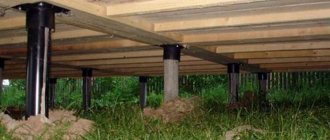
- hinged - a space of several centimeters remains between the floor and the ground to create ventilation, an area for soil expansion when freezing;
- monolithic - no different from the foundation of the same name, but is quickly damaged due to soil pressure.
There are several finishing options. Three popular methods are discussed below.
Siding
The first is the external arrangement of the basement with siding. Advantages: ease of process, cost-effectiveness, speed of installation. Installation of siding occurs as follows:
- The surface is being prepared. The base is cleaned. If necessary, a layer of waterproofing is laid.
- Insulation. You can use polystyrene foam or penoplex for insulation. The seams between the plates are carefully foamed.
- Choice of sheathing. Constructed from galvanized steel profile. It is not recommended to use a wooden frame. If wood is used, it is pre-treated with biological and fire-retardant impregnation.
- Installation of sheathing. The elements are fastened from bottom to top. The first profile is mounted at a height of 15 cm from ground level. The distance of the frame from the wall should be equal to the thickness of the panels. If insulation is required, then this distance increases to the thickness of the thermal insulation layer. The fastening occurs in such a way that a lattice with square cells is obtained. The side of the square should be 50 cm.
- Finishing. This happens in one of two ways - the lock method or the use of pins. The first option involves fastening the siding from the bottom up, the second - from the top down.
Process:
- installation of the starting profile strictly horizontally - the distance between the attachment points should be 30 cm;
- installation of the first panel - performed 2 cm below the starting profile, then moved to the left until it stops, treated with sealant and docked with the corner element;
- installation of subsequent rows, which are adjusted to the panel of the previous row;
- securing a profile;
- installation of finishing boards.
Plaster
The second is plastering. Advantages: cost-effectiveness and speed of the process, high decorative properties. Stages:
- Preparing the base. The surface is cleaned and dried well. But before applying the plaster, light wetting will be required to increase adhesion.
- Lathing. A ready-made mesh is used. It is fixed to the base with dowels with a wide head. For 1 sq. m should be 16 or more dowels.
- Plastering. Process:
- applying the first layer 5 mm thick;
- applying a base layer 9 mm thick;
- creating a third layer 3 cm thick;
- leveling the coating using a rule and grouting with special trowels;
- painting after the plaster has dried.
When using decorative plaster, it is necessary to carry out work strictly according to the manufacturer's instructions.
Fake diamond
The third is finishing with artificial stone. Advantages: high frost resistance, excellent imitation of natural stone, light weight, affordable price.
Stages:
- Preparing the base. It is leveled and insulated with foam or penoplex boards. Before arranging the reinforcement, a reinforcing mesh is attached. For better adhesion of materials, it is enough to coat the surface with a primer.
- Stone laying process:
- starts from the corners, from bottom to top;
- then the remaining surface is covered with an adhesive solution, also from the bottom up;
- the seams are filled with cement mortar, which is carefully compacted and rubbed.
It is recommended to use large stones first, and install small elements in the voids.
If necessary, the material is cut with a grinder.
Preparing the base before pouring the grillage
The arrangement of the foundation begins with the removal of points on the ground. To do this, mark out the outline of the future house, measure the diagonals, the equality of which guarantees the correctness of the work performed. Then, according to the construction design documentation, they mark the number of piles on the plane, remove the top layer of soil, and begin to go deeper. The recess can be made with a shovel or drill.
The main condition for the work performed is that the piles must be buried to the extent of soil freezing. This is especially true for corner supports. For example, for many cities in the Central Federal District, the depth of soil freezing is 1.2 meters. Going deeper by this amount, the earth is thrown into the future base.
Once the recesses are made, the pillars should be prepared for pouring. To do this, sand is poured onto the base of the pillar and compacted. This is how a cushion is installed, the size of which should be at least 10 cm. If possible, you should frame the edges of the future pile with roofing felt, since this will serve as waterproofing and prevent direct contact of concrete with the ground.
On this topic:
Strip foundation for a house: design and technology…
Oct 4, 2018
What is the TISE foundation
Jul 29, 2018
BACK FORWARD 1 of 3
Reinforcement is the next stage of work. The reinforcement is made with a metal rod with a diameter of 10 - 14 mm, from which a frame is welded with an outlet at the top, the size of the future formwork.

