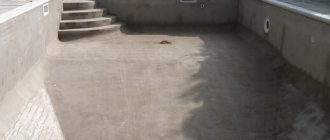
Calculating the dimensions of the pool
First of all, let's take into account the recommendations for pool depth:
- If the depth of the pool is 1.2 - 1.5 m, then this will be enough for an adult to fully swim.
- If you plan to equip the structure with a diving board, then the minimum depth of the bowl will need to be at least 2.3 m.
To calculate the pool bowl, consider the following example:
- the internal length of the pool will be 5 m;
- internal width – 2 m;
- water level – 1.3 m;
- depth at the highest point (including the side) - 1.5 m;
- depth at the lowest point (with sides) – 1.8 m;
- distance to the ledge – 2 m;
- wall thickness – 20 cm.
- bottom thickness – 25 cm;
- side width – 45 cm;
- height of sides – 30 cm.
Based on these numbers, we will get a calculation of the dimensions of the pool, the diagram of which will look like this.
According to this project, the volume of water in the pool will be 6.9 m3, the volume of the pit will be 14.41 m3 and the volume of concrete will be 6.55 m3.
In addition to calculating the volume of building material, you need to know how to properly prepare a solution for a structure of this type.
Determining the size of the pool.
When deciding on the size of the pool, you need to know that for an adult the depth of the pool bowl is from 1.5 m to 1.8 m, and the length can reach 4 m or more. If you are a fan of ski jumping or want to build a tower, then it is better to make the bowl depth 2.5 m or more.
It is not necessary to make the pool flush with the ground. Its walls can be raised above ground level, thus requiring less excavation work. In addition, this type of pool is safer for small children, as they will be less likely to fall into it.
You also need to understand that the deeper the pool, the thicker the walls of the pool should be and the more materials will be spent.
If the pool is being built for children, then the depth should be approximately 0.5 m. If both adults and children will swim, then think about dividing the pool into two spaces, one for children and the other for adults. At the same time, two spaces can be connected to each other due to a gentle difference in depth or due to a special partition, so that children certainly do not end up in a deeper “adult” zone.
At this stage, you need to decide which ladder will be in the pool - stationary or removable. If the pool area is small, then it is better not to take up space with stationary steps, but to install a removable ladder.
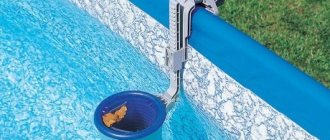
You also need to think about the location for the technical pit in which the filtration station will be located.
We suggest you familiarize yourself with How to dig a well: a detailed description of how to make and where to place a well (video 100 photos)
How to make a stationary pool with your own hands
Building a swimming pool is a modern fashion trend. Today, many owners of country houses want to have a beautiful artificial pond on their property.
It is quite possible to build a swimming pool for reasonable money today. This requires your own hands and modern building materials.
And, of course, you need to clearly understand all stages of construction.
Selecting a location for a future pool
First, you need to study the area to select the optimal location where the future structure will be located. There are a number of factors to consider. Such a place should be inaccessible to prying eyes.
Trees are undesirable above the pool as they will pollute the water surface. In the open space, the water is heated unhindered by the sun all day long, so in the evenings you can soak in a warm bath. It is advisable that the selected area is not located in a lowland, otherwise after rain, debris and dirty water will get into the reservoir.
The construction site should not be removed from utilities, as electricity and water supply will be required.
It is highly advisable to combine your artificial pond on your property or in your house with some kind of bathhouse. For example, a swimming pool with a hammam. Great combination!
The combination with a sauna is also good. You can learn about home infrared saunas from this article.
What shape should the pool be built?
The choice of the form of the structure is associated with the upcoming costs, the proximity of outbuildings and the house, landscape features, personal preferences, functionality and aesthetic considerations.
Changing the radius of an oval structure or installing an original staircase on a rectangular structure helps make the pool unusual.
Option with a ready-made bowl
To install a ready-made pool, it is necessary to perform a significant amount of work with the construction of the pit, since its dimensions depend entirely on the size and shape of the finished bowl. This is not all the difficulties: it is necessary to build a technical room below the bowl - communications will be located there. Reliable waterproofing of this utility room is necessary.
The disadvantages of such a pool are the high cost of construction and the complexity of the work. At the same time, using a bowl does not make it possible to obtain a pool of any shape.
Types and features of bowls
The finished bowl can be an inflatable or frame structure. However, such a pool can only be considered as a temporary option - there is no way to make it harmonious with the surrounding landscape, and the service life of such a reservoir is short.
Popular pool-bathtubs are bowls made of ceramic, composite material or fiberglass.
- quick installation;
- maximum waterproofing;
- wear resistance.
- high cost of installation and transportation;
- only standard projects;
- impossibility of installation indoors.
They also build concrete stationary pools, the lining of which is mosaic material, polymer film, natural stone and ceramic tiles.
Installation of a finished polypropylene bowl
It is better to dig a pit with an excavator, as it is much faster. Then the bottom is covered with a ten-centimeter layer of sand and compacted well. The formwork is mounted on the sand and the reinforcement cage is tied together. The walls of the formwork are insulated with roofing felt. Only after this is concrete, a quarter of a meter high, poured inside.
A polypropylene bowl is mounted on the resulting plate. Insulation is laid between it and the concrete slab. After installing the bowl, a reinforcement frame is made around it, the formwork is strengthened, insulation is installed, and then the space between the blocks is filled with concrete.
What if you do without a bowl? Pool made of polystyrene foam blocks
There will be a pool bowl, of course. Only the bowl will be constructed from polystyrene foam blocks. These blocks will serve as permanent formwork for the concrete. This technology is called “Thermod”. By the way, this technology can be used to cast not only a pool bowl, but also the foundation of a house and even the entire house.
To lay out such a structure, the installation kit includes:
- special fastening systems;
- skimmer and pump;
- mortgages;
- filter;
- facing film;
- mounting fittings;
- ladder.
First, the foundation is prepared, then polystyrene foam blocks are placed on it. When laying, holes are made in the blocks, and then reinforcement is inserted into them to tie them together. A skimmer is placed at the top of the pool - a tank that purifies the water. The stairs are installed and the polystyrene foam cavities are concreted.
After the concrete has hardened, a facing film is attached and the surface is covered with decorative slabs.
Sheet steel pool
Sometimes a pool is made from steel sheets. To build such a structure, you first need to prepare the foundation. It can be a concrete slab made using traditional technology. It is also acceptable to use reliably compacted soil. A non-woven fabric is laid on the base, and a covering film is placed on top of it.
It is clear that stationary swimming pools are not a cheap pleasure. There are different options to reduce the cost. Building a pool with your own hands is one of the most reliable ways.
Another way is to build a frame pool on the site. The technique is not complicated. Everyone can handle it.
The shape of the pool is organized by a steel strip equal in height to the depth of the bowl. The ends of the strip are fastened with a steel profile that provides the required rigidity.
The advantage is the production of the facing film in the shape of a bag. The owner can only lay it down and wait for it to straighten out.
After preparing the film, you need to fasten it around the perimeter. After filling the pool with water, it will finally straighten out.
The final stage of installation is the installation of decorative and additional accessories and elements.
Pool made of concrete blocks
Having prepared the base, they begin laying the blocks. A staircase is installed in one wall. Next, a waterproofing layer is made, on top of which a facing film is laid. From the outside, all joints are sealed.
Having completed the construction of any bowl, all that remains is to carry out the finishing work, giving the constructed pool an aesthetic appearance.
Finishing a finished pool
All finishing elements must be fixed even on curved planes, this protects the base and also creates a durable additional waterproofing layer.
The bowl is also lined with PVC film. This is a modern, inexpensive and practical material. Tiles have been used for finishing swimming pools for a long time. It can serve as a decoration not only for the bowl, but also for the surrounding space around it.
The choice of material is an aesthetic decision that serves to ensure design and style.
An example of installing a stationary swimming pool on the street
One of the simplest and most practical ways of arranging a structure can be considered the construction of a swimming pool with formwork made of polystyrene foam blocks. This material is lightweight, making installation easy. The variety of slab sizes makes it possible to select large blocks, then you can lay out a swimming pool at your dacha with your own hands in a very short time. At the same time, adjusting the parts will not be difficult - they can be processed using a regular hacksaw. Expanded polystyrene retains heat well, which makes it possible not to lay an additional thermal insulation layer.
Expanded polystyrene blocks are well suited for building a swimming pool. They are light in weight, quick to install, easy to process and retain heat well.
Construction should begin by marking the site. The dimensions of the pit should be 70-100 cm larger than the future bowl. We mark and begin excavation work. The finished pit should be approximately 50 cm deeper than the future bowl. We leave the excavated soil on the site for now - it will still be useful for backfilling the structure.
If you plan to build a large pool, it is worth considering the advisability of using an excavator for the work. It is quite possible that the cost will be comparable to the labor of excavators, but the speed will be much faster
The bottom of the pit is leveled and filled with a cushion of crushed stone, the height of which is about 30 cm. The structure is well compacted. A concrete screed will be installed on top of it.
To make it possible to swim in the pool even in the cold season, you need to provide a good water heating system. You can find out about this in our article:.
To arrange the screed, a reinforcement grid is knitted in increments of 25-30 cm. The reinforcing layer should be located approximately on the crushed stone and is unacceptable. Therefore, the grate is securely fixed at a height of about 5-7 cm. We fill the solution. If you plan to arrange a small bowl, you can use a concrete mixer and prepare the mixture yourself. For larger volumes, it may be easier to order a ready-made solution.
The thickness of the finished screed should be about 30 cm. The bottom is poured, carefully leveled and dried. A layer of dense geotextile is laid on the hardened concrete base, on top of which a cushion of extruded polystyrene foam is mounted. Sheet material is connected to each other with paper clips or construction tape. The operation is performed very carefully so as not to damage the substrate. The pool base is ready.
To properly arrange the base for the pool, dense geotextiles are laid on the concrete base, on top of which a cushion of extruded polystyrene foam is mounted
We assemble the walls. It is convenient to draw the contours of the future structure directly onto the concrete. A bowl is assembled from polystyrene foam blocks along them. If you plan to install a Roman staircase, you need to build a special niche for it. Thanks to special grooves, the blocks are very easy to install. Pipes for connecting special equipment are routed through the walls of the pool. The areas where they pass must be insulated with quick-drying foam. As a result of the operation, there should be no gaps or unfilled cavities. Entire houses are built on this formwork:
Metal rods for reinforcement are installed into the finished frame and securely connected to each other. The ladder and basket under the skimmer are put in place. Then the voids in the hay are filled with concrete mortar. The frame is ready. All that remains is to finish it off and backfill it. The simplest option is to line the bowl with a special film, cover the edges with decorative tiles and you can fill it with water.
A special film is used to finish the pool. It is laid over the entire surface of the structure. After the bowl is lined with material, welds are made at the joints of the strips
Also, it is possible (and rather even necessary) to place a special “roof”-canopy over the pool. You can learn more about this on the website diz-cafe.com in the article “Do-it-yourself pool pavilion: building a “roof” from polycarbonate.”
Composition of material for a concrete pool
Concrete pools have the longest service life, which is about 100 years (for comparison, polypropylene, which is very popular, lasts no more than 30 years). But, in order to build a durable concrete pool with your own hands, of course, you need to select the correct composition of the building material and calculate its proportions.
The grade of concrete for the pool must be at least M 350; it is better to take Portland cement M 400. It is also important that the material meets the requirements of frost resistance. For an artificial reservoir, this indicator should not be lower than F 100. The water resistance of the PC should be W6.
To model a bowl and independently construct concrete monolithic pools, heavy concrete, plasticizing and hydrophobic additives are usually used.
Healthy! You can give the material the desired density during work using a construction vibrator or a vacuum pump.
To make concrete for a swimming pool (per 1 m3) you will need:
- 600 kg PC;
- 1,600 kg of sand (it is better to choose medium granulation raw materials);
- 60 kg microsilica;
- 800 kg of fiber fiber;
- 1 kg of plasticizing additives.
In this case, the water-cement ratio will be 0.3%.
If we talk about other analogues from which a pool can be built, then, unlike houses and garages made of cinder block, this material is absolutely not suitable for artificial reservoirs. It’s not for nothing that such products are called wall blocks.
It is better not to build a pool from cinder blocks, since this material allows moisture to pass through too much, especially if sawdust is used as a filler for the block. In the best case, you can make permanent formwork for a concrete pool from cinder blocks, but even for this purpose you will need to choose a solid material with the highest strength. In addition, the cost of such formwork will be decent.
It is also worth considering some features of your suburban area.
Expanded polystyrene blocks - a new product on the building materials market
This truly unique insulation material has high technical characteristics. The structure of the block consists of 98% inert gas or air, which provides the material with excellent insulating properties. The polystyrene foam base is strong and has a high degree of rigidity, which allows the blocks to withstand high loads and not sag when the completed structure shrinks.
| Density | from 150 to 800 kg/m3; |
| Frost resistance | F35 to F300 (from 30 to 150 freeze-thaw cycles); |
| Compressive strength | from B0.35 - B2.5 (grade M5 - M35) |
| Coefficient of thermal conductivity | minimum 0.055 W/mC, maximum 0.145 W/mC |
| Vapor permeability | 0.05 mg/(m h Pa) |
| Flammability group | G1 (non-flammable material) |
We suggest you read How to make a boot for the New Year
Expanded polystyrene is used in the construction of buildings, finishing the facades of houses, as well as in the creation of hydraulic structures, including swimming pools. When installed correctly, a pool made of polystyrene foam blocks (foam) will not be inferior in its characteristics to a standard concrete structure.
DIY pool made from hollow blocks
When you decide to build a pool with your own hands, most often the design and technology for its creation are simple. Hollow concrete blocks make it possible to cope with the task independently, without involving workers with special knowledge.
But it’s not just a matter of simplicity of construction. The main advantage of this design is that the hollow concrete blocks are filled with thermal insulation material, which allows the water to remain warm for a long time.
If your suburban area is large and there are not many buildings on it, it is best to place the pool on the sunny side. It is also necessary to ensure that the pool is protected from wind, debris and the prying eyes of neighbors. It is not necessary to erect capital barriers; in this case, a small decorative fence or gazebo can serve as protection.
For a small pool, choose a depth of about 150 cm. In this case, the sufficient depth of the pit to be dug should be approximately 170 cm.
We make the dimensions of the pit itself with a margin on all sides to make it more convenient to lay out the walls of the bowl in blocks.
A concrete slab 15-20 cm thick with steel reinforcement is used as the bottom of the pool. You can take a ready-made slab, but you will need equipment to lay it. Options:
- lay the bottom of the pool bowl from several small concrete slabs, and seal the seams hermetically;
- pour the monolithic slab in place. It’s not that difficult, besides, it’s cheaper than using ready-made slabs, and you don’t have to worry about the tightness of the bowl. How to pour a monolithic slab is described in great detail, see the link.
Concrete hollow blocks are laid on a concrete base in 5 rows. The masonry is simple, with obligatory bandaging. This means that we lay the blocks in a checkerboard pattern, making sure that the seams of the next row fall in the middle of the blocks of the previous one. Everything is exactly the same as in brickwork. We make the solution according to the recipe.
Metal vertical reinforcement securely holds the blocks, so when filling the voids with concrete (mortar), they do not move. The clarification is very important: it is better not to weld the reinforcing bars, but to tie them with wire, since the welding points will be primarily damaged by corrosion.
Another special feature of the pool design is that the steel reinforcement built into the bottom extends into the walls, increasing their strength.
To descend into the pool, you can use a ready-made staircase (factory production). If you are not sure that you will make the steps correctly, it is better to purchase a ladder. In addition, purchased structures have not only rectangular steps, but also rounded steps - this is especially convenient for a swimming pool.
We begin the installation of the stairs when the concrete of the bowl has completely hardened.
We fix the ladder rigidly.
When the concrete is completely dry (12-28 days), cover the inside of the bowl (bottom, walls) with sealed PVC film - this is the simplest option. But other sealed finishes are also possible.
Along the edges of the pool (“shores”), the film is welded to the film on the walls. A hole is drilled at the bottom through which water will drain. Film joints are welded with a special apparatus for welding film and plastic.
We pour water into the bowl - we managed to make a pool with our own hands.
Assembling the factory kit ↑
You can simplify the work if you use special kits of construction and installation systems produced by manufacturers of swimming pool equipment.
Basic equipment of an artificial reservoir ↑
- wall materials, which are the main elements of the bathing bowl;
- waterproofing;
- facing film;
- fittings;
- embedded parts;
- underwater nozzles;
- flange units;
- skimmer;
- filter;
- pump;
- ladder for descent.
Pool design diagram
It is possible to supplement the basic set with individual accessories.
These could be underwater lights, a protective coating, a counterflow device, or a special tool needed to clean the walls and bottom of the bowl.
Quick self-installation ↑
The three pool options discussed below are capital in-ground structures. At the same time, wall elements, differing in weight, shape and size, are easily installed at the construction site of an artificial reservoir. The facing film is supplied in a compact roll, and its width is convenient for cutting and installation. In some kits, the film is already “welded” to the size of the bowl and is supplied in the form of a bag. Before starting work, the construction site, size and shape of the pool are determined, which determines the choice of the most suitable wall material. Its role may be:
- expanded polystyrene blocks;
- steel sheet;
- concrete blocks.
It is advisable to consult with specialists to understand what work can be done with your own hands. Some stages of construction are best left to professionals.
Construction of a swimming pool from polystyrene foam blocks ↑
This building material is even used in the construction of houses, so making a pool bowl out of it is not at all difficult. Large-format blocks with impressive dimensions combined with light weight allow you to lay out walls in a short time. The concrete mixture is poured only into the cavities provided in the design of the blocks. The presence of all fastening and reinforcing elements, necessary embedded parts facilitates the installation of the structure. At the same time, a self-built pool made from facing film looks very impressive, decorating the garden area of a private house. The work is performed in the following sequence:
1. Marking and digging a pit.
2. Pouring the concrete foundation.
3. Installation of blocks with tongue-and-groove fastenings, which simplify the construction of pool walls.
4. Using an ordinary hand hacksaw, the blocks are cut to size, and technological holes are cut into them.
5. It is necessary to insert reinforcement bars into the voids in the blocks, which must be fastened together for subsequent pouring with concrete.
6. Also, before concreting the walls, pipes are inserted into the places designated by the design, and the joint between the pipe and the wall of the structure is filled with sealed self-hardening foam.
7. The “Roman” staircase that provides access to the pool is made of fiberglass reinforced polyester. The staircase structure is inserted into the prepared recess.
8. Next, concreting of the walls begins, during which the cavities of the blocks are filled with the ready-made concrete mixture using a pump.
9. The work is completed by laying the facing film, which is used to line the walls and bottom of the bathing bowl. The pool is filled with water. Decorative slabs are laid along its perimeter, emphasizing the edge of the reservoir.
How to make a pool from a steel sheet ↑
When using this building material for wall installation, it allows you to build round or oval-shaped swimming pools with your own hands. It is also possible to design a bowl in the form of a figure eight. The base of the artificial reservoir is a monolithic concrete slab. You can also install the structure on well-compacted soil, having previously laid a protective non-woven fabric on it.
Installation of a pool made of steel sheet
The role of the structural and form-building basis is a wide, solid strip of sheet steel, supplied in a roll, which is unrolled only before installation directly in the pit at the construction site. To fasten the steel tape into a ring, a special steel profile is provided. It is with its help that a durable and stable bowl structure is installed.
The facing film for a round pool is supplied in the form of a ready-made large “bag”, which is unfolded and secured around the perimeter of the swimming bowl with a ring fastening profile. The installation of technical equipment begins after finishing the facing work and filling the pool with water, which tightly presses the film to the walls and bottom of the structure.
Construction of a pond made of concrete blocks ↑
1. After excavation work and installation of the bottom from a monolithic concrete slab, the installation of walls begins.
2. Standard concrete blocks are used to build the pool walls. In this case, every third row of masonry is reinforced along the entire perimeter.
3. Instead of an inconvenient stepladder, a factory-made staircase with comfortable wide steps is installed. The staircase structure is built into the structure during masonry work.
4. Next, the inner surface of the bowl, lined with blocks, is lined with insulating material around the entire perimeter.
5. Afterwards, the facing film is laid, which is unwound from the roll, and the individual strips are fastened together by cold welding.
6. The upper edge of the film is hidden under the decorative border.
For a better understanding of how to build a pool with your own hands, we recommend watching the video.
Specifics of building a brick pool
1. Protection of the building from groundwater
Flooding of a brick bowl with groundwater can lead to its premature destruction. In view of this, it is important for the developer to achieve sealing of the bowl from their influence.
2. Sealing the bowl from the inside
Water will have a destructive effect on the wall material from the inside, so it is important to work on insulating the walls with special materials.
Pool design diagram
3. Focus on durability
A considerable volume of water will exert pressure on the walls of a brick pool (we are talking about 12-18 cubic meters of liquid, which a medium-sized bowl can hold). The developer must take this point into account and correctly calculate everything at the project development stage.
4. Soil heaving
The brickwork from which the walls of the bowl are built is also influenced by soil heaving forces. Therefore, if there are any defects or if the brick laying technology is not followed, the wall may collapse.
5. Organization of water drainage
It is important for developers to properly organize the water drainage system. To do this, a pit is dug next to the bowl, and a pipe from the drain hole and equipment for filtering it are placed in it.
6. Arrangement of overflow holes in the walls
To control the water level in the pool, overflow holes will need to be installed in the brick walls.
As you can see, there will be many difficulties in the process of work. A bowl built from brick consists of separate fragments and is not monolithic, so it is important to ensure its rigidity. The porous structure of the brick also adds problems to developers. Because of this, you will have to work hard on high-quality and reliable insulation of the pool both inside and outside.
To do everything right, you need to consider several important aspects:
- There should be no large trees near the future building, as their root system may damage the integrity of the structure. In addition, leaves and small branches will constantly fall into the outdoor pool, which in turn will lead to rapid water pollution.
- Groundwater should lie quite deep; if it is at a depth of 0.5-1 m, then such a building should be abandoned.
- It is not recommended to build a pool close to residential buildings.
- It is best to build an artificial pond on clay soil, as it will allow less moisture to pass through.
- Determine the direction of the wind. It is better if he nails the debris accumulated in the pool to one wall. An overflow pipe should be placed in the same area.
If we talk about choosing a skimmer or overflow pool, then it is better to give preference to the first option for water circulation. In this case, after being taken from the bowl using a skimmer, the water immediately goes into the purification system. At the overflow pool, water is taken over the edge, after which the water is redirected into special overflow gutters and only after that it goes into the disinfection systems.
After all the calculations and determination of the soil quality, you can proceed to digging a pit.
Choosing the right place to build a swimming pool.
Choosing a pool design
Pools are mainly divided into two types - the pool bowl is buried in the ground, and the bowl is located on the surface of the earth.
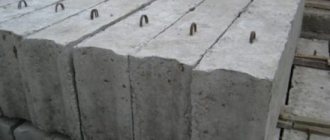
- made of concrete;
A concrete pool is made monolithic, which allows it to become an almost eternal and very reliable thing. The disadvantages include labor intensity, if there is no special equipment or a group of assistants, and significant time to build a pool.
If installed incorrectly, it will only cause expensive problems instead of joy.
Alternatively, you can make a pool bowl from cinder blocks or polystyrene foam blocks.
- frame
This type of pool can be purchased ready-made and assembled on your site. For the winter, the pool can be disassembled and removed from the site.
You can also make the frame yourself from boards and metal profiles. In this case, the pool bowl is ordered separately of the required size from PVC film. Afterwards the bowl is placed on the frame and the pool is almost ready.
- made of polypropylene.
The pool bowl is made from this material. The bowl is installed in a pre-dug pit.
- made of fiberglass;
In essence, this type of pool is similar to a polypropylene pool, but its thicket is made of fiberglass. This is a more expensive and durable material.
Today, such pools are quite common and in demand. The thing is that they are made of durable material, and thanks to this they do not need additional coating, and they are also not afraid of serious mechanical loads.
First of all, think about the space that you can allocate on your site for a pool. The area should be open to adequate sunlight and free of trees. What harm can trees do if they provide much-needed shade on a hot day? But the problem is that, firstly, leaves or even small twigs will fall from the trees, and if the tree is a fruit tree, even more so, fruits or bugs.
It is believed that the best soil for a pool is clay. Since clay itself serves as a good barrier to ground moisture. Therefore, those who have a choice should better give preference to such a place with clay soil.
If you are going to build a pool and you have the opportunity to do this work with an excavator or use other construction equipment: a concrete mixer, a dump truck, then think about a place where these machines can drive up easily and without problems.
Also keep in mind that if the groundwater in your area lies close to the surface of the earth, namely at a depth of less than one meter, then you should not build a pool in a pit.
A low-lying area is also not the best place for your pool, because in this case the water in the pool will be polluted by rainwater.
Marking the pit.
Armed with all the necessary tools and materials, you can begin laying the first stone. In other words, we are waiting for marking the pit for the pool and digging it. We take stakes, tape measure, cord, rope or wire and mark the construction site. The platform should be 0.5 m larger than the size of the desired pool on each side. To clearly mark the boundaries, you can drive stakes into the ground along the perimeter and stretch a rope or cord between them.
We begin to dig a pit of the size we need. Keep in mind that the bottom of the pit should be 25-30 cm deeper than the depth of the pool itself! Also try to immediately make the walls of the pit relatively smooth. To ensure that unnecessary water does not accumulate under a ready-made pool, but rather drains, the bottom of the pit is made with a slight slope, approximately 5-7%, and this slope is directed to the place where the water drains.
After digging a pit, you need to make a sand and gravel backfill. First, a layer of sand 20-30 cm thick is poured, and then a layer of gravel about 10 cm thick is laid. All this is compacted tightly. At this stage, you can already think about installing a bottom drain. If you decide not to drain the bottom, then you need to provide a special recess in the bottom of the pool bowl, into which you can lower the drainage pump and pump out the water.
Before pouring the floor screed, you need to take care of its waterproofing. If this is not done, then groundwater will slowly destroy the concrete.
As waterproofing, you can use fused bitumen rolls such as Bikrost and TechnoNIKOL. This material must be laid starting on the walls of the pit. This is necessary for subsequent waterproofing of the outer walls of the pool bowl.
When it comes to waterproofing the side walls of the pool, before fusing bitumen rolls on them, it is necessary to pre-treat the walls with bitumen mastic.
As a waterproofing material, you can use a special pimply membrane for waterproofing foundations. It can be purchased at almost any large hardware store.
In order for the water in the pool to warm up faster and cool down more slowly, it must be insulated. Not only the side walls of the pool are insulated, but also its bottom. As a bottom insulation, you need to use a special high-density insulation - foam glass. Under no circumstances should foam plastic be used for these purposes. Over time, it can sag under the weight of water and thus cracks will appear between the bottom and the walls of the pool bowl.
Extruded polystyrene foam with a thickness of at least 50 mm can be used as insulation for the walls of the bowl. This insulation is glued after waterproofing the walls.
Before pouring the floor screed, it is necessary to install the reinforcing mesh. For these purposes, you can use reinforcement with a diameter of 8-15mm. The cell size should be approximately 150-200mm. This mesh should be at some distance from the compacted pillow. This can be done with the help of supports - large stones, pieces of board or brick.
Before pouring the screed, you need to install metal or wooden beacons so as not to miss the height level and to control the thickness of the screed.
Pouring concrete screed.
At this stage, it is advisable to raise the reinforcement bars up along the future walls of the pool. In this way, the reinforced floor belt will be connected to the reinforced wall belt.
We invite you to familiarize yourself with DIY gutters made from plastic bottles
Pouring must be done on the same day so that the slab turns out monolithic. If this is not done, cracks may appear in the slab as the soil subsides or moves.
The thickness of the concrete monolithic slab must be at least 200mm.
To avoid uneven drying of the concrete slab and the appearance of cracks, it should be periodically watered. This is especially true in the hot season.
The thickness of the walls of a pool up to 1.8m deep should be approximately 250mm. This must be taken into account when installing the formwork.
Before making the formwork, it is necessary to make a reinforcing lattice for the pool walls. To do this, place reinforcing bars around the perimeter of the pit in 30 cm increments. Maintain a 50 mm gap between the reinforcement and the edges of the future pool. Fasten the reinforcement bars with wire.
Now you can start making formwork and pouring the walls. To do this you will need a 30 mm board. Instead of boards, you can use laminated moisture-resistant plywood.
Advice
To preserve the board after formwork, it can be covered with film.
Pool formwork.
If you want to create a pool of any unusual shape, then, therefore, the formwork should be of the same shape.
In addition, it is necessary to strengthen the formwork structure with stiffeners and spacers. There is no need to skimp on spacers. If they are deficient, the concrete can squeeze out the formwork and the result will be not a flat wall, but a convex one.
When installing the formwork, you should try to make it as level as possible. This will reduce the cost of leveling walls with plaster.
It is worth noting that at this stage it is necessary to provide for the presence of mounting holes necessary for the pool equipment (skimmer, lighting lamps, nozzles, counterflow). You also need to allocate a place for a pit in which the filter station will be located. The dimensions of the pit inside should be approximately 1000x1500mm.
It is recommended to pour concrete in horizontal layers of 150 mm, slowly and gradually, so that it is better distributed. After a few days, the concrete should harden well.
To ensure that there are no air bubbles in the wall monolith, you should use a deep vibrator.
The walls of the pool do not have to be built from monolithic concrete. They can be made from other materials.
The construction of such a pool begins with a pit. Afterwards, a concrete floor screed with mandatory reinforcement is performed. The reinforcement of the floor must be done so that reinforcement bars stick out from it along the perimeter of the walls of the pool. After the walls are erected, excess protruding reinforcement is cut off. Polystyrene foam blocks will be placed on these rods. Instead of polystyrene foam blocks, you can use any others, for example, an expanded clay concrete block with round holes.
Pool floor screed with protruding reinforcement.
Between each row of blocks it is necessary to place a masonry mesh with a rod diameter of at least 2.5 mm. Reinforcement of the masonry is necessary, since when you jump into the water, a wave is created that hits the walls with great force. It will not be able to break the side, but cracks may form.
Installation of polystyrene foam blocks.
After installing all the blocks, the free space inside them is filled with concrete. Thus, these blocks act as permanent formwork.
Pouring polystyrene foam blocks with concrete.
Afterwards, the equipment for the pool is installed, the external walls are waterproofed and the pit around the pool bowl is filled up.
Installation of pool equipment.
Pond on a suburban area
On a hot summer day, you just want to plunge into the cool water and beat off the sultry heat. Therefore, the popularity of private artificial reservoirs is only growing. There are a variety of designs, but in this article we will look at how to build a brick pool with your own hands.
We will also tell you what its pros and cons are.
For the construction of tanks, the most popular in Russia are frame structures and ready-made monolithic bowls. But brick also managed to find a place in the sun. Why is brick not the most popular material for building swimming pools? Let's look at its advantages and disadvantages.
Pros of a brick pool:
- Strength, reliability and durability;
- Freedom in choosing the shape and size of the bowl;
- Additional equipment (lighting, hydromassage, slides) can be installed without any problems.
It can be seen that bricks for building tanks really have advantages. But even here there are some drawbacks.
Disadvantages of a brick bowl:
- Extended construction periods;
- High cost of materials and construction in general;
- Brick is far from the easiest material to process. If you want to create a smooth bend, then difficulties will arise. In such cases, it is better to use concreteLINK.
- Complex construction technology;
- High thermal conductivity.
As a result, we find that brick is an excellent option for building a solid tank for many years of operation. Let's next look at how to build a brick pool with your own hands.
When constructing a tank, no detail should be overlooked. Therefore, for your convenience and clarity, we have divided the article into several stages. And the first of them is planning.
Construction layout
Any construction work begins with the drawings and planning that we need to carry out. Without this, your efforts will be wasted, and along with them your money.
First of all, write down why you need a pool, what are the requirements for it and who will swim in it. Write everything down in as much detail as possible, because all further work will depend on this.
You need a small pool for children, then the optimal dimensions of the bowl are: depth - 1.5 meters, width and length - 3-4 meters. For adults, a more spacious tank is needed: depth - from 2 meters, width and length - from 4 meters. These sizes will allow you to swim without experiencing discomfort and will save you money.
Next, list what additional equipment you want in your tank. Your kids will love the slides and diving boards. You can install a hydromassage for yourself. Don’t forget that a comfortable ladder is a must-have attribute of any pool.
If you decide to install a springboard, the depth should be at least 2 meters. It’s even better to do it with a margin of up to 2.5 meters. This depth is enough to leave a person after a jump.
After determining the basic requirements, make a detailed drawing indicating dimensions, location of additional equipment and communications.
Choosing a location and digging a hole
Now you have a detailed picture of the future construction in your head. The time has come to determine a place for it on the site. There are also some requirements for the construction site:
- Choose the most level place on the site;
- There should be no trees nearby. There are 2 reasons for this: the pool will become polluted by fallen leaves, and the root system of large trees can destroy the bowl;
- Connecting water supply, drainage and electricity should not cause difficulties;
- There should not be a house, gazebo, or parking lot nearby. Remember that splashes can hit everything within a radius of up to 5 meters.
Have you chosen a place? Great! Let's start digging a pit. To begin, mark the boundaries of the dig on the ground. The boundaries should be with a margin of 1 meter from the dimensions of the future tank on all sides.
Think about how you will organize your water drainage. You can make a drainage hole or connect a sewer. Dig small trenches for the pipes.
Preparing a pillow for the foundation
Before pouring the foundation, layers of gravel and sand are poured. As a result, you will get a cushion that protects the rigid structure from groundwater, heaving of the earth and soil displacement.
Before backfilling, level the soil at the bottom and lay geotextiles on top. This material is waterproof and can withstand heavy loads, so it is perfect for our task.
Next, fill the crushed stone with a layer of 15-20 centimeters, level it and compact it tightly. The next layer will be coarse sand. The thickness of the sand layer is 5-10 centimeters. We also level and compact.
The layers should be leveled using a flat, light board with a level attached to it.
The last layer for the pillow will be waterproofing material. It will already protect the bowl itself from groundwater. Many materials can be used as the final layer, but we recommend using waterproofing membranes. They spread in several stripes with an overlap of 20 centimeters. The edge must be folded up along the walls of the pool.
Next, let's look at laying the foundation.
Pouring the foundation
A concrete foundation is poured onto the cushion, on which all the walls of the tank will rest.
First of all, you need to prepare the formwork for the foundation. It is assembled from boards 20 centimeters wide, as this is the optimal thickness for the base of a small pool. From the outside, the formwork boards are supported by others. Please note that poured concrete will be subject to heavy loads, so support from the outside must be reliable.
The gaps between the boards can be covered with thick polyethylene or an additional board can be nailed on the outside.
The foundation must be larger in area than the pool itself. This will provide additional resistance to soil movement and heaving.
Reinforcement is placed into the finished formwork. It is knitted from steel rods with ribs with a diameter of at least 12 millimeters. The result should be a mesh with interlacing rods with a pitch of 20 by 20 millimeters.
The number of reinforced tiers depends on the soil. If the soil is subject to strong displacements, then 2 belts are needed. If the soil does not heave, then you can get by with 1 tier.
The connected reinforcement mesh for the pool base must be positioned at a certain height from the bottom plane of the base. Since our foundation height is 20 centimeters, it is best to place the tiers as follows:
- The first tier is 7 mm from the bottom plane;
- Second tier – 15 mm;
There should be at least 5 centimeters from the top tier of reinforcement to the surface.
To correctly lay the belts, you can use halves of bricks or special stands.
Concrete for the base of a brick pool must contain water-repellent components. This will have a positive effect on its service life. You can order it by machine and pour it right away, or you can do it yourself in a concrete mixer. Most likely, in the second case, you will have to work together, since hardening of part of the concrete until another is poured is unacceptable.
After pouring, level the concrete and allow it to completely harden. This usually takes 1-2 weeks depending on weather conditions. And then it will be possible to begin building the walls of the brick pool.
Brick walls
The construction of walls is a long process and has its own small nuances. First of all, you need to understand that the walls bear a huge load from water. Therefore, the walls should be at least 2 bricks wide.
For construction we use exclusively red ceramic bricks. It is not afraid of water, so it is suitable for bowl walls like no other brick. Every row or two, a reinforcing mesh of rods with a diameter of 4-5 millimeters is laid. The reinforcement mesh pitch is 10 centimeters.
Applying mortar between bricks also has its own non-obvious nuances. On the outside of the wall, the mortar should be flush with the brick. And inside the bowl there should be gaps between the bricks so that the finish is well fixed on the surface. A plasticizer or liquid glass composition is added to the solution for moisture resistance.
Finishing work
Now you need to apply plaster to the inside of the wall. Let us immediately note that the composition must contain water-repellent components.
Before starting work, secure the chain-link mesh to the wall. Next, a layer of plaster is evenly applied to it. After it has completely set and hardened, we apply a deep penetration primer with antibacterial additives.
Antibacterial additives are very important for the pool bowl. Without them, algae and bacteria will grow in the cracks. This will make cleaning the pool much more difficult.
We install water intake and return nozzles, skimmers and other equipment. The body of the holes should fit snugly against the wall, and the gap should be closed using a sealant that also has antibacterial properties.
The final finish is usually tiles or mosaics. To attach them, it is necessary to use water-repellent glue. All spaces between the tiles must be completely filled with the compound.
You can also use rubber paint to finish the bowl. It perfectly protects the brick from moisture and has an attractive appearance.
Exterior wall decoration
The reverse side of the walls also needs finishing. It consists of two layers: the first is sealing, the second is insulating.
For waterproofing, it is most rational to use coating compounds. We apply them like plaster and let them dry. The pool is insulated with polystyrene slabs. They are laid in two layers so that the second overlaps the joints of the first layer.
High-quality insulation of the tank will pay for itself many times over. If this is not done, then the lion's share of the heat from the water will go into the soil. Thermal insulation will reduce heat loss.
We treat the seams of the joints of the second row of polystyrene plates with water-repellent mastic.
The final step in building a tank is to fill the gap between it and the ground. You can fill it with the same soil that was dug up. But this option is only suitable if the soil is not subject to strong displacements. Otherwise, crushed stone should be used.
We invite you to watch an interesting video. It does not entirely correspond to the content of the article, since other construction technologies are used there. But still it will be interesting and useful to you.
- Preliminary planning
- Arrangement of a pond made of polystyrene foam
- Concrete blocks when arranging a swimming pool
Do-it-yourself bathhouse made of cinder blocks
Even the owners of those private houses “with all the amenities,” that is, which have both hot water supply and a bathroom, still, for the most part, always think about their own bathhouse. No bath or shower will provide such relaxation, relaxation, the concept of mood and surge of vitality. And if we also take into account the fact that a bathhouse is very often intended as a place for comfortable relaxation in good company, then the desire to have such a building on the site is quite understandable.
Do-it-yourself bathhouse made of cinder blocks
But it’s not always possible to build a traditional real log bathhouse - the excessively high costs of such construction may not allow it, and it’s impossible to quickly acquire good carpentry skills for independent construction. Therefore, many land owners are looking for alternative construction options that would be inexpensive and could be done themselves, with the help of relatives or friends. For example, one of the options could be a bathhouse made of cinder blocks with your own hands.
Read the brief instructions on the specifics of constructing a bathhouse from cinder blocks - perhaps this is exactly what will be most accessible for you to do it yourself.
A few words about cinder blocks
First, you need to take a closer look at this building material – cinder blocks. It is not entirely ordinary, so when building a bathhouse you will need to take into account some of its specific features.
As the name itself implies, these blocks at the dawn of their appearance were made from waste from the steel industry. Thus, at the same time, the problems of recycling huge heaps of blast furnace slag and the production of building materials were solved to some extent.
Blast furnace slag is a common abundant waste from large metallurgical enterprises.
The slag is subjected to crushing, sorting into fractions, initial preparation - moistening, and then mixed with cement in a ratio of 10: 1. This mass is supplied to the molding section, where it is filled with special forms on vibration stands, making it possible to obtain both monolithic and hollow blocks. After this, the products enter the autoclave drying or steaming area, where they quickly gain the strength necessary for storage and final “ripening”.
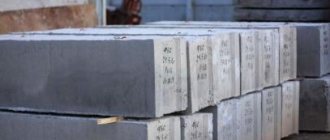
There are many varieties of cinder blocks of various linear sizes (usually quite impressive, much larger than standard bricks), and with varying degrees of hollowness. For example, the table shows several types of industrial blocks.
| Monolithic wall cinder block | Cinder block with 28% voids | Cinder block with 30% voids, two cylindrical cavities |
| Cinder block with 30% voids, three cylindrical cavities | Cinder block with 30% voids, four rectangular cavities | Cinder block with 40% hollowness |
The production of cinder blocks is carried out by many enterprises and private firms that have access to a cheap or even free source of raw materials. Often, home owners themselves practice making such building materials themselves - the molds are easy to make, and so is the vibrating table. And the drying process can also be carried out in “atmospheric” conditions, placing your production area under a canopy to protect the molded blocks from precipitation and direct sunlight.
By the way, the concept of “cinder blocks” can now cover blocks made using other bulk materials, waste from industrial production or construction - broken brick, crushed gravel or expanded clay, etc.
What are the advantages of cinder blocks:
- Simplicity and low cost of production - very little cement is required, and the filler most often costs nothing at all. You can make cinder blocks yourself.
- Industrially produced cinder blocks usually have very precise geometric dimensions, which simplifies the process of building walls.
- Working with cinder blocks is easy, and their large size allows you to raise walls very quickly.
- The material is absolutely fireproof.
Unfortunately, cinder blocks have many shortcomings and “weak points”. Some must be taken into account when purchasing a batch of material, others will have to be “fought” during construction:
- Cinder blocks cannot be classified as completely environmentally friendly materials. The catch is in the raw materials, since blast furnace slag can often produce a radioactive background or contain chemical components that are not harmless to humans. Therefore, when purchasing, you should not rush to a product that is too cheap and does not have a certificate of conformity - unfortunately, not all manufacturers are honest in this matter.
Never be embarrassed to request a certificate for purchased blocks
- The blocks are not highly frost-resistant. Usually this indicator lies within F15? F30 (deep freeze and thaw cycles). This means that the walls themselves will require good thermal insulation.
- Cinder concrete is a very thermally conductive material, which means that a building with it will not have good protection from either winter cold or summer heat. To a certain extent, this can be solved by using hollow blocks, but the cold bridges will still be very significant. This is another argument that a cinder block bathhouse will require reliable double-sided thermal insulation.
- The material of the blocks is hygroscopic, absorbs moisture well and tends to gradually collapse under its influence. This places special demands on hydro- and vapor barriers. If we are talking about a bathhouse, then such protection will need to be installed on both sides of the walls.
- The material has very modest sound-absorbing qualities, that is, it allows noise from the street to pass through quite freely. However, for a bathhouse this parameter is not so important.
- Cinder concrete has a high hardness, which makes it difficult to process (cutting, drilling, grooved), but at the same time it is quite fragile - a fallen block can easily split. This means special care must be taken both during transportation and when performing work.
- The large size of the blocks is convenient for quickly laying walls, but this will require considerable physical effort, since the weight of the blocks, especially monolithic wall ones, is significant.
- Plaster does not adhere very well to cinder block walls. However, if external insulation of walls is carried out, then cladding of the facade with panel materials is more often used.
- You must be prepared for the fact that ordinary dowels are very unreliably attached to slag concrete, even monolithic. Depending on the type of blocks, you will need to select special fastenings for unstable, loose foundations or for hollow walls.
Double spacer anchors
All this is told in detail so that the owner of the site, planning to build a bathhouse from cinder blocks, firmly understands that the cheapness of the material and the high speed of raising the walls result in a whole “heap” of other additional problems that will have to be solved one way or another. If this circumstance does not frighten you, then you can purchase (make) blocks and begin work.
Video: Characteristics, main advantages and disadvantages of cinder blocks
Bathhouse project
It is impossible to start work without drawing up a project, even if it is not completed according to all architectural canons. When undertaking independent construction, the owner must clearly know in advance which area of the territory is allocated for the construction of a bathhouse, what its area is.
The bathhouse must be “inscribed” in advance into the territory of the site
Information about the condition of the soil in the selected location will be very useful - the type and depth of the foundation, the installation of a sewerage system or drainage pit depend on this. You should immediately foresee what necessary communications will be supplied (water, electricity, possibly a gas main) and how they will be introduced into the bathhouse building (underground or by air).
As a rule, a bathhouse that is too large on a typical suburban site is not built, especially if we are talking about a structure made of cinder blocks. A building with a length of up to 6, a width of up to 4 and a wall height of up to 2.5? 3 meters. Such a compact structure will be easy to warm up with good thermal insulation. Even with such dimensions, it is possible to divide the internal area into 3? 4 rooms required in a bathhouse - an entrance hall (vestibule), a rest room, a washing room (shower) and the steam room itself.
A project created independently in a CAD application
Actually, it’s not difficult to create a project yourself if you have at least basic skills in this area. For these purposes, many application programs have been developed, with a Russian interface, quite simple and intuitive.
He is in 3D projection
They are also convenient in the fact that such applications allow you not only to draw a plan in compliance with all the required dimensions, “installing in place” the windows and doors. It is possible to switch to 3D viewing mode and even virtually “walk” around the building and its premises.
In addition, the programs will help you determine the required amount of materials - they have a function for such calculations.
When designing a bathhouse, a number of specific requirements must be taken into account - this is described in detail in the corresponding article on our portal.
If you don’t have the inclination to design yourself, it doesn’t matter. On the Internet and in the public domain, and for a fee, you can find (or order) the desired project that will appeal to the owners and will correspond to the size of the territory allocated for construction.
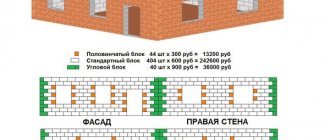
Having the project in front of your eyes, it will not be difficult to calculate the required number of blocks for the construction of the walls of the bathhouse. For example, let's look at our drawing and those blocks that are shown in the table above:
- Let's say blocks with a voidness of 40% are selected. The size of one on the front side is 390? 188 mm. You can safely give 10 mm for the thickness of the seam. Thus, the acceptable approximation accuracy can be taken as 400? 200 mm. So, the useful area of one block is 0.08 m?
- The height of the walls of the future bathhouse in the project is 2400 mm. It is easy to calculate that you will need to lay out 12 rows.
- Let's determine the perimeter of the building and multiply it by the height - we get the total area of the walls:
(6.2 ? 2 + 3.7 ? 2) ? 2.4 = 47.52 m?
- Divide the total area by the area of one block. So, to build solid walls you will need:
47.52 : 0.08 = 594 blocks
- On the walls we have: one door measuring 0.88? 2.0 m, two windows 0.9? 1.2 m and one ventilation window 0.2? 0.8. No masonry will be carried out here, so this area can be subtracted:
0.88? 2.0 + 2 ? 0.9? 1.2 + 0.8 ? 0.2 = 4.08 m?
- We divide the result by the area of the block:
4.08 : 0.08 = 51 blocks
- Subtract them from the total:
594 – 51 = 543 blocks.
- It probably makes sense to have at least a small supply. Let's add 7 more pieces for an even count - 550 blocks.
The calculation of other materials necessary for construction and finishing is carried out using other methods, but their consideration is beyond the scope of our publication - all this can be easily found on the pages of our portal.
After drawing up the project and carrying out calculations, you can proceed directly to the construction of the bathhouse.
Foundation for a bathhouse made of cinder blocks
Work begins with marking the site, linking the position of the future structure in accordance with the site plan. If necessary, the site is planned (leveled), stones, stumps and other dimensional obstacles for construction are removed.
Further work will depend on what type of foundation will be chosen for the bathhouse. Large loads are not expected here - the structure is small, but nevertheless it cannot be done without reliable support. And the choice of foundation mainly depends on the characteristics of the soil at the construction site.
On stable, dense, rocky or sandy soil, it will be quite possible to get by with a columnar foundation, raising it to a height of 300? 500 mm from ground level. In this case, the support pillars will need to be tied together with a reinforced concrete belt - a grillage, which will become the basis for further wall laying. This method allows you to save quite significantly on cement consumption.
Columnar foundation bound with a reinforced concrete grillage
If the soil is unstable, clayey, and prone to swelling, then you will have to pour a strip foundation. The main condition is that the tape must rise above ground level by 400? 500 mm. This is due to the fact that, as already mentioned, cinder concrete “does not like” water very much, so it is necessary to prevent its capillary rise along the base, splashes from rain, and contact of blocks with snowdrifts. If it is not possible to pour a concrete strip to such a height, then you will have to lay the plinth at the required height from waterproof sand-lime brick or other blocks.
After pouring the foundation, it must be opened right down to the base and the walls (pillars) must be waterproofed with special bitumen mastic or bitumen-based roll materials to a level of at least 200? 300 mm from the ground, or better yet, to the very top.
Strip foundation with waterproofed walls
Whatever foundation is erected, after complete completion, its horizontal plane is subject to mandatory waterproofing from 2? 3 layers of roofing material, best of all - hot laid on molten mastic. The laying of blocks will begin precisely from this insulating coating - this will completely eliminate the threat of capillary penetration of moisture from the soil onto the walls.
Waterproofing the horizontal plane of the foundation strip
When arranging the foundation, we must not forget about leaving channels in the tape for the passage of communications or to ensure ventilation of the underground space.
If the soil on the site is very complex, swampy, deeply frozen, with close water, then you can use modern technology for installing steel screw piles. After screwing in, they are connected at the selected height with a steel grillage (channel), from which further construction of the bathhouse will begin.
Screw pile foundation with steel grillage
There is one more small but important nuance. If you plan to install a massive brick stove in the bathhouse, then a foundation is also made for it in advance. At the same time, the foundation for a furnace building should not be connected with the general one - the loads here are completely different, and shrinkage may occur unevenly.
You can learn more about the technology of constructing a foundation for building a bathhouse by reading the corresponding article on our portal.
Laying cinder block walls
In fact, this is one of the main features of building a bathhouse from cinder blocks.
Preparation of masonry mortar
They begin, of course, with preparing the mortar for masonry:
- It must be homogeneous, without large solid inclusions, that is, the sand must be sifted for it. Minor clay inclusions will not spoil the “weather” - they will only improve the plasticity of the solution.
- The optimal proportion is considered to be 1 part M400 cement and 4 parts sand. When mixing, water should be added very carefully to avoid excess water - too thin a solution will seriously complicate the work.
- The consistency of the solution should be such that the mass is plastic, easily distributed over planes - horizontal and vertical, and at the same time does not spread itself. For a long time, lime additives have been actively used for this purpose. Currently, construction stores offer a large selection of special plasticizers - they are used in accordance with the attached instructions for use. However, experienced craftsmen offer another interesting, inexpensive and very effective method.
- We are talking about using a regular kitchen detergent - any, for dishes or for washing floors, but without the chlorine component. Adding it to the solution makes the mass extremely plastic and very convenient for the mason to work with.
Regular kitchen detergent can be an excellent plasticizer
The consumption is very small - you can add 10 ml of concentrate diluted in water when mixing the solution per bag (50 kg) of cement. This additive has absolutely no negative effect on the strength of the masonry - the adhesion of the composition to the blocks only benefits from this.
When the solution is ready, proceed directly to the masonry. Its technology may vary slightly depending on the type of blocks. Below are a step-by-step presentation of the basic techniques for laying monolithic and hollow cinder blocks.
Laying monolithic cinder blocks
| Miniature | Process description |
| We assume that the foundation is already ready and covered with a layer of waterproofing. The figure is taken as an example, but we remember that the height of the plinth should be approximately 500 mm. | |
| Always start from the corners. Lay out two interlocking blocks of the first row in each of them, and cover them “in a dressing” with one block of the second row. Careful control of the horizontality of the starting masonry is required - the evenness of all rows will largely depend on it. | |
| A similar operation is performed at all corners. Be sure to set the length and width of the future building, very careful measurements of these parameters are carried out, plus, for control, the diagonals are measured and compared - this will allow you to check the correctness of the specified rectangle. The laid out corner blocks must be at the same height. After everything is aligned and fully checked, a cord is pulled, which will serve as a guide when laying the row. | |
| To lay the block on a horizontal plane, a solution is applied and distributed (first on the surface of the foundation tape, and then, as it rises upward, on the previous laid row). The thickness of the applied layer should be approximately 20? 25 mm - in such a way that after installing the block, the width of the resulting seam is 10? 15 mm. | |
| The same layer of solution is applied to the vertical end plane of the previous block. If the solution is mixed according to all the rules, it will adhere perfectly to the surface. | |
| Cinder block is laid. With its weight it should sit well in the solution. You need to lay it so that the block immediately takes the correct position, which can then be easily corrected. The guideline will be a stretched cord, which determines both the height of the block and its location along the front. | |
| To adjust the position and completely sink into the solution, the block is tapped with the handle of a trowel or, if it is more convenient for the master, with a rubber hammer. If you have little experience in masonry, and the eye is not “sharpened” like real professionals, then it is better not to be lazy, but to check the evenness of the masonry using a building level. | |
| The mortar that appears on the seams is immediately picked up with a trowel. They immediately fill the remaining voids at the seams, if any, or minor defects in the blocks themselves. If not, then the selected solution will be used for laying the next block. | |
| The cycle is repeated - again applying the solution to the surface, etc. |
Laying hollow cinder blocks
When laying hollow cinder blocks, the technology changes somewhat. The point is to prevent excess consumption of masonry mortar, which can fall into the cavities, and leave them empty in order to maintain the effect of the air gap.
| Miniature | Process description |
| The first, lowest row is laid on a continuous layer of masonry mortar applied to a waterproofed foundation strip. The only difference is in the joining of adjacent blocks - this will be shown below. | |
| In the future, the solution is laid out only along the outer ribs of the already installed blocks, on both sides, in the form of a low 20? 25 mm parapet. | |
| It is convenient to do this by scooping the solution onto a trowel in small portions and using longitudinal movements tangent to the plane of the block to form such a longitudinal slide. The solution is not applied to the transverse ribs of the hollow block. | |
| It is advisable to make two remaining long parapets at once, as a backlog for masonry - the work in the future should go quickly. Pay attention to the photo - on the block already installed in this row, two strips of mortar of the same thickness are also applied along its vertical corners. | |
| Another block is taken. | |
| On the vertical edge where it will join with the already laid one, the same parapets of mortar are applied - first on one side... | |
| ... and then with the second one. | |
| The block is installed in its place and first pressed with force manually. The thickness of the seam should be the same - from 10 to 15 mm. | |
| To make adjustments, tap the block with a trowel or rubber hammer. Naturally, the horizontality of the row and the observance of the evenness of the façade along the front are controlled. | |
| The solution that comes out is immediately picked up with a trowel. Gaps should not be allowed to remain along the seams - they are immediately sealed, and the mortar is leveled flush with the outer and inner surfaces of the wall. | |
| The solution selected with a trowel is immediately used to form rollers on the end part of only one hundred laid blocks. Everything is the same, first on one side... | |
| ... and then from the opposite | |
| Next, the next block is taken - and so the work is repeated cyclically. With a “full hand”, the process goes quickly and with very economical consumption of masonry mortar. |
- It would probably be superfluous to say that the masonry is carried out “in a dressing” with an offset of half the length of the block. The planned window and door openings are immediately left. Surely, during the work you will have to cut blocks. So, for example, the vertical surfaces of openings, when laying the walls of their hollow blocks, should be laid out only with the entire end side. Unlike foam concrete, an ordinary cutting tool such as a hacksaw will not be a good helper here. Cinder concrete has a very dense structure with pronounced abrasive qualities, and a conventional tool will crumble it, becoming dull very quickly. Therefore, you need to prepare an angle grinder with a special wheel for cutting stone.
- Another important point that some novice builders, unfortunately, forget about is the reinforcement of masonry from blocks. When using monolithic blocks, this is the recommended procedure, but if hollow ones are used, then reinforcement is simply necessary.
The figure shows an approximate arrangement of reinforcing elements in the masonry:
Reinforcement diagram when making block masonry
How can it be accomplished?
Some cinder blocks produced by industry already have a special groove (one or two) in their design into which a reinforcing rod can be placed.
Cinder blocks with grooves for laying reinforcement
If there is no such groove, then making it yourself is quite problematic, due to the hardness and fragility of slag concrete. In this case, it is better to use special reinforcing metal mesh of the required width - they are sold in rolls of several meters each. Such a grid is spread over the laid row in the right place, and the next blocks are laid on it.
Rolls of reinforcing mesh
- The next question is lintels over window and door openings. You can install formwork over each of them and pour a reinforced concrete belt. But in this case, you will have to wait until the concrete in the lintel gains at least 70% strength. Another option is to install metal jumpers, for example, from a channel or two corners connected by crossbars. With this option, the masonry can be continued along the lintel, taking into account, of course, the reinforcement requirements indicated above in the diagram.
- And finally, the question of the very top row, if the masonry is made of hollow blocks. One option is to use monolithic blocks for these purposes. You can do it differently. Before the last row, reinforcement is still needed (see diagram), and the mesh laid there will help us. The voids of the blocks are filled approximately to the middle with large fragments of construction waste (the mesh will prevent them from falling through), and the remaining space is filled with concrete mortar, which is then leveled along the upper edge of the blocks.
- Some owners prefer to additionally tie the entire masonry on top with a reinforced concrete belt, approximately 100 ? 150 mm. If you have the desire and the material, then this is completely justified - such reinforcement will contribute to the strength of the entire structure.
Video: method of laying monolithic cinder blocks
Roof
For a small bathhouse, it doesn’t make sense to design some kind of complicated roof - a regular gable roof will suffice. You can also make a lean-to, but then this will have to be taken into account immediately in order to bring the masonry of the walls to different heights. However, a gable bathhouse is still better from the point of view of operating a bathhouse - it is warmer due to the air gap in the attic space, and in the attic itself you can, for example, arrange a storage and drying room for bathhouse brooms.
The roof for a bathhouse made of cinder blocks is practically no different from other buildings. A lot of useful information can be obtained by visiting a special section of our portal dedicated specifically to roofing and roofing. However, one feature can still be said.
The fact is that, due to the characteristics of cinder concrete, which were already mentioned above, securely attaching a massive Mauerlat to it is not an easy task. It will be easier to do without it, using only transverse floor beams.
The roof structure is without Mauerlat. Rafter legs are attached directly to the floor beams
It will be possible to cut grooves for them in the erected walls, or even embed beams in advance when laying the blocks. The rafter legs will rest on them, at the same time, by the way, forming the necessary eaves overhang.
And then it will be easy to hem the ceiling onto the beams, install thermal insulation of the attic floor between them and lay the attic floor.
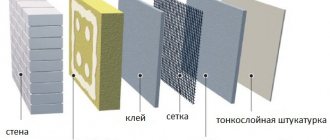
Insulation of the walls of a slag concrete bath
Probably the last thing in which a bathhouse made of cinder blocks differs significantly from buildings made of other materials is the mandatory finishing of the walls with double-sided thermal and waterproofing. This is due, again, to the specific features of the wall material.
The “hydrophobia” of slag concrete and its very low thermal insulation qualities have already been mentioned, and a bathhouse, by definition, should be a warm room, and the humidity level there is always elevated.
- Insulation from the inside is clear - it’s just that, logically, there should be warm walls inside. But at the same time, before installing the insulation, a layer of waterproofing film, for example, ordinary polyethylene, with a thickness of at least 200 microns, must be laid on the walls themselves. The overlaps of adjacent sheets must be at least 150? 200 mm and taped with waterproof tape - the path to wet fumes from the inside should be completely blocked.
Then guide battens are attached to the walls, between which the insulation will be laid. It also needs to be protected from excess moisture with the same film.
Here, when installing the sheathing, you may encounter surprises that the fasteners refuse to stay in the wall. This means that you will have to experiment to find the most acceptable solution. For example, you can install dowels in holes using “liquid nails”, gypsum or cement mortar, or use special spacer or double-spacer anchors (they have already been mentioned) or special dowels for loose and porous bases. In this case, it is recommended to drill holes with a diameter of approximately 1 mm smaller and be sure to remove all dust from them, for example, with a vacuum cleaner, before installing the dowel or anchor.
Special dowel for unstable, loose, porous walls
If the walls are made of hollow blocks, then special dowels or anchors can come to the rescue - “butterflies”, in which, when the central bolt is screwed in, the metal “skirt” is crushed, thereby creating a belt - it should reliably hold the fasteners in the wall.
For hollow blocks, a metal butterfly dowel will be optimal.
Under normal conditions, it is convenient to fasten thermal insulation slabs with special dowels - “fungi”, but on cinder-concrete walls this may not work - they will simply jump out of their sockets. The solution is simple: since mineral basalt wool is usually used inside the bathhouse (expanded polystyrene is extremely undesirable, since it is not harmless at high temperatures and is unsafe from a fire safety point of view), then blocks of it can be fixed between the sheathing guides with zigzags of a stretched nylon cord.
Otherwise, the interior decoration with insulation is not much different from that carried out in other baths. In the steam room, using additional foil insulation, a “thermos” is installed, followed by lining with natural wood. In the washing room, it is advisable to reinforce waterproof plasterboard along the crate, on which it will be very convenient to lay ceramic tiles. Well, you can decorate the dressing room at your own discretion, for example, by covering it with clapboard.
An example of wall cladding in a steam room
Now let's move on to the outer walls. If with other materials you can often limit yourself to internal insulation, then with slag concrete this will not work. The dew point is now located inside the wall, closer to its inner surface, which means that the walls will begin to become damp, and such a bathhouse will not last long. It is necessary to move this point outside, into a layer of insulation, while organizing a ventilated facade system so that condensed moisture has free access to the atmosphere.
The technology for insulating a ventilated facade is described in great detail in one of the publications on our portal - it makes sense to look at the link. But the features in our case are still the same: poor retention of fasteners in the walls. How to get out of the situation has already been said. If polystyrene foam panels are used for insulation, they can be attached to the surface of the walls between the guides using construction adhesive for exterior use.
Expanded polystyrene boards can be attached to construction adhesive
Of course, a wooden bathhouse always looks advantageous on the site. However, for cladding you can use either natural wood or a metal or plastic “block house” - no one will ever understand that the walls are made of inexpensive cinder blocks.
If you line the walls with a “block house”, you will have an almost complete external resemblance to a log house
In all other stages, the construction of a bathhouse from cinder blocks is no different from the construction of similar structures from other materials. All this is described in great detail on the pages of the portal.
And in conclusion, a clear example of building a small bathhouse from cinder blocks.
Video: building a bathhouse from cinder blocks
Prepare the foundation pit and fill the pillow
Before starting work, it is necessary to think through the drainage system of the pools. To do this, determine where the drain and fill lines will be located.
To dig a pit, it is necessary to apply markings to the ground, which will be 60-80 cm larger in width and length than the dimensions of the pool itself. When calculating the depth of the hole, also take into account the height of the bedding, bottom slab and finishing.
To prevent the walls of the pit from crumbling during work, it is better to make them at a slope of 5 degrees.
At the next stage, you need to lay pipes under the drain (bottom), if you are planning for just such a water intake system. The system is brought out into the pit at an angle.
It is also necessary to lay 2 layers of roofing material or geotextile on the bottom, which will act as a waterproofing material. It is better that the waterproofing extends 20 cm onto the walls of the pit.
After this, a pillow is poured into the bottom of the finished pit and compacted:
- The first layer is 15 cm of sand.
- The second layer is 15 cm of crushed stone.
In the process of compacting the pillow, it is also necessary to form a slope aimed at draining (bottom).
Reinforcement
To concrete the pool, you will need to prepare low formwork and reinforcement, the rods of which should never be welded. To avoid corrosion, use only wire to fasten the mesh.
The formwork for the pool should outline the outline of the future building. Two levels of reinforcement are neatly laid inside it:
- The first one should rise 5 cm above the edges of the slab.
- The second level is laid 5 cm below the top edge.
- Since a slab about 20 cm thick is usually poured onto the bottom, the distance between two layers of reinforcement should be 10 cm.
Healthy! For difficult soil, use thicker reinforcement.
The pool is reinforced with ribbed rods with a diameter of 10-14 mm and cells 20 x 20 cm, which are laid on small stones. The laying step is 20 cm. You need to step back 5 cm from the edge of the slab and bend the rods with the letter “G” (these bends will be required to create the frame of the walls).
Fill the bottom
After the frame is made, prepare and pour concrete mixture onto the bottom of the pool. To increase strength during the pouring process, use a vibrating device that will compact the solution.
After pouring and leveling (don't forget to maintain the slope), you need to wait a week until the slab hardens. If the weather is hot, then during this time wet the concrete surface with water 2 times a day.
After filling the pool bowl, you can not waste time and start preparing communications for draining water into the cesspool.
Building the vertical walls of the bowl
1. Construction of a pit
Once the size, shape and configuration of the pool are approved and the design is drawn up, developers begin work on the site. It begins with marking the area for digging a pit. Use a measuring tape to measure the boundaries of the pool, and then mark them with pegs and rope.
After marking, a pit is dug. Its dimensions should be 50-80 centimeters greater than the width and length of the pool, and 30-40 centimeters greater than its depth. The walls of the pit are carefully leveled, and the bottom is thoroughly compacted manually or using special vibrating equipment.
Digging a pit
2. Digging a pit for laying communications
Do not forget that communications will have to be connected to the pool in the future. This is a water supply and drainage system, as well as pumping and filtering equipment. These units are placed in a pit, which is dug next to the pit. The pit and pit should be connected by a ditch into which the pipes will be laid in the future.
3. Preparing the pit for installation of the bottom slab
The first step stated that the depth of the pit should exceed the depth of the pool. This is necessary then to place a special plate on the bottom. But before laying the bottom slab, the pit needs to be prepared - lay pipes for draining the water, level the bottom with a slope towards the drain, compact the soil.
A bedding of crushed stone and sand is poured onto the leveled bottom.
A layer of bedding is poured onto the geotextile, which is compacted well. On top of it, a layer of 15-20 centimeters is filled with crushed stone of small and medium fractions, and then fine-grained clean sand (layer thickness is about 10 centimeters). The resulting base must be compacted and placed on a waterproofing layer. Ideally, use special membranes that are installed overlapping.
4. Construction of the bottom slab
After work on the insulation, construction of the bottom slab begins. It is reinforced with metal elements and filled with cement mortar. The optimal thickness of the bottom plate is about 20 centimeters. This indicator can be changed in accordance with the landscape features of the site and other individual factors. When the concrete bottom is filled with concrete, wait the time necessary for it to dry.
Pouring concrete on the bottom slab
5. Construction of walls
Having made sure that the bottom slab is completely dry and meets all requirements, the developer can proceed to the next stage - the construction of brick walls. In construction centers you will need to purchase red solid bricks made of baked clay. You should not use sand-lime brick, because this material is only suitable for use in dry environments.
The wall is laid out in one layer, but there are options for building a bowl from several layers of brick. This step allows developers to increase the rigidity of the pool and achieve maximum structural strength.
It is recommended to reinforce each row of brick with metal rods or mesh, and for laying, developers should use cement with water-repellent properties (with the addition of a plasticizer, liquid glass or special hydrophobic additives).
6. Finishing work
When the walls are erected, work begins on plastering the brick bowl. The dried surface is primed, and then the embedded elements are installed - bottom drain, nozzles for overflowing water in the walls, etc. The last step is to cover the walls with the selected material - ceramic tiles, etc.
7. External insulation and waterproofing
Having taken care of insulating the bowl from the inside, it is worth thinking about the external sealing of the structure. For this purpose, hydro- and heat-insulating materials are used to protect the pool from destruction as a result of the action of the environment.
Waterproofing is an important stage in construction
For the walls, you will need to build formwork from moisture-resistant plywood with a thickness of about 21 mm or boards planed on one side (it will be more convenient to work with plywood). In this case, it is necessary to maintain a distance of 40 cm between the vertical slope of the pit and the formwork itself, and also take into account the thickness of the walls (20 cm).
After this, it is necessary to install reinforcement in the formwork and connect it to the “tails” of the horizontal reinforcing layer. The reinforcement spacing and mesh type are the same as for the bottom.
At the next stage, concrete solution is poured into the finished formwork. It also dries in 7 days.
Plastering and re-waterproofing
After the main construction of the pool has been completed, we move on to plastering work. We use the following solution as plaster:
- 1 part of cement grade not lower than M 500;
- 2 parts sand;
- latex plasticizer (will make the composition water-repellent);
- microfiber (has the same properties as reinforcement).
Liquid coating waterproofing must be applied to the plastered surface. To give the protective layer greater strength, it is better to apply the solution to a special plaster network made of fiberglass with cells of 5 x 5 mm.
At this point, the construction of the concrete pool is almost complete, and you can move on to finishing work. The easiest way is to cover the bowl with PVC film; it is easy to apply and has additional waterproofing properties.
After this, all that remains is to connect devices for disinfecting pools and equip the structure with stairs, springboards and removable flaps for draining water.