The glass-type foundation is not a continuous point base. It is used mainly for the construction of buildings with a large area but low number of floors, most often for industrial, utility, and infrastructure purposes. For multi-storey buildings, it can only be used on strong, non-heaving and non-crumpling soils with deep groundwater.
Technological features
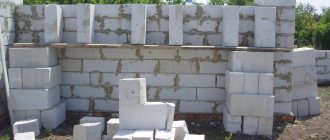
The construction of cups for the future placement of columns is carried out through the preparation of a preliminary foundation and enhanced reinforcement technology, due to which these foundations have high performance characteristics. As a rule, glass bases, due to their high strength and structural rigidity, are used in the construction of industrial facilities, but there are cases of their use in the private sector.
Base design
A glass foundation is a type of columnar foundation and includes the following elements:
- slab base installed on a sand or crushed stone base in an equipped pit;
- glass kneecap (element for future placement of the column);
- supporting columns for the building frame.
Upon completion of the assembly of all the listed components, a foundation structure is formed with a significant base area, usually from 15 to 50 sq.m.
The glass-type columnar foundation is used in two forms: prefabricated and monolithic. The fundamental difference between these types of bases lies in their structure - prefabricated involves the connection of the component parts of the glass directly on site, and monolithic - the installation of a finished integral structure. In each case, the column support is placed on a pre-equipped substrate.
Due to the fairly wide area of the supporting part, it is recommended to build such foundations on stable soils, excluding construction on heaving and subsidence-prone soils.
Device (circuit)
According to regulatory documents, the foundation consists of the following elements:
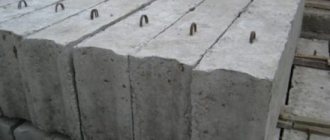
- Support monolithic reinforced concrete pad with large dimensions. It can be round or square. It is mandatory to have a top protective waterproofing layer. You can make a pillow at a construction site or order finished products from the manufacturer. The base is laid on a compacted sand and gravel layer.
- A reinforced concrete cup holder is mounted in the center of the base. It has a rectangular shape, a centered recess for installing a support element. Reinforcement of glasses in horizontal and vertical directions is required.
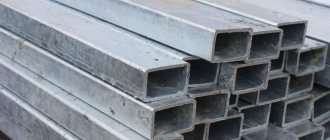
- Next, a steel or reinforced concrete support is installed in the glass. The cross section of the column can be in the shape of a square or a circle. In this case, the length and dimensions depend on the characteristics of the soil and design loads.
- Then the column is installed on the support. It is the main load-bearing component, taking on the bulk of the loads from future structures.
Prefabricated support cushions are shaped like a trapezoid with beveled side edges. Monolithic slabs are rectangular in shape. If the foundation is made from a monolithic slab, then the glass must also be made from a monolith and be integral with the slab due to their common reinforcement.
Advantages and disadvantages
“Glass” foundations
Glass-type foundations have a number of advantages that distinguish them from other types of foundations:
- high quality of materials (production of elements is carried out directly in industrial conditions and on a scale with strict adherence to the rules and requirements prescribed by construction documentation);
- simple assembly (installation of components is carried out in the shortest possible time and with a minimum amount of labor);
- long service life;
- reliability (due to the wide support area, the elements evenly distribute both longitudinal and transverse loads);
- immunity to moisture (the heavy concrete used as the basis for the components is capable of absorbing up to 5% of water).
Like any building element, a glass-type foundation has a number of disadvantages:
- inflated cost (due to factory production);
- mandatory use of special equipment both during transportation and during installation of the base (considerable weight and size of parts).
Areas of use
This type of foundation is most effective for:
- engineering objects - bridges, crossings and crossings built over railway tracks:
- infrastructure structures - underground parking lots, garages;
- buildings at thermal and power plants;
- warehouse facilities intended for storing materials, blanks, finished products;
- small industrial buildings;
- one-story sports, shopping, exhibition complexes of low weight;
- residential frame houses.
If the base is used for wooden buildings, then the number of floors can reach three.
Installation of glass base
Installation of the foundation
When constructing a glass foundation, one should be guided by classical rules and standards. The installation diagram is simple and intuitive if you follow the following sequence of actions:
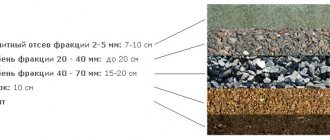
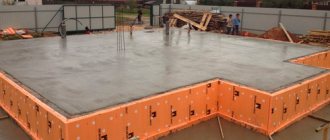
- Preparing the construction site. Before starting work, the surface for the future placement of the foundation is cleared of construction and other debris. At the same time, to simplify future marking work and leveling the site, it would be useful to remove a 20-30 cm layer of turf. The site equipped for installation must be additionally covered with a layer of fine sand or crushed stone and thoroughly compacted. Subsequently, making a preliminary substrate will allow you to preserve the constructed foundation for a long time by draining and preventing stagnation of excess water.
During the work at this stage, it is necessary to take into account that the prepared site should be 40-50 cm larger than the supporting part of the foundation.
Mounted supports
Marking. Future locations for supports with dimensions of 400x400 mm are marked and pegs are driven in around their perimeter. After determining the corner installation locations, we proceed to marking the center of the foundation. To do this, you should connect the 4 centers of the corner supports diagonally in pairs by pulling a wire or rope, and mark the intersection point by analogy with the method presented above.- Digging and preparing holes. Holes are dug along the perimeter of the installed boundary pegs depending on the height and weight of the future columns. Next, a 15-20 cm layer of fine sand or crushed stone is poured onto the bottom and compacted.
- Installation of components: glass and column. Both before and after placing the supporting platforms, the horizontal and vertical axes should be accurately measured using a building level or level. Having finished arranging the glass part and waiting for the solution to completely dry, in the case of self-production, it is advisable to carry out additional reinforcement of the columns and supporting elements.
- Final concreting of the glass and columns.
All procedures performed are carried out in conjunction with manual manipulations aimed at high-quality adjustment of the components and horizontal lines. Upon completion of the installation of the glass elements, care must be taken to protect them. In addition, at the stage of arranging glasses, do not forget about frost resistance and strength limits.
We recommend watching a video illustrating the process of filling the “glass”.
Stages of work
Glass bases are installed in strict accordance with current standards and regulations. Installation is carried out using heavy special equipment and under the supervision of experienced builders. In general, the construction technique has a number of main stages of work.
Earthen
The area allocated for the construction of the building needs to be cleared. Moreover, both debris and the top layer of soil with vegetation are removed.
In addition, it is necessary to prepare pits for the slabs. They can be dug separately for each element, or the trench can be dug in the form of one line, passing along the contour of the future structure. After organizing the pit, the bottom is cleaned, leveled and well compacted.
Bedding
Compaction is required if the construction is carried out on weak soils that shrink under the influence of the mass of the base and building. Gravel and sand are used for backfilling.
The thickness of the seal depends on the weight of the slab, and both layers must be the same. First, gravel is poured, evenly distributed throughout the trench, leveled and compacted. Then I pour sand, moisten it and also compact it thoroughly.
Marking
At the bottom of the dug trench, the locations of the slabs are marked. Why is the alignment axis attached to the dressing boards? When the axes intersect, a plumb line is placed, which indicates the point for installing the support block.
Then a slab template is made and the contours are transferred to the ground. Marks are made using rope and stakes. Having marked the location at the bottom of the trench, check the horizontal level of the bedding. If necessary, it is leveled.
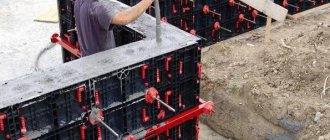
Installation
For quick installation of blocks, mounting loops are installed in the sections of the glass-type foundation. The hooks of the crane cables are hooked onto them, and hooking can be done with 2 or 4 hooks, taking into account the size of the slab. The block is slightly raised above ground level and the stuck soil is removed. Then the pointer crane moves the monolith to the required area.
Before completing installation, you must manually adjust the position of the slab. If required, it is rotated and moved in the required direction. Then you can install it in its proper place. This is how all elements are installed.
At the last stage, the resulting space near the blocks is filled. After completion, the earth is well compacted.
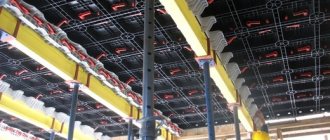
To strengthen the base, blocks, columns, and glasses are reinforced. Moreover, the rods are attached to each other using a welding machine. Reinforcement is placed into all foundation elements during production.
Waterproofing
Even a small area of contact between a glass foundation and the ground causes damage to the integrity of the concrete slab under the influence of moisture. That is, the outer surface of the block must be protected with waterproofing. Why do these actions:
- Dirt is removed from the surface of the block and leveled with cement.
- Coat with bitumen and allow to dry completely.
- Roofing felt is laid on top and the joints are treated with mastic.
Attention: If there is close passage of groundwater, waterproofing is done in several layers.
Installation of columns
Pre-delivered columns must be laid out so that special equipment can easily reach them and move them to the required location. The columns are measured to determine where to grab with slings.
Installation of columns involves applying special marks. The crane moves along the row and can install two of these elements at the same time on one parking lot. The alignment of the columns and the base must be as accurate as possible in order to avoid displacement of the beams in the future.
Foundation beams are being installed. Re-mark and determine the design parameters of the installation site of the columns. Then remove dirt from the mounting elements, secure them with a cable, lift them and hang them over the column.
The beams are first fixed with bolts, the alignment is checked again, and only then they are firmly fixed in the column console.
The scope of application of glass foundations is quite extensive, but in private housing construction there are a number of restrictions. The strength of the glass base significantly depends on compliance with all the rules and technology for installing concrete slabs. During installation, it is necessary to take into account all GOST requirements and manufacturer’s recommendations.
Reinforcement of the foundation base with meshes
The minimum protective layer of concrete for this reinforcement is accepted: if there is a preparation of lean concrete under the foundation - 40 mm, if not - 70 mm.
If the normal cross-section of the column support as a concrete element is not provided with strength, the column support is reinforced with flat welded mesh with a reinforcement percentage of the entire longitudinal reinforcement of at least 0.2% (Fig. below).
Reinforcement of a reinforced concrete column with a spatial frame assembled from meshes
In reinforced concrete columns, where, according to calculations, compressed reinforcement is not required, and the amount of tensile reinforcement does not exceed 0.3%, it is allowed to install meshes only along the edges of the column, perpendicular to the plane of action of the larger of the two moments acting on the foundation. In this case, the thickness of the protective layer of concrete must be at least 50 mm and at least twice the diameter of the reinforcement.
If it is necessary to reinforce the walls of the glass in concrete columns, a spatial frame should be installed within the glass part with a depth below the bottom of the glass by at least 35 diameters of the longitudinal reinforcement. In this case, the area of all longitudinal reinforcement is taken to be no less than 0.04% of the area of the column outside the glass (Fig. below).
Reinforcement of a concrete column with a glass
In addition, when e0 > Ic/b, horizontal welded mesh should be installed in the glass part of the column with the rods located at the outer and inner surfaces of the walls of the glass. In this case, the vertical reinforcement is placed inside the meshes (Fig. below). The diameter of the mesh rods is taken to be at least 8 mm and at least a quarter of the diameter of the longitudinal reinforcement.
Glass type foundation video
For a better understanding of the technology for arranging a glass-type foundation, we offer you a video explaining the main nuances of this process:
Video No. 1 - Features of laying out the foundation
Video No. 2 - Theoretical basis for installing columns in glass blocks
Important construction features
To ensure reliable protection of the structure from cracks and wall distortions both before installation and during it, it is important to consider the following points:
- mandatory use of high-quality concrete grade M250 not lower;
- implementation of measures for reinforcing columns and supporting elements;
- finishing layer around the perimeter of each part of the structure from 3 cm;
- The width of the cracks after complete drying should be less than 0.1 mm.
Watch the video on how to install glasses under columns.
It is more expedient to carry out the entire scheme of measures for the installation and arrangement of a glass-type base in the warm season, since, firstly, in accordance with the requirements of SNiP, the installation of concrete products on frozen soils is strictly prohibited, and secondly, such part of the installation as concreting in the cold weather conditions for high-quality setting of the composition requires the mandatory use of special additives, the purchase of which is detrimentally reflected in monetary terms on the final estimate.
Marking
The foundation is marked with paint on the side surface of the structure. The marking consists of one or two alphanumeric groups separated by a hyphen.
In the first group, according to GOST, the dimensions of the sole and the height of the product are indicated in decimeters, which are rounded to whole numbers.
The second group reveals the bearing capacity, as well as the type of permeability, if the foundation is intended for placement in aggressive environments.
Examples of notation:
- 1F13.8-1. Foundation for a column 300x300 mm with a base size of 1300x1300 mm, height 800 mm. Load-bearing capacity of group 1 for walls up to 250 mm thick.
- 2F20.9-2P. The transverse dimension of the column is 400x400 mm, the base is 2000x2000, height is 900 mm. It is possible to build walls thicker than 250 mm; low-permeability concrete is used.