We are all familiar with the concepts of “wall” and “partition”.
These two elements perform the function of dividing the space of the premises.
Partitions are smaller in thickness than walls.
Brick partitions are self-supporting in structural terms; they serve as a fence.
Depending on the design and material, partitions are divided into types:
- large-panel
- slab - made from small slabs
- stone - made of brick, lightweight concrete blocks and others
- made of glass blocks and fiberglass
- wooden
In this article I want to focus on brick partitions, as the most popular and often performed. The brick meets all the requirements for strength, fire resistance, it is moisture resistant and reliable. Brick partitions have found their use in wet rooms - bathrooms, kitchens.
They are indispensable where fire resistance of enclosing structures is required. The partitions are laid with bandaging of the seams, reinforced if necessary (I will talk about this below), cement grade mortar is used for masonry. The weight of a brick partition is quite large, so the design institute carries out all the necessary calculations.
The supports for partitions are floors (panels, beams). In the basement floors or, if the building does not have a basement, the partitions are supported on brick columns, concrete preparation thickened from below. Installing brick partitions on a clean floor is not permitted.
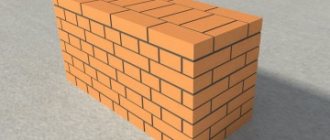
Brick partitions are ½ and ¼ brick thick; if the thickness is greater, then these are already walls.
Let's briefly look at these two types of partitions:
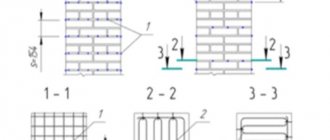
With a thickness of ½ brick, partitions are not reinforced if their dimensions in length are up to 5 meters and in height up to 3 meters. If the area of the room is larger, then they must be reinforced in horizontal seams with reinforcement in increments of 6 rows. The reinforcement is bent at the ends and secured to the walls with nails and pins.
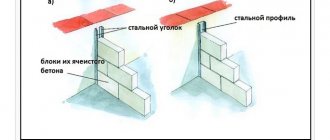
If the room is large, then in addition to horizontal reinforcement, vertical reinforcement is necessary. These can be racks made of channel bars or corners, installed every 5 meters in a vertical position from floor to ceiling in the body of the partition. This gives the brick partition strength and stability.
If the room is small, it is possible to install brick partitions ¼ brick thick. These are storage rooms, bathrooms, small rooms, etc. Reinforcement is made using the same technology as ½ brick, so I will not repeat it.
Rules for installing brick partitions
Before proceeding with the installation of brick partitions, all seams between floor slabs and panels should be sealed with cement grade mortar.
Before laying in partitions, bricks are moistened in hot, dry and windy weather.
Brick partitions are connected to the walls in increments of 70 cm in height. They are fixed with overlap in cases where their length is more than 3 meters.
The material for constructing brick partitions must meet the requirements specified above and be carried out according to the project.
The connection of brick partitions with walls in the event that there was a technological break in work is arranged by making a groove in the wall, where we place the brick partition. If the groove was not provided in advance, then we hammer metal pins (8-10 mm in diameter) into the wall to a depth of 10 cm and insert them into the masonry joints to connect the “partition-wall”.
When reinforcing masonry, reinforcing bars should protrude beyond the surface of the partition by 5-10mm.
The pairing of pillars and partitions is carried out by releasing grooves from the body of the pillar, steel pins and inserting them into the joints of the masonry.
The thickness of the seams when reinforcing brick partitions should be 4 mm or more greater than the diameter of the reinforcement. At the same time, the average thickness of the seams provided for masonry is maintained.
Installation of partitions from blocks and foam blocks
Installation of partitions from blocks is carried out using masonry. The installation of partitions from foam blocks is carried out in a similar way.
Technology for installing partitions made of foam concrete blocks:
- marking and tensioning the mooring line;
- spread mortar, foam concrete block masonry;
- checking the accuracy of masonry;
- laying metal lintels in places where doorways are installed.
At the points where it meets the load-bearing walls, the partition is connected to them with an anchor bolt. As with the installation of brick partitions, if it is necessary to install curved partitions, templates from boards should be used. When laying partitions, lintels are installed above the openings. The consumption of materials for the construction of various types of partitions is given in the table “Approximate consumption of materials for the construction of various types of partitions” Table “Approximate consumption of materials for the construction of various types of partitions”
| Partition | Thickness, mm | Material consumption per 1 m2 | Necessary finishing work |
| From gypsum plasterboard on a metal frame | 100 |
| Primer, painting (or wallpapering) |
| Frame wooden | 100 |
| |
| Brick | 120 |
| Plastering, priming, painting (or wallpapering) |
| From foam block | 100 |
| |
| 200 |
|
Technical indicators of quality assessment
To assess the quality of masonry brick partitions, check out the main indicators when grading “good”:
1. Deviation from design parameters by:
- thickness 8mm (+or-)
- displacement of structure axes 8mm
- opening width +10mm
2. Deviation from the horizontal of some rows of brickwork by 10 meters in length - up to 15 mm
3. Deviation from the vertical surface of the partitions on the 1st floor (at h = 2.7m - 4m) - up to 8mm
4. Seam thickness:
- horizontal up to 10mm
- vertical up to 10mm
5. Surface irregularities in the masonry of partitions determined using a 2m strip:
- to be plastered - 8mm
- not subject to plastering - 4mm
6. When laying hollow areas, the depth of unfilled joints with mortar on the front side is up to 8 mm
Now you no longer need a technical supervision specialist to assess the quality of completed brick partitions. You have all the necessary information. I wish you strong, even, stable brick partitions.
Brick for a partition length of up to 3 m and its height of up to 2.7 m: half a brick for large dimensions of the structure being built.
Preparatory work for the construction of brick partitions:
- marking;
- installation and inspection of scaffolding (used for laying the second tier);
- delivery of construction materials, tools and equipment to the workplace;
- if necessary, a lighting device.
The sequence of installation of brick partitions:
- pull;
- spread and lay out bricks;
- perform partitions;
- check the correctness of the work performed.
The process of laying brick partitions:
- made of solid brick with half-brick ligation along the length of the rows;
- secure and tighten the mooring cord. After finishing the laying of the next row, loosen the tension clamp; With one hand they lift the clamp, with the other they maintain the order and install the clamp at the risk of the next row and secure it with a screw. The cord is pulled and checked for horizontalness;
- on the laid partition, 6 bricks are laid out closely with an indentation of 3 bricks from the beginning of the masonry (a place for spreading the mortar);
- use a shovel to apply the mixed solution onto the partition and spread it in a bed 2-2.5 cm thick, 10 cm wide, 75 cm long;
- lay 3 bricks;
- again and lay 3 more bricks;
- masonry is carried out using the method. To do this, level the mortar for 3 bricks with a trowel. The brick is held in the left hand in an inclined position. Using the butt edge, they scoop up part of the solution and move it to the place of installation. This should create a complete vertical seam. The brick is leveled and set down to the level of the mooring cord. The gap between the cord and the brick should not exceed 1-2 mm. The squeezed out solution is trimmed with a trowel and thrown into a vertical seam;
- partitions half a brick thick are laid out with spoons;
- partitions a quarter of a brick thick are reinforced in horizontal joints with frequency - at least every 5-6 rows. For this purpose, strip iron with a thickness of 1 mm or reinforcement bars with a diameter of no more than 6 mm are used. The thickness of the seam in which the reinforcement is placed should not exceed the diameter of the reinforcement by more than 4 mm;
- in places where the partitions interface with the main walls, steel pins or ruffs are hammered in;
- during the masonry process, they control the quality of filling the joints with mortar, the correct position of the brick, and the verticality of the masonry as a whole;
- For laying corners, templates are used from boards - planed on the outside and planed on the inside (working side). If ceilings have already been installed in the room, then the template is installed vertically between the floor and the ceiling. Corner bricks are laid close to the template;
Template for laying brick partitions
- during the masonry process, reinforcement is installed; above openings; plugs for fastening door frames;
- Periodically, using a level, plumb line and rules, check the horizontal and vertical positions of the masonry rows. To level the masonry on the outside of the partition, apply a rule and lightly tap it with a pick-hammer;
- thickness of masonry joints – horizontal – 12 mm, vertical – 10 mm;
- in case of forced ruptures, the masonry is made in the form of a groove (oblique or vertical). A mesh of longitudinal reinforcement bars with a diameter of no more than 6 mm, and transverse reinforcement bars with a diameter of no more than 3 mm with a distance of up to 1.5 m along the height of the masonry and at the level of each floor is laid into the seams of the vertical groove. The number of longitudinal reinforcement rods is 1 rod for every 12 cm of wall thickness, at 12 cm - at least 2 rods;
- requirements for masonry reinforcement: the thickness of the seam of the reinforced masonry must exceed by at least 4 mm the sum of the diameters of the intersecting reinforcement, while the thickness of the seam is no more than 16 mm; transverse reinforcement of the wall piers is carried out at the rate of at least 2 reinforcing bars protruding onto the inner surface of the pier by 2 - 3 mm; with longitudinal reinforcement, the reinforcement bars are connected to each other by welding; at joints of reinforcement without welding, the ends of smooth rods are finished with a hook, the rods are tied with wire with an overlap - 20 diameters of the rods.
Quality and acceptance of work on the construction of brick partitions:
- permissible deviations in the dimensions and position of the partition:
Thickness: ±15 mm; — opening width: ±15 mm; — displacement of the partition axes from the alignment axes: 10 mm; - deviation of the corners and surface of the masonry from the vertical by one floor: 10 mm; — thickness of seams: horizontal -2;+3 mm; vertical ± 2 mm: - unevenness on a vertical surface when applying a thread 2 m long: 10 mm;
- acceptance of completed work on the construction of brick partitions is carried out before plastering the surfaces;
- upon acceptance check:
Correct suture dressing; — thickness of seams and their filling; — horizontality of masonry rows; - geometric dimensions and position of the brick partition structure.
In this article we will learn how to make a brick partition with your own hands. There is nothing overly complicated in this work; you should approach the work carefully and follow all the points in this article.
Basics
At first glance, there is nothing simpler than taking and laying out a wall. Nevertheless, there are some subtleties here too.
First of all, brick interior partitions will require the following tools:
- Master OK. You can use a regular trowel with a wide grip, or a narrow one for more beautiful, decorative masonry.
- Level. We will need to check each row for compliance with the horizontal plane.
- Plumb. A simple string and a weight will allow us to control the wall in the vertical plane and ensure that our structure does not deviate to the side.
- A hammer or saw for chipping or sawing off bricks.
- A drill with a hammer function and a drill with a pobedit tip.
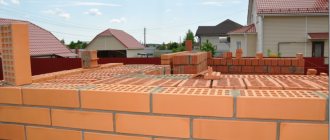
Start of masonry
If we are not talking about decorative masonry, then we may not consider building bricks for chips or small cracks. All this will still be hidden under a layer of finishing.
Mark the base of the wall. If we have a concrete floor, we can drill several holes into which we will insert reinforcement of a small cross-section, for example, 8 mm , this will be a kind of connection with the floor.
Brick partition for a bath - the beginning of masonry
We sweep the floor and moisten it with water, this will give the necessary strength to the adhesion. Let's start preparing the solution.
Here we have to do everything with our own hands, if you have a concrete mixer, great, if not, we do the mixing in a trough.
Let's make the proportions of cement and sand one to three. Stir the solution until it becomes sour cream, and lay out the first row.
Advice! Before you start kneading, we recommend sifting the sand, then we will get a beautiful masonry with a thin and neat seam.
We set the first row according to the level and two horizontal guides. Since this is masonry done on our own, we move the twine a little higher and lay the next row along it, and so on up to the ceiling.
Level and guide
Here the question arises, what is the maximum height of a brick partition available for construction. In principle, we can erect a partition to a height of 3-3 and a half meters, taking into account the fact that it will be reinforced and at least half a brick thick, that is, 120 mm .
We reinforce the pier
As a reinforcing element, we will use reinforcement with a cross-section of 8 mm and a reinforced mesh with a cross-section of 4-5 mm.
Some experts recommend laying the net in cut strips on each row of brick and recessing it into the masonry. Our DIY brick partition will alternate both the network and the reinforcement - we’ll make it even more durable!
We reinforce the masonry
We will also use the metal structure when we need to attach brick partitions to the walls.
To do this, we drive the reinforcement into the hole drilled in the wall and lay the second part of it on the masonry. In this case, the seam remains practically unchanged, and we get a complete connection with the wall.
You can place partition bricks on metal plates, one end of which is already attached to the wall. That is, there are several options, we have described the simplest one.
Example of a simple fastening
This type of fastening is used when a 120 mm thick brick partition is needed for a bathhouse, for example. And, despite the fact that there is a joining of brick and wood, the basic principles of the design are completely preserved unchanged.
Result
An interior partition made of brick is an excellent solution, in which the price is attractive, and the ease of operation will allow you to do everything yourself and quickly enough.
As a rule, the height of the ceilings is almost the same everywhere, if we are talking about residential premises - the basic half-brick masonry is excellent for constructing this type of structure.
What do we make a partition from?
Partitions should be made of ordinary red single brick. Hollow brick is not particularly suitable for laying a partition, especially if electrical communications will be embedded in the surface. With this work, the integrity of the brick can be damaged and the partition will not be strong and reliable. The main requirement for installing a brick partition is a reliable foundation for this structure. If the partition is laid on reinforced concrete floor slabs, then no additional work on its installation will be required. The ceiling itself serves as an excellent basis for a partition.
If during the construction of a house wooden floor beams are used to install partitions, it is necessary to make a simple strip foundation. The width of the foundation is taken to be 200 - 250 mm, and its depth must be at least 250 mm. In a house with a basement and wooden beams, brick partitions should not be installed.
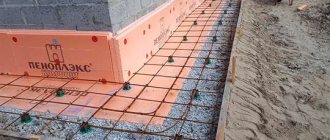
Before starting work, horizontal waterproofing is installed on the surface of the foundation using roofing felt and cement mortar. Waterproofing is not required for reinforced concrete floor slabs.
Advantages and disadvantages
Advantages.
Brick partitions are a very reliable solution from all points of view. They are moisture-resistant, durable, fire-resistant, provide good sound insulation, and can withstand large cantilever loads. If you plan to mount heavy equipment (for example, a 50 kg plasma panel) or cladding (for example, marble or granite slabs) on the walls, brick partitions are best suited. In addition, brick comes in a variety of shapes and sizes, so it can be used to realize almost any design idea. It is not difficult to lay out any arc, niche, opening, etc. from brick. In addition, in modern interiors (especially non-residential premises), brick often does not require additional finishing.
Flaws.
Brick partitions are quite expensive. To the cost of the base material is added the cost of mortar and plaster, of which quite a lot will be required. In addition, brick is a very heavy material, so in some cases the use of brick partitions becomes impossible - the floor does not support it. If the work is performed poorly, the sound insulation of the partition is significantly reduced. And even without experience, it is very difficult to build a neat brick wall. Not even every craftsman can achieve a perfectly smooth partition, so when finishing it, it will have to be leveled using plaster with a layer of 15 to 50 mm. All work with brickwork is a “wet” process, therefore, before proceeding to the next stage of work, it is necessary to thoroughly dry what has already been done (masonry, plaster, putty). All this is precious time.
Masonry process
The masonry of partitions is usually made with a thickness of 120 mm; this size is sufficient to construct a reliable partition. Sometimes quarter bricks are laid to save material, but this should not be done. As a last resort, a quarter-brick partition can be made with a partition length of no more than 2 - 2.5 meters, otherwise the structure will not be reliable enough.
Masonry begins from load-bearing walls and doorways. Raise several rows of bricks and check the verticality of the partition using a level. Then a cord is stretched between the laid out parts of the partition and the rest of the brick is laid along it. Then several rows of bricks are laid out again along the edges of the partition, the cord is pulled, and the work in this sequence is carried out to the desired height.
After 3 - 5 rows, the masonry should be reinforced with a masonry mesh or two small diameter reinforcement bars. Partitions are usually attached to load-bearing walls also using a masonry mesh; it should be released a few centimeters from the load-bearing wall during the construction of the outer walls. If the mesh was not previously embedded in the wall, you will have to secure anchors and attach the partition reinforcement to them.
The masonry is made with ligation of vertical seams without jointing them. If finishing work on the partition will not be carried out in the future, the seams should be carefully unstitched. For plastering work, it is better to do the masonry “in the waste area”, i.e. no need to painstakingly seal the seams. In this case, the layer of plaster will be more securely bonded to the brick.
Frame partitions
Technology for installing frame partitions from plasterboard sheets:
The outer layer of this type of partition is made of plasterboard sheets (GKL) with a compacted edge or gypsum fiber sheets (GVL) 2500 x 1200 mm with a thickness of 12.5 and 10 mm. GKL (GVL) sheets are installed on a metal frame made of a special profile - a rack and a binder. The pitch of the rack profile for all types of partitions is 600 mm. The frame is assembled using self-tapping screws.
When installing partitions of considerable length, it is recommended to perform expansion joints to reduce the load on the structural elements of the frame.
An expansion joint is a kind of cut in the structure that divides partitions of considerable length into separate blocks. Seams are made in structures longer than 15 m. When installing partitions from gypsum plasterboard, the sheets are attached to the profile with self-tapping screws. Vertical gypsum board seams are sealed with putty with reinforcing tape, horizontal end joints are sealed with putty without reinforcing tape. When covering the frame with two layers of gypsum board, puttying of the vertical joints of the first layer is performed without reinforcing tape.
Doorways
When constructing doorways, they should be made 1 - 2 centimeters larger in height and width, then the door frames will be mounted without problems. Lintels over openings can be mounted in several types: ready-made concrete lintels, from two corners with a 50 mm flange, you can put several reinforcing bars. The main thing is that the support of any lintel is at least 80 - 100 mm. When laying a brick partition, it is necessary to leave a small gap between the floor slab and the top row of bricks. In case of shrinkage of the building, breakage of the brick in the partition will be prevented; this gap can be filled with polyurethane foam.
Brick partitions are erected to divide a large living space into separate, smaller rooms or to redevelop the entire living space. The structure reduces the entry of noise and cold into the rooms. Unlike the main wall, it does not serve as a load-bearing wall, is stationary due to the quality of the building material, and has good strength and resistance to moisture. performs some additional functions: placement of electrical wiring, installation of water supply and sewerage, heating devices.
Scheme of interior partitions made of bricks.
A do-it-yourself brick partition, in addition to its specific purpose, can significantly change the interior interior of a house, giving it an original and cozy look.
Interior walls
With all the variety of different building materials, brick continues to be the most commonly used type in the construction of various structures. Let's talk about brick partitions: built according to SNiP, they will not cause any difficulties. So, let's try to understand all the intricacies.
Photo: interior wall
Partitions can be erected both in low-rise construction and in high-rise buildings, cottages, offices, during repairs and redevelopment of apartments.
What are the types of partitions?
Even such a simple design can be systematized by us according to three main criteria:
- Thickness, width of the wall.
- Design features of the wall.
- Weight.
The most common interior partition is made of half a brick; the thickness of such a wall is 12 centimeters. However, this parameter is also calculated using additional components. For example, if we need a wall that will also perform load-bearing functions, then the masonry can be one and a half or two bricks.
Half a brick
Choosing material
The choice of material is very simple; we just need bricks for partitions, based on the purpose of the wall.
- For the interior partition, you can choose hollow red brick. It is lightweight and has high noise insulation properties.
- For a partition with the function of a load-bearing wall, double sand-lime brick M 150, which has increased strength, is perfect.
- And when constructing partitions in basement rooms or in rooms with high humidity, solid clay bricks will serve well.
That is, the choice of material is quite wide, not to mention the fact that there are also foam blocks that are trying with all their might to impose competition on traditional bricks.
As a matter of fact, the brand of brick for partitions is selected according to almost the same principle, only here only one criterion is taken into account - strength.
We often see building materials designated by type: M50, M100, M150, etc. and this marking means the strength of the brick, the density of the material.
For an ordinary interior wall, it simply doesn’t make sense for us to choose a durable and dense material; here we need completely different properties of brick. Therefore, we will leave the choice of brand depending on the type of construction.
Design requirements
Cross-sectional diagram of a sub-concrete assembly.
The basic requirements for interior brick partitions are as follows: they must be reliable and durable.
The structure is constructed at the end of all stages of construction work, after the installation of absolutely all load-bearing walls and ceilings. Construction must begin after the floors and walls have completely dried.
A brick partition weighs a lot, so its installation should be done on reinforced concrete floors. The weight of the structure can be reduced by using porous or hollow bricks. Although the weight of this structure will still remain heavy, so you should not build a partition in old houses and rooms with wooden floors.
Heavy brick partitions are usually built on the ground floor of a building, where they can carry the load of a load-bearing wall.
Scheme of steel lintels.
For a partition 5 m long and 3 m high, use gas silicate or foam concrete blocks. In pools, bathrooms and living rooms where humidity is high, use red solid brick. This type of brick does not absorb moisture so much and is not subject to rapid destruction. The partitions should be free of cracks and crevices through which insects can enter.
If you have built a new house, then you should wait at least six months with the construction of interior partitions in order for the final shrinkage of the load-bearing structures of the room to occur.
Types and types of internal interior partitions
Partitions divide the house into separate rooms. The main requirements for them are efficiency, soundproofness and moisture resistance.
In an individual residential building, they are usually installed after the roofing is installed.
There are the following types of interior partitions:
- solid and frame;
- sliding and stationary.
Based on the material of manufacture, the types of internal partitions are divided as follows. Stationary solid ones are made of brick or concrete blocks. They are built similarly to walls made of these materials.
To build a partition made of foam concrete or aerated concrete, blocks of reduced thickness and low density are used.
Stationary frame partitions are made of wood (plywood) on a wooden frame, or from plasterboard sheets on a wooden or metal frame.
Sliding partitions are made to order from glass, plastic or wood. They are usually installed by the manufacturer.
Stationary glass and plastic partitions are structures attached to the floor and ceiling of the room, which are developed according to the individual specifications of the customer.
The design of partitions is determined at the project development stage and depends on the design of the floors:
- in a house with reinforced concrete floors (prefabricated and monolithic), it is allowed to use any types of partitions;
- in a house with wooden floors and floors over metal beams, frame partitions can be used.
Preparation of the solution
Brick diagram.
The reliability and durability of the constructed partitions directly depends on the quality of the prepared solution. The most commonly used cement-sand mixture. When preparing the solution, you should strictly follow the instructions and choose the correct proportions of cement, sand and water: one part cement and three parts sand, add water gradually, stirring until a creamy consistency is formed, so that the solution can be scooped up with a trowel. Take clean, river sand, without organic and clay inclusions and small stones. A solution prepared by hand will be inferior in quality to a solution made from a concrete mixer. The next step in installing a partition with your own hands is laying bricks.
Interior partition
Mix the solution. Start building interior walls with your own hands by laying a roofing felt or compensating film layer on the floor. Spread the mortar on this base and lay bricks on it in rows. Apply mortar to each brick on all sides.
Do not forget to pull the string between the adjacent walls on each row in order to build the partition strictly vertically.
Partition installation diagram.
Continue along the lace to lay out the entire row to the end. By analogy, proceed to the next row. Remember that the brick on top should cover the bottom by half. Determine the thickness of the solution by eye, from 1.0 to 1.5 cm.
After laying several rows, for strength at the junction points, drive metal pins into the adjacent walls: one end of the pin is inserted into the masonry joint, the other into the base of the wall. Every four rows of masonry, to increase the strength of the entire partition, lay a thin reinforcing mesh along the row.
Observe the tightness of the seams when joining the partition to the main wall. Brick laying is a painstaking process.
To build an internal partition, use M100 brick measuring 200x120x65 mm. In apartments, the installation of walls is usually done in half a brick. If you are building an interior floor about 3 meters long, then it is not recommended to lay more than one meter in one day. Otherwise, the wall may bend under its own weight with minor distortions. Work should be continued when the solution has set firmly, after 1-2 days.
When the construction of the partition with your own hands is completed, after some time the surface of the wall, using plaster and putty, must be carefully leveled, cleaned and sanded. The process between the finishing work and the completion of the repair will take a lot of time due to the fact that after each stage it is necessary to take breaks to consolidate the results.
Laying brick partitions is quite popular. This is not a difficult job and you can do it entirely with your own hands. In this case, the price will be significantly lower.
Today we will look at how brick partitions are made, what material to choose and how to make them. You can also look at some moments of the work in the video in this article and photos.
Preparatory work
The general construction plan indicates all partitions, their sizes, as well as methods and materials of fastening to load-bearing walls.
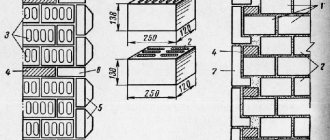
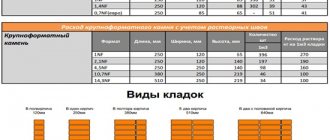
At the first stage, it is necessary to take measurements of the future partition in order to calculate the required amount of brick. The brick structure can have a thickness of 12 or 6.5 cm (the stone is placed on its edge). The dimensions of a standard brick are 250x120x65 mm; when calculating, take into account the thickness of the mortar joint, which is 12 mm.
To build a structure at a height, you will need trestles, which can be made from available materials - boards, bars. You can also make a container for mixing the solution (if you don’t have one) yourself - to do this, take a 200-liter steel barrel and cut it lengthwise with a grinder. All that remains is to place the bars for stability - and you can knead!
The solution requires high-quality sand. You can use regular one, after sifting it first. To do this, use a metal mesh; fits well with the old, “Soviet-style” bed. In addition to bricks you will need:
The partition in the brick floor must be additionally secured at the junction of the load-bearing walls.
- cement (grade not lower than M500);
- water;
- mason's hammer ("pick");
- trowel or trowel;
- reinforcing bars or fine mesh;
- dowels or metal profile for attaching a 12 cm thick brick partition to the base;
- building level, plumb line;
- rule (well-planed strip 1.5-2 m long);
- nylon cord.
If necessary, plastic additives can be purchased to add to the solution. They can prolong the “workability” of the mixture or ensure its quality at low air temperatures. The door frame is installed in advance and fixed with spacers.
What can an interior partition be made from?
The design of an internal brick partition can be quite different, it all depends on what you want to get in the end. But here you also need to choose the right material.
After all, you can make partitions from sand-lime brick, but you can also use fire-resistant material. It all depends on the type of structure.
Several factors influence the choice of material:
- If this is an apartment that does not have a solid foundation
, then it makes sense to choose a lightweight partition made of plasterboard. Moreover, plasterboard partitions look very good in any apartment and with any base. In addition, they are easy to install and do not leave much waste behind, and can be installed in a very short time. Their only drawback is their weak strength, which does not allow large mechanical loads to be applied to them. - If the house has a solid foundation
, then you can choose a reliable brick for the partitions, despite the fact that you will have to be patient a little, because there will be a lot of garbage, and you will have to spend a lot of time on such construction. - To somewhat speed up the construction of the partition, you can choose the option of using appropriate foam or aerated concrete blocks. This will be somewhat faster because the blocks are much larger in size compared to bricks.
Attention: When choosing brick or aerated concrete partitions, you must immediately pay attention to the load-bearing walls. After all, aerated concrete is much lighter than brick. Accordingly, the load will be lower.
In any case, it makes sense to familiarize yourself with the requirements of building codes. This will be useful not only for independent work, but also in case of inviting specialists.
The fire resistance limit of brick walls and partitions is quite high, so firefighters will definitely not have any complaints against you.
Brick partition
If you use solid brick, then in 1 square meter of masonry half a brick will weigh about 300 kg. It’s not difficult to calculate, a brick partition with an area of 5 square meters is 1500 kg. And if there is a weak foundation, then it is better to abandon such an idea in favor of a lighter partition made of plasterboard.
Knowing the area of the future partition, it is not difficult to calculate the amount of building materials needed using this approach:
- The area of one brick is: 13.5x7.5 cm, taking into account the thickness of the seams.
- For 20 bricks you will need about 40 kg of sand.
- 1 kg of M500 cement is required for 4 kg of sand.
- The brick partition is plastered on both sides with a layer of mortar 10 mm thick.
Interior partitions made of brick are also characterized by labor-intensive work, if we also take into account plastering work. In addition, it will turn out to be very heavy, which is not always suitable if the base is not very strong.
So:
- As for the cost of such a partition, it will be very expensive, especially since you will have to hire several craftsmen: masons for masonry and plasterers for plastering the partition. Of course, it will be somewhat cheaper if you build the partition yourself.
- The advantage of such a partition is its strength, which allows you to hang the heaviest objects on it. For conditions with high humidity, it is advisable to use red brick. This refers to premises such as bathrooms, kitchens, basements, etc.
Completing of the work.
What we pay attention to
When building brick partitions, certain rules should be followed:
- It should be borne in mind that a brick partition has an impressive weight and for its construction you need to have a reliable foundation. If there is no such foundation, then it can be prepared by pouring concrete with mandatory reinforcement.
- Brickwork requires a cement-sand mortar of appropriate thickness. If it is too thick, the result will be very thick seams, and their thickness should be in the range of 10-12 mm. If the solution is very liquid, it will simply be squeezed out of the seams, which will negatively affect the quality of the brickwork. As a rule, a cement-sand mortar is prepared as follows: 1 part of M400 cement and 1 part of water are added to 4 parts of sand. You need to be very careful with water so as not to overdo it. As a rule, water is added in small portions until the desired thickness is obtained.
- In order to more reliably connect the partition with the load-bearing wall, it is necessary to make a vertical groove up to 50 mm deep in the last wall, into which the outermost bricks of the partition are laid.
- Before installing the partition, a waterproofing and soundproofing layer consisting of a couple of layers of roofing material is laid on top of the base.
- Brickwork technology involves bandaging the seams. When laying half a brick, vertical seam dressing is used: the vertical seams of the previous row should be in the middle of the middle brick of the next row. To do this, they begin to lay bricks from either half or a whole brick. At the same time, with each row the sequence will change: if the first row began to be laid with a whole brick, then the next one - from a half, then again from a whole one, and the next one again from a half, and so on until the ceiling.
- To increase the strength of a brick partition, you can reinforce it using steel wire with a diameter of 4-6 mm. This procedure can be repeated after 4-5 rows of masonry. As practice shows, a brick partition has sufficient strength and with small wall spans, it is possible to do without reinforcement. The main thing is that the partition securely adheres to the main walls.
- Under certain conditions, especially when the ambient temperature is above +20°C, it is better to lay wet bricks. This allows you to easily adjust the brick, because it does not absorb moisture from the mortar. To do this, just wet the brick in some container.
- Since the brick partition will need to be plastered, no high demands are placed on the quality of the seams; on the contrary, such masonry is carried out with incomplete filling of the seams so that the plaster holds better.
Partitions in an apartment or house made of foam concrete
Advantages.
Light weight, a partition made of foam blocks can be placed on almost any base. It is easy to process without special tools - even an amateur can lay out a wall of complex shapes from foam blocks. The material is easy to cut with a regular saw. The large shape of the blocks speeds up the construction of partitions.
Flaws.
The material has a porous structure, and in order to hang a heavy interior element, you must use anchor bolts or through holes if the wall is small in thickness. Otherwise, the foam block will crumble and will not support even a small weight. Absorbs moisture, so this building material is unacceptable in damp areas.
Expanded clay blocks
Advantages of expanded clay blocks as a material for partitions.
Expanded clay blocks are made from “lightweight concrete”; expanded clay is used as a filler. Thanks to this source material, the blocks weigh little and retain heat well. But their load-bearing capacity is less than that of concrete and they retain heat worse than foam blocks. In most cases, these characteristics are not the main ones for interior walls, so expanded clay blocks can be an excellent material for additional partitions.
Expanded clay blocks are made in different sizes; you can choose the right ones based on the individual layout features.
Flaws.
To process expanded clay blocks, additional tools are required (angle grinder) and installation requires cement mortar.
Drywall and tongue-and-groove boards as materials for internal partitions
Tongue-and-groove boards are the same plasterboard with the addition of plasticizers, thanks to which the material receives increased mechanical properties. During the construction of walls from tongue-and-groove slabs, a frame is not needed and the connection occurs according to the “groove-toe” principle, hence the peculiar name.
A wall made of tongue-and-groove slabs is solid, does not “buzz” or vibrate during an impact or push.
For wet rooms, plasterboard and tongue-and-groove boards of special modifications are produced.
Tongue-and-groove boards are more expensive than drywall, so they are much less widespread and more difficult to buy.
Advantages.
The main advantage of this material is its minimal weight; walls can be built on any foundation. The second advantage is that the assembled wall is already ready for finishing; it can be primed, puttied and a decorative finishing coating (paint, wallpaper) applied. The third advantage is the lowest price compared to other materials. The fourth advantage is quick installation with a minimum of dirt and dust.
Flaws.
The lowest level of strength of all the materials considered is that you can hang something heavier than 5 kg on the wall. problematic. Low level of sound insulation; the problem can only be solved by using special soundproofing materials.
Let's summarize the choice of materials for interior walls
It makes sense to use brick to build partitions that will subsequently experience heavy loads and if you need to divide large areas. In other cases, this material is inconvenient, since it is expensive and labor-intensive to install.
In most cases, foam blocks or expanded clay concrete are suitable for solving standard problems. The material can withstand significant mechanical loads, retains heat well and provides sound insulation. Laying is easier and faster than brick.
For zoning and visual separation of rooms, plasterboard or tongue-and-groove boards are suitable. Fast, cheap, minimum effort.
Let's consider the features of constructing partitions from different materials.
We build a brick partition
Pay attention to the foundation; brickwork can only be built on a concrete (natural or wild stone) foundation. If the foundation is not designed to support a lot of weight, a heavy brick wall can make the entire structure unstable.
The base has been checked. We draw a chalk line on the floor along which we will lay out the first row of bricks. We make a cement mortar, it should be thick - this will simplify the laying.
In most cases, the wall should be made with 1/2 brick, that is, we place it on a wide base along the line on the floor. In rare cases, the partition is made 1 brick thick - the brick is laid on a wide base across the drawn line.
We carry out the laying in a checkerboard pattern. A partition up to a standard height ceiling can be completed in one go. The solution needs several days to harden. After this, the wall can be plastered, puttied or lathed for plasterboard or other finishing material.
Making a partition from foam concrete
We make markings on the floor where we will lay the wall. The floor surface on which we will place the first layer of foam blocks must be swept or even vacuumed, and then a primer must be applied. Such preparation is necessary, since the foam blocks are placed on a special construction mixture; you can use a mixture for ceramic tiles.
We apply a thin layer of the mixture to the floor (it is sold dry and mixed with water before use), lay the foam block and tap it with a rubber hammer. The layer of the mixture should be such a thickness that after tapping the gap between the foam blocks becomes minimal. Visually, correct masonry looks as if the blocks are standing one on top of the other without a binder mixture.
Foam blocks, like bricks, must be laid in a checkerboard pattern.
A partition made of expanded clay concrete is built according to the same rules.
We make a partition from plasterboard or tongue-and-groove slabs
The drywall is attached to the profile, so you need to install it first. The profile is usually made of galvanized metal. We fix it to the floor, then the adjacent walls and definitely the ceiling. Then you need to connect the profile on the floor with the profile on the ceiling with jumpers, the distance between the jumpers is 50 centimeters.
Sheets of plasterboard are attached using self-tapping screws, the thickness of the partition is 75 - 100 mm. Sound insulation is placed between the sheets, usually mineral wool mats.
Additional articles with useful information
A flat ceiling, ready for any finishing coating, if desired, in several levels - these characteristics apply to a plasterboard ceiling. And if you also remember that installation can be done by two people, without the involvement of specialists and without special tools, then a ceiling made of plasterboard sheets becomes a tempting idea. Read more.
By insulating the walls in any way, we kill two birds with one stone: in winter we make the temperature in the rooms higher, and in summer we do not allow it to warm up excessively. A draft-free living space is beneficial and comfortable for everyone. Initial expenses for insulation will pay off after several years of operation. Read more.
