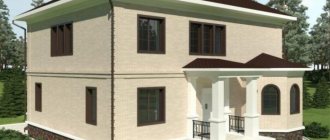
Lacquered staircase
One of the most practical materials for creating a staircase in a private house or country house is wood. It is inexpensive and quite durable, and its fragility is compensated by its ease of processing. Even a novice craftsman can make a wooden single-flight staircase with stringers to the porch with his own hands. This will save on attracting additional labor, and the result of the work will warm the soul and can become a backdrop for cozy family photos.
- How to calculate the dimensions of a staircase
- Easy to implement design options
- What needs to be done to prepare for installation
- Stages of installing a wooden staircase
- How and with what finishing treatment
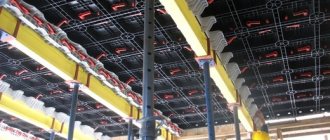
Manufacturing of formwork
How to calculate parameters
First you need to decide which way the steps will go. They can be on one, two or three sides. You determine this based on personal preferences and the finances that you can/want to allocate for construction. The height of the porch depends on the height of the plinth and should be 50-70 mm below the edge of the door leaf. This small step prevents precipitation from getting inside the house. Perhaps more importantly, it prevents the doors from becoming blocked if the porch rises up due to frost heaving (if the doors open outward).
Determining the dimensions of the upper platform
The layout of the porch begins with determining the size of the upper platform. If the doors open outward, you should be able to stand on the landing to open the doors. That is, its depth should be 30-40 cm greater than the width of the door leaf. According to GOST recommendations, the dimensions of the platform should be 1.5 times the width of the doorway. More is possible - less - undesirable - inconvenient.
Porch with a small terrace
If your doors are 80 cm wide, then the depth of the upper platform at the very minimum is 120 cm. Its width is determined based on the tastes and proportions of the house, but it should definitely be greater than the width of the doorway.
We count the number and sizes of steps
You know the height of the porch: 50-60 mm below the door leaf. The recommended height of the step (riser) is 15-20 cm. Divide the height of the porch by the height of the steps, you get the approximate number of steps. The number rarely turns out to be a whole number. The remaining centimeters can be divided between all steps or one of them can be made higher. Another option is to create a small step at the bottom, although this may be awkward.
Optimal step sizes
The optimal width of the step (tread) is 25-30 cm. Knowing the number of steps, the depth of the upper platform, the depth of the steps, you can calculate the full dimensions of the porch. Using them you can already develop the foundation for the porch.
When choosing the parameters of the steps, you must adhere to the recommendations of SNiP: the sum of the tread and double riser should be in the range of 600-640 mm. For example, you calculated that the height of the step (riser) is 17 cm, the tread (depth) is 280 mm. After performing the calculations we get: 170 mm * 2+280 mm = 620 mm. We fit into the recommended parameters, which means there is no need to change anything.
Example 1:
In the photo below, the flower bed near the porch was not built correctly, without waterproofing. The flowerbed does not have a canopy and precipitation falls into it.
From the flowerbed, moisture is absorbed into the brickwork (from which the flowerbed and porch are built). Part of the excess water from the flowerbed leaves through special tubes so that the roots of the plants do not rot.
In winter, this damp porch with a flowerbed succumbs to frost heaving and collapses. The porch with a flower bed (photo above) only stood for four years. The owner of this store with a porch completely tore off all the tiles and re-tiled it (with the same tiles and the same color), but did not eliminate the cause of the destruction!
It's only been one year and already a couple of tiles have fallen off the porch steps (photo above).
What kind of foundation is needed?
If the porch is planned to be light - wooden or metal - the foundation is most often made of piles or columns. Specifically chosen based on geological conditions. On well-draining soils with a low groundwater level, a columnar foundation is sufficient; if there is a tendency to heave, a pile foundation, possibly a TISE, is needed.
For a heavy porch - made of brick or monolithic concrete - a strip foundation or monolithic slab is made. The type of foundation is most often similar to the one on which the house is built.
Types of foundations for a porch
Next, you need to decide whether you will connect the porch foundation to the house foundation or not. Decisions are made based on the planned mass of the extension and the type of soil. Both options have disadvantages. If there is no connection, cracks often form at the junction of the porch and the house; due to frost heaving, the porch may become warped. Owners of dacha plots often face this problem - usually the porch to the dachas is made of wood and is disconnected. After the ground thaws, it may “sit” in place on its own, or it may require some additional measures.
When installing connections, it is also possible for cracks to form, but not only at the joint, but also in the “body” of the extension. This happens if the reinforced connections installed cannot compensate for the uneven load created by the house and the extension. Therefore, a connected foundation for a porch is made if it is attached to a heavy house and is itself heavy and massive, made of reinforced concrete. The second difficulty with this decision is to make the connection high-quality. To do this, use ribbed reinforcement with a diameter of 12-16 mm, for which holes are drilled in the foundation with a given diameter. Reinforcement is hammered into them and a frame for the porch is knitted on its basis.
Related article: How deep should the foundation be?
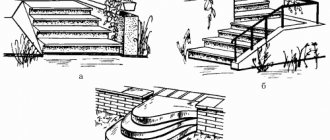
Easy to implement design options
If a simple staircase to the terrace does not require special tricks, the design of the basement or first floor should combine functionality and beauty. This can be achieved by installing railings; they are especially necessary when there are children or elderly people in the family. Photos with ready-made solutions from the albums on our website will help you get design ideas. A popular decoration option for the basement floor is a simple do-it-yourself canopy or a straight or gable canopy. It will protect from bad weather and increase the life of the wood. A canopy over the terrace, the entrance to the house and the design of the first floor windows with the same architectural elements can become part of a stylish composition, a photo of which you won’t be ashamed to show off.
Stone entrance group
Staircase designs
There are two main designs of stairs: on bowstrings and on stringers. They can be made of wood or metal. There are also combined options - metal + wooden steps or metal + concrete steps.
Staircase designs - on bowstrings and on stringers
On the bowstrings
Stairs on bowstrings are the simplest. For a porch - a good option, especially if the house is wooden or a small country house. Support bars are attached to the inside of the bowstring. If you are working with metal, the bars are welded horizontally (with a minimum slope of 1-2° to allow water to drain from the steps). In the case of wood, support bars can either be nailed to which the step will then be attached, or recesses can be cut into the bowstring (no more than 1/2 the thickness of the board), into which the step boards are inserted.
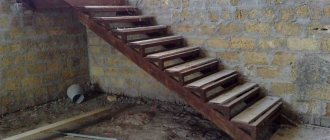
On the stringers
A staircase on stringers can also be of a simple design - with open supports. In this case, triangles are cut at the required angle in the upper part of the board. Their lower part serves as a support for the steps.
Staircase on an open stringer
When cutting the stringer, set aside the height of the step and the width of the tread. They are connected at right angles. Using the applied markings, a template is made, with which all steps are marked.
The principle of cutting stringers
The number of stringers in a staircase depends on its width and the thickness of the boards used for the steps. The thinner the board for the steps, the more often you need to install stringers. If you use 25 mm boards, then there should be a distance of no more than 50-60 cm between the two supports. If you need a larger staircase width and don’t want to install three stringers, use thicker boards. It is important that they do not bend under your feet.
The procedure for assembling stairs on stringers
If you decide to weld a ladder on stringers from metal, you will need to be patient: you will have to weld many small sections, but the formation principle is the same.
Metal staircase on stringers
Methods of fastening parts
The lower edge of the porch stairs can sometimes rest directly on the ground. This option is simple, but unreliable. Firstly, the soil may settle and the stairs will begin to collapse. Secondly, upon contact with the ground, both wood and metal are destroyed faster. There are special impregnations for wood (Senezh and Senezh Ultra, for example), and metal is well prepared with a primer and painted in several layers. However, it is better to make a base - pour a shallow tape on which the bowstrings or stringers will rest.
How to Support a Porch Staircase
There are two ways to attach a porch ladder to a reinforced concrete base - to a beam - a beam with a cross-section of at least 75 * 75 mm or to an embedded beam of a smaller cross-section (pictured on the left).
Difficulties may also arise with the installation of porch posts. There are several ways. There is one very simple and effective one that works great even on heaving soils (clays and loams). Holes 50-60 cm deep are dug under the pillars. A bucket and a half of sand is poured into them at the bottom and compacted well. Half a bucket of crushed stone is poured on top of the sand and compacted too. They put up a pole, level it, put spacers that will hold it in a given position. The space between the wall of the hole and the pillar is gradually filled with crushed stone, tamping it thoroughly. The hole is filled flush with the ground, the top can be concreted (so that precipitation does not drain), but not spilled to the very bottom. Pillars installed in this way do not lead even with severe heaving. A significant part of the water goes into the sand, and the remaining forces of frost heaving are absorbed by the rubble, neutralizing them.
Methods for attaching pillars to a concrete base
If piles, a strip foundation or a monolithic slab are poured under the pillars of the porch, or a columnar base is laid, then studs or special glasses are walled into the concrete to secure the wooden posts. After the concrete has matured, the rack bars are attached to them with wood grouse or bolts.
If the racks are metal, a corner with a wall thickness of at least 3-4 mm is placed in the concrete so that it can be easily welded to it later.
When building a wooden porch with your own hands, questions may arise about attaching the railings and balusters. They can be assembled using ordinary nails, but if desired, you can use bolts or wood grouse. In this case, holes are pre-drilled, then fasteners are installed in them and tightened using an angle wrench. Such a connection is certainly more reliable than simply using nails.
How to attach railings or balusters
If the porch is attached to a freshly cut wooden house, in which the shrinkage has not yet been completed, and the design of the porch provides for a canopy, the posts must be attached to special adjustable plates.
Installation of porch posts with the ability to compensate for the shrinkage of a wooden house
Related article: Do-it-yourself finishing of balconies and loggias
All racks supporting the canopy over the porch of a wooden house are placed on special adjustable elevators
Please note that both the metal and wood that you will use to build the porch require careful processing. The porch is exposed to all climatic influences and the materials require good protection.
Monolithic concrete stairs
The most durable stairs are made of monolithic concrete. They take longer to manufacture than metal or wood ones, but their service life is calculated in decades. The types of concrete stairs are described in detail in the video. The basics of calculation are also given.
How to make a concrete staircase on stringers with your own hands, see the following video.
Wooden porch
A wooden porch is one of the most common options in our country. Wood is plastic, easy to process, costs relatively little (in our country), and forgives many mistakes. That is why it is a favorite building material.
It also has disadvantages: it requires good protection before construction begins (antibacterial impregnations and fire retardants), as well as regular maintenance - updating the protective paint coating. Then it looks attractive for a long time, otherwise it quickly loses its decorative effect.
One of the options for building a wooden porch with a ladder on bowstrings can be seen in the video. Please note that the porch is being built on sandy soil, so the method used to install the pillars is not suitable for everyone. Everything else is clear.
Brick porch
Since brick is a dense and heavy material, a brick porch requires a serious foundation. Usually this is a monolithic slab, with double reinforcement and it is better if it is larger in size than the planned porch.
When calculating the parameters of the steps, it is necessary to take into account the dimensions of the brick and the thickness of the seam between them. Then the laying work will be easier - no need to cut the brick. If you are not going to cover the porch, use high-quality material for the outer rows. The inner rows - backfilling - can be made from scrap or building blocks and their remains.
Brick porch with wooden steps
If the house is on a high base, making a monolithic brick porch is too expensive. Then the columns or walls are folded, leaving empty space inside. It can then be used for household purposes or covered with decorative panels. If an upper platform is needed, these columns/walls are covered from above with a concrete slab - homemade or ready-made - this is your choice. Then a staircase is attached to the resulting base. It doesn't have to be brick. It can be metal, concrete or a combination.
Basics you need to know
In order to build a porch from any material, it is necessary to take into account several rules and design features, without which it is almost impossible to make such a structure. After all, we are talking not just about steps that you need to climb somewhere, but about the beauty of the facade and the exterior as a whole. Therefore, before you start working, you need to complete a short training course.
What does the staircase consist of?
Basic elements for assembling a staircase: bowstrings, stringers, steps
When open, similar parts are encountered in both wood and metal versions. For concrete, they are also needed, only there it already looks like a monolithic structure, so an inexperienced person may get the impression that there are no bowstrings or stringers there at all, but this is not entirely true.
Main elements of the staircase:
- A bowstring is an element that most often comes in pairs on the same structure and consists of two inclined boards, to the inner parts of which steps are attached. The only exceptions are those cases when the steps are adjacent to the house on one side and lie on the stringer, but on the other side rest against the bowstring.
- Kosour - can be single, double, triple and so on. The element performs the same functions as the bowstring, only it is made in the form of a comb and steps are placed on top of it. In wooden stairs, including those for the porch, such parts are mounted together with bowstrings.
- Steps - usually consist of two elements, where the horizontal part is called a “tread” and the vertical part is called a “riser”. Sometimes there are no risers.
Basic parameters of the stairs and landing
Wooden porch on a columnar foundation - simple and beautiful design
When creating any construction projects, four criteria are taken into account as a basis: strength, safety and beauty, and the porch cannot be an exception to the rule. First of all, this is a staircase that leads directly to the porch, that is, to the platform, and this applies to the height and width of the steps, as well as the width of the span.
There are certain geometric parameters for treads and risers
In order not to feel discomfort when climbing onto the porch, you should take into account some parameters for the steps of the stairs, which are calculated taking into account the calm average step of a person, which is 60-65 cm. By the way, I looked on the Internet and found out that my step should be calculated according to formula and can be from 40 cm to a meter! Can you imagine a man with meter-long strides calmly walking down the street?
So, we calculate the width of the tread and the height of the riser, where the latter value is multiplied by 2, and the result should be the length of a quiet step for a person of average height. But we should not forget that a safe tread must provide full support for the human foot, at least 2/3:
B+2H=60-65 cm
Let's say the width of the tread is 26 cm, and the height of the riser is 18 cm, then:
26+2*18=62 cm
The hypotenuse (string) is calculated using the Pythagorean theorem
Now you can calculate the length of the bowstring and/or stringer (hypotenuse), using for this purpose the Pythagorean theorem, which everyone studied at school, but if anyone has forgotten, let me remind you that it is: a2 + b2 = c2. In this case, we will conditionally take the height of the porch to be 0.9 m (so that there are fewer fractions). This height will require 5 steps (0.9/0.18=5), which means the reach length will be 5*0.26=1.3 m. We know the legs, which means;
c2= a2 + b2=0.92+1.32= √2.5= 1.58113883008≈1.6 m
As you can see, we didn’t get an exact figure, but this is always the case during construction, and I hope you understood the essence.
Before proceeding directly to the installation, I would like to note one more nuance: railings and fences. Of course, if the ascent is no more than one or two steps, then railings are not needed, and in such cases fences are not always installed. Since the times of the USSR, GOST 25772-83 has been in force, which states that the height of fences for balconies should be at least 80 cm. In fact, this parameter can also be used for the porch, although if made lower, it will simply be inconvenient. If it is intended that the structure will be used by small children, then the step of the balusters (including on the stairs) should not exceed 10 cm so that the child does not fall out.
Photo report: wooden porch on a metal frame
A theory is just a theory, and in construction too. You always understand the essence of the matter better if you observe the process yourself, because you can see how others do it and learn something for yourself.
At the request of the parents, an exact copy of the old porch was made. The only difference is that the new one has a welded metal frame.
This is an old porch
In place of the demolished porch, a pit with a depth of 25 cm was dug. Sand was poured and compacted into layers at the bottom, crushed stone was placed on it - 10 cm each. A metal mesh with a mesh of 10 cm was laid on top and the whole thing was filled with concrete.
Porch slab
A metal frame was welded according to the previous dimensions of the porch (from a 70*5 mm corner). The sidewalls are set vertically and secured with studs. Next, the base for the benches is welded to them. All metal is treated with a rust converter, primed and painted twice.
We weld, prime and paint the base for the benches
The wood used for construction was dry. Planed boards were cut to size (the width of the porch) and treated with impregnation for direct contact with the ground.
Wood dries after impregnation
We lay the dried boards on the frame. You have to drill a hole for each fastener - you can’t just take a corner.
The boarding of the porch has begun
At this stage, two mistakes were made at once. The first is that the sheathing did not start from the sides. They immediately began laying the steps. As a result, water constantly flows into the joints of the side paneling and steps and warps the wood. It is necessary to start the cladding from the sides, and make the steps a little longer so that they protrude beyond the side cladding by at least a couple of centimeters. The second mistake is that the boards on the porch are laid close to each other. With high humidity they swell and the surface becomes uneven. When laying porch sheathing, make gaps of at least 5-8 mm.
Sheathing process
After all the boards are secured, they are sanded. First, with a belt sander with a coarse grain, then with a disk sander with a fine grain. The process is long. At the same time, the task of removing the green color of the impregnation is being solved. It is not covered even by three layers of tint.
Sanding the surface of the boards for an acceptable smoothness
After sanding, we begin painting. We apply it three times. Each layer after the previous one has completely dried. The resulting color is dark mahogany.
Related article: Textiles in the living room interior: recommendations for choosing
Wooden parts are coated with a protective compound
That's already three layers of paint
While the paint dries completely, we begin making the benches. We cut boards for them, grind down an oblique chamfer (for beauty), and cover them with impregnation.
Boards for benches
We make the backs with a small decor - roundings at the edges.
We mark beauty according to the template
We saw along the marked lines with a jigsaw, then sanded to a smooth edge.
This is how the bench on the porch turned out
The sides are covered with plywood, which was painted the same color. The porch is ready.
Do-it-yourself finished wooden porch - side view
Stages of installation work
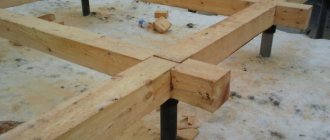
- Land works. It is necessary to dig a pit for a shallow foundation of the required dimensions.
- Level the bottom of the pit.
- We make a sand-crushed stone base.
- We install wooden formwork.
- We knit the reinforcement frame
- We fill the structure with concrete.
Concrete can be factory-made or hand-made. To make concrete yourself you will need:
- sand;
- cement;
- crushed stone;
- water.
All components are taken of a certain brand and fraction, as well as in a certain percentage relative to each other. First you need to mix all the dry substances, and then add water and mix everything thoroughly again.
After you have poured the factory or your own concrete, you need to get rid of the voids. To do this, ideally take a vibrator and walk it over the entire area of concrete. If you don’t want to spend money on buying a device, then take a hoe and get rid of excess air in the concrete.
When you are sure that the concrete has no voids, you need to cover it with film. The film protects concrete from atmospheric influences on it. Ideally, concrete will gain the required strength only after 28 days. 7 days are enough for the porch, after which we remove the film and formwork.
To avoid chipping, you can press a small equal angle corner into the end of the steps. This procedure must be done before the concrete hardens.
If desired, the steps can be finished with special floor tiles that have a rough surface.
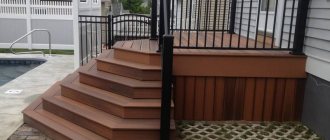
The railings can be made from metal corners or wooden ones, which is still best.
Now you know how to make a concrete porch yourself.
DIY brick and concrete porch: photo
The walls of the staircase landing were pre-built from brick, on top of which a monolithic concrete slab was poured. Along the edge, a frame of corners is embedded into it so that the stairs and railings can be welded.
Porch plan: how everything should look
Finished brick base with concrete slab
From a corner 70*70*5 mm we cut blanks of the required length. After which we treat them with a rust converter. We start cooking after the reaction has stopped and the metal has dried.
Cut the metal to the required length
Treated with rust converter
We welded the first metal string.
First string welded
The finished sidewall was attached to the concrete base with two pins.
Attaching to a concrete support support
We cook the second string in the same way and secure it. When working, make sure that the two bowstrings are in the same plane.
Two bowstrings and a level, the feast of which controlled the plane
We begin to weld the support bars. Here it is important to constantly monitor the horizontality so that the steps are not oblique.
The first frame for the top step is ready
We weld all the supporting pieces onto the bowstrings
We weld transverse pieces of the corner to the support bars to form a shelf.
The cross members are almost welded
The corners are welded so that they form a frame. We put a piece of slate sheet in it. We lay out a reinforcing metal mesh on the slate. We weld the edges of the mesh to the frame.
Steps ready for pouring concrete
We pour concrete into the prepared steps. We make it high-quality so that the steps do not wear out longer.
The steps are filled with concrete
While the concrete gains strength, we begin to work on the posts that will support the canopy over the porch. For them we take a profiled pipe 70*40*3 mm. We cut four columns from it. Two are slightly longer - they will be near the wall of the house, two are 15 cm shorter - they stand on the outer edge of the porch, creating the necessary slope - so that the water and snow melt off normally. For railings and crossbars we use profiled pipe 40*40 mm.
Canopy and Porch Railing Parts
All metal is also treated with a rust converter.
First we set up the racks, grab them, install temporary stops
To avoid lateral stresses, it is important to position the racks strictly vertically. We set them up, grab them, use short seams in several places, and check again whether they are positioned correctly. We weld the temporary stops and only after the next check we weld them according to all the rules.
Clamps make work easier
Once all the posts are aligned and welded, you can assemble the railings. At the required height they are fixed strictly horizontally.
Railings are welded horizontally
This is what it looks like from the outside
Then we proceed to install the roof. We also cook it from a 40*40 mm profile pipe. First, strapping around the perimeter - at the level of the shorter posts, then - the rest of the structure. It's not complicated, but it takes a lot of time - a lot of intersections.
Rafter system for canopy over porch
Then it was time to do the railings and decorations. And again, there are no difficulties, it can be done easily if desired.
We improve the railings
That's it, the porch is ready for finishing work. Rough tiles for outdoor use were purchased for the steps and landing. The sidewall of the monolithic slab was also trimmed with it.
The tiles for the steps were red-brown to match the color of the brick
The metal was painted with paint that matched the tone, and the corrugated sheeting left over from the installation of the roof was used on the roof. The DIY porch turned out pretty good.
Ready
Example 2:
The photo below shows the same thing, a porch with a flowerbed without waterproofing. It didn't last long either.
No amount of super glue or mesh will hold the tiles so that they do not come off the base!
How to make a flower bed correctly? Nothing complicated. It is necessary to remove the access of moisture to the “body” of the porch. In other words, it is necessary not only to cut off the porch and flower bed from the moisture of groundwater from below.
It is imperative to make the flowerbed bowl airtight. That is, so that moisture from the flowerbed cannot get (absorb) into the walls and bottom of the flowerbed.
Waterproofing in a flower bed can be done using paintable waterproofing (coat with primer) and glue aquaizol on top using a gas torch.
If you waterproof a flowerbed using only paint (primer) or solid waterproofing (special mixtures), then moisture will enter the walls and bottom of the flowerbed through the natural deformation of the flowerbed or micro cracks.
Ideally, waterproofing in a flower bed should be elastic and airtight.
.
Example 3:
For the normal existence of plants in a flowerbed, it is also necessary to drain excess water from the flowerbed, like a hole in the bottom of a pot, so that the roots of the plants do not rot and so that it does not break in the winter. See photo below:
.