Korovin Sergey Dmitrievich
Master of Architecture, graduated from Samara State University of Architecture and Civil Engineering. 11 years of experience in design and construction.
Before starting excavation work when constructing the foundations of a building, it is necessary to prepare the site. To do this, you need to know how to correctly mark the foundation for a private house with your own hands. The drawing or sketch must be transferred to the area and this must be done with high accuracy in order to avoid problems during further construction.
Why is markup needed?
Many non-professional builders do not understand the importance of preparatory work. Below are the problems that may arise if the markup is done incorrectly or if it is completely neglected:
- violation of the geometric dimensions of the building;
- inaccuracies in angular dimensions;
- improper operation of load-bearing structures due to deviation of foundations and walls from the design;
- When using prefabricated floors, their elements, manufactured according to design values, may not fit the existing dimensions, which will lead to additional financial and labor costs.
Marking the contour of the foundation for the house allows you to position the supporting structures in strict accordance with the decision made.
The location of the future walls of the building and the size of the premises depend on the location of the foundations.
What is the verification of a pile foundation according to the first group of limit states?
Structural requirements of the standards for the placement of piles and the designation of grillage sizes.
Pile foundations, depending on the current loads, should be designed in the form of:
a) single piles - for free-standing supports;
b) pile belts - under the walls of buildings and structures when transferring loads distributed along the length to the foundation with piles arranged in one, two or more rows;
c) pile bushes - under columns with piles arranged in plan on an area of square, rectangular, trapezoidal and other shapes;
d) continuous pile field - for heavy structures with piles located under the entire structure and united by a continuous grillage, the base of which is placed on the ground (concrete preparation);
d) pile-slab foundation.
8.2 Depending on the design of the building, strip grillages, glass-type grillages and slab grillages are used.
8.3 Tape grillages are used, as a rule, for buildings with load-bearing walls. The width of the grillage depends on the number of piles in the cross section and on the width of the load-bearing wall.
The value of the overhang of the grillage from the face of the piles should be taken into account the permissible deviations of the piles.
The height of the grillage is determined by calculation in accordance with SP 63.13330. The grillage is designed as a reinforced concrete multi-span beam. The grillage is reinforced with spatial reinforcement cages, usually from class A-III (A400) reinforcement. For the grillage, as a rule, concrete of strength class B > 15 is used. The grillage is laid using concrete preparation of class B7.5.
8.4 Glass-type grillages, consisting of a slab part and a kneecap - glass part, are used in buildings with a prefabricated reinforced concrete frame.
The dimensions of the grillage in plan should be taken as multiples of 30 cm, and in height - 15 cm. The structural height of the grillage is set to be 40 cm greater than the depth of the glass. The grillage is designed for bending (slab part, glass part) and punching (punching of a column and corner pile) in accordance with the requirements of SP 63.13330. The grillage is reinforced with flat meshes (slab part) and spatial frames (glass walls).
8.5 For heavy buildings and structures, as a rule, large-sized slab grillages are used. In this case, the height of the slab grillage is determined based on the possibility of it absorbing transverse forces (based on punching calculations).
Slab grillages are reinforced with upper and lower meshes of reinforcement, which are laid on supporting frames. Large slab grillages are made from concrete laid on a concrete preparation.
8.6 When developing a project for pile foundations, the following data must be taken into account: the structural diagram of the building or structure being designed; dimensions of supporting structures and the material from which they are designed; the presence and dimensions of nearby buried rooms of a building or structure and their foundations; loads on the foundation from building structures; placement of technological equipment and loads transmitted from it to building structures and floors, as well as requirements for maximum settlements and rolls of building structures and foundations for equipment.
8.7 The number of piles in the foundation and their dimensions should be determined based on the condition of maximum use of the strength of the material of the piles and foundation soils at the design load allowed on the pile, taking into account the permissible overloads of the outermost piles in the foundation in accordance with the requirements of 7.1.11.
The choice of design and dimensions of piles should be made taking into account the values and direction of loads on the foundations, as well as the construction technology of the building and structure.
When placing piles in the plan, it is necessary to strive for the minimum number of them in pile bushes or the maximum possible pitch of piles in strips, achieving the greatest use of the load-bearing capacity of the piles adopted in the project.
8.8 The connection between the pile cap and the piles may be either freely supported or rigid.
The free support of the grillage on the piles should be taken into account in the calculations conditionally as a hinged connection and with monolithic grillages it should be done by embedding the head of the pile into the grillage to a depth of 5-10 cm.
Rigid coupling of the pile grillage with the piles should be provided in the case when:
a) pile trunks are located in soft soils (loose sands, clayey soils of fluid consistency, silt, peat, etc.);
b) at the junction, the compressive load transmitted to the pile is applied to it with an eccentricity extending beyond the core of its section;
c) horizontal loads act on the pile, the displacement values from which, when freely supported, turn out to be more than the maximum for the designed building or structure:
d) the foundation contains inclined or vertical composite piles;
e) piles operate under pull-out loads.
8.9 Rigid connection of reinforced concrete piles with a monolithic reinforced concrete grillage should be provided by embedding the head of the pile into the grillage to a depth corresponding to the length of the reinforcement anchorage, or with embedding of reinforcement outlets into the grillage to the length of their anchorage in accordance with the requirements of SP 63.13330. For rigid embedding, a non-prestressed reinforcement cage must be provided at the head of prestressed piles, which is subsequently used as anchor reinforcement.
Rigid coupling by welding embedded steel elements is also allowed, provided that the required strength is ensured.
Notes
Anchoring of the grillage and piles subject to pull-out loads must be provided with embedding of the pile reinforcement into the grillage to a depth determined by the pull-out calculation.
When strengthening the bases of existing foundations with the help of drilled injection piles, the length of embedding of piles in the foundation should be taken by calculation or assigned structurally equal to five diameters of the pile (if it is impossible to fulfill this condition, provision should be made for creating a widening of the pile shaft at the point where it adjoins the grillage).
When rigidly embedding piles by inserting their shaft into a grillage, the latter must be designed for punching, taking into account the design solution of such embedding.
A rigid connection of piles with a prefabricated grillage should be ensured using bell-shaped heads. With a prefabricated grillage, it is also possible to embed piles into holes specially provided in the grillage.
Piles in a bush of an eccentrically loaded foundation should be placed in such a way that the resultant of the constant loads acting on the foundation passes as close as possible to the center of gravity of the pile plan.
To absorb vertical loads and moments, as well as horizontal loads (depending on their value and direction), it is allowed to provide a combination of vertical, inclined and gantry piles.
The distance between the axes of suspended driven and pressed piles must be at least 3 d
(where
d
is the diameter of the round or the side of the square, or the larger side of the rectangular cross-section of the pile shaft), and rack piles - at least 1.5
d
.
The clear distance between the shafts of drilled piles, cast-in-place piles and shell piles, as well as between the boreholes of pillar piles must be at least 1.0 m, and the distance between drilled injection piles in the axes must be at least three of their diameters; the clear distance between the widenings when installing them in hard and semi-solid clay soils is 0.5 m, in other dispersed soils - 1.0 m.
The distance between inclined or between inclined and vertical piles at the level of the grillage base should be taken based on the design features of the foundations and ensuring their reliability of penetration into the ground, reinforcement and concreting of the grillage.
The choice of pile length should be made depending on the soil conditions of the construction site, the level of the grillage base, taking into account the capabilities of the available equipment for constructing pile foundations. The lower end of the piles, as a rule, should be buried in strong soils, cutting through weaker soil layers, while the penetration of driven piles into soils taken as the base should be: in coarse, gravelly, coarse sandy and clayey soils with a fluidity index IL
£0.1 - at least 0.5 m, and in other dispersed soils - at least 1.0 m. Supporting the lower ends of the piles on loose sand and clayey soils of fluid consistency is not allowed.
In the design of foundations made of drilled and cast-in-place piles, as a rule, control static tests of piles should be provided.
The depth of the base of the pile grillage should be determined depending on the design solutions of the underground part of the building or structure (presence of a basement, technical underground) and the site planning project (cutting or filling), as well as the height of the grillage determined by calculation.
When building on heaving soils, it is necessary to take measures to prevent or reduce the influence of the forces of frost heaving of the soil on the pile grillage.
What is the verification of a pile foundation according to the first group of limit states?
Checking the pile foundation for the first group of limit states
A final check of the pile foundation is carried out for bearing capacity according to condition (6.3). All piles in a row are subject to inspection for possible operational load combinations.
The design load on the pile is determined by the formula
where ∑NIi, ∑MIi are respectively the calculated vertical loads and moments of all forces relative to the center of gravity of the grillage base, kN, kNm from load combinations;
n – number of piles in the grillage;
ymax – distance in the direction of the moment to the axis of the most distant pile from the center of gravity of the pile field, m;
yi – the same, to the axis of each pile, m.
When checking the condition N ≤ F′d, one should achieve a load-bearing capacity reserve of no more than 20%, i.e.
(F′d – N)/F′d ≤ 0.20.
Required Tools
In order for the marking for the foundation to be accurate and quick to complete, it is necessary to stock up on the following instruments and materials:
Tools for marking foundations
- a tape measure with a long measuring tape (ideally equal to or greater than the length of the longest wall of the house);
- wooden pegs or reinforcing bars (the choice depends on the available materials and the density of the foundation soil);
- construction square (has angles of 30,60 and 90 degrees);
- durable cord;
- wooden slats;
- clips, clothespins or nails for securing the cord to the pegs;
- construction level (you can buy an inexpensive bubble level; a laser level will make the work much easier, but is expensive).
If possible, you can also use a level, but purchasing it for the construction of one building is impractical. You also need to have scissors for cutting the cord, a hammer for driving nails, and a calculator for making the necessary calculations.
Beginning of work
As a general method, marking the strip foundation can be cited. Removal of tape or individual supports (pillars, piles) to the area. The difference is insignificant. The easiest way is to mark the ground for a slab foundation. Here it is enough to indicate the corners and sides of the slab.
They begin preparing the site for construction by finding the first point. It can serve as any corner of the house. For strip and other types of foundations, you will need to find the outer side of the corner. When making drawings or sketches, it is recommended to link the object under construction to existing ones or to the boundaries of the site.
Having determined the first point, you need to construct a right angle. The easiest way to do this is using the “Egyptian Triangle” method. First you need to mark a corner with a short side length using a construction square. Next, a value divisible by 3 is set aside in one direction (it is convenient to set aside 3 or 6 meters, such a large length will reduce the measurement error), and in the other direction, divisible by 4 (if in the previous case 3 meters were set aside, then the side length should be taken as 4 meters, and if 6 meters, then – 8).
Then check that the angle corresponds to 90 degrees. To do this, you need to measure the distance between the ends of the postponed segments along the shortest path. If segments of 3 and 4 meters were used, then the length of the diagonal should be 5 meters. If the segments were 6 and 8 meters, then the diagonal, if the angle is even, will be 10 meters. If the values do not match, it is necessary to align the angle until it meets the condition.
To perform the work correctly, it is also necessary to clearly understand the design of the markings.
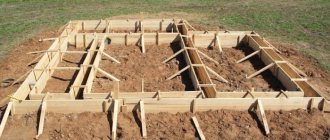
The marking or casting consists of wooden pegs and slats nailed to them. This design is created only along the outer contour of the strip foundation.
The internal boundaries of the outer tape and the internal walls are marked with a cord, which is nailed to the cast-off. External castings made of wood can be made either continuous or with breaks.
After finding the first corner, work on marking a strip foundation of a simple rectangular section is carried out in the following order:
The process of applying markings under the base
- Finding the second and third points by plotting the lengths of the walls. Constructing 90ᵒ angles from these points and checking them. At every point, milestones are forgotten.
- Finding the last fourth point and completing the building outline. Checking the angle.
- Checking diagonals. They must correspond to the drawing. If the house, as in the case under consideration, is rectangular in plan, the diagonals should be equal. The same rule applies to a square.
- Driving pegs around the outer perimeter, pulling the cord.
- Nailing horizontal slats to pegs. This should be done approximately at the middle of the height of the vertical post or along its upper edge.
- Next, mark the internal contour. To do this, step back from the outside by the width of the foundation and also mark it using pegs and a cord (slat).
- Checking internal angles and diagonals.
- Marking internal walls and checking the angles of their connection with external ones.
After marking is completed, the top layer of fertile soil is removed from the area under the house and a trench is dug. When installing a strip foundation for a building with a basement, instead of a trench, it is necessary to make a foundation pit. In this case, the construction of the internal part of the marking is not required before the start of soil development. The cord for marking the internal boundary is pulled out after excavation work, attaching it to the external slats at the required distance.
Problems with the foundation of the house. Concrete foundations
There may also be problems with shallow and deep concrete foundations. In the case of a deep foundation, it is necessary to carefully approach the issue of drainage and continuous waterproofing, otherwise the basement may flood. A shallow foundation should be built, taking into account the forces of frost heaving; be sure to provide drainage, remove water from the house, insulate the base and make a warm blind area.
In addition, with these types of foundations, as with monolithic-slab foundations, the following problems may arise:
- Using low-quality concrete mortar;
- Absence or poor quality of reinforcement ties;
- Defects during mortar pouring, insufficient compaction of the base.
Problems with a monolithic house foundation are generally similar to the types described above:
- Rusty, low-quality fittings;
- Poor base preparation. You need to compact the backfill of sand and crushed stone with a vibrating plate! If the workers do not have it, the base may not be dense enough;
- Violation of the technology for preparing the solution or working with ready-made concrete solution;
- Long breaks in work without proper preservation of the base and pouring concrete in winter without observing the necessary technologies;
- Insufficient insulation or refusal to do so.
As we can see, most of the problems with the foundation of a house are related to the human factor, lack of necessary knowledge, builder mistakes, neglect of the requirements of DBN, GOST and technological standards. What could all this lead to?
How to find out if the foundation of your house is not reliable enough:
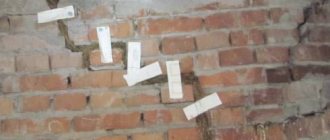
- The roof of the panel house began to leak at the location of the pillars. The repair did not help, the next year everything happened again. Most likely, the foundation is simply “walking”, therefore, the seams of the panel house are coming apart;
- Cracks appeared in the corners of the stone house. You need to find out whether this is a serious problem or a minor defect. Methods for studying cracks have long been known - at least paper beacons;
- In a wooden house or “frame”, the doors and windows began to warp; they open and close poorly.
In your own home, foundation problems are easier to identify. What if we are talking about buying a finished home? We advise you to pay attention to the following points:
- The distortion of windows and doors can be determined already during the first inspection. Just, open them, slam them, make sure everything is in order;
- Check the groundwater level. It is enough to dig a hole up to a meter deep near the house. Filled with water - trouble. True, to make sure of this, you will have to come to inspect the house and site again, at least in a couple of days. Yes, and the owner may be against the fact that you manage his property like this;
- A small hole dug directly next to the foundation will allow you to determine whether the building has a sand cushion. Yes - excellent, it means the builders followed the installation technology;
- If the house is on screw piles, gain access to them and knock: there is no “emptiness” sound, which means they are filled with concrete inside, everything is done correctly;
- Be sure to go down to the basement, there should be no mold, water on the walls, or stains on the concrete;
- It is worth walking around the house with a building level to make sure there are no distortions;
- An ordinary tennis ball will help to check the evenness of a monolithic foundation: if in every room of the house it quickly rolls down in the same direction, it means that the shrinkage has been uneven, there is a distortion that, unfortunately, cannot be eliminated;
- Of course, the foundation on concrete must be free of cracks and fallen, collapsed bricks. However, if the house itself is already old, and the foundation has clearly just been repaired, it means that the owners were trying to hide the existing defects. And it’s not a fact that they did it efficiently, because the house is still for sale.
We suggest you familiarize yourself with Green potatoes, what to do
General rules for any foundation
Select a starting point.
The first side of our foundation needs to be tied to some object on our site.
Example.
Let's make sure that our foundation (house) is parallel to one of the sides of the fence. Therefore, we stretch the first string equidistant from this side of the fence to the distance we need.
Construction of a right angle (90⁰). As an example, we will consider a rectangular foundation in which all angles are as close as possible to 90⁰.
There are several ways to do this. We will look at 2 main ones. © www.gvozdem.ru
Method 1. Golden triangle rule
To construct a right angle we will use the Pythagorean theorem.
Formula
In order not to go deep into geometry, let's try to describe it more simply. So that between two segments a
and
b
to make an angle of 90⁰, you need to add the lengths of these segments and derive the root of this sum. The resulting number will be the length of our diagonal connecting our segments. It is very easy to do the calculation using a calculator.
Usually, when marking the foundation, the dimensions of the sides are taken so that when taken from the root, a whole number is obtained. Example: 3x4x5; 6x8x10.
If you have a tape measure, then in general there will be no problems if you take segments that are different from those in common use. For example: 3x3x4.24; 2x2x2.83; 4x6x7.21
If we made measurements in meters, then the values turn out to be very clear: 4m24cm; 2m83cm; 7m21cm.
Calculator
It is also worth noting that measurements can be made in any length measurement system; the main thing is to use the aspect ratio we know: 3x4x5 meters, 3x4x5 centimeters, etc. That is, even if you don’t have a tool for measuring the length, you can take, for example, a rod (the length of the rod does not matter) and measure it with it (3 slats x 4 slats x 5 slats).
Now let's see how to put this into practice.
Home inspection before purchasing, or What the seller won’t tell you
Having decided to become summer residents, but not wanting to engage in long-term and labor-intensive construction, many decide to buy a country house - unfinished, finished or old. We will leave it to the specialists to determine the cost of the cottages put up for sale.
Let's talk about the technical aspects of the issue. About those that you must ensure are in satisfactory condition before making a “historical” purchase. Then the price can be discussed. At least you will have arguments to knock it down or agree with its validity.
Many people decide to buy a ready-made country house
Before starting the inspection, I suggest checking the area you like for the presence (or rather, absence) of low-flying aircraft. Their noise can significantly spoil the patriarchal charm of dacha life.
To do this, it is absolutely not necessary to go to the site. It’s easier to study the current air situation on the website at different times of the day. There you will find tracks of silvery beauties anywhere in the world, including the plot of land you choose.
We invite you to familiarize yourself with Sloe jam: 8 recipes
I am writing this because I know of a case where future owners were invited to evaluate the merits of a dacha near a well-known air hub near Moscow strictly during a “lull.”
I don’t want such a car flying over the dacha every minute. When going out to get acquainted with a construction site, arm yourself with:
- plumb,
- water level,
- measuring tape,
- camera.
Without measuring instruments, it makes no sense to go for an examination (photo - STYRO) And if today everyone always has the latter with them (in their phone), then the remaining items still need to be looked for. You can select the necessary tools in our catalog, which contains offers from many large online stores.
Let's start the examination with the foundation and ground floor. The main condition is proper waterproofing. If it is poorly installed or made of low-quality materials, over time the walls will get wet, mold, smudges, etc. will appear on them.
Moreover, due to freezing in the cold season, walls can collapse, and aggressive substances penetrating into them with water can cause corrosion of metal fittings. This foundation still needs to be hydro- and thermally insulated (photo by V.V.
Chernomashentseva) Usually, with moist soils, the entire structure “below zero” is covered with bitumen-containing roll materials - hydroglass insulation, glass elastomer or rubitex - using special mastics. The panels are glued with a large vertical and horizontal overlap, at least two layers.
During an external inspection of the base, it is necessary to check for the presence of vents, possible cracks, and exposed fittings. It wouldn’t be a bad idea to simply use a nail to pick at the concrete base.
Basement
If you went into the basement and saw freshly plastered walls, this should seriously alert you. Such a “fresh” condition most likely indicates the presence of leaks.
Along the way, find out the depth of groundwater.
When inspecting basement walls, pay special attention to the pipe entry and exit points. Usually they are made in tubular sleeves and are stamped using a special technological cord.
When in contact with moisture, it increases in size, thereby isolating the passage of communications. It makes sense to check the presence and condition of this cord.
In modern designs, special plastic couplings are used instead.
Modern input of communications into the basement of the cottage
If you remember to take a plumb line with you, check the verticality of all corner joints of the basement walls. Here, in the basement, measure the original area of the building site and compare it with that stated in the offer.
Undoubtedly, the best insulation for the floor and walls of the basement is extruded polystyrene foam. It is completely waterproof, quite strong and durable, it has low thermal conductivity and almost zero capillary suction.
Plates made of extruded polystyrene foam are easy to install; their tongue-and-groove edges make it easy to join elements together, and the back rough surface firmly adheres to concrete and plaster mortars.
Installation of polystyrene foam insulation
The best way to prevent flooding of basements and foundations is to create a drainage system around the perimeter of the building, as well as a blind area that protects the underground part of the house from rain flows from the roof.
The blind area is made with a slope away from the house. You can check it using the supplied water level.
If you find that the blind area is insulated with sheets of extruded polystyrene foam, it means that you are on the right track and before you is a worthy building structure that commands professional respect.
A drainage system is installed along the edge of the blind area - water intake grates, drainage channels, storm water inlets. Finding such a system in the house under study is a great and rare success.
Instructions for marking a rectangular foundation
Method 1. Rules of the golden triangle (i.e. Pythagoras)
Let's look at the example of building a rectangular foundation with dimensions 6x8m using the golden triangle (so-called Pythagoras).
1. Mark the first side of the foundation. This is the easiest part in constructing our rectangle. The main thing to remember. If we want our foundation (house) to be parallel to one of the sides of the fence or other object on the site or beyond, then we make the first line of our foundation equidistant from the object we have chosen. We described this procedure above. To place the first string, you can use pegs firmly fixed in the ground, but ideally, use cast-offs for this purpose. We will use it. We will make the distance between the cast-offs for this side 14 m: between the cast-offs and future corners, 3 m and 8 m under the foundation.
2. Pull the second string as perpendicular to the first as possible. In practice, it is difficult to pull it perfectly perpendicular, so in the figure we also showed it slightly deflected.
Marking for the foundation of the house
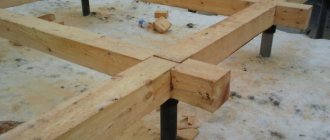
Marking for a columnar foundation
We make a two-tier cast-off. The lower tier is the level of the pillars.
The upper tier of cast-off is the level of the grillage.
Marking for strip foundation
Create a rectangle for the outer contour using the so-called Pythagoras. Then we retreat by an amount equal to the width of the tape and make an internal contour.
Marking for slab foundation
The easiest way to mark. We build a rectangle according to the dimensions of the foundation using the Pythagorean theorem to find the right angle. © www.gvozdem.ru
From the author
In this article, we looked at how to make markings for the foundation with your own hands by building a rectangle with angles of 90⁰. In general, there is nothing complicated about the markup. The price of the issue is the cost of twine, boards for casting (an economical option is pegs) and the ability to use a tape measure.
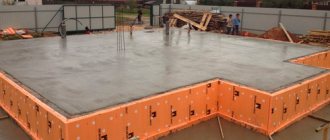
Work on building a foundation for a house begins with site preparation, including cleaning and leveling the surface. The prepared area should have a flat horizontal surface. If possible, you should get rid of the slope, and then begin marking the future supporting structure.
Visual determination of strength
During a careful inspection of the structure, it is possible to determine the presence of shortcomings in different types of foundations: strip, monolithic and pile.
It is advisable to carry out the check in the spring, after the base has gone through a freezing and thawing cycle.
When visually identifying, special attention is paid to:
- soil failures around the foundation;
- the presence of a large number of cracks;
- salt deposits;
- significant porosity of the concrete pad.
Binding
Before you start digging trenches or a pit, drilling wells or digging holes for a columnar foundation, you need to determine which object or structure located in the yard will become the starting point for marking. This procedure is the binding of the supporting structure of the future house. In most cases, such a structure becomes a fence, parallel to which the walls of the building will be erected, but it is possible to tie it to a tree or even a concrete column, from which a right corner of the building is marked. This binding will ensure correct markings, absolute horizontality of the base and stability of the structure.
Site marking
The selected constant point is the so-called altitude zero. The construction of a foundation for a rectangular building begins with constructing a right angle using a level or a building square. However, many builders trust more in the Egyptian triangle, whose sides are equal to 4, 5 and 3 units. If the sides are 3 and 4 units long, then the side 5 units long is the hypotenuse.
Accordingly, a right angle is formed between the legs. The top of the corner will become the place where the first peg will be driven in for the upcoming marking. You can make an Egyptian triangle with your own hands. You will need 12 meters of durable, non-elastic cord, on which you need to make marks, measuring 3 and 4 meters respectively.
On one side, parallel to the fence or other structure of the line, fix the end of the cord. The 3 meter mark is attached at the point of intersection of the lines forming an angle. On the adjacent side, a part of the cord is attached, on which there is a 4-meter mark. The attachment point for the second end of the rope can be determined by aligning the ends of the cord to form a triangle. In this case, the angle formed at the intersection of the marking lines will be right.
When marking a foundation of a complex geometric shape, it must first be divided into several rectangles, and only after that carry out the marking using the Egyptian triangle.
Chip-off method
The most common and informative way to assess the strength level of a concrete structure. Verification process:
- Drill a hole in the foundation.
- The anchor is fixed using a special device.
- Tear off the fastening and measure the force and depth of the funnel at the point of impact of the device.
In order to obtain correct data, you need to repeat the method at least three times, recalculating the results.
A competent examination of the foundation in various ways helps to examine the structures of the underground part before the construction, reconstruction or major repair of a building, and also guarantees a long service life for the building.
Foundation diagonal
Another way to do this is to use the Pythagorean theorem. Knowing the length and width of the future building and having determined the place where the first corner of the foundation will be located, you can drive a peg in this place. Having pulled the cord in the desired direction, mark the base line under one of the walls. A cord is pulled perpendicular to the resulting line, the length of which is equal to the length of the second side of the foundation. You can check the presence of a right angle by using the formula, which, knowing the lengths of the legs, calculates the length of the hypotenuse.
This is how the first diagonal is calculated. If the supporting structure has the shape of a rectangle, all steps must be repeated, taking the end of the cord, which is used to mark the length or width of the base, as the vertex of the second corner. Having received two diagonals, you can make sure that all measurements and work were carried out correctly. How accurately the calculations and measurements are made can be checked using a laser level. This device will allow you to create the desired design, without errors.
On any site, regardless of the presence of a slope, soil quality and other features, the most accurate way to make a foundation, ensuring the stability of the building, is to create a right angle using the Pythagorean theorem. Other tools and methods are considered auxiliary.
You should not calm down by making sure that the length of all diagonals is the same, because they are equal in a trapezoid. This means that checking right angles is a must.
Watch the video on how to check whether the diagonals are aligned correctly.
How to check the quality of the foundation?
How to check the quality of the foundation? Sometimes a situation arises when you simply need to check the foundation. This question is very responsible and important. After all, the correctness of the assessment determines whether you will have problems in the future or whether they will be minimized.
So, the first step is a visual inspection. The presence of cracks in the walls, floor, or some incomprehensible deviations indicates that the foundation of the house is damaged. Streaks on the basement walls or salt deposits on the foundation walls indicate damaged waterproofing or no waterproofing at all. And problems are inevitable.
If a superficial inspection does not lead to any results, the concrete is tested for compression. For these purposes, a specialist with a Schmidt hammer is invited. He will be able to determine the compression ratio.
Next, check the cross-sectional size of the foundation: the stiffer the foundation is, and the less capable it is of bending from various uneven loads, the larger its reinforced concrete, monolithic part. The area of the base should also be taken into account. More area means less pressure on the ground. The next stage is to determine the quality of the materials used to build the foundation. It should be remembered that the minimum grade of concrete for the foundation is 200, and preferably 400. If foam concrete was used, then for grade 600 foam concrete, the thickness of the walls should be at least 45 cm, for foam concrete grade 800 at least 68 cm, and grade 1000 at least 94 cm It is worth checking the waterproofing, since if it is missing, the foundation will absorb moisture from the soil, and this is fraught with consequences.
An alternative is to let the foundation overwinter, in which case all the shortcomings will come to light: both the heaving of the soil and the foundation itself will show themselves in the freeze-thaw cycle. If the foundation is columnar, then you yourself will not be able to determine anything. Here you will have to call specialists to carry out an examination; by the way, here in parallel it will be possible to conduct a study: flaw detection of concrete floors for the presence of voids. For a slab foundation, almost the same actions: visual inspection, presence - absence of cracking, strength check, compliance with geometric dimensions, compliance with horizontal slab.
In cases of the slightest doubt about the integrity or defects of the foundation, do not be stingy, call specialists for an examination. Because if you made a mistake in assessing the foundation, the costs will continue to increase. Do you need it?