Sliding gates began to be used in private construction not so long ago. This popularity is due to practicality of use. You can purchase ready-made structures and order installation. Apart from the complexity of the mechanisms, installation can be done independently. Before you make sliding gates with your own hands, you need to familiarize yourself with some recommendations. Compliance with them will make the structure strong, reliable, and durable. In addition to reliability and practicality, the gates have an attractive appearance. A factor that plays an important role when choosing such structures.
Main characteristics of sliding gates
The recoil type has its disadvantages and advantages. It is necessary to familiarize yourself with such points in advance so that you can make the right decision. The main advantages include the following points:
- In confined spaces, they open and close quietly without creating any interference. The console type makes it possible to significantly save space.
- The cantilever mechanism requires the presence of a lower fastening - this is a guarantee that the structure can be used regardless of climatic conditions.
- Various materials are used as finishing materials - profiled sheets, forging, polycarbonate, vertical lathing. This makes it possible to combine them with fencing or other buildings.
- By performing the installation correctly, you can prevent such a phenomenon as sagging, which is more common in swing structures.
- They are often equipped with different types of automation to open and close remotely.
In addition to the huge number of positive qualities, you need to remember the not very pleasant moments that you need to be aware of. The first thing to raise doubts is the fairly high cost. Comparing a conventional swing structure with a sliding one, for the second option you will have to pay 20 percent more. Along the fence, you need to remove bushes, as well as other obstacles that may interfere with free movement. It is also worth noting the fact that to equip the console part, you need to additionally make a foundation. This will make the structure quite reliable and stable.
DIY sliding gates - installation
You can purchase ready-made sliding gates - in this case, you do not have to cook the base/frame yourself, sew it up with finishing material and wait until the foundation is completely dry. But you can also make a sliding gate leaf with your own hands - this will not require significant financial costs, and the drying time of the foundation will pass unnoticed. Moreover, even a person with minimal experience in the welding process can handle the work of manufacturing a sliding gate frame and finishing it with decorative material.
The frame is made from metal pipes, angles and channels - they can even be purchased at a scrap metal collection point, which will be practical and profitable.
Do not forget to purchase fittings that will operate the entire sliding gate mechanism.
Step-by-step instructions for making a sliding gate frame:
- We prepare the material - metal parts need to be cleaned of rust and scale - for this we use a grinder. Be sure to use safety glasses when working - small particles of rust and scale can get into your eyes and damage them. The last stage of preparatory work is degreasing the surface of metal fragments, which is performed using a solvent.
Please note: experts recommend priming the metal at the stage of preparing materials. Many people ignore this point, but after assembling the frame, it will be difficult to carefully prime the surface of the elements at the points of their connection.
- Let's start welding the supporting frame. In principle, there are no standards when choosing a profiled pipe - here you need to proceed from your capabilities: some purchase new material, some use the services of scrap metal collection points. First, we weld the supporting frame of the sliding gate, then weld the sheathing - it will give the frame strength.
Please note: if you plan to sew up the gate on one side using thick material, then the inner pipe must be moved to the edge of the frame. If you plan to sheathe the frame on both sides, then the same pipe should be located in the middle.
- After making the frame, you need to weld the carrier from a set of fittings that was purchased in advance. Please note that both the guide and the pipes must be welded to the frame in a checkerboard pattern, the tacks must be at least 20 mm and located at a distance of 25 cm. Only by following these rules can you be sure of the strength of the entire sliding gate frame; it will not “lead” even with prolonged and aggressive use.
It is recommended to weld the frame with a “jib” - this will ensure resistance to wind loads.
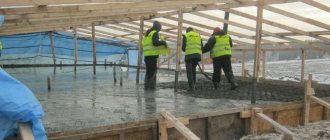
After welding work, you need to clean all welding seams and paint the finished structure. Moreover, experts recommend using alkyd paint for this - yes, it is not cheap, but before applying it there is no need to carry out preparatory work and the quality of the coating will be at the highest level.
Now you need to sew up the frame with any decorative material - it can be a profiled sheet, boards. The sheathing material is attached to the frame using self-tapping screws, and if you use a screwdriver or drill to carry out the work, the process will go quickly and without problems.
Types of departure gates
- Retractables are a separate group that has its own subgroups, which have distinctive features; they are very important to consider when choosing the type of structure.
- Suspended - this type has been very popular since Soviet times. This type involves hanging the canvas from a beam located in the upper part. The disadvantages include the fact that the beam above the passage is a kind of limiter for tall cars.
- Cantilever structures can rightfully be called an ideal option for Russia, taking into account the climatic conditions. It does not imply the location of the beam at the top of the structure. Even the heaviest snow drift will not interfere with movement. Roller trolleys are used for fastening. To secure it, you will have to equip a sufficiently strong foundation. It is equipped on the side of the opening.
- On screw piles. This option involves installing a metal pile to a depth of at least 1500 mm. This element is a kind of load-bearing part.
- Mechanical opening and closing is done manually. It is much easier to install such a structure, and the cost is also lower. It is advisable to use such a design only when they are used extremely rarely.
- Automatic options are the opposite of manual ones. Opening and closing is carried out using a special device. An excellent solution for a private home.
Choice of basis
As with building a house, soil characteristics play an important role when choosing the type of foundation. If the soils are not mobile, a frame-monolithic foundation for the gate is suitable.
In areas where groundwater rises high, it is recommended to use a pile foundation. It is also recommended to use on loams and heaving soils. It can be monolithic or screw. Monolithic, you can clearly do it by filling the pillars yourself. Then place the channel on pillars connected by a reinforced concrete groove.
You can also use screw piles here. Their simple design allows you to install everything in one day, which is the advantage. There will be no need to wait until the foundation for the gate dries, and you can immediately begin further work. Also, such a foundation can be easily constructed in the winter season. And in terms of costs, pile foundation is a very economical option.
Nevertheless, the most used foundation option is considered to be a monolithic frame foundation. This can withstand considerable weight of the structure without being subject to deformation or shifts. But how to make a base for sliding gates with your own hands.
Advantages of the cantilever design of sliding gates
Among the existing options, the console type is very popular. This is due to the fact that the design features have a fairly large number of undeniable advantages over other options. Among the positive aspects it is worth highlighting the following:
- The console type does not provide for equipment with lower or upper restrictions on dimensions. This allows them to be installed even in areas where large vehicles move.
- Weather conditions, even the heaviest snowfalls will not interfere with movement. This is due to the fact that the canvas is located above the surface of the earth - 10 centimeters.
- The mechanism is protected and is completely located inside the beam, which is the key to long service.
- The powerful base and suspended canvas are very well thought out in terms of design, thanks to which the structure can withstand even significant wind loads.
- It is better to equip the console type with an automatic drive. You can even control the movement of the mechanism remotely without leaving the car.
There are several negative aspects that it is better to be aware of before starting installation. It is difficult to install it yourself, due to the rather complex design. Therefore, it is worth studying the intricacies of the work in advance to prevent the possibility of shortcomings. To install such a structure along the fence, you will need to clear the area of other structures or vegetation.
Studying the area for installing sliding gates
Having no financial restrictions, and having a great desire to do them yourself, situations may arise when this is simply impossible. This is due to several reasons.
- The space through which the canvas moves along the fence must be cleared by at least 1.5 times the width of the gate. This is due to the fact that the canvas must be taken into account with the technological part, which can be quite large in size. They are due to the fact that the load from the gate is thus distributed specifically to the cantilever block.
- The canvas moves only in a straight line, which is why the area for its movement should not have any unevenness.
- The gate should be located on the side opposite to opening. Otherwise, movement will become difficult or simply impossible. An option is to make a gate in the canvas itself; in this case, the thresholds will be quite high. This will be especially inconvenient for older people or those who have physical limitations.
- If entry is from a narrow alley, then it is recommended to widen the opening a little, and therefore increase the width of the roadway itself. Everything will lead to the need to strengthen the foundation of the cantilever structure.
Considering the subtleties, you can do the work yourself, and they will serve for a long time. It is important to remember to perform protective painting using special paints and varnishes. Such processing must be carried out for all elements.
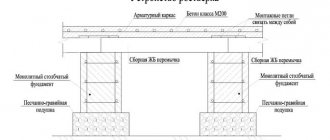
Features of this type of foundation
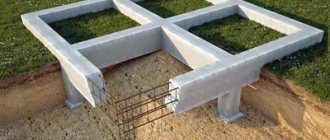
Foundation reinforcement diagram
will help you do everything correctly, drawings of the product and correctly selected building materials. First, you need to prepare the area where the work will be carried out and draw up a diagram. If you make mistakes during work, this can lead to the destruction of the structure and its bending. The fence must be concreted in the following sequence:
- Clearing the required area of any obstacles and debris that could interfere with concreting.
- Making a drawing of a gate with a foundation.
- Digging a hole for the foundation.
- Welding of necessary parts and their installation.
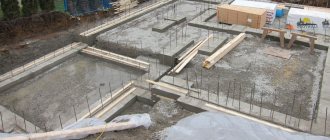
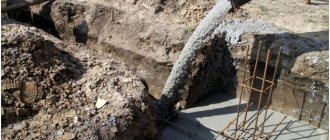
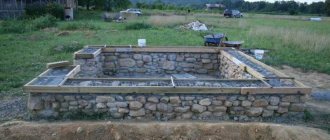
It is quite possible to make a foundation for sliding gates with your own hands. It is important to consider that the depth of pouring the foundation depends on the size of the parts that will be installed above. The trench must be at least 1.2 m deep, sometimes up to 2 meters.
Section reinforcement
Depending on the type of gate, a different foundation for the gate is laid. The following types of design are distinguished:
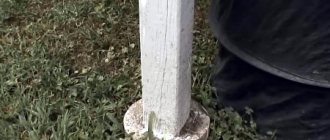
- Swing. They are used everywhere and are the simplest option. The basis for them is 2 pillars, which are mounted along the edges of the gate, the 3rd pillar is responsible for setting the length of the gate. These posts are usually concreted.
- Sliding. They can be of several varieties. Each requires the installation of a different type of base. They differ: Sliding ones, which move along the rail.
Sliding gate devices
- Hanging. A special plate is installed along which part of the gate moves. They will open no wider than the established length of the profile on which the structure is fixed.
- Console. The gate parts are attached to a beam that will move along the fence.
The foundation for the gate can be of the following types:
- A single piece of canvas that is poured along the entire fence. First, you need to dig a trench about 1.3 m deep and about half a meter wide. It is important to take into account the depth of freezing of the ground in order to make the foundation below this level. Reinforcing mesh is placed in the pit, after which everything is concreted.
Example of a solid foundation
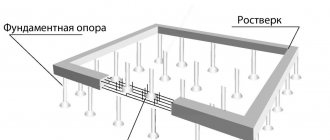
- Pile type of base: reinforced posts are fixed in the ground. The channel will connect the parts of the gate supports.
- Screw supports. There is no need for concreting or digging up the ground. The piles are simply treated with an anti-corrosion compound and driven into the ground.
Preparatory work
Before the preparatory stage, it is recommended to evaluate the installation site as a whole. If a cantilever structure is installed instead of the old one, it is first necessary to assess the condition of the supporting elements. You can use old supports only if they are made of brickwork or reinforced concrete with a cross-section of at least 20*20 or a profile metal pipe 60*40 centimeters. It is very important to maintain verticality, and the pillars had a very good foundation. If these conditions are not met, the supports must be removed by constructing new ones in accordance with all the rules.
Near the main supporting element, you need to make room for a hole for laying the foundation. It will be located close to the post, running parallel to the fence. Such a strip foundation will have dimensions of 50 cm * 2 meters.
It is recommended to install a gate and also install a new fence if the condition of the old one is not entirely satisfactory or it is planned to replace it in the near future. By performing work at the same time, you can immediately complete some work without repeating it later.
If you plan to build brick supports at the entrance, you should immediately take care of the embedded elements. Steel plates 100*100 mm and 5 mm thick are used as mortgages. Three plates must be used per support post. The top plate should be located on the inside close to the very edge. You will need to retreat 20 centimeters from the top, the lower mortgage is located in this way, and you should also retreat 20 centimeters from the zero mark. The middle mortgage is located strictly in the center between the top and bottom. A part of the cantilever gate will later be attached to them.
It is recommended to take into account that when constructing the passage width, the size is 4 meters. Hardware manufacturers most often produce components taking into account 4 meters. If you do all the work yourself, you should purchase ready-made kits of fittings.
At the preparatory stage, it is also worth deciding what kind of canvas. The weight of the product, as well as the subsequent selection of all components, will depend on this. It’s also worth making a detailed drawing with specifications before you go shopping for the necessary elements. Everyone has the opportunity to do this kind of work on their own, or you can use ready-made solutions and find them on the Internet. Such a detailed diagram will allow you to calculate as accurately as possible the amount of material needed, significantly saving your budget on waste.
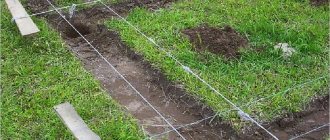
Performing markup
The first thing marking begins with is determining the location of the supporting elements. After they are mounted, you can begin subsequent work on applying markings. The first is to determine the zero level. It should be taken as the level of the ground surface exactly at the opening. The mark is made on one pole, the mark is transferred to the second support using a laser level. With its help you can get the most accurate result.
It is necessary to stretch the construction thread or fishing line according to the marks. It is recommended to extend such a cord further than the support by two meters where the gate leaf will move. It is important to control the horizontal plane of the stretched line; how they open and close will depend on this.
Making a foundation for sliding gates
The supporting element to which the roller units will be attached is channel No. 20, 2 meters long. To construct the foundation, you need to dig a trench adjacent to the pillar. Its dimensions are 2.1 meters * 50 centimeters. The depth directly depends on the level of soil freezing; each region has its own indicators; more often they make a trench 1.5 meters deep.
To make a reinforced frame, reinforcement No. 16 is used. you need to prepare three frames with a cross-section of 150 mm and a length of 1.4 meters. For cross bars, you can use reinforcement of a smaller diameter. The prepared frames must be welded to the bottom of the channel.
The most important condition is that the channel must be applied end-to-end to the supporting pole. This arrangement provides maximum strength and reliability. Also, the upper part of the channel should be located at the zero mark.
Sliding gate leaf
Before welding the exit gate, it is worth assessing your strength in welding. If experience is not enough, it is recommended to contact specialists. The structure itself is quite large in size, so before manufacturing it will be necessary to prepare the work site. The main frame is made from a profile pipe with a cross-section of 60*40 mm. The load-bearing support, represented by a beam, is welded to the gate and must have a length of 6 meters. The fittings that will be attached to the canvas are either domestically produced or imported. When purchasing components, the most important point to pay attention to is the weight of the canvas. The standard set of components offered in stores consists of:
- Guide beam 6 meters long, section 71*60*3.5 mm;
- Two roller bearings;
- End roller;
- Lower and upper catcher for the end roller mechanism;
- Guide device;
- Two plugs for the beam.
The connection of metal parts must be done by welding. If there are pockets of corrosion on the profile pipe, it is recommended to clean them using a special attachment on an angle grinder. When assembling the frame, it is important to ensure that all dimensions and angles are accurate. The guide beam will be welded to the bottom of the blade. It is recommended to treat the finished frame with a primer and then paint it with a special coating, this will prevent corrosion. It is recommended to paint the surface with a compressor. This technology allows you to get the highest quality results.
Sliding gates - operating principle and design
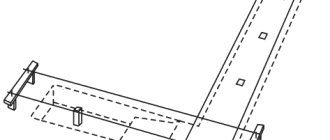
The principle of operation of the gate: the gate moves on two roller trolleys mounted on a concrete channel. The upper rollers provide protection against falls and distortion. In the closed state, to relieve the load on the roller supports, an end roller is installed on the guide, which slides into the lower catcher when the gate is closed. The upper catcher is installed to more reliably fix the gate in the closed state. The full size of the gate is 150% of the opening width, that is, if our opening is 4 m, then the full width of the gate leaf will be 6 m and, accordingly, the space for rollback should be at least 6 m. Perhaps this is the main disadvantage of this type of gate and if there is not enough place, it is worth considering other options.
Sliding gate diagram with main elements
Installation of sliding gates
Installation of the cantilever structure can begin only after one week has passed after the completion of concrete work. Installation work can be divided into several stages:
- It is necessary to place the roller carriages on the prepared mounting plate. Using it you need to make the height the same.
- The mounting plates are marked on the base. You need to retreat 150 mm from the edge of the channel and draw a perpendicular line.
- Before placing the second support, you need to measure the length of the gate and subtract 100 mm from it. The distance that will be obtained must be set aside from the vertical pillar to the channel.
- If the brick pillars have sufficient strength, the anchors can be fixed directly into them. Otherwise, you will need to equip an additional fastening element, represented by a profile pipe with a cross-section of 40*40*2 mm. It is attached directly to the supporting part.
- Roller carriages must be placed in the supporting beam and moved immediately to the middle. After checking all the planes, you can grab the parts using a welding machine.
- The necessary correction work is carried out using studs on the installation sites.
It will not be possible to make cantilever structures cheaply, since all the components are quite expensive. You can only save money if you do the installation yourself. To do this, it is best to take a ready-made project and carry out work on it. Thus, the installation will be carried out as accurately as possible and in compliance with all rules and regulations. Sketches and projects can be found on the Internet. Sliding gates are very popular today, which is justified by their convenient and practical design.
Preparing to lay the foundation
Before you start creating a special foundation for sliding gates, you need to select the place where the trench will be dug. It should be remembered that the size calculation must be made in advance.
Experts recommend laying the base of the foundation 300 mm more than the freezing point of the soil. According to calculations, a structure for pouring concrete is installed in the dug hole.
Using U-shaped channels made of metal, strong reinforcing bars are inserted into them, which ensure the reliability and strength of the base fill. The installation of the entire embedded structure must have tight contact between the side flanges of the channel and the post.
The upper structural element is located perpendicular to the line of the opening. When all the calculations have been made, the installation of the embedded structure has been carried out correctly, then liquid concrete is poured into the prepared niche. At the next stage, the sliding gates are installed according to the prepared diagram.