Carrying out construction and installation work when facing a building with brick requires certain knowledge and skills. The task of correctly covering the walls of an old house using finishing bricks is no exception. If brick laying is in most cases trusted to professionals, then the owner of the building can prepare the foundation for facing bricks.
The width of the foundation for facing bricks must be 25-30 cm, and its laying must be no less than the depth of the soil at which it begins to freeze.
To avoid mistakes that could cause premature destruction of the cladding, knowledge of the general procedure and some of the subtleties of carrying out work on the correct installation of the foundation will help. Proper laying of the foundation for the cladding, taking into account all the loads, is the key to high-quality execution of the cladding itself.
Requirements for the foundation and choice of its type
When measurements have been taken of the walls of the house that require cladding, the amount of brick has been calculated, and the brick itself has been selected and brought to the work site, you can calculate the total load that will affect the additional foundation.
It should be borne in mind that we are talking about a ready-made building, during the construction of which brick finishing was not planned, therefore there is no room for brick on the existing foundation of an already built house. In addition, when calculating the main foundation of the house, the additional load that the brick would give was not taken into account. The values of this load are large.
Scheme of the wall of a house made of ceramic blocks: 1 – facing brick; 2 – ventilation slot; 3 – thermal insulation 100 mm thick; 4 – ceramic blocks; 5 – plaster.
This is explained simply: with an increase in the area of the wall intended for lining, the total weight of the brick used increases, that is, the load on the foundation of the house. For example, for 1 sq. m of masonry requires a little more than 50 pieces of finishing bricks weighing from 1.7 kg to 6 kg (depending on the type and modification), then the total load of one wall is only 15 sq. m. m will range from 1250 kg to 4580 kg per foundation. And this does not take into account the mortar on which the brick is laid.
The best option for a foundation for brick cladding is considered to be a monolithic strip foundation. It holds the load well and is quite simple to implement.
Schematically, the work comes down to expanding the foundation, so the newly cast part should form a single whole with the existing one.
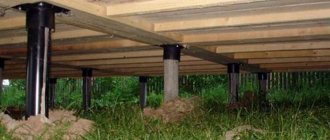
Sometimes a columnar foundation with a reinforced concrete monolithic grillage is installed, which is something like a pile structure. Its use is justified when the soil is loose or marshy. Unlike a strip monolithic foundation, when constructing such a foundation it is almost impossible to do without the use of construction equipment, since a reinforced concrete grillage or sometimes metal beams used as it have enormous weight.
Scheme of the device of a strip monolithic foundation.
Taking into account the above, in the vast majority of cases of brick cladding of private buildings, a monolithic strip foundation is installed. Another advantage of this choice: it is easy to “connect” with the main foundation of the house, regardless of its type. In rare cases, when the house stands on a rubble, brick or sand and gravel foundation, the installation of a monolithic concrete belt will strengthen the entire foundation of the building.
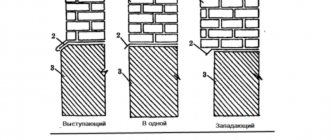
The simplest option is when the cladding is planned during the construction of the house. In this case, the foundation is laid immediately of the required width. The calculation is made as follows: the width of the load-bearing wall plus the gap for the insulation (if there is a need for it, then 10-15 cm) plus the air gap (3-5 cm), plus the size of the facing brick (12 cm), that is, there should remain directly under the cladding minimum 15 cm.
In some cases, building codes allow the cladding to protrude beyond the foundation by a third of the width of the brick, that is, 4 cm, but this will have to be taken into account when laying the brick - more attention will need to be paid to the connection of the cladding with the old wall.
In private construction, foundation loads are calculated in isolated cases. Usually the consideration that it is better to give a margin of safety prevails. Therefore, you can omit the exact calculation of the additional width of the foundation for the brick and take it equal to 30 cm. In a narrower space, it is also more difficult to arrange high-quality reinforcement.
Strengthening the foundation of a private house
Very often, owners of country houses are interested in strengthening the foundation - no wonder, because everyone wants to be confident in the reliability and durability of their home.
Carrying out work to strengthen foundations is a whole story, the outcome of which depends on theoretical knowledge and practical experience.
But don’t be afraid, strengthening the foundation of a private house can be done with your own hands, of course, if you are not faced with a situation where it is easier to build a new house than to repair an old one.
The conclusion that suggests itself: first eliminate the reasons that cause changes in the foundation (its destruction) and natural violations of the integrity of the house built on it. Let's look at the most common reasons:
- the foundation was initially built in violation of technology. In this case, it is definitely necessary to strengthen it;
- changes in the foundation of the house are associated with increased soil moisture. In this situation, much attention is paid to the blind area of the foundation; if necessary, drainage of the foundation is arranged. We will talk about the latter solution in one of the following articles;
- The site chosen for construction has a heterogeneous soil composition, which leads to local deformations of the foundation of the house. As an effective solution, a set of measures is used, including strengthening and insulating the foundation, drainage, and, if possible, replacing part of the unstable soil with crushed stone and sand.
Preparing the necessary tools and materials
Tools used in laying foundations and walls: 1 – trowel; 2 and 3 – jointing; 4 – shovel; 5 – tamping; 6 – hammer-pick; 7 – plumb line; 8 – roulette; 9 – meter; 10 – square; 11 – level.
Before you begin work on the foundation, you need to deliver tools, equipment and prepared materials to the construction site. It is understood that the brick itself has already been purchased and delivered.
The following tools should be at hand:
- bayonet and shovel shovels;
- tamping;
- building level;
- Master OK;
- grinder or hacksaw;
- container for mixing the solution;
- sledgehammer;
- construction hammer;
- pegs and twine;
- roulette.
Materials that must be delivered to the construction site in sufficient quantities:
- fittings with a diameter of at least 12 mm;
- cement;
- sand;
- gravel or other foundation filler;
- boards for formwork;
- wire for tying reinforcement;
- polyethylene film;
- roofing felt
Cladding works
Having certain skills in working with bricks, you can cladding the house yourself. Moreover, facing bricks are made with more careful adherence to dimensions than ordinary building bricks.
Since it is desirable for a house lined with brick to be not only aesthetically pleasing, but also warm, various insulation materials are used for this purpose. The best option is sheet mineral insulation. It is produced in various thicknesses and is easy to install. The insulation sheets are attached to anchors appropriately located in the wall, which are driven into the wall every meter and every sixth row of brick. This could be wire cut into pieces. Its length should be enough for reliable fastening in the wall (5 - 8 cm), a layer of insulation (10 cm) and laying in the facing masonry, that is, about 30 cm. Also, the insulation sheets should be pressed with mounting dowels and umbrellas (5 pieces per 1 m. sq.). The anchors provide additional strength and stability to the façade wall.
Preparing the site for the foundation
Marking is being done. Using a tape measure, string and pegs, the width of the trench is marked, taking into account the fact that formwork will have to be placed in it, that is, 15-20 cm should be added to the width of the future foundation. The distance from the wall of the house to the outer edge of the trench should be at least 50 cm. According Pegs are installed in the corners, and a string is stretched between them.
If there are blind areas, paths or other finishing coverings under the walls of the house, they will have to be dismantled before marking the trench.
A trench is dug to the depth of the foundation, to its base. It is allowed not to open the entire foundation, limiting it to a depth of at least 50 cm. If the entire structure is being prepared for facing bricks, and not a separate wall of the house, work is carried out simultaneously along the entire perimeter.
Scheme of the design of a shallow foundation of a house.
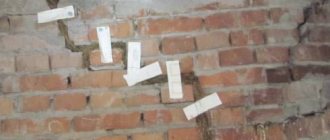
Having descended into the prepared trench, it is necessary to mark the anchors on the old foundation, approximately 10 cm from its top. The distance between them is about 50 cm. It should be noted that the larger the wall area for cladding and the smaller the diameter of the reinforcement used, the more frequent the location of the holes.
According to the markings, holes are drilled with a depth of 10 cm (if there is a concrete foundation) or 15-20 cm (if there is a brick or rubble foundation) with a slight slope relative to the horizontal of 15-20 degrees. Making a slope down or up is not important, so they often proceed from convenience (it’s easier to drill from above than from below, bending over in a trench). It is advisable to perform this operation using a construction hammer.
Sections of reinforcement (30 cm blanks, pre-cut) are driven into prepared holes so that they protrude 15 centimeters from the foundation of the house at a predetermined angle. It is these pieces of reinforcement that will serve as rigid connections between the two foundations.
The trench is cleared of what has been poured into it, compacted, leveled horizontally using a level laid on a flat board or metal strip at least 1 m long. A cushion of sand or fine gravel is poured in a layer of 10-20 cm, moistened, and compacted.
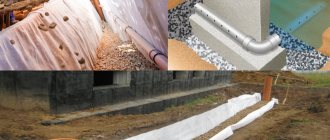
A layer of waterproofing is laid. This can be a polyethylene film in several layers or a cement screed. The purpose of waterproofing at this stage is to prevent water from leaving the concrete into the ground during hardening. If you use a screed, you will have to wait a day or two for it to set.
How to increase the foundation in height, width, depth - the nuances of performing the work
There are several situations that require changing the shape or size of the underground part of the house.
How to build a foundation depends on the landscape surrounding the object, the goal set, the variant of the problem that has arisen and the correctness of the initial structure.
The extension is carried out in height or width, reliably connecting two structural elements together using reinforcement. In exceptional cases, the foundation of the house is deepened, but such work is too dangerous, labor-intensive and requires considerable financial investment.
Reasons for building up the foundation
The motive for strengthening the underground structure of a building can be:
- desire to add a second floor;
- initial error in design calculations of the foundation;
- weak soils with insufficient bearing capacity;
- gross violations of technology during the construction of the foundation of the house;
- significant increase in permanent loads;
- partial destruction due to accidental damage during operation;
- planned repairs;
- the need to construct a basement, boiler room, ground floor, etc.
A new part is added to the existing foundation after a thorough examination of the first part and selection of the most effective method of performing the work. It is necessary to understand that the process will be complex and painstaking, and therefore you should prepare for it thoroughly. But you should not postpone repairs indefinitely, since the problem will not disappear by itself, but will only get worse over time. To avoid unforeseen situations, it is recommended to use the services of professionals.
When purchasing a plot with a built foundation, a detailed inspection of the structure will be required to determine the depth of the foundation and the presence of high-quality waterproofing.
Methods for building a foundation
There are three main options for structural strengthening of the underground part of the house:
Connecting two foundations together using the first method is quite simple, but only if there are no walls. If the house has already been built, then to increase its height it will have to be raised, which from a technical point of view is not always feasible. In any case, formwork panels are attached to the existing foundation on both sides.
For reliability, they are supported by wooden or metal stakes and fastened together with transverse bars. Next, the reinforcement is laid. It will need to be connected to anchor outlets installed in the old foundation. Concrete mixture is poured into the prepared formwork.
In this way the basement part of the building is raised.
The foundation section is often reinforced with profile metal beams of the appropriate size. The decision is made individually, based on specific conditions.
Extending the foundation from the side
The technology for expanding the underground part of the house involves the construction of a monolithic reinforced concrete shell on one, two or three sides of the existing foundation. The structure is exposed to the depth of its foundation and a thorough inspection of the base is carried out along the entire reinforced perimeter. Mandatory compaction of the soil under the newly poured foundation walls will be required, as well as the installation of a crushed stone-sand cushion.
In order for the loads to be redistributed, it will certainly be necessary to connect the two foundations with each other using reinforcing bars. Otherwise, the issue of expansion will not be resolved. In old masonry or monolithic tape, holes are drilled into which metal rods are driven. They are welded to the reinforcing mesh of the building part of the foundation. This approach will ensure a reliable connection between the new and old underground structure of the building.
For better adhesion of the existing foundation to the concrete solution being poured, it is necessary to make notches on the smooth surface and then clean it of dust.
At the next stage, the formwork is installed with an indentation from the foundation wall to the thickness of the expandable zone. To construct the box, ready-made boards or boards are used.
To prevent them from moving apart when pouring the concrete mixture, two clamping strips are placed on the outer sides, as well as struts and spacers.
To obtain a smooth side surface of a monolithic stone, it is recommended to spread a thick polyethylene film on the inside of the formwork. It is fixed to the boards using a construction stapler.
Before concrete is poured, existing foundation surfaces are wetted with water. This will allow the two layers to better adhere to each other. After laying, the solution is compacted with improvised means and leveled. The new area must be waterproofed and, if necessary, drainage constructed.
Building the foundation down
The most labor-intensive and complex process. With the right approach and subject to compliance with technological nuances, it allows a depth of 50-80 cm. A trench is dug under the old foundation in sections no more than a meter long. The base is compacted, then a crushed stone-sand cushion is added, after which the formwork is constructed. Reinforcement is placed in it and concrete is poured.
To ensure that work does not stop until the monolith finally hardens, after a few meters you can also dig up a meter-long foundation. And carry out the previously described cycle of work. And so - section by section.
Connecting adjacent two segments is allowed only after the concrete has gained strength. Adjacent blocks must be connected using reinforcement. To do this, releases of metal rods are made in the initially poured areas. The frames are welded together.
The same applies to joining a new structure with an old one.
Under no circumstances should you start building up the foundation in depth from the corners of the house. These areas are completed last. Otherwise, the building may collapse. Do not forget about the construction of the waterproofing layer.
Even if the groundwater in a given area is deep, during rain or spring floods the foundation will be exposed to moisture. The lack of water protection threatens the destruction of the underground part.
This means that complex and time-consuming work will be pointless.
Increasing the depth of the foundation on your own can lead to disastrous consequences. Only experienced professionals are able to cope with such tricky and difficult work. Of course, its implementation requires compelling reasons.
Probably, it would hardly occur to anyone to strengthen the underground part of a dilapidated house, spending considerable money on it. But if the need for expansion nevertheless arises, then first you will need to turn to specialists. They examine the foundation using their own technology and tools.
And only after that they will make their conclusion with the most acceptable solutions. You will also need to make calculations and a design.
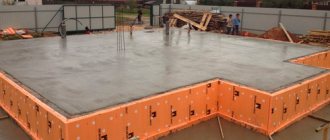
Pouring the foundation
Detailed foundation pouring diagram.
Formwork is installed (only on the outside of the foundation) from boards planed from the pouring side. It should protrude about 30 cm above the level of the future foundation. The formwork is checked using a level for verticality and secured with spacers. The boards are generously moistened with water. Instead of wetting, you can line the prepared bed with plastic film, the edge of which is removed and secured on the back side of the formwork.
Reinforcement is being prepared for laying in the foundation. As a rule, these are two rows of vertically installed (driven into the ground) sections of reinforcement. The distances that must be maintained both from the formwork and from the old foundation are at least 3, but not more than 5 cm. It is enough to install reinforcement in a row in increments of 50-60 cm. Each rod is tied with adjacent wires to create a metal frame.
Scheme of a columnar foundation with a grillage made of prefabricated standard elements: 1 - strip foundation blocks FL 8-12-3 (1180*800*300 mm); 2 — concrete blocks FBS 9-5-6 (880*500*580 mm); 3 - grillage made of reinforced concrete lintels 5 PB-25-37 P (2460*250*200 mm); 4 - twisted wire; 5 - reinforced monolithic belt.
After the metal frame is formed, concrete is prepared for pouring the formwork. It should be remembered that it is not recommended to fill the foundation to its entire depth at once. This is done in two or three passes. Each time a layer of 20 centimeters is made and left to set for at least 2 days. In hot weather, the layer is covered with a waterproofing pad so that the moisture from the concrete does not evaporate before setting occurs.
When pouring concrete, do not forget to compact it so that there are no voids left inside. The last layer of concrete after pouring must be checked for horizontalness using a building level. If necessary, correct it by making a cement screed.
After the concrete has completely hardened, the formwork is removed. From the outside, the concrete is protected with two layers of roofing felt. The groove remaining after pouring the foundation is filled to its entire depth with sand or soil, compacted and compacted.
Organization of the work site
Having decided on the choice of materials, having carried out all the preparatory work, it does not hurt to think about the place where the finishing will be carried out. Correct placement of all containers, concrete mixers, pallets with bricks on the site will reduce the finishing work time by half.
The rules here are simple:
- The passage from the wall must be at least 1200 mm, along the entire perimeter of the foundation. Freedom of action, so to speak.
- Carry out a simple calculation of how much of all resources will be needed, group them for every 6 meters of masonry using pallets.
- Think about the water supply, interruptions in water supply happen everywhere.
- Use protective equipment, and think about additional lighting in the evening.
- When choosing an outside team, check their experience and professionalism. Ask the foreman about the previous place of work.
Brickworking skills are quite simple. The more thoroughly you prepare for the process, the better the result will be. You will have to do several stages of marking and checking.
The first stage includes checking the perimeter and levels. You will need a simple tool:
- Hydro level, a tube with flasks, 10-20 meters long, filled with water. Before use in the work area, it must be filled for at least 12 hours.
- The rule is 2.5 meters in length, measure individual sections of the bed (places of masonry).
- Tape measure, marker, pencil.
- Construction cord, fishing line. Take into account line sagging in hot weather.
- A hammer drill with a drill and dowels are useful when tensioning ordinary cords.
If the horizontal level deviates by more than 5 mm, make a leveling pad from cement mortar.
The second stage, we check the right angles. You can check the angle using a construction square or the “Egyptian triangle” method. On one cord we mark 3 meters with a marker, on the perpendicular cord 4 meters, the distance from point to point should be exactly 5 m. We make adjustments before starting the first and main row.
Non-standard situations
The complexity can be presented by communications leading through the foundation of the house, for example, water or sewer pipes. It is not recommended to embed them into a concrete foundation. For them, you can build belts from tin or, to protect them from damage while working on the foundation, wrap the sections of pipes exposed during the preparation of the trench with polyethylene film in several layers.
Any house lined with brick will be protected from atmospheric influences, and its temperature and humidity conditions will be normalized.
Sometimes old buildings that are planned to be improved using facing bricks turn out to be standing with virtually no foundation. In this case, the foundation for the cladding is still laid, but it is connected to the basement of the house using reinforcement, the slope of which (15-20 degrees) is made downwards. With such unfavorable initial data, it is recommended to install formwork on both sides.
It is necessary to remember that the foundation of an old house almost always has to be expanded before facing it with brick. Simply casting a new brick foundation parallel to the old one is unacceptable, since subsequently cracks may appear along the brick lining due to subsidence or displacement of the constructed foundation. To avoid this, both foundations must merge into one, strong and durable. This requirement is achieved by a reliable mechanical connection.
When the foundation for brick cladding is completed according to all the rules, after it has completely hardened, you can proceed directly to the cladding. The place for the brick is ready!
Why is cladding needed?
Facing a house with brick looks quite aesthetically pleasing and can turn the most dilapidated and simple house into an attractive building that will look rich and elegant.
A house built from timber may, after some time, suffer from the effects of natural and human factors.
Cladding a building allows you to protect its foundation from the negative effects of natural factors and temperature changes. Cladding will help protect the lower part of the house from dirt, mold and fungal growth.
Proper cladding creates a protective layer of brick that can protect the building from floods and floods. In addition, it is additional fire protection and good wall insulation.
Finishing the base with brick or stone.
Often, many owners of private houses and some careless builders make the most common mistake, forgetting to take into account the thermal physics of walls when making calculations. It turns out that outwardly everything seems to be correct and beautiful, but in fact, poor-quality cladding can lead to the destruction of the building, especially for houses made of wood, the walls of which can simply rot.
The same mistake is made when lining a house with bricks to insulate the walls. In the future, this can lead to white efflorescence appearing on the brick, and there is a possibility of a decrease in the thermal efficiency of the insulation and moisture accumulation.
At first, a beautiful façade can hide all these shortcomings, but over time they will make themselves felt through irreversible destruction of the building. To avoid this, it is important to follow the technology for creating cladding.