What is a hook for tying reinforcement and its types
The device provides convenience, speed and safety of work.
It is used to connect perpendicular rods with a thickness of no more than 2 mm at their intersections. Scope of application: strip foundation, construction of residential, industrial and administrative facilities. It’s easy to make a crochet hook yourself if you know the features of its design.
Crochet reinforcement pattern
https://www.youtube.com/watch?v=MVyXEjdBNkk
Depending on what type of product you plan to purchase, the cost of the latter will vary. Naturally, simple models will be the cheapest. Mechanized hooks will cost a little more, and the most expensive will be professional devices, also known as guns for tying reinforcement. In the table below we will look at all three categories of tools, compare their prices and technical characteristics.
| Model name | Specifications | Product cost |
| Hook for fastening reinforced mesh SIBRTECH |
| 134 rub. |
| Hook for fastening reinforced mesh SIBRTECH 84879 |
| 220 rub. |
| Hook for connecting reinforcing bars, mechanized SPARTA 848805 |
| 630 rub. |
| Mechanized hook for tying reinforcement KA300 |
| 800 rub. |
| Gun for tying reinforcement RT 308 GROST |
| RUR 38,790 |
| Gun for tying reinforcement RB655 MAX |
| RUB 148,000 |
Regardless of what type of hook for tying reinforcement will be used in the work, one technology is used to create the frame, which is easy to implement. The main thing is to choose the right consumables, but we will consider this point below.
To tie the reinforcement bars, you will need a special wire, which is cut into pieces. Their length is usually from 30 to 40 cm. These are the most common indicators, but the calculation of this parameter always depends on the thickness of the reinforcement section.
Knitting a reinforcing belt using hooks is carried out according to a simple pattern. What steps should you take:
- Fold the tie wire in half.
- Pass the folded piece under the cross, in other words, the fastening knot.
- Cross the loop with the free ends.
- Insert the end of the hook into the wire loop and hook onto the free ends.
- Start the usual rotational movements, with the help of which the wire will be wrapped.
- After the first few turns have been made, reduce the rotation speed and carefully tighten the knot until the end. Otherwise, there is a risk of breaking the wire.
- Pull the hook out of the loop and check the resulting connection for strength.
To check the reliability of the resulting unit, it is not necessary to check the strength of the wire and how tight the connection is. It is enough just to try to shake the bars of the reinforced mesh. If the result is correct, they will be motionless.
This was a knitting pattern using a regular crochet hook. However, it also works when using a screw type product. The beginning of mating follows the same principle. The wire is folded in half and then passed under the crossed reinforcement bars.
Next, its edges are folded and secured to the hook. The main difference between a mechanized product is that to tie the wire, you just need to pull the hook handle towards you. There is no need to wrap the wire yourself using rotational movements of the brush.
The hook shaft begins to rotate due to displacement. Next, the handle is released, after which the action is repeated. The number of times this procedure will need to be repeated depends on the degree of hardness to be achieved. Plus, the device has one more feature - the product can both fold and unfold during operation. We remind you that to rotate the product, just pull its handle towards you.
The described binding scheme is quite simple, but at the same time it ensures reliable fastening of the reinforcing belt. Thanks to this, many can save money on this type of construction work. With a little practice and “straight hands”, you can knit reinforcement bars yourself, which will save a sufficient amount of money.
The key task is to ensure that the wire does not break while tying the reinforcement. To do this, it can be pre-fired if it is not flexible enough and does not bend well. To obtain optimal results, the wire should be held over the fire for some time. And before using it, it will need to be cooled. The most convenient is low carbon steel.
This parameter is selected experimentally whenever possible, since using wire that is too thin will cause the knots to break, and wire that is too thick will be more difficult to bend.
Additionally, when knitting, special clamps can be used, which are plastic parts. They are laid between the formwork and the rods, protecting the entire structure from damage.
Not always a product purchased at a hardware store will be ideal for the required type of work. Therefore, many craftsmen eventually switch to homemade hooks for knitting reinforced meshes. There can be many reasons for this:
- rod thickness is too small or too large;
- awkward angles at which the hook is bent;
- steel is of poor quality, which causes the hook to quickly unbend, etc.
Therefore, often you can not buy a hook, but can easily make it yourself. Moreover, in such a way that it would be convenient to work with it, and all its parameters would be adjusted to the master. Below we will look at a number of ways in which you can make a homemade hook that allows you to fasten reinforcement rods.
We invite you to familiarize yourself with Repair of flat roofs and soft roofs -
Electrode hook
This type of product can be made from thickened steel wire. Its cross-sectional value should be 4 mm or more. Most often, a special welding electrode is used for this, since it is made of a fairly strong metal. Manufacturing proceeds according to the following principle:
- A circle is bent at one end of the wire, into which the handle will later rest. Moreover, the bend should be made in the shape of a circle, so that later during operation the bent end does not catch on the sleeves and does not cause inconvenience. Therefore, you should definitely make sure that the bent end is directed towards the main rod.
- Next, the specified rod is bent to create an angle of 30 degrees approximately in the center. After this action, the rod should represent some semblance of a rocker.
- The next step is to string 2-3 washers and push them towards the ring. They will need to serve to fix the handle.
To create a handle, you can use several options:
- Use two tubes, one of which has a slightly larger diameter than the original rod. To do this, the diameter of the inner hollow part of the tube must be at least 5-6 mm if the thickness of the rod is 4 mm. The second tube should have an even larger cross-section. The length of the tubes should be a third of the entire hook, or slightly longer. One tube is inserted into the other, and their ends are riveted with a hammer.
- Take one tube and weld washers to it on both sides, the inner diameter of which will be slightly smaller than the diameter of the rod itself.
- Use a lathe and turn it into a handle of the required size and with the required diameter of the internal hollow space for the rod. For this option, only dense tree species are suitable. It is better not to use spruce or pine for such a product, since such a handle will quickly wear off.
- Instead of wood, a polymer pipe of suitable length is also suitable. For the lower stopper, a nut or washer is welded to the product.
- Or use any other suitable solution to the problem if you have suitable material for the job.
Regardless of what material the handle is made of, if there is no desire or opportunity to make a ring at the end, you can simply weld a lock nut or washer to prevent the handle of the product from rolling down. It is best to do this on both sides of the handle. Otherwise, it will ride on the rod, which will make working with the tool inconvenient.
Once the base and handle are ready, you can start working on the hook itself. To do this, using a grinder, the end of the rod is sharpened so that a cone-shaped shape is obtained. Don't make the end too sharp, just leave it a little rounded. This significantly reduces the risk of scratches or more serious injuries while working.
DIY crochet hook
A homemade crochet hook for reinforcement is small in size. It does not require much time to manufacture. The reinforcement bender consists of two main elements: the base, which is the working part, and the handle. It can be made in two ways.
To install the product you will need the following materials:
- Welding electrode or steel wire with a diameter of 3–4 mm.
- A piece of thin hose or a handle from a used construction trowel.
Making a hook for tying reinforcement with your own hands
- The hose is used to make a device handle to suit the size of the rod.
- The parts are fastened together using epoxy resin.
- The working part is bent at an angle of 900 at a distance of 6 cm from the handle. In appearance it resembles a rocker arm.
- The tip, no more than 2 cm long, is deformed in an arcuate manner.
- Before putting it into use, the crochet hook is sharpened with a file.
To make a knitting device, you will need:
- A piece of steel wire with a diameter of 7–8 mm.
- Retainers: Hex nuts and washers of the appropriate diameter to fit onto the rod.
- A used handle from any hand tool: screwdriver, paint roller.
The manufacturing process is the same as in the previous case. Only the handle is attached to the base using clamps. It should maintain free rotation around the base.
Often, factory-made crochet hooks do not fully satisfy the needs of builders performing reinforcement. This is because their rods may have an incorrect bend.
To make hooks, specialists use electrodes for welding machines, or less often, a piece of steel wire at least 4 mm thick.
There is no need to create drawings; you only need the following materials:
- - trowel handle, piece of hose or roller handle
- - electrode or 4 mm wire
- - sharpener
Process
- We make a handle from the hose for the future hook, or use the handle from a trowel/roller.
- We insert the rod (electrode or wire) into the hole in the handle or into a piece of hose and fix it with epoxy resin.
- After the epoxy has dried, bend the rod 90 degrees at a distance of 5 cm from the handle. The correct bend resembles a rocker arm.
- We bend the end of the rod in an arcuate manner.
- We sharpen the sharp part of the electrode with a sharpener or a file.
The process of knitting reinforcement for constructing a foundation, flight of stairs or screed differs only in the type of crochet hook. The technology of knot twisting itself does not change. It is usually recommended to immediately cut the steel wire into pieces of 30-40 cm. Experienced craftsmen first make several test knots to clearly see how long a piece of wire is required. This way the wire consumption will be minimal.
Stages of tying reinforcement
- — cutting steel wire for workpieces
- - folding the workpiece in half and turning it around the intersection of the rods
- - gripping the ends of the wire with a hook through the loop of the workpiece
- — 2-3 rotational movements to obtain a knot
- - neat crochet twist tightening
- — checking the assembly (we move the reinforcement bars - they should fit tightly to each other)
The whole process is very simple. But before you try, it’s better to study photos of the creation of reinforcing structures.
Electrode hook
This type of product is even easier to make with your own hands than its manual counterpart. This will require additional devices. The most common solution is to use a screwdriver. To do this, a hook is inserted into the device’s cartridge, which must first be made from a regular nail of the required length.
We suggest you familiarize yourself with How to make a water seal for a bathhouse with your own hands
The shape of the hook is practically no different from that described above. The process of tying the reinforcing belt is also no different from that used with manual types of products. Therefore, the main difficulty when working with an automatic construction crochet will be the selection of the optimal operating mode for the screwdriver. The determining factor here is speed. With the right parameters, the work will proceed quickly and without defects.
The main goal, again, is to ensure that the binding wire does not break when connecting the reinforcement. Otherwise, using this device you can significantly reduce the cost of physical labor and reduce work time.
You can make a crochet hook for reinforcement with your own hands from wire with a diameter of 4 mm. For this purpose, welding electrodes are used as they are the most durable.
The manufacturing procedure is as follows:
- A small loop is formed at one end of the wire. It will serve as a support for the handle. The loop is made carefully so that the end is rounded towards the rod. During work, this place should not cling to clothing.
- In the central part, the rod is bent at an angle of 30 degrees in the shape of a rocker arm.
- Several washers are threaded onto the rod until they stop with a loop. This place will fix the handle.
The handle can be made in different versions:
- Take 2 tubes, constituting 1/3 of the length of the rod. If the rod is 4 mm in diameter, then one of the tubes should have an internal diameter of 5-6 mm. It is put on a rod. The second tube should have a larger internal diameter. It is put on from above, and the entire system is riveted with a hammer.
- 1 tube is taken. Slides onto the rod. The washer is welded to the handle and rod for fixation.
- A handle with a hole for a rod is turned from dense wood on a lathe. Instead of wood, you can use a polymer pipe. A washer is welded for the stopper.
If you do not make a ring at the bottom, then you also need to weld a washer.
At the last stage, the opposite part from the electrode handle is sharpened into a cone shape. Using pliers it is wrapped. A hook is made for tying the reinforcement of such a length that it is convenient for them to work.
Variety of crochet hooks
Simple design
Simple hooks make it easy to grab loops. The tool looks like a rod with a curved tip for gripping wire and a comfortable handle with a built-in bearing. The shape of the rod has an irregular bend. Despite the fact that the device is rotated manually, it is capable of developing high speed and tightening the wire tightly.
Simple hooks are convenient for home use, especially if you need to do a small amount of work. The twisting speed is the same as a screwdriver. Knitting reinforcement is reminiscent of stirring paint in a jar with a special wooden spatula. The tool has a number of positive qualities:
- low cost;
- easy operation;
- Suitable for hard to reach places.
DIY electrode hook
Hook with screw
Screw hooks are semi-automatic, as they tighten the loops with a hook-tip in the form of a drill with a stationary handle. They have a different design and greatly facilitate the monotonous work of the master. To tighten the knot tightly, you need to make several forward movements at the intersection of the rods.
The process is carried out by rotating the tip with a worm gear while pressing the handle forcefully. Equipment that produces reinforcement knitting has another name - reversible. It has a number of advantages:
- durability;
- ease of use;
- high speed.
Hook for tying reinforcement from a screwdriver
This design is characterized by high productivity, which is why it is used in large-scale construction. The device is fully automated, works from the mains or using batteries. It is pre-filled with wire, which is wound on a special reel.
Gun for tying reinforcement GROST PA33
The principle of operation is as follows: the knitting gun is connected to the desired element and the trigger is pressed. In a matter of seconds, the wire is wound and pulled into a knot. The tension is applied evenly. To work with the tool, a wire of a certain diameter and stiffness is required. Otherwise, the equipment may be damaged.
The choice of knitting tool depends on the purpose of use and installation features. It can be used not only for metal, but also for fiberglass reinforcement, which is knitted with annealed steel wire, plastic clamps or plastic clips. This is a modern material with positive properties:
- corrosion resistance;
- tensile strength;
- low thermal conductivity.
Knitting reinforcement is a fairly simple technology. It involves many methods of knitting:
- corner;
- double row;
- double;
- crusades;
- dead nodes.
Techniques for tying reinforcement
The main methods of fastening are as follows:
- Formation of one loop with an overlap, observing the length of the overlap of the rods.
- Forming two loops for end-to-end fastening.
For each type of metalworking, a specific brand of mounting rods is used. The simplest and most frequently used is the first method. The actions are performed in this order:
- The reinforcing wire is pre-cut into pieces up to 30 cm long.
- In your work you need to use flexible, elastic material that does not tear. A fired profile with a diameter of 1 mm has these properties.
- The workpiece is folded in half and wrapped around the reinforcement bars.
- Thread a hook into the loop.
- The tool grabs the ends of the wire rods.
- Perform rotational movements to securely fasten the wire. It turns out 2-3 turns.
- Carefully pull the knot so as not to break it.
- The crochet hook is pulled out.
- The main thing is not to make long twists.
Check the strength of the connection. You don't need to touch the wire to do this. It is enough to move the reinforcing bars. They must hold tightly relative to each other.
Knitting reinforcement in the second way is done as follows:
- A section of the reinforcement rod is bent in half.
- Retreat a third of the distance from the loop and bend it again.
- Cover the joint. The loop is on one side, the loose ends are on the other.
- The hook is inserted into the loop, the tips are hooked, and pulled.
- The elements are twisted together with the loop several turns.
Knitting reinforcement requires compliance with certain rules in accordance with SNiP standards.
When using a simple homemade crochet hook, the knitting technique involves the following steps:
- The wire, which will be the fastening element, is cut into pieces of 30 - 40 cm;
- Each piece is folded in half and applied to the intersection of the rods. Apply from below, slightly lifting the edge of the wire;
- The end of the hook is threaded into the resulting loop, and the second end is bent on the back side of the tool;
- Then, holding the tool firmly in the hand, they perform a circular rotation, which causes the rods to twist among themselves;
- After the number of turns necessary for fixation, the hook is pulled out.
We suggest you familiarize yourself with How to knit reinforcement for concrete
Important! Tying the reinforcement too tightly can break the wire.
Knitting with a screw hook is performed in the same way, but instead of rotating, the handle is pulled towards itself, which activates the rotation mechanism of the hook.
Attention! With high quality knitting, the reliability of the screed is checked by shaking sections of the reinforcement structure relative to each other. It is necessary to exclude their movement.
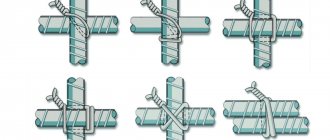
Crochet technology
Scheme of knitting techniques according to the working drawing of a monolithic structure.
The technology for connecting foundation reinforcement rods is quite simple and is not determined by the type of hook: the knitting wire, one way or another, is tightened in a loop, thereby connecting the metal rods.
The reinforcement is knitted after the preparatory work has been completed and the vertical rods have been installed. To install the reinforcement, use a working drawing of a monolithic structure.
In practice, there are two main knitting technologies:
- One loop for overlapping connection.
- Two loops for butt connection.
Most often, they knit using the first method, since it is the simplest: you can learn it in a few minutes, and making a mistake while working is quite difficult. On the other hand, butt stitching is, in theory, good for corner pieces.
Important! In your work, you should use only burnt wire with a round profile and a diameter of 1 mm, as it is flexible and elastic: it fits well to the rods and does not break when knitting.
The principle of knitting reinforcement with one loop in the first stages does not depend on the type of hook. The only differences in how different tools work will be in the way the rod rotates: with a brush, by inertia or automatically.
To connect the frame rods you need:
- Cut the knitting wire into pieces of 20-40 cm (depending on the diameter of the rods).
- Fold the piece in half and wrap it around the joints where the rods intersect, slightly overlapping.
- Take the hook and pull it through the loop.
- Hook the two free ends of the wire with the tool.
- Twist the wire tightly, slightly lifting the tool up.
- Remove the tool from the loop and check the quality of the knot.
We suggest you read: How to make a ceiling in a bathhouse with your own hands
Diagram of types of wire knots for manual knitting.
The reliability of the bundle is checked not by the tension of the wire (if you tighten it, the wire can easily break), but by the mobility of the rods.
Some features
Low carbon steel is best for tying. It is difficult to deform, and if necessary, it can be annealed, which will improve the properties of the material. To ensure an optimal level of flexibility, the diameter of the wire is chosen to be about 1.5 cm. Too thin and it will quickly break, and thicker will not be able to bend as necessary.
A convenient and simple tool that is not so difficult to make with your own hands - a hook for tying reinforcement - will help you quickly and effortlessly make the necessary structure, which will improve the strength and wear resistance of the foundation. At the same time, the durability and reliability of the house will be improved.
You can understand the principle of operation and gain some experience in practice only if you try to tie the reinforcement with your own hands using a hook. This simple and interesting process will become even more amazing and exciting if you use an independent device. Having decided to tie the reinforcement in this way, you should choose the type of crochet hook, depending on the parameters of the future design.
What wire is better to knit reinforcement
Annealed wire is used for tying the reinforcement. It bends well and, at the same time, has high strength, so it can be tightened with force without fear of tearing.
We invite you to familiarize yourself with the crochet jute washcloth pattern
For knitting reinforcement cages, wire with a diameter of 1 to 1.4 mm is best suited.
Black baked wire is most often used, but in some cases corrosion-resistant wire with zinc protection is used.
The wire can be delivered to the construction site in coils or cut into pieces of a certain size suitable for obtaining one connection. Often such segments are already equipped with a loop at the end, which allows you to speed up the knitting process. Working with skeins is more difficult - you have to spend time cutting.
Screwdriver device
A tool for tying reinforcement can be made using a screwdriver. A pre-prepared hook of the required length and shape is inserted into the screwdriver chuck. The work process is the same as when knitting with a manual device. The main thing is to choose the right operating mode for the equipment. The main parameter is the rotation speed.
When using an automatic gun, knot tying occurs at a speed of 1 knot per second. There is no need to cut the wire; it is cut automatically.
Some features
Hook with screw
Regardless of the type of device, the knitting technology is the same. The work is carried out according to the following scheme:
- The cut wire is folded in half.
- It is stretched under the intersection of the reinforcement.
- The free ends of the wire are crossed.
- The hook is pulled through the wire loop and hooks the loose ends.
- Rotational movements begin, during which the wire is wrapped.
- The hook is removed and the knot is checked for strength.
When checking the strength of the connection, the rigidity of the structure is checked. She must be motionless.
The process of knitting with a screw product is the same. The difference lies in the finishing stage. When threading a hook into a loop, you do not need to wrap it yourself. Thanks to the worm mechanism, just pull the handle towards you and the rotational movements will begin automatically.
Low carbon steel is used as wire material. To prevent rupture during knitting, it must be held over the fire. After cooling, it is ready for use. Its diameter can be 1 mm, 1.2 mm, 1.4 mm. Parameters are selected based on experience. A wire that is too thin will break, and a wire that is too thick will be difficult to work with.
When fastening reinforcement, it is expensive to use welding. A knitting device is the best option. It is easy to make it yourself from scrap materials. This device performs high-quality work and is inexpensive.
Low carbon steel is best for tying. It is difficult to deform, and if necessary, it can be annealed, which will improve the properties of the material. To ensure an optimal level of flexibility, the diameter of the wire is chosen to be about 1.5 cm. Too thin and it will quickly break, and thicker will not be able to bend as necessary.
A convenient and simple tool that is not so difficult to make with your own hands - a hook for tying reinforcement - will help you quickly and effortlessly make the necessary structure, which will improve the strength and wear resistance of the foundation. At the same time, the durability and reliability of the house will be improved.
You can understand the principle of operation and gain some experience in practice only if you try to tie the reinforcement with your own hands using a hook. This simple and interesting process will become even more amazing and exciting if you use an independent device. Having decided to tie the reinforcement in this way, you should choose the type of crochet hook, depending on the parameters of the future design.
As we noted above, a hook is used to knit rods together.
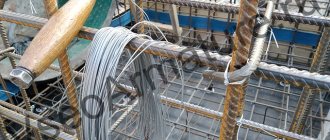
Knitting reinforcement means connecting individual elements together with a special knitting wire. The wire is made of hardened steel, can withstand enormous tensile loads and has a diameter of 1-2 mm.
The joints are tied with wire, assembling the frame as in a construction set. When knitting, our task is to form a working structure from individual rods, and make sure that it is strong enough to withstand the pressure of, for example, several tons of monolithic concrete.
After hardening, the frame is integrated into the concrete, forming the reinforced concrete we all know. But until then, these are two different designs.
Knitting reinforcement means doing a huge number of similar actions, consisting of tying rods in several dozen places with wire.
Knitting reinforcement
For example, if you need to make a frame for a column 2 meters high and with a cross-section of 30x30 cm, then for this you will need to purchase about 10-15 rods and assemble them together into a frame of similar sizes. The number of knots tied with wire in this case tends to several hundred.
Tasks like these are the hooks that help us accomplish them. They allow you to knit wire for reinforcement units quickly and efficiently, speeding up the work process, without exaggeration, several times. Production and speed increases, the quality of components increases, therefore, the quality of the entire structure improves, which is extremely important for load-bearing foundations.
Knitting wire
Reinforcement with rebar increases the strength of concrete. The reinforcement creates a frame that significantly increases the service life of concrete.
You cannot weld the reinforcement, because... welding “lowers” the metal and it becomes soft. The welding area becomes corroded over time. In addition, the reinforcement must move relative to each other, otherwise the concrete may burst.
Knitting of reinforcement must be done correctly and with high-quality material. There are quite a lot of knitting methods used now and we will look at the main methods. Knitting reinforcement with your own hands is the best way to increase the reliability of the foundation.
Wire for tying reinforcement
Certified reinforcement is used for reinforcement. For tying reinforcement, baked low-carbon steel wire is used. There is no oxygen in concrete, which means the wire can be uncoated. If it is not soft enough, you can keep it in the fire and then cool it in the air.
The recommended wire diameter is in the range of 1.2-1.4 mm. This diameter is convenient to work with and the wire is strong enough. It is not advisable to use a smaller diameter. Wire for knitting reinforcement is sold in stores and it is called “Knitting”. You can also take wire from old metal cord tires. They need to be burned at the stake, and immediately there will be ready-made burnt wire.
Plastic clamps
Plastic clamps
Plastic clamps are used for tying reinforcement. They are very quick and convenient to work with, but builders look at them with caution. After all, the service life of plastic leaves much to be desired.
The best, but most expensive options are plastic clamps that have a wire core. Outdoors in winter, plastic clamps can crack in the cold.
Tools for tying reinforcement
For knitting, use a hook, a screwdriver or a knitting gun.
The hook can be made from wire with a diameter of 3-4 mm or bought ready-made in a store. An electrode can be used as a hook wire.
Hook for tying reinforcement
It is much more convenient to use a screwdriver with an attachment that can be made from a nail.
Screwdriver with bent nail
A tying gun is the most convenient and fastest way to tie reinforcement.
Knitting gun
The most popular knitting methods
Method 1
Take the wire in your hands and fold it in half. Then the wire goes around the reinforcement and is inserted in a loop into the hook. The hook turns and grabs the other end of the wire. By turning the hook we tighten the wire, after which the hook is removed and the wire is bent.
Method 2
The wire is folded in half and inserted from the bottom of the reinforcement. The hook grabs the loop, the other end of the wire is bent over the hook. Then the hook turns and tightens the reinforcement.
The video below shows a method for quickly tying reinforcement with a screwdriver.
And this is how quickly the reinforcement is knitted using a knitting gun.
Of course, tying guns are expensive, but they pay off in teams where they often have to tie reinforcement.
As you can see, tying the reinforcement is quite simple even for an inexperienced builder.
If you liked the pack, share with your friends and leave a comment
RќСЂР°РІРёС‚СЃСЏ
Useful posts on the topic:
- Insulation of walls
The article will discuss how to properly insulate walls. Winter in Russia tr... - Composition of concrete
The article gives the compositions of various types of concrete, their classification, as well as methods... - Making a heated floor with your own hands
Creating efficient heating in a house, apartment or country house in winter is a... - Application of liquid wallpaper
Liquid wallpaper is loved because there is no need to adjust the design, remove bubbles, cuts... - Finishing walls to resemble brick
It is easy to decorate walls to look like brick using ordinary plaster. To work on… - What roof covering do you choose?
I want to share my experience. The purchase of euroroofing felt solved the main problem...