Design features of the room
This indicator plays a decisive role in determining the work plan for thermal insulation of the second floor in a private house. Structurally, the room can be:
- A full second floor, above which there is an unheated attic or living room.
- The attic, which is located directly under the roof.
In each case, the principle of insulation will be different. The main difference between an attic and a full floor is the proximity of the roof, so the main task of insulation is to preserve heat in the room.
It should be emphasized that thermal insulation of the second floor must be done not only inside, but also outside the house. When insulating a full floor, you don’t have to install a vapor barrier layer; for the attic, vapor barrier is mandatory. Expanded polystyrene, mineral wool or expanded clay are most often used as insulation.
Insulation materials
Various thermal insulation materials can be used as interfloor insulation for a wooden house:
- glass wool;
- basalt wool;
- slag;
- Styrofoam;
- penoplex;
- expanded clay;
- foamed polyurethane;
- shavings, sawdust.
The choice is based on the availability of the material, its cost, and characteristics. Thus, mineral wool and expanded clay are the most acceptable from the point of view of fire safety. At the same time, penoplex does not absorb moisture, does not cake, and has high thermal insulation properties. Sometimes materials are combined to increase thermal protection.
Various types of cotton wool
Most often, various types of construction thermal insulating mineral wool are used to insulate interfloor ceilings. They are made by melting and drawing fibers from raw materials. These fibers are then intertwined on special machines and formed into mats or rolls. In some cases, such mats or rolls are stitched with synthetic threads to increase the strength of the products.
For glass wool, the raw materials are waste and waste from glass production; for mineral wool and basalt wool, igneous rock melts are used. Slag is produced by melting blast furnace slag.
Different types of cotton wool have different properties. They have different densities and different thermal conductivities. These characteristics depend not only on the type of feedstock, but also on the specified production parameters.
Foam plastic and penoplex
These are two similar materials in properties and production method. The starting materials for their production are plastics of various compositions. During the production process, they foam and, when hardened, are formed into sheets of the correct geometric shape. The difference lies in the fact that during formation, penoplex is extruded through a special device - an extruder.
Both foam plastic and penoplex have closed pores filled with gas in their volume. Only in polystyrene foam it is ordinary air, and when foaming polystyrene foam, carbon dioxide is usually used. In terms of thermal conductivity, both materials are almost identical. But due to the fact that the pores in the penoplex mass are distributed more evenly and they themselves have almost the same size, its strength is much higher.
Very often, when forming sheets of penoplex, their ends are not made even, but in the form of two or more ledges. When insulating, two adjacent sheets, connecting to each other during installation, provide better insulation, since the joints are not blown through and retain heat well.
Expanded clay
Expanded clay is a building material that consists of many oval granules - pellets with an average diameter of 10 to 20 mm. The material of these granules is clay and shale sand. The pellets themselves are obtained by firing pre-prepared semi-finished products in special ovens. When heated, pores of different sizes appear in the volume of expanded clay, as a result of which it has a very low density. One cubic meter of bulk expanded clay can weigh only 300 kg. For comparison, it can be noted that one cubic meter of pine wood weighs 500-550 kg at natural humidity.
Note! Expanded clay is an environmentally friendly material. It is durable and will not rot or decompose.
Polyurethane
Foamed polyurethane is used, as a rule, for insulating basement and attic floors. It is simply applied using special equipment, and later it foams in air and takes on a three-dimensional shape. The advantage of using such material is that it fills all the leaks and cracks in the ceiling structure, allowing you to create a sealed water- and windproof thermal protection.
Sawdust
Wood shavings and sawdust have recently been used much less frequently, but more recently they have also been used to insulate interfloor ceilings, filling the cavity between the beams. To prevent such insulation from rotting inside the ceilings, it is treated with special compounds that kill putrefactive bacteria and woodworms. When laying, shavings or sawdust are mixed with lime.
Vapor barrier
To properly insulate interfloor ceilings, it is not enough to use only materials with thermal insulation properties. If you do not protect the insulation from the action of moisture located in the interior of the premises, various microorganisms will multiply in the material, which can subsequently lead to mold or mildew. To avoid this phenomenon, it is necessary to make the correct vapor barrier for the insulation.
Any of the many options produced by industry can be used as a vapor barrier. Ready-made protective membranes are very widely represented on the building materials market. When building and insulating a private house with your own hands, you can use available materials if you know their strength and vapor barrier properties and use them correctly.
As the main layer, the coefficient of vapor permeability of which should be minimal, you can use ordinary polyethylene film or foil. This layer is laid below the insulation, preventing moisture vapor from the basement or lower floor from penetrating into it.
As the second layer, which will be on top of the insulation, you can use wax paper or glassine. These materials have greater vapor permeability than foil or polyethylene. They will facilitate the free release of vapors from the thickness of the insulation upwards.
Extruded polystyrene foam
Most often it is called penoplex, and is also confused with polystyrene foam (they are similar in appearance). What they have in common is only the raw materials, but the production methods are fundamentally different. As a result, this insulation is very dense, so it can be immediately plastered or used as a subfloor. Features are as follows:
- High density.
- Lowest thermal conductivity (best in class). This indicates maximum efficiency.
- Convenient to use (easy to cut).
- Harmless to humans.
- Very light weight, so there is no need to create a strong structure between floors.
- Lights up (class G4). Apart from the high cost, this is the only drawback.
Foil polyethylene foam
Despite its thinness, it is a very effective insulation material (second only to penoplex). It can be recommended in cases where the space between floors is not enough to insert a thicker mat. However, such material is often used for other reasons.
It is sold in the form of rolls 100-120 cm wide, and the thickness can reach 2 cm. It almost completely reflects heat, preventing it from escaping. The main feature is that it is not at all “afraid” of moisture, which is why it is often used to create a moisture-proofing layer. For houses located in the far north, we can recommend the combined use of penoplex and foil polyethylene (laid as a vapor barrier film).
Wooden floor slabs for basements and plinths
In frame or wooden houses, floors made of wooden beams are used, between which a bead is laid, then insulation and, finally, the floor itself. Before laying the beams, they are treated with an antiseptic. The ends of the beams are wrapped in two layers of roofing material, then laid on the basement walls.
If you want to first build a plinth and then lay a wooden floor, you can make openings in the walls of the plinth for the floor beams. Then insulation and beams are laid in them. The beam should not reach close to the wall so that there is room for insulation.
After installing the beams, thin bars are attached to the underside of their sidewalls, which serve as support for the rolling boards. The knurling boards are attached to these bars with self-tapping screws. After laying the bevel, a layer of vapor barrier (roofing roofing) is made, and thermal insulation (10 cm) is placed on it.
Construction requirements for wooden floors
In order to install a durable and safe wooden floor between the 1st and 2nd floors with your own hands, you must strictly comply with the technical requirements for them.
Thermal insulation layer
Thermal insulation of the floor will improve the temperature in the room on the second floor.
If a wooden floor separates the upper and lower rooms with a temperature difference between them of more than 10 ° C, it will be necessary to construct a thermal insulation layer.
This is necessary, for example, when arranging floors between the first floor and the subfloor, basement, or between the first/second floor and an uninsulated attic.
Beam strength
Beams and floors must withstand up to 180 kg/sq.m of load.
When constructing the floor of the second floor on wooden beams, special attention should be paid to the strength of the load-bearing structures. The safety of the building depends on how strong the wooden floor beams are.
According to building standards for wooden low-rise buildings, the maximum load on the floors of the first floor should not exceed 210 kg per sq.m., the pressure on the wooden floor of the second floor should not exceed 180 kg/sq.m., and for attics and attics this figure should be less than 105 kg/sq.m.
Maximum deflection
In addition, building regulations also impose requirements on the deflection values of wooden floor beams. According to SNiP, this coefficient should not exceed 1 to 250. That is, the maximum deflection of wooden load-bearing structures during operation should be less than 4 mm per meter of beam length.
According to this standard, the deflection of a beam structure 4 m long in the center should not be more than 1.6 cm (4 m: 250 = 0.016 m). If it is planned to place massive furniture and household appliances in the room, tile flooring, etc., then the requirements for structural rigidity increase to 1 to 400.
That is, the deflection should not exceed 2.5 mm per meter. For non-residential attics and attics, a higher deflection coefficient is allowed - 1 to 200 (5 mm per 1 meter).
Soundproofing
Fifty-millimeter mineral wool will not only insulate the floor, but will also become a good sound insulator.
According to building regulations, the sound insulation threshold for interfloor ceilings of residential buildings should be 50 dB.
To meet this requirement, it will be sufficient to cover the floor of the second floor under the finishing coating with mineral wool 50 mm thick.
Length of supporting beams
The length of the beam should be no more than 5 m.
The maximum permissible length of free sag of wooden beams should not exceed 5 m for interfloor and 6 m for attic floors. If the design length of the room is more than 5 m, it will be necessary to install additional support under the load-bearing beam. The fact is that the optimal length of a load-bearing wooden structure is 4 m.
With a further increase in its length, the rigidity and strength of the supporting structure sharply decreases and the requirements for the thickness of the beam section increase disproportionately. So, in order for the deflection indicators for an 8 m beam to “fit” into SNiP standards, its thickness should be about 40 cm. For example: the same deflection indicator is shown by a 4 m beam with a cross section of only 15 x 15 cm.
Wood is a material quite vulnerable to external influences, primarily dampness and fire, therefore, before proceeding with the construction of load-bearing structures, all wooden elements must be treated with antiseptic materials and fire retardants.
Method two
The second method of creating floors between floors is more suitable for professional builders due to several factors. For example, the first factor why this method is used only on professional construction sites is that the equipment is very expensive, secondly, the cost of the solution is very high, and thirdly, construction experience and a team of people are needed for the work. What is the meaning of this method? Supports are installed in the basement floor, in our case a foundation slab. At the level of the proposed floor, iron pallets are installed on supports, then special fittings are placed on these pallets, which are also laid with their edges on the walls of the basement floor. Now, using a concrete pump, the solution is pumped from the concrete mixer into the pallets and poured to the required thickness. As you already understand, the process is very similar to the construction of a foundation slab, but only in this case it is more expensive and more complex. A mistake can lead not only to wasting money, but also to the destruction of the entire house, but with proper installation and construction, you immediately get a perfectly flat surface on which you can subsequently lay tiles and other types of flooring.
Construction material
Before you begin installing the floor on the second floor using wooden beams, you should make a list of all the necessary materials. This will allow you to avoid unexpected downtime and delays during work caused by the need to purchase additional building materials.
Beams
A beam section of 15 x 15 will be sufficient.
The basis of the entire structure of interfloor wooden floors is beams. They act as load-bearing elements, and the strength of the structure depends on them. For them, a beam or carriage with a section of 15 x 15 cm or 18 x 18 cm is usually taken.
This cross-section is usually enough to provide sufficient rigidity for a specific load of 400 kg per sq.m. In this case, it is necessary to comply with the parameters recommended by construction standards: the span length is 4 m, and the step between the beams is 60 cm. Based on these parameters, you can also calculate the required amount of timber.
The table shows the recommended cross-sectional dimensions of the load-bearing beam for a certain span length.
No. Span length (mm) Beam cross section (mm)
| 1 | 2000 | 75×150 |
| 2 | 2500 | 100×150 |
| 3 | 3000 | 100×175 |
| 4 | 3500 | 125×175 |
| 5 | 4000 | 125×200 |
| 6 | 4500 | 150×200 |
| 7 | 5000 | 150×225 |
However, in the absence of timber and small values of the expected loads on the floor, it is quite possible to use boards 50 or 40 mm thick, knocked together in pairs and placed on edge. This option is suitable for installing floors in an attic or in a small country house.
For the first floor of a residential building, this option is not suitable due to the low load-bearing capacity of the boards: to ensure the necessary rigidity, the pitch between the board beams will have to be significantly reduced, which will lead to an unjustified waste of material.
Pine is most often used as a material for beams.
This is the best option in terms of price-quality: its wood is quite affordable and at the same time has good technical characteristics. Beams made from wood of stronger species (larch, oak) can rarely be found on the open market, and their price is incomparably higher, and pine wood, after appropriate treatment with antiseptics, will be little inferior in durability to the same larch.
When purchasing timber, you should choose a material with dry wood. Otherwise, after installation of the beams, they may become deformed during the drying process - bending and twisting.
Flooring
Wooden flooring laid on the beams will be a rough base for the floor covering.
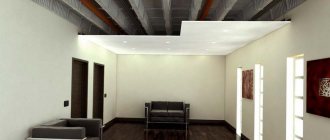
Typically, the flooring of interfloor floors is made in two tiers: below are rough floors on which insulation is laid, and on top is a pre-finish flooring mounted on top of the load-bearing beams. Decorative flooring is laid directly on it.
To determine the nature and amount of material for the flooring, you should clearly think through the design of the floors.
When constructing a subfloor, either 5 x 6 cm bars, packed onto load-bearing beams, or grooves made in the beams can be used as support for the flooring boards. The latter option is quite labor-intensive, so most often 5 x 6 cm bars are used to create support.
To calculate the required number of bars, it is enough to count the number of beams and multiply them by the length of each of them. We multiply the resulting footage (the total length of all beams) by two more (since the bars will be packed on both sides of each beam).
A wide range of materials can be used for finishing flooring. This can be plank flooring, plywood, chipboard panels, MDF, OSB, etc. Each of these materials has its own advantages and disadvantages, after reading which you can choose one of them. To calculate the required amount of material, simply calculate the area of the room.
When purchasing building material, you should always purchase it with a reserve of 10–15%, since during construction unforeseen material overruns are inevitable.
This will save you from having to interrupt your work and buy the missing part.
Impregnations
An antiseptic will extend the service life of wood.
To maximize the service life of wooden structures, they must be treated with antiseptic materials.
It would also be useful to treat the wood with fire retardants, which increase its fire safety.
To calculate the required amount of impregnation, you should read the instructions for its use - the approximate consumption of the mixture per sq.m. is always indicated there.
Overlapping on wooden beams: features
The construction of interfloor slabs made of wood has a number of advantages:
- The design is simple to implement and can be done with your own hands. Its installation does not take much time. The cost of work is significantly reduced due to the absence of the need to use special equipment, and activities for lifting and moving material can be carried out with one or two assistants;
- availability of wood. For the manufacture of beams, coniferous trees are used, which are widespread;
- relatively low weight, which makes it possible to significantly reduce the weight of the structure as a whole. Thus, construction costs are reduced;
- ease of installation of sound insulation improves the comfort of living in the house;
- wooden structures have a lower cost, which overall provides significant cost savings;
- the speed of creating a floor is comparable to the installation of floor slabs and is carried out in a day. In this case, a truck crane is not needed.
Floors on wooden beams
The disadvantages of wooden floors include:
- the existing length limitation (4.5 m) does not make it possible to construct floors over longer rooms without additional support;
- the high fire hazard of wood requires special processing of parts;
- the tree is exposed to a number of biological factors, which is prevented by appropriate treatment;
- relatively low strength.
Design nuances
The ceiling, made on beams, consists of wooden beams that are laid at a certain distance from each other. They determine the degree of strength and reliability of the entire structure. Usually they are sheathed (on one side or both) with various materials of a flat configuration. These can be sheets, panels or slats. Inside a structure equipped with this method, voids appear between the beams, inside of which it is convenient to lay insulation.
Another feature is the presence of wooden beams, which are fragments of lumber. Attaching additional elements to a wooden structure is very simple. The fastening elements can be self-tapping screws or nails; there is no need to glue or embed the heat insulator. Thus, the process of installing insulated floors becomes as simple and convenient as possible.
Advantages and disadvantages of floor slab foundations
The advantages of a slab foundation include the following:
- good load-bearing capacity;
- good resistance to subsidence and swelling of the base soil due to the complete coverage of the base with a slab;
- simple process of installation of the structure;
- successful counteraction to the negative influence of melt and groundwater;
- the possibility of constructing a basement floor is created.
The disadvantages of this type of foundation are very insignificant compared to the advantages. These include only significant material costs for the purchase of materials and for the construction and installation work itself. The total cost of work in some cases can reach half of the cost of constructing the building box. This is due to the high cost of inert materials for the cushion, concrete, as well as payment for the work of specialized equipment and workers.
Main workflow steps
The instructions for carrying out the work will be divided into several stages so that you can understand all the features as best as possible. And we will start by laying out the main supporting elements.
Fastening beams
Work in wooden buildings can be carried out in several ways; consider the sequence of required operations:
- First of all, you should prepare the products - clean them of dirt and bark residues, if any, and also coat them with a special fire-retardant composition. This will protect the wood from fire and damage from woodworms and will significantly extend the life of the structure.
It is most convenient to carry out the treatment before attaching the elements; if you have a sprayer, the work can be done with your own hands very quickly
- Next, all the necessary measurements are taken; if cutting of beams is required, then it is better to double-check all the dimensions, since cutting off the excess will simply ruin the product, the price of which is quite high. Cutting is easiest done with a chainsaw or other special woodworking device.
Fastening is carried out in three main ways:
- The first is cutting out recesses to fit the ends of the beams and securing each element in special recesses. This option has been very widely used for several centuries. It is important to cut the material carefully so that the laying level of all elements is the same, the joints are sealed and thermally insulated using tow, this helps protect all cutouts from the penetration of cold air.
Laying in recesses is convenient because each element is located in its place, which is prepared in advance
- The second solution is laying on the ends of the walls, with each of them fixed in a stationary position using staples or special screws. This option is applicable if cutting the recesses would be too time-consuming and complex, and the configuration of the building allows the beams to be laid with sufficient overlap on the walls so that they rest securely and provide high load-bearing capacity.
- The newest option - the use of special supports for timber - is used if it is necessary to make a partition anywhere on the wall surface without cutting out recesses or where the beams extend into the walls only a few centimeters. The work is simple: the fastening element is fixed to the base, after which the element is inserted into it and fixed using self-tapping screws.
The supports are highly durable and provide the necessary load-bearing capacity
Ring fastening, waterproofing and insulation
After the beams are installed, you can begin covering the structure with rough flooring, the work is carried out in different ways, we will consider the simplest and most cost-effective option:
- The underside is filled with rough flooring, which is most often made from inexpensive unedged boards of the same thickness. The optimal solution is a 20-25 mm pine board. Its cost is low, and for this type of work it is ideally suited.
Important! Be sure to remove the bark from the ends if there is any, as it may contain pest larvae, which can greatly harm your home in the future. Also, do not forget about treating all elements with a fire-retardant composition.
- The boards can be laid on a cranial block specially fixed at the lower level of the beams (50x50 mm in size) or screwed directly to the beams. We strongly recommend using self-tapping screws for these purposes; they are much more reliable than nails and will hold all the elements much better.
This is what the construction of the second floor floor in a wooden house using a cranial block looks like
- Next, the surface must be waterproofed, and if previously various options were used for this - from clay-based putty to roofing felt, then in our time special materials have appeared that release moisture from the wood, but prevent its penetration from the outside. These are so-called membranes, and we recommend using them.
Special membrane materials are an excellent solution for floors
- Now let's look at how to insulate the floor of the second floor of a wooden house. Previously, different options were used - from sawdust and slag to expanded clay and various mixtures. With the advent of mineral wool, all work has been simplified - this type of material is characterized by high performance properties and excellent heat retention. In addition, mineral wool is an excellent sound insulator.
Insulating the floor of the second floor in a wooden house using mineral wool is a quick and simple process; it is important to lay the material as tightly as possible
- From the outside, the surface is covered with another layer of waterproofing material, at which point this stage of work can be considered complete.
Floor construction
The floor of the second floor on wooden beams can be laid in two main ways:
- Directly along the surface of the structure, this option is applicable if the thickness of the insulation inside the structure is less than the height of the beams and there is a small cavity below for ventilation. If the mineral wool is located flush with the top edge of the beams, then it is better to use the second option.
- Logs are laid on the beams, which makes it possible to create a so-called “floating floor”, since it is not rigidly connected to the walls and can move slightly due to temperature changes. This option allows you to improve sound insulation in a wooden house.
The work also varies depending on the material used:
- If you decide to make a wooden floor, then purchase a special board 32 mm thick or more with a special tongue-and-groove fastening system. The work is simple: the board is secured with screws or nails through the recess, i.e. groove, then the next element is inserted so that the connection is tight; if necessary, you can tap the end with a mallet. This results in a smooth surface without nail heads or screws.
- If you decide to lay laminate, parquet or other covering, the easiest way to cover the surface is with sheet materials: plywood or oriented strand board. The second option has high moisture resistance, so it is used more often. The work is simple: the sheets are combined so that the connections go along the beams and are screwed with self-tapping screws.
Basic requirements for the walls of the basement
Foundation walls must be resistant to horizontal movement due to the pressure of the surrounding soil. It is recommended to use a concrete monolith cushion, belted with a reinforcement cage, as the base of the foundation.
The basement floor does not provide for the placement of living rooms if its upper ceiling rises less than two meters above ground level. Otherwise, such a basement is considered a ground floor. When planning the arrangement of a basement as a living area, it is important to take into account that high underground walls will experience significant pressure from the soil over the entire surface.
They will need to be additionally reinforced. The spacing between the reinforcement bars in the frame should not be excessively large - up to 40 cm horizontally and vertically will be sufficient. The frame is certainly connected to the foundation cushion.
It is especially important to follow the rules for reinforcing corners and surface junctions. The structure can be strengthened in terms of reliability and strength by building basement partitions, which will distribute the load on the supporting walls.
Important! The most reliable option for strength and resistance to soil pressure is a monolithic concrete wall reinforced with reinforcement. Its durability, hydro- and thermal insulation characteristics are many times higher than those made from blocks or bricks.
Basement wall thickness
The thickness of the walls of the basement directly depends on the building materials used and the depth of the underground structure. When used as a residential area, the height should be 2.5-3 meters; if technical premises are located, a value of 1.8-2.2 meters will be sufficient. It is necessary to provide a reserve for floor screed and finishing work.
The wall thickness is calculated taking into account the groundwater level. If the groundwater is far enough from the base, it is recommended to adhere to the following requirements: the lower wall may not be strong and protrude 10 cm beyond the contour of the building, and the thickness of the basement walls at a placement depth of 1.5-2.5 meters can be from 20 to 40 cm.
If the base is located below the groundwater level, then the base slab must be reinforced, have a thickness of 20 cm and extend beyond the building frame by 40 cm.
There are approved standards for the minimum values of basement walls, which are regulated by SNiP 2.09.03-85, “Design of retaining walls and basement walls.”
When laying a basement from small-format blocks, for example, expanded clay concrete, it is necessary to reinforce it with longitudinal reinforcement and a special belt over the entire masonry. In the case of prefabricated concrete blocks, the requirements for the grade of manufacture are observed - the use of concrete M150 and higher.
- When calculating the basement walls, you should remember the following design features: The wall has lateral support if the ceiling beams of the basement rest on its upper part;
- If there is an opening in the wall of more than 1.2 m (or several, with a total width of more than a quarter of the entire length), then in the absence of reinforcement it is considered that it does not have lateral support;
- If the width of the wall sections is less than the width of the void spaces, then the entire wall is considered as one large opening.
In any case, the structure should be as stable as possible. Moreover, stability directly depends on its length - the shorter it is, the more reliable it is.
Arrangement of expansion joints
In basements with a length of more than 25 m, it is necessary to provide for a special location of special expansion joints. Their relative position should be about 15 meters. In addition, such seams should be provided in all places with differences in height of the structure. This will provide protection from moisture entering the room.
Requirements for facing work
When externally facing with brick, decorative masonry can also be laid on part of the protruding basement wall, taking into account its height above the ground - the value should be at least 15 cm above the ground surface. In this case, the thickness of the ground part of the basement wall can be reduced by 9 cm.
The facing masonry is attached to the concrete with special ties. The distance between them should not exceed 90 cm horizontally and 20 cm vertically. The resulting gap between the wall and the facing masonry is filled with mortar.
When covering the base with wood or decorative plaster over a heat-insulating or waterproofing layer, there should be a gap of at least 25 cm from the bottom border of the cladding to the ground surface.
Strengthening with reinforced frame
As a rule, a basement wall is created using reinforcing mesh, the main feature of which is elasticity. When creating it, experts recommend using the knitting method rather than welding, since in the event of a violation of the position of the foundation (displacement, damage), the knitted reinforcing mesh will be able to maintain its integrity, while the welded structure cannot withstand the places where the elements are attached to each other.
When making a mesh, it is important to correctly determine the cell dimensions. For basements, this value can range from 25 cm to 35 cm. Moreover, it is important to know that the smaller the link (cell), the more reliable and durable the effect of strengthening will be.
Important! Considering the characteristics of the cement mortar, it is important to remember that its penetrating ability when pouring does not allow making cells smaller than 5 cm, otherwise voids may occur and a decrease in the strength of the structure.
The necessary and sufficient strength will be provided by mesh reinforcement in two layers, and the wire diameter should be at least 1.2 cm, and the horizontal and vertical spacing should not exceed 40 cm.
Both layers of the mesh are connected in a checkerboard pattern through each pair of cells using wire of the same diameter. When using a grid, you can check the correctness of its location with a laser or building levels.
Important! The reinforcement and all its constituent elements should not come into contact with the formwork, but should be placed at a short distance from it. Otherwise, when dismantling the formwork there is a risk of damaging the reinforcing mesh.
When installing reinforcement bars, it is important to pay special attention to their strictly vertical location. Deviation is allowed only 1-2 mm. This is due to the pressure that the soil from the outside exerts on the walls.
At the suggestion of Nikolai, a regular reader of my blog, to whom I am sincerely grateful for always interesting and unusual suggestions about new topics for discussion, today I want to talk about the junction between the upper part of the foundation and the walls of the house. Base design
, as a mandatory element of the design of a house, in principle, should always be worked out and detailed in the project.
But this is in an almost ideal scenario, when the project is done first and only after that construction begins, which is typical for large cities where there are design firms. But in most cases, everything happens completely differently: a person in a magazine or on the Internet chooses the cottage he likes, depending on his own knowledge or the advice of more experienced people, finalizes its schematic drawing and begins to build. Most often, as a result of this, a whole bunch of questions arise during the construction process, the answers to which for the developer, basically, are needed “yesterday” :-). Such issues include the design of the base
.
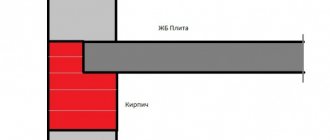
There are three ways to construct a plinth, which differ in the location of the outer surface of the wall in relation to the foundation. I will not consider all the options in detail, but will focus your attention on the most optimal of them, which is often called, mentioning the rest in passing.
What are the advantages of such a base? There are several of them, and all of them are associated with additional opportunities to protect the house from the effects of precipitation. In the diagram, using arrows, I indicated the movement of water along the surface of the wall and blind area during rain. Getting on
wall, water flows directly onto the blind area, bypassing the joint between the end of the wall and the beginning of finishing the foundation base
.
This is a very important point, because no matter how well it is done, after some time water will still penetrate under the finishing layer and as a result of winter thawing and freezing, the finishing will certainly begin to crumble! In addition, when constructing a blind area made of concrete, which is the main protective means for draining water from the foundation, there will definitely be a seam crack along the perimeter of its junction with the foundation wall, in any case! The construction of a basement
with an overhang will also protect this junction from rainwater entering there, and this means the absence of dampness in the basement or floor structure.
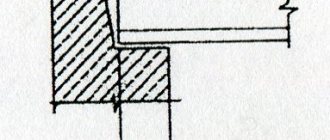
2. The width of the wall and the width of the foundation are the same
.
This often happens when we build a foundation
400 mm wide and on it we build walls of one and a half bricks, the size of which is also 380-400 mm. This option can only be considered neutral at a stretch, since this position of the walls leaves open the junction of the wall finishing and the plinth.
3. The width of the foundation is greater than the width of the wall
. As a rule, this version of the base is used when the house has a basement, and the lateral pressure of the soil on its walls requires increasing their cross-section. Arranging a plinth in this way is a DIY problem that will appear in a few years. As an example, you can look at the photo.
To summarize all of the above, I would like to warn those who are just about to make a decision on how to build the basement of their future home. The best option is with an overlap on the outside, but you should not go to extremes and make this overlap exactly 100 mm, since such an overhang can be considered a permitted exception rather than the norm. In addition, on sunny days such a large overhang will provide a noticeable shadow, and in such a place this is not entirely necessary. One more thing. Almost every construction of your own home
cannot do without external thermal insulation using rigid mineral wool or polystyrene foam. And this is an additional 50 mm of overlap. Therefore, if you are planning to do such insulation, take into account these 5 cm. And how to insulate the floor and basement when building a house without a basement, you can find out by going to
Often in private houses a basement is created. It is the first or ground floor
.
Although, in fact, this is a basement. Work on it must be carried out in strict compliance with certain criteria. According to the law, there are specific criteria (from 2.5 to 3 meters)
. They touch the height of this space.
There are also taxes on the area built for living. This question interests everyone who is planning their home.
The disadvantages of a basement are the enormous costs, from digging holes to electrical wiring. The estimated cost is calculated after a geological and engineering study: the type of soil and groundwater level are determined. There are situations when these factors categorically do not allow creating a basement floor - its construction and maintenance will be unreasonably expensive.
Attic insulation
Unlike a cold attic, the thermal insulation of which is done solely to minimize heat loss through the roof, the attic is a full-fledged living room, so the task is to insulate the room so that it can be lived in.
How to properly insulate an attic floor
- A vapor barrier material is laid over the wooden beams, the canvases are laid overlapping each other with a margin of 20-25 cm.
- On the vapor barrier from the lower floor, boards are placed on the beams, which will serve as the subfloor of the attic and the base for the ceiling of the second floor.
- Fine expanded clay is poured between the ceilings, which will serve as insulation and at the same time soundproof the room.
- Another layer of vapor barrier is laid on top of the expanded clay, and the film is fixed to the beams using slats.
- The bars are mounted perpendicular to the beam floors; the distance between them should be equal to the width of the selected insulation.
- Plates of insulating material are laid between the bars, bringing them as close as possible to each other. A vapor barrier layer is laid on top.
- If ecowool is used as thermal insulation, instead of wooden blocks a truss is made from metal profiles. Installation of a metal frame and insulation with ecowool are jobs that are difficult to do yourself. To do this, you need to have professional equipment and devices, so such thermal insulation is usually not done independently, but is entrusted to specialists.
- Boards or thick plywood are laid on top of the insulating pie, which are attached to wooden blocks.
Insulation of the ceiling and walls of the attic floor
The method of insulating these elements depends on the design features of the room. If the attic roof reaches the floor, the ceiling is insulated as follows:
- Waterproofing is laid from the floor itself to the ridge. The film must cover the entire surface, so that no open spaces are formed, the sheets must be placed on top of each other. The material is secured to the rafters with a stapler.
- The sheathing is made from wooden slats, which are attached to the beams at a distance of 50-60 cm from each other.
- Insulation is laid between the lathing slats; its thickness should correspond to the width of the joists. The slabs are laid from the bottom of the room, moving towards the top.
- The top of the pie is covered with a vapor barrier film, which is attached to the sheathing with thin slats, and the joints between the sheets are additionally taped.
- Finishing finishing material, for example, lining or decorative panels, is mounted to the sheathing.
If the ceiling and walls of the attic are separate parts of the room, then insulation of the walls is carried out as follows:
- Lay a layer of waterproofing.
- They make wooden sheathing around the windows.
- A horizontal base beam is installed below along the entire length of the wall, and vertical racks are mounted from it in increments equal to the width of the insulation.
- A heat insulator is laid between the beams.
- Everything is covered with a vapor barrier film.
- A counter-lattice is made from thin slats to create a ventilation gap.
- Finishing is being installed.
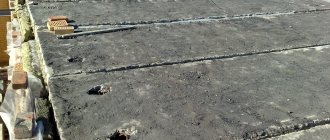
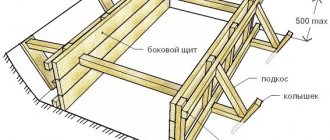
How I did the overlap
First, I poured sand inside the foundation tape, flush with this tape. The reinforcement bars that stuck out of the foundation strip upwards after pouring were bent horizontally, with their ends facing inside the foundation, at the level of the concrete poured into the strip.
There was no need to bring in additional sand; it was enough to take out the sand when digging the foundation pit for the basement.
I leveled the surface of the sand, but did not tamp it particularly (I attached a horizontal block to a piece of log on top, and a piece of board on the bottom, so it turned out to be a manual tamper).
I didn’t compact it much, because ideally it would be good if over time the sand would subside by 2-3 cm, so that under the concrete slab, over time, there would be an air gap between the concrete and the sand.
Next, I laid a plastic film over the compacted sand, laid reinforcement bars over the film, tying them to the bars sticking out from the foundation tape.
The result was a continuous connected reinforcement mesh with a cell size of 40-50 cm. I placed pebbles and pieces of concrete under the rods so that the rods would not lie on the film and under them so that the concrete would flow. This was the bottom metal layer of my stove.
Then I poured the screed, about 5-6 cm thick over the entire area (mortar through a concrete mixer). Then mesh cards made of 4 mm wire with a 15 cm cell were laid in a continuous carpet (knitted together with wire) over the entire surface of the floor so that they did not reach the surface of the future slab by 2-3 cm.
Formation of floor covering
So, we have sorted out the questions of what is the best way to insulate the floor in a wooden house yourself, and what are the best ways to do this. It remains to give a little information on how to form the floor covering.
If the floor structure is a concrete screed, then covering it will require materials and technologies used for finishing concrete floors. Moreover, the floor itself is already insulated, so no additional measures are required.
What can you offer? Here are a few traditional options: linoleum, laminate with underlay, plank flooring with joists underneath, ceramic tiles, stone, etc.
Building a floor using floor beams is a little more complicated. If a plank floor is assembled, then it is carried out without additional operations and nested, that is, using standard technology. In order to lay laminate or linoleum over the beams, additional investments will be required in the form of plywood sheets or OSB boards. They are the ones that are first laid along the beams, leveled in one plane, and then the floor finishing can be mounted on them. In this case, the substrate layer must be treated with protective compounds, often drying oil.
Boardwalk under a wooden house
Before making an insulated floor in a wooden house, you need to think carefully about what technology and thermal insulation material is best to use. But keep in mind that you should not save on thermal insulation measures. The initial investment will pay off quickly by reducing energy consumption for heating a wooden house.
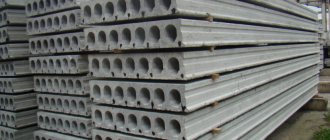
Types of floor slabs for constructing a building foundation
The depth of the slab foundation is small. There are several types of plates:
- monolithic reinforced concrete;
- prefabricated, which include individual factory plates.
Monolithic reinforced concrete slabs are made on a construction site by pouring concrete into a pre-prepared reinforcement frame enclosed by formwork. Prefabricated slabs are delivered directly from the manufacturer or store to the prepared construction site. Due to its ability to withstand heavy loads, a monolithic slab looks preferable, however, for the construction of light buildings, a prefabricated slab is more acceptable, since it saves time and cost of work compared to monolithic reinforced concrete. The parameters of factory plates are different. Detailed information about each plate is contained in the specific product labeling. The material used for manufacturing factory slabs is high-strength concrete (B 7.5 and higher), as well as reinforcement with a cross-section of rods over 10 mm.
Proper sound insulation of wooden floors
The technologies described above are designed to insulate floors as efficiently as possible. It is important to remember that in addition to thermal insulation, there are other important standards related to the sound insulation criterion. Some insulation insulates noise well and does not require additional measures in this direction. Noise coming from the street should not exceed a human-comfortable level of 45 dB. Below are ways to achieve this result using different building materials.
- Laying mineral wool with a density of 50 kg/m3 and above in a layer of 100 millimeters or more.
- Installation of special acoustic mats with a density of 30 kg/m3 and a thickness of 100 millimeters.
- Construction felt stuffing. Its density is from 20 to 30 kg/m3, the required layer thickness is from 20 to 40 millimeters.
How to lay floor slabs on a foundation
Covering the foundation with slabs
Laying floor slabs on the foundation is the final stage of foundation construction. The whole process takes place in several stages using lifting mechanisms. Correct installation ensures the creation of a strong, reliable support for the structure being built. In this way, construction is carried out faster than when pouring exposed formwork with concrete.
Types of floor slabs
The criterion for choosing material for installation is the area of the base of the structure. For small buildings, slabs 10 cm thick are used. If the size of the building is significant, then this parameter is from 20 to 25 cm.
The slabs presented in the table below are used in construction.
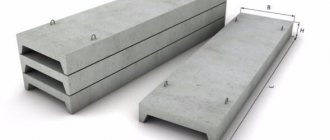
No. Varieties of slab structures Product description
| 1 | round hollow-core reinforced concrete | the main option for creating floors |
| 2 | monolithic | are reinforced concrete structures used to construct the foundation |
| 3 | hollow-core | these are panels 9-15 m long with edges along the contour |
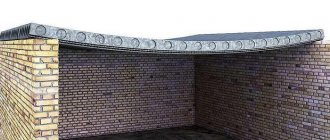
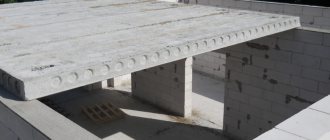
Round-hollow slab
The use of slab structures allows you to complete all the work faster and with less labor than when pouring floors with concrete mortar. The voids inside the products provide additional heat and sound insulation.
The disadvantage of structures created on large-area foundations is considered to be a lack of integrity. This disadvantage is eliminated by the additional installation of a reinforcing frame.
Round-hollow panels most often cover the base. They are considered the best option for these purposes.
Carrying out preparatory work
Preliminary measures are intended to create conditions for further productive work and adherence to technology. The process begins with preparing the slabs and base surface.
The panels are first inspected for chips, protrusions, and compliance with geometric parameters. Detected defects are eliminated before installation work begins.
Then the ends are processed. Existing holes are closed in two ways:
- by laying bricks followed by filling with cement;
- filled with insulation, covering it with plaster.
Filling holes with bricks and cement mortar
The foundation is prepared as follows:
- using a level, determine the curvature of the base surface;
- Based on the magnitude of the differences, select the appropriate alignment option;
- when the discrepancies do not exceed 5 cm, then use a cement screed laid on a reinforcing mesh;
- for large differences, leveling is done using bricks.
The foundation assembled from blocks, before laying the slabs on it, is combined using a reinforced concrete belt.
The slabs are placed on a flat surface to minimize further costs of leveling the floor of the structure and to facilitate further construction work.
Laying slabs on the plinth
After preparation, they begin to lay the floor slabs on the foundation. Since the weight of the material is several tons, lifting mechanisms are used. The panels can be laid on cement mortar or on a dry surface. The first method is preferable because the installation will be further strengthened.
Here's how to properly create a slab floor:
- mix a thin solution;
- apply it to the foundation tape with a two-centimeter layer;
- arrange the reinforcement rod (sufficient diameter - 1-1.2 cm);
- then lay the floor slabs on the foundation with the smooth side inward, fitting them tightly using a crowbar.
Floor installation
It is not necessary to lay reinforcement, but this prevents the mortar from being squeezed out at the seams, and the joints are located at the same level. The overlap should be horizontal as much as possible. Reliability is achieved by fixing the hinges of adjacent reinforcement panels to each other. Each connecting node is connected by welding. The width of the area where the ceiling is supported on the plinth depends on the material from which the latter is built: the “overlap” on the brickwork should be no less than 125 mm, and on a reinforced concrete structure - at least 6 cm. These values are determined by the project.
Floor panels can rest on 2 or 3 sides, or completely along their perimeter.
The outermost and 1st slabs are laid with support on 2 sides. The gap between the 3rd side and the strip foundation can reach 0.25 m. It is sealed in various ways, for example, by constructing a reinforcing belt.
Reinforcement and sealing of seams
Brickwork around the perimeter of the ceiling
To increase the rigidity of the created structure and improve the stability of the slabs, an armored belt is created around the perimeter. The work technology is as follows:
- formwork is installed around the perimeter;
- reinforcement is placed inside;
- connect the rods in the structural units using wire or welding;
- pour concrete.
An alternative to armored belt is brickwork. It is laid out around the perimeter. The work uses reinforcing mesh to make the structure stronger.
Immediately after installation of the floors, the joints and remaining voids are sealed with cement mortar. In some cases, formwork is installed under wide seams.
Reinforced flooring has increased reliability. The period of operation of the building increases, it collapses more slowly. Sealing joints and voids can significantly reduce heat loss.
The process of laying floor slabs is shown in the video below.
The laying of floor slabs on the plinth must be carried out in strict compliance with safety regulations. This will help avoid injury. Before installation, the panels and foundation surfaces in contact with them are prepared accordingly. After installation, in order to improve the performance characteristics of the created structure, reinforcement is performed and the joints are sealed. Compliance with installation technology allows you to achieve high-quality and durable results.
Sand as a soundproofing layer
Soundproofing with sand has been used for a long time because the material has the ability to absorb both low and high sounds. In its mass it is porous with small cells inside between the particles. It is there, reflected from the walls of the air chamber, that sound waves are damped.
But sand has several negative characteristics:
- high specific gravity, which requires the construction of floors using powerful beams and a rough foundation (ceiling);
- high thermal conductivity, it is impossible to insulate floors with sand, you will have to add an additional layer of thermal insulation material;
- If you do not assemble a sealed structure, sealing all the cracks and holes, then sand will penetrate into the premises of the house.
Sand is used as a soundproofing layer in wooden floors