Probably, you need to start with the fact that the wall panel in the kitchen can be made from different materials, each of which has its own advantages and disadvantages. And since the kitchen is the place where a lot of grease and other drops fall on the walls near the work surfaces, you need to approach the choice of material very carefully.
Let's figure out what can actually be used to install a wall panel in the kitchen, and only then consider the principles and sequence of installation.
Decorating the walls in the kitchen with panels
Advantages of finishing a kitchen with wall panels
But today, when tastes and fashion trends begin to change quickly, the market offers a more rational and economical approach to this issue. We are talking about finishing the kitchen with wall panels, which will significantly save time and money during installation, as well as during dismantling, if the apartment owner wants to change the decor in a year or two.
“Kitchen panels” are also superior to facing tiles in terms of aesthetics due to their rich variety of materials, textures, and designs. The user selects them to match the color of the walls and furniture, to suit his own taste and desired mood.
A significant advantage lies in the fact that even for a person inexperienced in household and repair matters, installing wall panels with his own hands will not seem difficult. You can easily cope with this task.
How to attach a wall panel in the kitchen: instructions, tips and videos
- Design and decor
- Kitchen
1 star 2 stars 3 stars 4 stars 5 stars Wall panels can be easily and quickly assembled by almost anyone; this does not require many tools or any special experience in construction. We have written a step-by-step plan that will help you do it right.
Unsplash
Installation methods and list of tools
Preparation for installation
- Calculation of material quantity
- Rules for using PVC sheets
Method of fastening to the lathing
- Marking
- Frame assembly
- Sheathing: instructions and video
Installation method with liquid nails and glue
- Glue selection
- Preparing the wall
- Panel installation
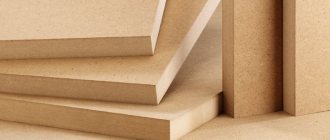
The article will contain two step-by-step instructions for installing wall panels with your own hands. We'll tell you how to properly install MDF, chipboard and PVC elements in different ways. These materials are most often used in finishing the kitchen area. They are lightweight, cheap compared to other designs, but at the same time quite durable, creating sound and heat insulation. Plastic and fiberboards are moisture-resistant and easy to clean, which is especially important for aprons over countertops and the entire room as a whole.
What types of panels does the market offer?
Experts in interior decoration recommend installing wall panels in the kitchen from certified materials. The manufacturer, when producing the product, has already taken into account that its surface will be located in close proximity to the cooking “hearth”, the cutting work table and not far from the sink. To make them easy to clean, all types of certified materials have a special decorative and protective lining to impart heat-resistant and moisture-repellent properties.
Varieties based on material of manufacture:
- from treated wood;
- from a special grade of chipboard;
- made of PVC;
- from MDF.
Moreover, ordinary chipboards and simple wood boards not subject to special treatment are inappropriate to use here, because these materials do not have sufficient moisture resistance, and under the influence of vapors their surface will deform, warp, accumulating moisture in its structure. Additionally, this will serve as a medium for the development of putrefactive microorganisms; a hotbed of fungal infection may appear in the kitchen.
A special technology for preparing materials has been developed for finishing the kitchen with wall panels. In accordance with it, MDF and chipboard boards are produced by hot pressing with the addition of special moisture-repellent and non-flammable synthetic components to the pressed chips. This is documented by special markings, a quality certificate and a fire safety confirmation form. Most users consider MDF-based tiles to be the golden mean in terms of price-quality and installation complexity.
Varieties by panel type:
- sheet panels resemble plywood sheets in size - 122x244 cm and 3-6 mm thick. with decorative design on the front side;
- cut square tiles of various textures and designs, various sizes (cm): starting from 30X30 and ending with 98x98;
- slatted panels made of the “lining” type.
Do-it-yourself methods for installing wall panels
ways to install wall panels for the kitchen
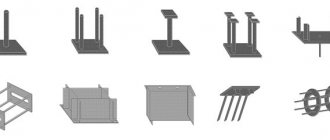
The manufacturer provides 4 rational and simple ways to attach wall panels in the kitchen, these include:
- By installing a wooden sheathing.
- Installation on a metal profile.
- Using construction staples.
- Gluing with liquid nails.
Each method has its own advantages under certain conditions. For example, on smooth wall surfaces, if the humidity in the kitchen is at optimal levels, wooden sheathing is perfectly attached. It is made of rectangular bars, which are placed vertically, parallel to each other in increments of 50 cm, and secured with screws. When installing the sheathing, use a level to avoid distortions, then installing wall panels in the kitchen is easy and simple.
In conditions of uneven walls or high humidity, the installation profile has advantages for use, because, firstly, it is attached to metal slats installed on the wall, which corrects the unevenness, which means there is no need to level the wall with plaster. Secondly, being in dampness, it will not warp. It is not difficult to attach wall panels in the kitchen to profile sheathing.
It’s even easier to use regular construction staples and a stapler when decorating a wall, however, if the configuration of the grooves allows it. Anyone can fix the panel with glue, be it a man or a woman. It is important that the surface of the wall has been well repaired before: cleaned, leveled, primed, well dried. Then there is no need to arrange sheathing, stock up on staples or power tools for installing sheathing and sheathing (you don’t have to buy it, the work will take a little time, so you can rent it).
What else should you consider when choosing a material?
how to choose wall panel material
The decision of which wall panels to install in the kitchen depends on many factors. Practicality cannot be the determining function in this matter, because the main goal for which the choice is made is aesthetics and harmonious interior design. The main criterion here is compliance with the style of kitchen design. The main task you are solving today is successful decoration, and only then practicality, economy and efficiency. If you can combine all these qualities, you will be in an advantageous position.
Let's first consider how to attach wall panels in the kitchen made of slatted plastic or MDF, because this is the most popular type on the market. It is chosen not only because of its reasonable price and quality, the ability to quickly and accurately install, but also because of the wide decorative variety of front surfaces. They are sold in a variety of colors with countless patterns, which is very beneficial for design purposes. Other materials are also good, but their cost is higher and not acceptable for everyone.
Installation of slatted “aprons” on wooden sheathing
Having learned how to attach a slatted panel, you will easily install both a sheet and a square cut panel, because you will understand the principle of operation and will adhere to it.
First, you need to take measurements and purchase the required number of slats, you will also need decorative skirting boards to decorate the panel edge around the perimeter, as well as self-tapping screws, 20 or 30 mm wooden blocks, a measuring tape, a simple pencil and thread, a screwdriver, a level, a hacksaw , hammer drill.
Create a sheathing from a block
Recommendation: In order not to doubt the quality and reliability of the sheathing and to improve the quality of the wood, before starting work, treat the bars with an antiseptic and impregnations that reduce the risk of fire and enhance water-repellent properties. Thus, you will extend the life of the sheathing for many, many years and will not have to change it, even when replacing the panel itself.
Sheathing sheathing
we cover the sheathing with wall panels
In order to carefully install wooden wall panels in the kitchen or panels made of other materials, start covering the horizontal slats from the bottom up. Then, if the last rail does not fit, it will have to be cut lengthwise. To prevent this drawback from spoiling the aesthetics of the view, it needs to be placed under wall cabinets, where it will be invisible.
- Measure the length of the panel with a tape measure, transfer the measurement to the slats and cut the required length.
- Each rail must be attached to the frame, the edges connected, and secured using a drill and self-tapping screws and screwed to the jumpers. Connect the slats to each other and fix them depending on the configuration of the grooves (groove-tenon; groove-groove), that is, insert the tenon of the upper level into the groove of the lower level slats, and then fasten it. If the edge grooves allow it, then use construction staples instead of self-tapping screws, then the work will go faster.
When the panel is assembled, install skirting boards along its perimeter at the top and bottom. Then wipe the surface with a rag and collect the tools.
Fastening the panel using “liquid nails”
Preparation for work begins with the need to take accurate measurements of a section of the wall to determine how much material to buy. Along with the panels, you also need to buy fittings: skirting boards or corners.
Leave the purchased material in the house overnight so that they adapt to the temperature conditions.
It is better to glue the panels together with an assistant:
- It is necessary to clean the surface of the wall.
- Think over and prepare tools and accessories, available materials: plywood, laminate, boards, supports for fixing, which will support the panels after gluing until the glue dries for several hours.
- Remove stickers with manufacturer's markings from the facing material, sometimes this takes a long time if there is no special liquid for removing stickers.
- Then, using a spatula or roller, apply glue to the surface according to the instructions for use and stretch it to a layer of the required thickness.
- Apply the panels to the prepared surface, fix them using the prepared means, and leave until the glue hardens for 6-10 hours.
- Remove the materials at hand, attach the baseboards to the panels and glue them.
Your kitchen has been transformed.
The front side of MDF panels is covered with polyvinyl chloride film, imitating various types of wood or a cut of natural stone. The panels can be plain or with any pattern applied. The surface can be either matte or glossy.
Often, wall panels are finished with natural veneer of valuable wood species, which in appearance do not differ from those made of natural wood. It is the cladding that gives MDF a decorative look and provides protection from moisture. Polyvinyl chloride film is easy to clean and does not change its original color for a long time.
MDF wall panels can be used in the kitchen to fully or partially cover walls, as well as aprons between the work table and wall furniture.
An MDF kitchen apron performs the main functions: protects walls from moisture and food waste, covers the gap between the table and the wall, preventing kitchen items from falling, and serves as a decorative decoration.
An MDF kitchen apron is almost no different in appearance from panels made of glass, tiles, mosaics and other materials.
How to install an apron in the kitchen from MDF
There are several ways to attach an MDF kitchen apron, and each of them has its own advantages and disadvantages:
- Installing MDF panels with glue directly to the wall.
- Installing panels with glue to the timber sheathing.
- Fastening panels using self-tapping screws or dowels.
- Fastening panels using aluminum profiles.
The fastest way is to install an MDF apron in the kitchen using glue. The wall on which the panel is installed must have a flat surface.
If there are significant deviations in plane, then the wall should be leveled by any available means.
Important! If you replace a damaged panel when removing the adhesive from the wall, the plaster layer may be destroyed. In this regard, fasteners using baguettes, self-tapping screws and plastic dowels are preferable; replacement is easier and does not require additional costs. This point should be taken into account when choosing how to secure an MDF apron in the kitchen.
Installing a kitchen apron made of MDF
It is especially important to accurately calculate the dimensions of the sheet:
- It is necessary to calculate the distance from the floor to the apron (usually the distance is determined by the standard height of the tabletop - 85 cm);
- Next, you should determine the height of the kitchen apron (the distance between the countertop and the cabinets is approximately 55-65 cm);
- It should be taken into account that a hood will be mounted above the stove; the standard distance from the countertop to the hood is 75 cm;
- Usually there are several sockets above the tabletop, so you should cut holes for them in the MDF sheet.
Preparatory work
If the kitchen has undergone a complete renovation with the walls leveled, then there is no need to additionally prepare the wall for installing a kitchen apron. If you need to replace the old apron in the kitchen, then the wall needs to be prepared.
It is necessary to remove the previous finish, protruding nails and screws, repair wall defects, level the surface with putty, and then treat with an antiseptic. To ensure that the structure is securely strengthened, it is recommended to pre-install a mounting plate, for example, a wooden strip. The plank must be secured horizontally to the wall with self-tapping screws. So the bar acts as a support on which the MDF sheet will be installed. After completing all work on installing the apron, the strip must be dismantled.
Marking and cutting MDF sheets
Often, a kitchen apron made of MDF consists of several panels, which can have different heights due to different configurations and sizes of wall cabinets.
In this case, the vertical joint between the panels should be in the same alignment as the junction of the walls of the wall cabinets. When measuring and marking, you should adhere to the golden proverb: “Measure twice, cut once.”
Important! Before marking, you should check the horizontal position of the kitchen cabinets and the plane of the countertop using a building level or a laser level. If necessary, adjust the position of the kitchen furniture.
How to choose the right apron from MDF panels
Kitchen apron made from MDF
An apron made from MDF panels can be purchased in a completely finished form.
You can also order it to be made to your own sizes.
In many ways, the choice depends on the size of the space between the furniture.
The standard dimensions of MDF boards are 3 m long and 60 cm wide.
Such a slab will be able to completely cover the distance that remains between the cabinets, since according to the rules, exactly 60 cm should remain between them. But there is also a hood, which is located much higher.
The slabs will have to be joined at this point. Such seams are very noticeable, so you will need an addition that can hide this flaw. Melamine tape is perfect for this.
As mentioned earlier, you can order an apron in individual sizes, in which there will be no seams, but the cost will be very high.
There are two ways to select an apron: purchasing an item with standard sizes or ordering custom sizes.
Cutting MDF sheets
MDF is cut quite easily with any tool designed for cutting wood with a small and sharp tooth. The use of a large tooth leads to crumbling and delamination of the material, as well as unevenness of the cut end.
Recommended Tool:
- Hacksaw for metal.
- Hacksaw for wort.
- Electric jigsaw.
- Hand-held electric circular saw with fine pobedit teeth.
If there is an image on the panels, you should carefully adjust the details of the picture, both horizontally and vertically. The joint of a correctly fitted pattern will be less noticeable and, conversely, the displacement will introduce an imbalance in the image, which will be noticeable at first glance.
Using glue when installing MDF panels
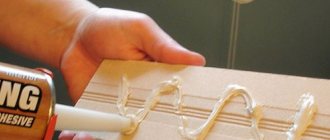
Note. For those who do not know how to attach an MDF kitchen apron using glue: so-called liquid nails are used as the latter.
To apply the glue evenly, a special mounting gun is used. Liquid nails are applied to the back surface of the panel, sometimes additionally to the wall, after fifteen minutes the panel is pressed tightly and firmly against the wall. Thin wooden wedges inserted between the bottom of the panel and the tabletop will help prevent downward movement under the weight of the weight.
Installation of MDF apron
Manufacturers recommend attaching skinals to the wall using adhesive compounds - universal construction adhesive (Titanium, Moment) or the Liquid Nails composition. It is not enough to simply apply the compound and apply it to the wall. The work is painstaking and requires care and patience.
The first priority is to prepare tools and components. You will need:
- Skinals and fittings made of MDF or PVC (various external, internal, F-, U- or T-shaped corners, decorative layouts).
- Moldings (starting, finishing)
- The primer composition is adhesive.
- Glue or “Liquid nails”, hardware.
- A hacksaw with wood blades, a jigsaw, a mallet.
- Tape measure and construction pencil.
- Hydraulic level.
First you need to prepare the base. It should be smooth, dry, clean, free of dust, oil stains, and soot. Metal elements and hardware must be cut off or completely removed, holes, cavities, and cracks must be filled with putty. Wires and cables can be “buried” by laying grooves or brought out to be subsequently covered with a cable channel.
The next stage is priming. The application of special compounds can significantly reduce glue consumption and improve the adhesion of the material to the base.
The third step is preparing the apron. You need to carefully measure the length and width of the panel, cut and cut off the excess with a hacksaw or jigsaw. If necessary, use an electric drill with a circle attachment to cut circles for sockets and switches.
The distance between glue strips should be 8-10 cm
The last stage is gluing. A starter molding or support strip is installed on the wall, and glue is applied to the underside of the panel using a zigzag motion. Next, the slab is applied to the base and tapped with a rubber mallet or simply with a fist. Along the perimeter, the edges can be decorated with finishing corners.
A good video on installation techniques and preparing the base for an apron:
Fastening the apron with dowels and screws
Fastening an MDF apron in the kitchen with self-tapping screws or mounting dowels is done as follows.
- First, holes are marked on the panel blank and holes are drilled for the inserts of the decorative caps.
- Then, having positioned the panel at the installation site, mark the marks of the holes for the nylon dowels. This method will avoid displacement of the holes.
- Having removed the panel, drill technological holes and then install nylon dowels.
The panel is secured with self-tapping screws or screws through inserts onto which decorative chrome caps are screwed onto threads. Of course, this fastening method requires accuracy and more time, but in the future, if necessary, it allows you to quickly replace partially or completely the wall elements of the kitchen apron.
Required tool:
- Metric tape measure.
- Pencil.
- Screwdriver.
- Drill.
- Hammer.
First, a plastic dowel is installed in the technological hole flush with the wall surface, then a brass bushing with a silicone damper is put on, and secured with a self-tapping screw. The last thing to install is the chrome decorative cap.
Installing a prefabricated panel splashback
Sometimes an MDF kitchen backsplash is made from prefabricated panels that can be arranged horizontally, vertically or diagonally depending on the design chosen. Metal clamps are used as fasteners (mainly when installed on a wooden sheathing).
Lathing is used when the wall has significant unevenness and deviation from the vertical. This allows you to hide wall defects much faster and cheaper. When the panels are installed vertically, the sheathing beam is positioned horizontally at a distance of 400 mm, and when installed horizontally, the beam is attached vertically.
Note. The timber must be treated with an antiseptic to prevent wood rotting, which can be caused by high room humidity and insufficient ventilation.
Prefabricated panels have grooves that provide a tight connection between the panels. The clamps are installed in the internal groove of the panel and attached to the beam with nails or screws.
This method is quite simple, which allows you to install an MDF apron in the kitchen with your own hands.
The kitchen is not just a room where food is prepared. But it is also a place where people communicate, solve everyday issues, and generally spend quite a lot of time. Naturally, everyone wants to equip it as best as possible, create comfort and ensure maximum ease of use. To do this, people usually start renovations.
Today, the construction market offers a fairly large selection of materials that can be used in kitchen decoration. One of the most acceptable materials are wall panels. With their help, your modest kitchen will take on a completely new and modern look.
This is a very good solution in choosing finishing materials. An undeniable advantage is that they are quite easy to care for, they wash well and will last for many years. Attaching wall panels is very simple and easy, but the kitchen will be transformed before your eyes. Even a non-professional can handle this. All you need is:
- hammer;
- drill;
- galvanizing sheets;
- self-tapping screws;
- dowels;
- roulette;
- level.
To mount the “apron”, a slab is used, the width of which ranges from four to ten millimeters. The film covering it must contain the same pattern and color scheme as the tabletop itself. You can see an example in the photo. To properly install wall panels you need to follow certain rules.
In order to attach wall panels to the wall, where necessary, liquid nails are used. You can also put it on dowel nails. Their dimensions are selected according to the thickness of the panel itself, and can be 6x60 or 6x40 millimeters. Then they can be disguised to match the color of the panel using caps. If dimensions allow, the upper edges can be hidden under the shelf that is located above.
Preparation for installation
First, the kitchen must be carefully measured. To correctly determine how many panels are required, you need to divide the length of the kitchen wall by their width. If there is a doorway or window, then their dimensions must be subtracted from the total length.
Before starting work, you should leave the panels in the apartment for at least 10-12 hours. After that, you need to unpack them and prepare the wooden slats. They are needed to make the frame of the sheathing. They are fastened using dowels and self-tapping screws. The width of the gap between them should be about 50-60 centimeters.
The slats should be fastened horizontally so that they are parallel to the floor. You can check this using a level. If vertical fastening of the facing panels is provided, then the sheathing slats must be installed vertically. The principle is that the sheathing should always be perpendicular to the panels, as in the photo.
To ensure that PVC panels are not exposed to the harmful effects of moisture, they should be protected using special impregnation. This must be done before you begin attaching them to the frame. Then you need to install the corner profiles.
After the preparatory work has been completed, feel free to begin installing the wall panels. This must be done from the left corner, moving towards the doorway or window.
Work algorithm
First, the edge of the panel must be inserted into the groove of the corner. Next, install the fastening edge of the panel on the slats. This can be done using staples. The next panel is attached to the groove of the first, and the edge for fastening is fixed to the sheathing. All remaining panels are attached in the same way. The final phase is the installation of skirting boards.
The free (bottom) edge of the wall panel should be secured to the baseboard using a wall bead. It needs to be attached to the tabletop with self-tapping screws. This will securely fasten and ensure good fixation of the wall panel. The color scheme here should also match the overall interior of the kitchen. The colors of the corner can be gold or silver. This is a matter of taste. It is advisable that they match the color of the roof rails or handles in the kitchen.
That's all. Your kitchen has changed. An example would be the kitchen shown in the photo. To better understand how to properly attach wall panels, you can watch the video.
As you can see, installing wall panels in the kitchen is not as difficult as it might seem at first glance. However, if you doubt your abilities, it is better to take the help of professionals.
DIY wall panels in the kitchen
Do-it-yourself installation of wall panels for the kitchen is much easier than it seems at first glance. This type of work, in my opinion, is much less labor-intensive than, for example, laying tiles or, moreover, covering a wall with natural clapboard. You just need to be careful and choose the panel that best suits your kitchen.
How are wall panels attached?
Today, the consumer is offered a large number of different finishing materials , including budget ones, which in their design properties are not inferior to expensive solid wood or tiles.
Plus, the installation process is so simple that anyone can do it.
How to attach MDF wall panels?
MDF panels for wall cladding are quite popular among those who want to save money and get cladding that imitates wood.
In its design, the MDF panel is similar to a laminate, however, there is no top protective layer , in addition, the base, consisting of chipboard, is thinner, which contributes to the flexibility of the product, although in this it is inferior to plastic panels.
Advantages of MDF panels:
- Easy installation;
- Large number of colors;
- Can be used in any room with normal humidity.
To install the MDV, it is necessary to make a lathing, since the material is not suitable for use on the street and in bathrooms, then the optimal solution for the frame will be a wooden beam.
If it is necessary to save space, then the panels are glued to the wall surface, but this requires careful preparation of the base.
MDF is attached to the completed wooden sheathing using special fasteners - clamps , which are closed by the next panel, installed in the same way and locked with the first one.
For installation, only one universal corner profile , used for all types of joints.
How to install PVC wall panels?
The installation of PVC panels has allowed many to solve the issue of decorating space on a limited budget, when it is impossible to purchase expensive wallpaper or wooden lining, while PVC coating is much more rational , as it is easy to install and also conveniently maintained.
The panels are installed on a pre-made sheathing , placed horizontally over the entire surface to be covered.
Wooden beams can be used as ribs for the sheathing , if the cladding is done in a room with standard humidity, a metal profile is suitable for indoors or outdoors, and fasteners in a bathroom or sauna must be made using a plastic profile.
Also, to attach the PVC you will need a starting profile that holds the first panel. It is inserted into it with the sharp side and attached to the sheathing using self-tapping screws or staples, after which the next panel is inserted into the groove on the back side and fastened to the frame.
The same action is performed for all subsequent panels, and the last one is simply inserted into the groove of the penultimate one and into the finishing profile.
How to attach fiberboard wall panels?
Fiberboard wall panels are an option for those who want to create an imitation of natural wood on the walls , since the purchase of lining or laminate will be unaffordable for the budget.
As you know, fiberboard is denser than cardboard, but at the same time, the panel can be cut with powerful scissors and even more so with a hacksaw; in addition, such cladding does not tolerate high humidity, which is why it is installed in rooms such as hallways , where it is necessary to protect the lower part of the wall.
Unlike plastic, although it imitates wood, it gives itself away to the touch, fiberboard copes well with its purpose , although it is unstable to mechanical stress.
It is not recommended to install the panels in rooms with constant traffic of people, since the top decorative layer will be erased quite quickly.
To attach the fiberboard, you can make a frame from a wooden beam , in which case it will be convenient to place communications here; the panels can also be glued to the wall surface, having previously prepared the base.
You might also be interested in:
No profiles are required , the panels are installed using special fasteners - clamps and by locking connections between the panels; a universal corner is used to hide the joints. Normal site.
Also watch a useful video on how PVC wall panels are attached
Source: https://postroyka.org/kak-krepyatsya-stenovyie-paneli/
What types of panels exist today?
The construction market today offers a large number of different panels. When answering the question of how to choose panels for the kitchen, it is important to remember the conditions under which they will be used. Constant temperature changes, significantly increased humidity during cooking, large amounts of fat and other complex chemicals can destroy any panels made from insufficiently suitable material. Sometimes, instead of wall panels, it is still worth putting ceramic tiles in the kitchen.
For installation in the kitchen, I do not recommend using chipboard and fiberboard panels. Firstly, this is the last century. Despite their relative cheapness, such panels are very poorly suited for kitchen decoration. Being large in size, they look unaesthetic and quickly “eat up” space.
Much more practical for the kitchen are MDF panels. They are not afraid of high temperatures, are not sensitive to changes in humidity, and do not dry out over time. Such panels have, perhaps, only one drawback - they are quite expensive. And to attach hooks and other special holders directly to the panel, you need to choose fasteners for MDF with an enlarged joint area. Ordinary self-tapping screws simply do not stick to MDF boards and quickly fall out.
Finishing the kitchen with plastic panels will also be an excellent solution if you want to save money or the weight of kitchen panels. Plastic is perfect for covering large kitchen spaces, especially walls. It is best to choose textured plastic for painting, or multi-colored plastic. Also, plastic panels are often supplied on an MDF sheet, which allows you to combine the glossy aesthetics of plastic and the strength of an MDF panel.
So, having decided on the type of panel, you can begin installation.
Advantages and disadvantages of an MDF apron
The abbreviation MDF is from English Medium Density Fideboar, it translates as “medium density fiberboard”. It cannot be said that this material is an ideal choice for rooms with high humidity, but these panels have their adherents.
You can easily install them yourself.
The main advantages are usually indicated:
- inexpensive and practical material, which is available in a large assortment from the retail chain and through catalogues;
- ease of self-installation - does not require the use of complex fastening technology or the use of high-precision tools;
- piece panels are convenient because they are easy to dismantle - partial repairs of wall decor are available with maximum load without large investments (some reserve is required);
- there is no need to do preliminary surface preparation, with the exception of convexities (it is better to grind them off);
- rigid panels are a good way to hide defects in walls or grooves in which pipes, electrical cables, and other communications are laid;
- wall panels for kitchen splashbacks are sold with low price tags, regardless of the manufacturer.
Often, MDF decor is considered as a temporary cladding that will not last long in the kitchen interior. The reason is its disadvantages, which any finishing and building material has:
- the lining of the apron made of laminated panels does not have high fire resistance, and when ignited it can produce acrid smoke (within the slab it requires treatment with special liquids);
- over time, the slabs can become deformed from excess humidity and temperature exposure and peel off from the wall;
- hot fat and sparks from an open flame can leave marks, the kitchen apron panel can be hopelessly damaged (it is recommended to use a metal shield or a gas stove cover).
Such materials are not susceptible to mold and mildew.
The general recommendation is to follow safety rules when preparing food and take care of decorative interior panels. You should not experiment with recipes that involve the use of an open flame, as well as piezo lighters with a spark to ignite gas burners.
MDF panels do not require complex and constant maintenance, which indicates their unpretentiousness.
How to install
I’ll say a few words about why you need to level the surface under the panels and how best to attach them. Most of the panels are fastened along guide profiles, which are installed level. This is necessary for absolute evenness of the walls. If only the kitchen apron is laid out with panels, the curvature of the wall does not matter at all - the panels are simply installed on profile guides or regular tile adhesive. It is also possible to plaster the walls along the beacons for a perfectly flat surface. When installing the panels, no additional puttying of the walls is required.
Finishing the kitchen with wall panels is carried out in 2 stages - marking the material and its preparation and, in fact, finishing.
If the panels are installed on metal or wooden guides, the guides are first installed and screwed using screws and dowels. All guides are leveled. Guides are installed if the height difference is no more than 5 mm. Otherwise, it is necessary to plaster the wall along the beacons and then install the panels.
Small panels that serve as an apron in the kitchen are marked with a pencil to fit the required wall dimensions and cut out with a jigsaw. After this, tile adhesive or special glue for panels is applied to the surface, mixed with a drill with a “mixer” attachment in a small bucket. Do not knead too much glue, because after gluing one panel, you need to take measurements for the other. This takes time, but the glue will have time to harden. The adhesive is applied with a regular spatula and leveled with a v-notch spatula (like a tile spatula). After this, the panel is placed on the glue and leveled. Remember that before installing the panel, you need to check the evenness of the wall with a building level and putty it in places where the height difference is more than 3 mm.
The easiest way to additionally screw heavy panels to the profile is with self-tapping screws, recessing them into the slab. The places where the screws are screwed can be covered with special caps. The fact is that large MDF boards, which can be used to decorate walls, are not always held together only by glue and can collapse at one moment. Of course, the use of plastic panels involves placing them on glue, similar to the method described above. Lightweight sheet panels for the kitchen are installed with glue. First you need to completely level the walls.
So, to install the panels we will need:
— Tape measure, pencil or marker;
— Low-speed drill with a “mixer” attachment;
— Aluminum guides, if panels need to be mounted on them;
— Dowels and screws of the appropriate size (3-4 mm);
— Special glue for panels (MDF or plastic);
— Trowel, regular and figured spatula with v-shaped teeth;
The sequence of actions is as follows:
— We check the evenness of the walls and, if necessary, level them with plaster. An alternative option is to level the aluminum profile for drywall.
— We take measurements on the wall and cut off the required piece from our slab. Apply it to the desired area to measure.
— We coat a flat wall with glue so that a layer 3-4 mm thick with v-shaped grooves remains on it. Apply a thin layer of glue to the wall panel using a regular spatula.
— Glue the panel, measure the normal level vertically and horizontally.
— If necessary, beat it with your hand or a rubber mallet.
How to install: installation
There are two ways to attach the apron to the wall: install with self-tapping screws or liquid nails. The second option is preferable if the screw heads will stand out from the overall design of the kitchen.
Fastening with self-tapping screws
The good thing about this method is that the panel secured with self-tapping screws fits tightly to the wall. And this is an important indicator for small kitchens. After all, even the thinnest panel takes up a certain amount of space, and a tightly pressed panel frees up a small, but much-needed space.
To secure the apron, first, future holes are marked on it. The distance between the marks is:
- length 50–60 cm;
- in height, no more than 15 cm.
Then holes are drilled in the panel, through which marks are made on the wall with a thin pencil. And dowels are inserted into the drilled recesses, after which the panel is secured with self-tapping screws.
Fastening with liquid nails
Using liquid nails to attach a kitchen backsplash has a number of undoubted advantages.
The decorative panel is attached to such a frame using self-tapping screws. And the installed slats should have a cross-section of 10 x 40 mm and be located at a distance of 40 cm from each other.
Installation on a plasterboard wall
Fastening the panel to drywall is only possible using special dowels. The use of standard fasteners is unacceptable, since ordinary dowels will not hold in drywall.
Where is it better to use decorative panels in the kitchen?
This question has been raised more than once by many experts. Most often, panels are used to decorate the kitchen apron, as the area most susceptible to various contaminations. The use of such panels not only makes it easier to clean walls, but also offers an excellent option for replacing tired panels after a few years. If you want a durable option, you can use special glass panels with heat-resistant glass, which look great in the kitchen interior and increase the practicality of the kitchen apron.
The ubiquitous plastic and, as a result, plastic panels for the kitchen can be used in the dining area, where there is no direct contact with very hot surfaces. Thus, it is not recommended to install plastic panels in the area of the oven without appropriate protection with heat-resistant glass. Of course, you shouldn’t apply panels to this kitchen. Decorative kitchen wallpaper is better suited for this purpose.
Currently, decorative panels for the kitchen are a good alternative to classic facing materials such as tiles and, if properly designed, look no less aesthetically pleasing. Thanks to their remarkable properties, they are increasingly becoming part of the interiors of truly stylish kitchens.
Installing wall panels is a great opportunity to quickly transform the appearance of your kitchen without putting in any serious effort. Using these fairly simple tips, you can create an image kitchen by choosing wall panels with the desired pattern.
Probably, you need to start with the fact that the wall panel in the kitchen can be made from different materials, each of which has its own advantages and disadvantages. And since the kitchen is the place where a lot of grease and other drops fall on the walls near the work surfaces, you need to approach the choice of material very carefully.
Let's figure out what can actually be used to install a wall panel in the kitchen, and only then consider the principles and sequence of installation.
Types of materials used
It is important to note here that the decision whether to use this or that material or not depends not only on its practical features, but also on the overall design of the kitchen. Try to choose the material so that it harmonizes as much as possible with the style of the room.
So, let's start reviewing the materials:
- Washable wallpaper or PVC film. The option is, of course, the simplest and cheapest. Because you won’t need much wallpaper, and you can paste it in a couple of hours. However, there are serious drawbacks - near the kitchen work surfaces, any wallpaper, even very good ones, will quickly become unusable, and a wallpaper apron most often does not look very chic.
- Plastic panels for the kitchen. In principle, the convenient thing here is that the material is inexpensive, you only need a little of it, and it’s easy to care for such a surface. If we talk about how to cover a kitchen with plastic panels, then there are unlikely to be any difficulties with this. Because the assembly technology is simple and fast. One of the disadvantages is that the plastic itself is not very strong. If it gets hit hard by something, a dent or crack will most likely appear on the apron. Therefore, if you are interested in how to decorate a kitchen with plastic panels and what nuances there may be, then remember that such a surface will require maximum care.
- Tile backsplash. Of course, this is a very good option, since the surface of such a wall will be both durable and beautiful, and it will be easy to clean. However, there are also some disadvantages - the total price of all the necessary materials will be an order of magnitude higher than in other cases. In addition, not everyone can do the installation themselves, since working with tiles requires at least some experience. In addition, it is unlikely that the tiles can be laid quickly, and they cannot be glued to any wall. Therefore, we will not consider the assembly of such an apron.
- MDF wall panels for the kitchen. Perhaps this is the “golden mean” between the price of the material, its quality, and ease of installation. The material is not afraid of moisture (due to the presence of varnish on the surface), quite durable, inexpensive, and you can choose almost any color and design of the panels.
It turns out that it is best to make wall panels for the kitchen yourself from plastic or MDF. The remaining options are either of poor quality or will cost more.
Let's take a step-by-step look at the instructions for assembling such panels.
Panel installation
It is worth noting that both materials are attached to the wall in approximately the same way, and there is no significant difference in technology (Find out how to attach a wall panel for the kitchen).
So, in addition to the panels themselves, we will need the following tools and consumables:
Advice: you can save money and not buy power tools. Rent it for a couple of days - it’s unlikely that installing a wall panel in the kitchen with your own hands will take more time.
- wood hacksaw;
- self-tapping screws and quick installation;
- wooden slats for the frame (usually slats 20 by 30 mm wide are sufficient);
- plinths for decorating the perimeter of the future apron.
In principle, with such a “gentleman’s set” you can begin the first stage of work.
Marking
First you need to mark where the slats will be located. These are the perimeter and vertical jumpers. In most cases, jumpers can be placed at a distance of 40-50 cm from each other - as a rule, this distance is sufficient.
But of course, if wall panels made of thin plastic are being installed in the kitchen, then this distance may need to be reduced so that the panels do not sag.
Let's start installing the slats.
Frame assembly
Advice: in order for the frame to last longer, before attaching the slats, treat them with moisture-proof and antiseptic impregnations. With this approach, high humidity in the kitchen will not damage the frame for a very long time.
In general, the frame is ready and the photo below shows what it should look like.
By the way, perhaps you are interested in how to glue a wall panel in the kitchen, rather than screw it. In this case, in fact, everything is like this - you can glue it, but it will not be so reliable, since over time, due to temperature changes in the room and high humidity, the glued panels will most likely “move away” from the rough wall.
And before gluing anything, the wall needs to be very well prepared - leveled with plaster and treated with a primer, plus be sure to wait until it all dries. It’s easier and faster to make a frame.
Sheathing
So, let's proceed to the last stage (as you already understand, as a clear example, we are considering the assembly of several horizontal panels - not a solid one). We assemble the panels from the bottom up, so that if the end panel does not fit and has to be cut lengthwise, it will be at the top of the wall - under the cabinets this point will not be so noticeable.
In principle, that's all!
Installation of glass panels
The installation of the skinal is carried out after the kitchen has been completely finished, the furniture has been assembled and the electrical wiring has been installed. How to attach an apron in a kitchen of this kind is demonstrated in the following video.
You can install only small skins (and only straight ones) yourself, or fix glass panels. Only specialists can install a wall-length or corner model.
There are 3 types of fasteners:
- hinged - allows you to join panels and form a single protective screen. This method hides the condition of the wall, since the material appears at a distance of 4 mm from the surface;
- for silicone glue – allowed for small element sizes;
- with the help of Velcro - essentially wall mounting. Possible only if the latter is in perfect condition.
The most popular, despite the complexity, is wall-mounted installation.
- Mark the wall for the future apron.
- Holes with a diameter of 6 mm are drilled for the fasteners - the standard size of plastic dowels included in the kit.
- They drive dowels into the walls. The panel is freed from the protective film and placed on the fasteners. The holes in the glass are made by the manufacturer. However, the hole for the socket and switch is either made to order or made independently.
- A silicone damper is inserted into the hole in the glass - it prevents contact between glass and metal. Then install the threaded bushing and screw in the self-tapping screw. The fasteners must be reliable, but not excessive; the glass must be hung on the fasteners, and not pressed between the screw and the wall.
Self-tapping screws are masked with decorative caps.