At first glance it seems that to implement installation of floor slabs very easy, but there are some nuances that it is better to learn about now, so that there are fewer problems later.
In this article you will learn:
— How to install reinforced concrete round-hollow slabs (PC).
— How to properly make a hatch (hole) in reinforced concrete round-hollow floor slabs for an attic staircase? WATCH THE VIDEO BELOW.
— We hammer in the rustics correctly. 44D08C
— How to cover half a meter of void without slabs (cheap and easy)?
— What to do if a hollow-core slab is cracked.
— How to cut a round-hollow slab easily and quickly.
- Why might the stove burst?
— How to seal the ends of the slabs so that the round-hollow slab does not freeze.
.
.
.
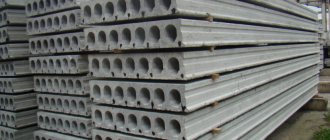
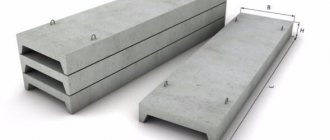
The types of slabs we most often work with:
There are slabs - hollow-core panels, tent panels with ribs along the contour in the form of a cornice (one slab covers the entire room) and ribbed prestressed slabs whose length can be from 9 to 15 meters.
We very rarely use layered solid panels for roofing.
We also rarely use monolithic reinforced concrete floors (mainly for non-repairs), since they are two to three times more expensive than prefabricated hollow-core floors and several times longer in time.
You can cover a floor with slabs in one day, but a monolithic floor can take an indefinite period of time (set up formwork, tie reinforcement, pour concrete, remove formwork, etc.)
In this article we will look at the most common and most optimal floor slabs - reinforced concrete round-hollow slabs. Voids in slabs come in different shapes: oval and irregular:
Round hollow-core floor slabs have some advantages over other slabs, namely:
— Noise insulation due to voids.
- Relatively light weight.
— Additional thermal insulation due to voids and so on.
.
.
.
You won’t believe it, but with the help of a crowbar, a grinder and a fist, you can cut a reinforced concrete circular hollow-core slab 1.2 meters wide in 40 minutes. You will say: “Why do I need to cut the slab, make it shorter, if I can order a slab of any length?”
This is of course absolutely correct, but this is not always the case. In almost all the houses we built, we had to cut at least one slab here and there.
For example, to cover a bay window, you need to make a reinforced concrete monolithic ceiling over it or trim a round-hollow slab in the shape of a trapezoid.
The second example is to cut out the same hatch in the ceiling so that there is a hole into the attic. Or it is simply necessary to reduce the length of the reinforced concrete slab.
Summary: very often in reinforced concrete floors you have to trim, cut and chop off here and there.
.
a) Cut the slab crosswise.
So we need to make the reinforced concrete slab a little shorter. The slab lies on pads on the ground. On top of the slab we mark the size we need with chalk. On top of the stove, use a large grinder, using a disc on the concrete.
A nuance: the chalk mark on the slab must coincide with the lining under the slab (it will become clearer later).
If, for example, it is necessary to cut half a meter from a round hollow-core slab, then we mark half a meter from the edge, but before that, when unloading the slab onto the ground, we placed a wooden lining in advance not on the very edge, but also half a meter from the edge
If the lining under the slab is shifted further (not half a meter from the edge, but 600 mm), then the concrete will “slick” while cutting the slab.
After we have cut through the chalk with a grinder, we hit the pipes (voids) near the cut with our fist. You need to hit not the rib, but the pipe. With 3–4 hits you will break through the pipe. And so we punch through all the pipes with a fist.
As the popular saying goes: “It’s better to see once than to hear a hundred times and read a thousand times,” so below in the third section (how to make a hatch in a round-hollow reinforced concrete slab) you will see in the video how easily reinforced concrete slabs break through.
Then, when the pipes are broken, we hit the edge, not from the top, but from the side. By that time, most likely, the unnecessary piece of the slab (half a meter) had sagged under its weight and made the work even easier.
When the pipes are broken, the ribs are knocked down with a fist, the crowbar gets to work. We use a crowbar to break through the lower part of the pipe and get to the working fittings. We clean the reinforcement from concrete and cut it with a grinder and a metal disc.
It is best to “pack” the torn edge of the slab with backing bricks and cover it with mortar, this will strengthen it.
.
Production of products for reinforced concrete construction
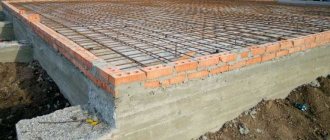
In reinforced concrete products, reinforcement is an important element. Wire or rod reinforcement is placed in the concrete. For the manufacture of chamber floor slabs, spatial reinforcement mesh frames are used. Thanks to this, the product has additional strength.
If platforms are used in conditions where humidity is high, then steel with anti-corrosion additives is used in manufacturing. Increased humidity or acidity may occur in areas where water pipes or sewer lines are covered. When they are built using such collector slabs, their service life increases by 5-10 years, compared to products that contain general-purpose fittings.
b) Cut the slab lengthwise.
In principle, cutting a slab lengthwise is even easier than cutting it across. The only difference is that it takes longer to cut lengthwise, since the slab can be 6 meters long, while only 1.2 m - 1.5 m need to be cut across.
The principle of cutting a slab lengthwise is exactly the same as cutting it across. We hit the top of the slab with a fist along the entire length of the pipe.
To make the edge of the slab more neat, you can first cut it with a grinder and then hit the cut with your fist. Then use a crowbar to break through the bottom of the pipe along its entire length.
As you cut the slab, you will come across a mesh (smooth reinforcement with a diameter of 3 mm - up to 8 mm), which we also cut with a grinder.
.
Characteristics of hollow reinforced concrete products
Only practice shows how convenient and practical certain materials are. Reviews of such slabs say that their thermal conductivity is low and their noise insulation is high. But consumers are satisfied with the low price and light weight; the product is even on both sides, so between floors it can act as both a floor and a ceiling. According to GOST 9561-91, products are divided into groups. The PKK platform is supported on four sides, on three sides - PKT, supported on two sides with round voids - PC, with pear-shaped voids - PG. There is also a group of PB - these slabs are produced by continuous formless formation. Thickness varies from 160 to 300 mm. The holes come in different diameters from 114 to 203 mm. The ends can be sealed with cement to create reinforcement.
The maximum length of hollow products is 12 meters and width is 6.6 meters. You can test the strength of the products with your own hands and make sure they are reliable.
Conclusion:
The slabs are cut very easily. When I cut the slab for the first time, I couldn’t believe my eyes. It was very easy and I began to doubt the strength of the round hollow-core slabs.
But this is not so, hollow-core slabs are very durable and can withstand 800 kg/m2. Strength in round-hollow slabs is ensured by: ribs, reinforcement, the principle of corpses and other things.
.
.
.
In this video (see above), we cut this hatch in about 50 minutes.
A caveat: you need to be careful when cutting out the reinforcement with an angle grinder, since the reinforcement is tense and it can jam the disc in the angle grinder. It’s best to just cut the reinforcement with a grinder, and then hit this cut with a crowbar or a fist.
The safest way is to cut off the reinforcement in the hatch with an autogenous cutter.
To make the contours of the hatch a little smoother, you can first cut it with a grinder along the perimeter (from above). In the video above, we cut a hatch across the pipes in the slab.
.
Hatch dimensions for attic stairs.
Hatches for stairs are usually punched between two slabs, at the junction. The width and length of the hatch depends on:
— Widths of floor slabs.
— The load that the cut slabs will experience. For example, the roof racks will rest on these cut slabs (the roof will put pressure).
If the pits are wide, then the hatch can be made larger. In the video above, the width of the reinforced concrete round-hollow slabs is 1.5 meters.
We often make hatches 900 mm by 900 mm in slabs 1.2 meters wide. That is, we cut 450 mm in one slab and 450 mm in another slab. These are the dimensions of the hatch for ladders, but they are very inconvenient. Since the attic ladder will always be stored somewhere nearby, in the living room.
It is best to use folding attic ladders, which are attached to the hatch cover and folded when the hatch is closed.
The most common sizes for folding attic stairs are: 600 mm by 1200 mm; 700 mm by 1200 mm; 600 mm by 1300; 700 mm by 1300 mm; 700 mm by 1400 mm.
For example, if you have chosen a folding attic ladder measuring 700 mm by 1400 mm, then it is very IMPORTANT to cut the hatch in the slabs in such a way that the long side of the hatch (1400 mm) is along the slabs and not across.
.
.
.
We use this method when it is not possible to cover all non-multiplicities with slabs. When it is not possible to purchase slabs of different widths. When you don’t want to cut floor slabs lengthwise.
.
Main advantages of floor slabs
Floor slabs are products made from prestressed reinforced concrete.
This building material has many varieties and is widely used in construction, especially in the construction of multi-story buildings. One of the main advantages of floor slabs is their affordable price. In addition, floor slabs are so versatile that they can be used both in the construction of industrial premises and in the construction of residential premises. Floor slabs are highly durable. They can be safely used when constructing buildings in areas with high seismic activity (7-9 points). Functionally, the slabs are designed to organize floors between floors; they are also used to construct load-bearing structures of a building and lay heating mains. Floor slabs simultaneously perform insulating tasks, provide steam, gas, and water resistance, and increase the fire safety of the building. Hollow floor slabs have the best insulating characteristics; in some cases, the voids are filled with various fillers (lightweight concrete, porous materials). Some types of slabs are made from frost-resistant concrete grade F50, but in most cases, floor slabs are used in non-aggressive environments, under normal climatic conditions and temperature and humidity conditions. In the recent past, floor slabs were not very convenient, and their installation required the installation of additional support beams. Currently, it is possible to produce larger slabs that are easier to use. Shortened slabs are still used today if there is a need to organize technical openings (ventilation shafts, for example). Floor slabs are manufactured according to drawings for specific buildings. The production technology makes it possible to comply with the required geometric parameters with high accuracy, which, undoubtedly, is also one of the advantages of floor slabs. The variety of types of floor slabs allows you to choose the required type, ideal for specific purposes. For example, for the construction of wall partitions it is convenient to use tongue-and-groove floor slabs. These slabs are easy to install, and their surface allows you to save on plastering work. And solid floor slabs are convenient for installing balconies. If all installation rules are followed, reinforced concrete floor slabs provide perfectly flat floor and ceiling surfaces, which greatly simplifies the finishing of the room. A particularly important condition for installing floor slabs is adjusting the support levels. Sometimes this happens during the installation process. The service life of floor slabs is more than one decade, and if you follow simple installation and operation rules, you will receive high-quality and durable floors. Of all the materials used in prefabricated construction, about 30 percent are reinforced concrete floor slabs. All materials used in their manufacture undergo thorough testing in special laboratory conditions. The latest production technologies and modern equipment allow us to produce products of the highest quality. www.pliti-perekritiya.ru
a) The best and easiest way.
When installing reinforced concrete slabs, sometimes misalignments occur. That is, it is not possible to completely cover the entire space of the house; holes remain. Below we will look at how you can cover half a meter without slabs.
So, for example, we cover the first floor of a house with round hollow-core slabs. When laying out the slabs, we are missing half a meter to completely cover the floor.
When we install the first slab, we retreat 250 mm from the edge of the inner wall. Next we install the remaining slabs.
There is also a 250 mm gap between the last slab and the inner wall. In other words, we divided our half meter of non-multiples in half by 250 mm and made them on both sides (the holes between the wall and the slab are 250 mm each).
Next, we fill this space with ordinary cinder block, the same one from which we laid out the walls. We build a cinder block with a “poke”:
The cinder block will not fall, since its end (butt) rests on the slab.
A nuance: it is best to build a cinder block with holes on the side, so that there are no holes at the bottom or at the top.
Next, the outer wall is built and it clamps the released cinder block. For those who doubt the strength of such covering of space, I will say that we have been using this method for more than one year, everything works well.
If you are really worried about the strength, then you can strengthen this place (where the cinder block is placed) when you screed the floor. To do this, you need to place a masonry mesh on top of the slid cinder block or tie a mesh of reinforcement with a diameter of 6 mm.
.
Hole technology
In a reinforced concrete hollow-core slab, 1-2 holes with a diameter of 15 cm can be made in one of its voids.
If there is a need to increase their number, then it is necessary to recalculate the load-bearing capacity of the floor taking into account the change in stress in the compressed zone of concrete. In the catalogs of reinforced concrete products for hollow-core slabs, it is allowed to drill out one of the ribs and remove the reinforcement, which will reduce by 15%.
Installation of holes using diamond drilling
You can make a hole in a concrete slab using drilling machines and specialized crowns of various diameters. This allows you to drill a hole of the desired shape to a given depth. You can drill not only in a horizontal plane, but also at different angles. Stages of work:
Holes for sewerage and air conditioning systems should be drilled with the designed slope, otherwise the correct operation of the system will be disrupted.
- First of all, you should select a suitable modification of the diamond drilling installation, its equipment, and the necessary tools. The decision is made based on the design documentation;
- Next, the equipment is transported to the site;
- All markings necessary for drilling are carried out on the surface of the slab: first of all, find the center of the hole;
- From this point, using a special template, find the drilling center. An anchor will be installed here, with the help of which the frame of the diamond drilling apparatus will be attached;
- Using a hammer drill or impact drill, a hole is punched for installing the anchor. Its (hole) diameter must correspond to the diameter of the anchor used in the work;
- Dust is removed from the plate and hole;
- The anchor is installed flush with the concrete floor;
- A wedging device is inserted into it, which is hit 2-3 times with a hammer, after which it becomes possible to screw in the anchor bolt;
- Next, the drilling machine frame is installed, which is centered using a special drilling center indicator;
- After which the frame is leveled and secured using special screws;
- A diamond bit of the required diameter is screwed onto the gearbox spindle.
- The cooling system of the drilling rig should be connected to a water supply from the central network;
- When a diamond bit enters concrete, its rotation speed should be low. After passing the protective layer, it should be increased.
Holes for laying communications
Reinforced concrete is a composite material, its strength is ensured by the joint “work” of concrete and reinforcing material (reinforcement). If you make a hole in the slab using a jackhammer, the reinforcement will be exposed. Therefore, it is recommended to cut the slab along the line of voids, and reinforce the holes using an iron angle welded to the channel.
Hollow-core floor slabs are widely used in the construction of multi-storey residential buildings and industrial buildings. They are one of the most popular reinforced concrete products. With their help, they create interfloor and under-roof spaces.
Round hollow-core slabs are produced in any size, but if necessary they are easily cut, despite their high strength characteristics.
Each hole in the floor slab is filled with air, so these products have good heat and sound insulation properties.
These products are made of heavy concrete, with longitudinal steel prestressing reinforcement laid inside them. To prevent the edges of the slabs from deforming under the weight of the walls above, they are sealed with lightweight concrete. Which leads to improved heat and sound insulation properties. The grade of concrete used for the manufacture of hollow core slabs is B15 or B25 in strength, and F50 in frost resistance. Standard product dimensions: thickness – 220 mm, length – from 2.4 to 6.3 m, width – from 1 to 1.8 m.
The rod participates in the redistribution of the payload onto the beams, thereby reducing the span between them.
At the building design stage, the operational load on the floors is calculated. However, during operation, these loads often begin to exceed permissible standards. The installation of fireplaces, large aquariums, Jacuzzi systems, and support columns has a direct impact on the interfloor slabs. For this reason, their load-bearing capacity is insufficient. However, the main reasons requiring strengthening of load-bearing structures are corrosion of reinforcement and aging of concrete.
In addition, during the operation of the building, an unsatisfactory technical condition of its structural elements arises. Strengthening the old floor can be done in different ways. A radical measure is to replace the slabs. But it is often impractical both from the point of view of technical capabilities and economic costs. The method of repairing a building and the order of work are determined by the organization designing it.
Main stages of work and their sequence:
- Reinforcing bars should be cleared of concrete;
- The metal is coated with an anti-corrosion compound;
- The voids in the reinforced concrete slab are broken, after which it is cleared of debris and rubble;
- Reinforcing frames are installed;
- The surface of the slab is concreted;
- After drying, the concrete is coated with a primer;
- A plaster layer 10-15 mm thick is applied.
b) The second method is more labor-intensive.
You can also disperse the plates, that is, make small equal distances between them.
For example, to cover a floor you need 10 slabs and there remains a hole of 500 mm (half a meter). We install the first slab from the edge of the inner wall (so that there is no gap). We install the second slab with a slight indentation of 55 mm from the first.
Ten slabs are nine joints between them. Dividing 500 mm into 9 joints we get 55 mm distance between the plates.
Next, we tie the formwork (board) from below under this hole between the slabs. We place reinforcement in the gap between the slabs and fill it with concrete.
.
.
.
Very often, when installing floor slabs, you come across a broken slab. This most often occurs from improper storage of floor slabs or transportation.
In the photo below you see how circular hollow-core floor slabs should never be stored.
All these slabs burst, and the lower ones in several places. I took a closer photo
Many times I saw how the slabs seemed to be folded correctly, but winter passed, the base under the slabs became limp, the middle of the slab touched the ground and the slab burst.
To prevent the slab from bursting, you must be careful when storing slabs in stacks. To do this, you need to make a good base under the edges of the first slab (bottom).
It is advisable that the slabs lie horizontally. It is important that the first linings under the slabs are high, in case it begins to sink into the ground.
Under no circumstances should the middle of the slab touch the ground, since it is almost 100% likely that it will burst, not just one, but also those on top of it!
The following spacers between slabs are usually made from wooden slats. There are three factors to consider here:
a) So that the slats are thick enough so that the slabs do not touch each other.
b) So that the wooden slats (spacers) are located one above the other VERTICALLY.
c) Spacers are laid 200 - 400 mm from the edge of the slab.
The height of a stack of slabs on a good, solid base can reach a maximum of 2.5 meters (8 - 10 rows).
.
.
If the cracks on the round-hollow slabs are not very large, then in principle there is nothing to worry about. Almost every house we have built had cracked slabs installed.
Below we will consider the best options for installing cracked slabs so that the minimum load is put on them:
a) If the crack in the slab is large, then we usually place such a slab on the main (or external) wall by 100 - 150 millimeters.
In other words, we install the cracked slab so that it rests on three walls, namely, the ends of the slab rest on the main walls and the long side of the slab also extends and rests on the main wall.
The cracked slab is pressed against the walls above and a completely solid ceiling is obtained.
b) You can also mount a cracked slab where there will be a brick partition underneath it. In other words, the cracked slab will be supported from below by a partition.
c) We install the cracked slab between good, intact slabs. Please make sure that the rusts between the cracked slab and the good one are well sealed. When the solution in the locks hardens, the ceiling will be solid.
d) If you don’t really like the quality of the round-hollow floor slabs (cracks), you can strengthen the screed on these slabs. The screed can be made of concrete, with reinforcement. The result is a reinforced concrete screed that will completely relieve and strengthen the floor slabs.
e) You can mount cracked slabs in places where there will be minimal pressure on them. For example, mount a cracked slab on the very top - the attic floor, where there will be no pressure or support from the roof (rack, etc.) on it.
f) If the slab is severely cracked, forming a gap of 4-10 mm, then it is best to cut such a slab and make it short.
.
.
.
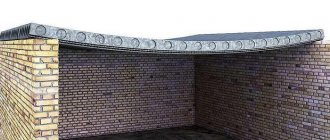
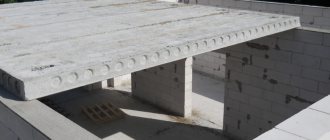
Rusts are the joints of slabs. Two slabs are mounted side by side, with the long side facing each other. Between them is rust:
You should always fill in rusty areas with mortar. Why hammer in rustications? The fact is that round-hollow slabs have locks on the sides, round recessed dimples (photo below):
When these recesses are filled with mortar, the slabs adhere to each other and the overlap becomes one. Thanks to the locks, the plates firmly adhere to each other.
.
PC floor slabs - reinforced concrete load-bearing slabs
PC floor slabs are round-hollow reinforced concrete load-bearing structures designed to cover any premises. The service life of a building structure depends on the quality of its production. They can be made from light, dense and heavy silicate concrete.
PC floor slabs vary in void diameter and thickness. They must necessarily comply with all the requirements of state standards for design (in terms of rigidity, strength, crack resistance). The main requirements for PC floor slabs are not only reliability, but also high sound insulation. They are distinguished by enhanced properties against the formation of cracks and chips. They are produced both using stressed reinforcement and conventional reinforcement. This is their main difference from PB beam floor slabs, which are produced only using prestressed reinforcement. In addition, the latter have more flexible physical characteristics, allowing installation at any pitch, and also allow the slab to be made of almost any shape. PC floor slabs have more stringent installation requirements, but are much denser and stronger in terms of fracture/bending characteristics.
When lifting and installing PC floor slabs, use special gripping devices or mounting loops. When manufacturing this building material for loopless mounting, the dimensions and location of the holes are pre-provided for in the design documentation drawings.
To ensure that reinforced concrete building materials do not lose their distinctive properties, it is necessary to follow the storage rules: the height when laying stacks should not be more than two and a half meters; during long-term storage, they must be supported on wooden blocks. Such linings are located near special mounting loops.
Hollow floor slabs are intended for the construction of the load-bearing part of structures and floors for various purposes. They are applied in strict accordance with the developed drawings and the necessary additional requirements.
Hollow-core structures, in accordance with state standards, are marked with markings. It consists of groups that include a letter and a number, separated by a hyphen. The first part indicates the type of hollow slab, its required dimensions, rounded to the nearest whole number, measured in decimeters. The second part indicates the serial number according to the required load-bearing capacity or the design load. In addition, they indicate the class of reinforced steel and the type of concrete (they are not designated by the letters heavy, light - L, silicate dense - C). The third group includes additional parameters.
Ribbed floor slabs are produced for flooring in multi-storey buildings or industrial premises with a minimum pitch of six meters. Their height is four hundred millimeters (in accordance with state standard 27215-87) or three hundred millimeters (in accordance with state standard 21506-87).
Hollow-core floors, which are produced with parallel voids (the length of the floors are determined from them), are designed to rest on two or three sides.
Alphanumeric groups in the brands contain the following necessary designations: class of prestressing reinforcing steel, load-bearing capacity, type of concrete, standard size of the slab and the presence of holes of one thousand, seven hundred or four hundred millimeters (denoted 3, 2, 1, respectively).
The material in greatest demand in housing construction is 12 - PC floor slabs with a width of one thousand two hundred millimeters. Strict compliance with the requirements of standards and design documentation determines the further safety of the entire structure as a whole.
fb.ru
How to repair defective rust.
Sometimes you come across defective round-hollow slabs with incorrect sides (where the locks are). When installing such slabs, the rustication turns out to be upside down, that is, the top of the slabs fits tightly to each other, but the bottom does not.
Repairing inverted rust is very easy. To do this, we install the slabs with a slight spread of 20 - 30 mm from each other. In other words, so that the top of the slabs (along the length) does not fit tightly, but has a gap of 20 - 30 m.
Then, underneath this inverted rustication, we tie a board along the entire length of the slabs and fill the rustication with mortar on top. The solution should not be completely liquid, but not thick either.
Due to the fact that we have a small gap between the slabs on top (20 - 30 mm), it is easy to pour mortar into the rustication through it.
.
.
.
It is very important to follow safety precautions when installing slabs!
Most often we install slabs using a truck crane. We move the plates (correct) to the desired position with a crowbar. Due to the fact that the slabs are mounted on the mortar, they move easily within 10 - 20 minutes.
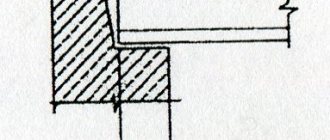
It is advisable to make the support of the slabs on the wall 120 - 150 mm.
In order not to constantly run for mortar during the installation of slabs, we install the first slab and place a trough with mortar on it with a tap. Using the remaining solution in the trough, we hammer the rustics between the slabs.
.
.
.
Service life of floor slabs, service life of slabs
Any material, not just construction material, loses its original strength characteristics over time under the influence of the environment and constant loads. Depending on the operating conditions and in durable reinforced concrete structures, irreversible damage may occur.
The estimated service life of floor slabs is determined based on laboratory test data for maximum loads and the most unfavorable operating conditions. This determines the limit at which irreversible changes occur in the product and it loses strength.
For various groups of building materials, there are standard service life, which may differ significantly from the maximum service life. They are smaller for operational safety reasons. But even according to existing standards, the service life of floor slabs in residential buildings is 100-150 years and is equal to the permissible service life of the entire prefabricated building.
Is this period determined once and for all? No, this is only a possible period, which can be adjusted after collecting observation statistics.
Ensuring regulatory safety of building operation
In practice, one cannot be guided only by standard service life. Even guaranteed high-quality reinforced concrete floor slabs from the manufacturer may partially lose their strength characteristics during installation or increased load. In order to notice any changes in time, periodic inspections of structures are carried out within the time limits also determined by regulatory documents. This is called collecting statistics on the condition of structures in operating buildings.
After regular inspections, the practical service life of floor slabs may decrease, since many factors are taken into account during inspections. This is the presence of deformations, the degree of crack opening, leaks, signs of metal corrosion, etc.
But if, for comparison, we take the service life before major repairs, which for houses with wooden structures is only 40-50 years, and for houses with reinforced concrete floors it is 100-150 years, then the difference is significant. This comparison quite clearly shows that reinforced concrete floor slabs are truly durable and very strong structures.
www.dom-gbi.ru
a) The slabs rest on the outer wall.
When resting the end of the slab on the external walls, it must be sealed to retain heat.
The ends of the slabs can be sealed (packed) in several ways:
— We inserted mineral wool into the pipes of the slab to a depth of 200 - 300 mm.
— Insert concrete plugs or fill with lightweight concrete, 120 - 250 mm deep.
— Insert a backing brick with mortar into the pipe and cover it well with the mortar. It is best to insert a one-and-a-half backing brick into the pipe.
It happens that the end of the slab comes too close to the facing brick. If there is no insulation between the facing masonry and the slab and the ends of the saw are not “packed”, then the slab may freeze.
Summary: we seal the ends of the slabs most often with backfill bricks.
.
What to do if the slab is frozen?
It happened in our practice: we mounted one slab close to the facing brick and did not seal the end of the slab. The stove froze and the house was covered in ice. The owner of the house turned on the heating and the stove began to “cry.”
In other words, the house is warm, but frost entered the voids of the slab, the temperature difference caused the dew point and the slab constantly became wet.
The way out of this situation is very simple - we drill with a hammer drill all the frozen pipes in the slab from below, near the outer wall. We insert a tube into the hole, pointing it towards the outer wall and blow a little foam into the pipe.
That is, we blow foam into the pipes in the slab near the end, which rests on the outer wall. We do not blow out a lot of foam, approximately, to get a plug of 100 - 200 mm.
.
Hole technology
In a reinforced concrete hollow-core slab, 1-2 holes with a diameter of 15 cm can be made in one of its voids.
If there is a need to increase their number, then it is necessary to recalculate the load-bearing capacity of the floor taking into account the change in stress in the compressed zone of concrete. Catalogs of reinforced concrete products for hollow-core slabs allow the possibility of drilling out one of the ribs with the removal of reinforcement, which will reduce the load-bearing capacity of the floor slab by 15%.
Installation of holes using diamond drilling
You can make a hole in a concrete slab using drilling machines and specialized crowns of various diameters. This allows you to drill a hole of the desired shape to a given depth. You can drill not only in a horizontal plane, but also at different angles. Stages of work:
Holes for sewerage and air conditioning systems should be drilled with the designed slope, otherwise the correct operation of the system will be disrupted.
- First of all, you should select a suitable modification of the diamond drilling installation, its equipment, and the necessary tools. The decision is made based on the design documentation;
- Next, the equipment is transported to the site;
- All markings necessary for drilling are carried out on the surface of the slab: first of all, find the center of the hole;
- From this point, using a special template, find the drilling center. An anchor will be installed here, with the help of which the frame of the diamond drilling apparatus will be attached;
- Using a hammer drill or impact drill, a hole is punched for installing the anchor. Its (hole) diameter must correspond to the diameter of the anchor used in the work;
- Dust is removed from the plate and hole;
- The anchor is installed flush with the concrete floor;
- A wedging device is inserted into it, which is hit 2-3 times with a hammer, after which it becomes possible to screw in the anchor bolt;
- Next, the drilling machine frame is installed, which is centered using a special drilling center indicator;
- After which the frame is leveled and secured using special screws;
- A diamond bit of the required diameter is screwed onto the gearbox spindle.
- The cooling system of the drilling rig should be connected to a water supply from the central network;
- When a diamond bit enters concrete, its rotation speed should be low. After passing the protective layer, it should be increased.