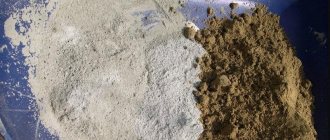
Types of installation
At this point in time, there is a mass of different fastening materials, thanks to which any connection of various elements can be made. They all differ in their technical characteristics and scope of application. At the same time, the installation instructions clearly regulate their use when working with timber.
Corner
This type of fastener for timber is a metal corner with holes in both planes. It is made from those types of materials that are not susceptible to oxidation and have sufficient strength.
In this case, the metal corners for fastening the beam must withstand a weight twice as large as the element that it will fix.
- First, you need to apply markings to the surface that will correspond to the contours of the beam. When making it, you need to use not only a measuring tool, but also a water level with a plumb line.
- After this, the corners are fixed using nails, self-tapping screws or impact dowels. It is worth noting that at this moment you should not create a strong connection so that adjustments can be made later.
- Next, a beam is placed on the surface and connected using self-tapping screws to the corners. In this case, the fasteners are fully tightened.
- At the final stage of installation, adjustments are made. To do this, they begin to tightly clamp the corner for fastening the beam with fasteners, adjusting it so that the material aligns with the applied markings.
Advice! This type of installation is well suited for brick and concrete structures, but the reliability and strength of the finished connection depends entirely on the quality of the corners and their ability to withstand loads.
Interconnection
When building a house from this material, it is quite often necessary to fasten timber to timber.
At different times, many methods were used for this, but in modern construction they are presented in the form of a combination of them.
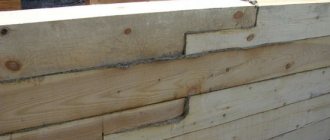
- First, special grooves are made on the beams, which, when connected to each other, form a lock.
- Next, they are fastened together, and the lock itself is additionally secured with a large nail or wooden cotter pin through a pre-made hole.
- Some craftsmen prefer to glue such joints, but it is believed that such a measure is unnecessary. However, if a corner is formed as a result of installing the material, then it is worth putting rolled tow in the lock as a seal and insulator.
- To ensure the reliability of these types of connections, auxiliary material is often used. It can be a metal bracket for fastening the beam. It is driven into both materials, pulling them together.
Advice! It is not necessary to use all types of fasteners for such installation, but it is necessary to do this in critical areas or corners. As a result of such actions, the structure will receive additional strength and stability.
Concreting and masonry
Typically, timber is attached to a brick wall using corners. However, there is often a need for large loads to be placed on the material, and this joining method cannot provide this. This problem is associated with the organization of floors or when arranging timber floors in a house.
In such cases, the timber is mounted into the wall during its manufacture:
- To do this, the material is first treated with moisture-proof impregnation, which not only protects it, but also increases adhesion.
- Next, it is installed on the masonry in the place where installation is planned.
- Then they continue to build the wall taking into account the walled up material.
It is worth noting that this method is also suitable for fastening timber to concrete. In this case, it is used as an additional reinforcing element. If the design of the house assumes that the walls will be built from slabs, then a concrete belt is created to organize the ceiling and install the timber.
Advice! This method can be considered one of the most reliable, since it does not weaken the material and creates a strong connection with the supporting structure.
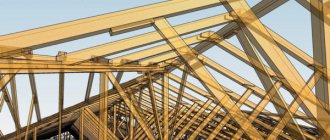
Roof
Considering that the lags are fastened to the wall of a house made of timber by connecting them using a carved lock and bracket, many builders make the mistake that it is also possible to organize a connection on the roof. However, this design requires a completely different approach, since it has its own operating conditions.
First of all, it should be noted that the type of connection of all roof elements must be developed in accordance with the project. They must withstand heavy loads and be strong enough. Therefore, to fix them, not only nails and locks are used, but also staples.
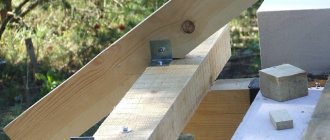
A typical fastening of rafters to a ridge beam is carried out by installing them at an angle of 45 degrees and connecting them using a fastener. Quite often, when creating a roof, bolted systems are used, which can provide increased reliability and quality of all components. However, even when using them, it is better to strengthen the structure with brackets.
Currently, there are a lot of different mounting elements for implementing all kinds of projects of similar structures. They are sold in the form of finished products, and their price is quite affordable even for people with low incomes.
Advice! When making a roof, you should not make changes to the project yourself. This can lead to weakening of the structure and shortening its service life.
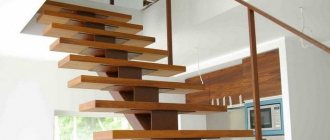
Suspension
Quite often, when finishing a room, it becomes necessary to secure the timber at a short distance from the ceiling. This may be due to various design solutions or decorative elements.
This type of fastening of timber to a concrete ceiling can be done using special hangers. They are purchased in specialized stores in accordance with the weight of the material they will need to carry.
The suspension is fixed to the ceiling using impact dowels, and special fasteners are mounted on the beam. Next, both elements are connected and as a result the necessary connection is obtained. The height of the material is regulated by a suspension system, which allows fixation at the required level.
It is believed that this installation method is not reliable, but in practice it turns out that it can withstand significant loads. However, if this material is used only as decoration, then the imitation timber can be attached to the wall, which will create the desired effect without the risk of it falling on your head.
Such elements have their own fixation systems, which are designed for a specific product. They are usually supplied along with the material itself.
Advice! If it is possible to avoid this installation method, then you should use it. Usually, builders simply wall such beams into the wall, and install hangers for reinforcement or beauty.
Fastening floor beams to the wall
Building a house with your own hands is not as difficult as it seems at first glance. The only element that inexperienced builders may have difficulty constructing is the roof. The degree of comfort when living in the house depends on it. Let's look at the issue of attaching the rafters to the floor beams.
Features of creating a roof project
Errors when creating a rafter system can lead to roof collapse and leaks. At the design stage, it is important to correctly set the angle of the roof so that it can withstand the load from snow and other precipitation. In addition, you need to consider the distance between the elements so that the roof has an optimal weight.
When preparing your project, pay attention to the following points:
- roof shape;
- roofing material used;
- locations of internal supports;
- rafter system;
- at what angle the roof slope will be located;
- distance between walls.
The appearance of the future roof will depend on these points. The use of such a structural element as a Mauerlat depends on the material of the walls of the house and the distance between them. If it is less than six meters, then this beam does not need to be laid.
How to fasten rafters if a Mauerlat is used
You can do without a Mauerlat in frame and wooden houses, but sometimes it is a mandatory part of the structure. For example, when using foam concrete blocks and similar materials for walls:
- transfer of moisture from the walls to the rafter system;
- features of the material due to which the fasteners do not linger in it;
- fragility of walls;
- inability to support the roof without using a Mauerlat.
If the house is built from a material that does not shrink, it is advisable to use a rigid fastening, otherwise the connection may have a degree of freedom. The rafter system is first attached to the mauerlat, and at the free ends it is connected to the floor beams.
Rigid mount
For a rigid connection, you will need to cut out a rafter beam or use a retaining strip. This type of fastening is used both to create a shed roof and for other types of construction.
The step-by-step execution of the cutting method is as follows:
- Cut out all the blanks according to the template. To begin, install the beam for the future rafter leg with a certain angle (laid in the project), and then mark the location of the notch. Its depth should be no more than a third of the height of the bar. After making one rafter leg, use it as a sample. You will need to make the rest identical. It is important not to make a mistake at this stage.
- Place each rafter leg with a saddle on the Mauerlat and secure with nails. First, hammer two at an angle to each other, from the sides of the rafter system. The third one must be driven vertically - it ensures the strength of the structure.
This way you will get a rigid rafter connection that can withstand any load. Remember that cutting cannot be done in the Mauerlat, as this will weaken it. Look carefully at the photo to understand how to correctly cut and assemble rigid fasteners.
There is another method of rigid fastening: when using it, meter-long bars are hemmed to the rafter legs, which rest against the mauerlat. They must be secured with metal corners.
Sliding type mount
The movable joint is used for houses made of timber, logs and other materials that shrink. If in such a house you make a rigid joint between the rafter legs and the mauerlat, over time the entire structure may collapse. When there are errors in construction, deformation begins from the walls of houses and is transmitted further.
For a sliding connection, it is a good idea to purchase a special fastener called a “sled” from any hardware store. You can also purchase corners with unusual holes for connection (oblong shape). The rafters are attached to all roof elements using clamps and brackets.
How to make a mount with floor beams
Attaching the rafters to the floor beams, which protrude 40 centimeters from the walls, can be done by cutting down using the double tooth method. This is quite simple to do: at the end of each rafter leg, cut out something like a step. The same lock needs to be cut out on the beam. Tighten the connection of these elements using a bolt and a clamp.
There is another way to install the junction of rafters and floor beams - using overlays made of boards. They are secured using self-tapping screws or nails with special notches. Distributing the load from the rafters between the mauerlat and the floor beams makes the roof more durable.
Features of the construction of the rafter system during frame construction
In the construction of light frame structures, rafters can be attached directly to the floor beams without a Mauerlat. Step-by-step instructions for carrying out this work are as follows:
- When you start working with the rafter system, you must have walls and a rough ceiling erected. Install additional supports during the work.
- Connect the ceiling beams and the top trim. Secure them.
- Install the rafters. To strengthen their block, you can use double vertical posts.
- Using racks, attach the rafter legs to the walls. After this part of the work, you can begin lathing and installing the roof.
It is best to watch a video on the construction of a rafter system on frame houses without a Mauerlat before starting construction. It will help you understand how to carry out the work so that the rafters can withstand even the heaviest loads.
When building frames, you will need a tightening. It will take on part of the load and make the structure unified. To tighten, it is not necessary to use timber; a board will do.
Arrangement and installation of floors on wooden beams
: 04/13/2013 Category: Construction
14 745
Arrangement and installation of floors on wooden beams. Wooden beams
Floors are one of the most important structural elements of any private or country house. In this article we will try to consider in as much detail as possible the features of the design and installation of floors on wooden beams.
A ceiling is a horizontal structure that divides the space of a building by height. Floors take loads from furniture, equipment and people in the room, and also by connecting load-bearing walls with each other, they serve as elements that ensure the stability of the structure.
Depending on the location, there are basement, basement, interfloor and attic floors. According to their design, floors can be beamless or beam.
What are the requirements for floors?
Floors must first of all have the necessary strength . to withstand their own weight and the loads acting on them (uniformly distributed or concentrated).
Source: https://krovlya-mp.ru/kreplenie-balok-perekrytiya-k-stene.html
Nuances of fastening installation
When it comes to hanging a shelf, equipment, decorative element or other structure, it is very important to make a reliable fastening. The better the work is done, the longer the equipment will last, and the better the design solutions will fit in. Otherwise, you may be left without a weighing object, but also injured, so read the instructions carefully before starting work.
Professionals can easily tell you how to mount something on a wall made of different materials. But ordinary people do not have this information, so they often get lost in stores and cannot choose the one they need from the variety of options offered. Let's look at the most popular fastener options, which are universal and suitable for attaching necessary items to walls made of different materials.
- Self-tapping screws are the most common fastener. It can be used to attach sheets of drywall to the wall or metal guides. It's a pleasure to work with him.
- Dowels are necessary in situations where something heavy is attached. They provide a strong grip, reducing the likelihood of falling.
- Anchors are used to secure large items weighing more than 100 kilograms.
- You can fasten glass and other transparent things using special rivets. They have a decorative appearance and do not give themselves away as a massive structure.
- Regular nails are used to fasten objects together. The principle of operation is known to everyone, so we won’t focus on it.
- A corner will be needed when attaching small wall cabinets or small shelves.
The type of brick used for masonry is of great importance for fasteners. The type of fastening changes depending on whether the brick is hollow or solid. Its type, grade and degree of reliability are also assessed.
The most important point is connecting the bricks together. The binder mortar crumbles under mechanical stress, so it is necessary to treat it with care and precision, trying to preserve its original appearance.
Fastening external cladding boards
External cladding boards made of pine or spruce must be fastened with hot-dip galvanized nails or screws. Untreated exterior sheathing boards made from other types of wood (such as larch or red cedar) must be secured with stainless nails or screws.
External cladding boards must be fastened so that each individual board can work in changing humidity conditions. For example, vertical sheathing boards cannot be fastened to the same nail with a flashing, otherwise cracks will appear due to the fact that the boards will not be able to expand and contract independently of each other.
There are two main conditions that determine the rules for fastening external cladding boards: board size and profile.
- All horizontal exterior sheathing boards (tongue-and-groove or tongue-and-groove) must be secured with one nail or screw to each batten. The same applies to milled vertical exterior cladding boards. The main thing is that the dimensions of the boards do not exceed 19x173 mm. Larger boards need to be secured with two nails or screws.
- Vertical outer cladding boards of rectangular cross-section or with an open tongue-and-groove joint (Fig. 9.38) must be fastened with two nails or screws to each batten. Boards less than 61 mm wide can be fastened with one nail or screw to each batten.
Nails and screws should not reach the bottom edge of the vertical board by approximately 100 mm.
To reduce the risk of cracks, it is advisable to pre-drill the outer sheathing boards before driving nails into it, or replace the nails with self-tapping screws.
Fastening external cladding boards with nails
Traditionally in Norway, the outer cladding boards of frame houses are fastened to the battens with nails.
The disadvantage of a nail joint is that due to changes in humidity and temperature conditions, the nails may gradually begin to come out. This most often occurs when the siding boards are not painted and when the boards are too wide and the nails are too short.
In most cases, a nail connection is sufficient. To do this, you need to make sure that the humidity conditions for the external walls are within normal limits, that the cladding boards are made of coniferous wood, a maximum thickness of 22 mm and are painted with light facade paint.
In addition, a nail connection is the fastest and least expensive way to fasten the outer cladding materials of frame walls. You can use both regular nails and drum nailers. Drum nails are used twisted or rough. As a general rule, the working length of the nail should be 2 to 2.5 times longer than the thickness of the sheathing board. For pulling out work, it is recommended to take the working length of a smooth nail as 12d; for twisted and rough nails, the working length will be 8d. Based on these rules, Table 9.12 was compiled, which establishes the working length of nails and screws depending on the thickness of the cladding boards of wooden frame walls.
Fastening external cladding boards with screws
In Norway, special corrosion-resistant screws are produced for the installation of external cladding boards. They are used in cases where external cladding boards are exposed to high humidity for a long time - for example, they are installed without additional processing. Screws are also used for installing exterior cladding boards under dark paint when the boards are thicker than 22 mm and for installing exterior cladding boards made of hardwood.
Screws for installing exterior sheathing must be designed for exterior use. The most suitable screw diameter is 6 mm, the head should be recessed into the board, and the tip of the screw should be self-drilling to avoid cracks.
As a rule, the working length of a screw for installing exterior sheathing should be 1.5 to 2 times longer than the thickness of the exterior sheathing board. For pulling out work, it is recommended to take the working length of the screws equal to 6d (Table 9.12).
Table 9.12
Recommended working length of fastening elements and corresponding thickness of embedded boards*
| Thickness of external cladding boards, mm | Minimum working length (thickness of embedded board), mm | Type of fastening elements |
| 19 | 36 | Smooth nails - better rough or twisted |
| 22 | 36 | Rough or twisted nails |
| 22 | 48 | Smooth nails |
| 28 | 36 | Screws |
| 28 | 48 | Rough or twisted nails are better than screws |
*) Fastening external cladding boards made of softwood.
Attaching siding boards using nail guns
When attaching exterior sheathing boards using nail guns, you must strictly adhere to the following rules:
- You should always press the sheathing boards well against the battens before securing them.
- The nail gun should be adjusted so that the nail heads are flush with the surface of the sheathing boards.
If the nails are driven too deep, water and dust from the wall will collect in the recesses, and in such places dark stripes will quickly form under each nail. Increased humidity in the recesses will cause galvanized nails to quickly corrode, so careful adjustment of nail guns is very important. If you can’t adjust the nail gun, it’s better to hammer the nails in by hand.
The material was prepared by designer Vladislav Vorotyntsev based on the Norwegian technology of frame house construction developed by the SINTEF Institute
Recommendations from professionals
The technique of making a fastening element is no less important than the choice of tools and fasteners. A hammer drill will not work for a brick wall, so you have to look for other ways out of the situation. Unlike a concrete wall, brickwork requires careful handling. If you touch the wall with a hammer drill, the brick may crack or even crumble. This will not only spoil the appearance of the wall, but also make subsequent use difficult.
The only possible option is to use a drill. You just need to do this carefully to avoid chipping and cracking. Put effort into doing your work accurately. If your plans include more than one hole in the wall, then it makes sense to purchase a special drill. But even this does not guarantee 100% protection against cracking. In most cases, you can consult with sellers in a store specializing in construction tools; they will tell you how best to make it and which model to choose, select fasteners and give brief instructions.
Thus, we found the first available wall mount - smooth drilling.
Sometimes the work is complicated by the fact that hollow brick was chosen for construction. This species does not tolerate proximity to heavy objects, but sometimes it is necessary to attach it. Construction and renovation professionals can continue to follow the “grandfathered” method for you. This technique involves driving a dowel into a drilled hole and securing it with a wooden peg. However, it is better not to use it for a large-scale project, but nailing a board is quite possible.
The second available option is to use a corner. But this method cannot be called ideal, because the corner is not the best thing you can think of for attaching to a brick wall.
To create a strong fastening, dowels are used, which are tied into a knot in the void. Fortunately for builders, you can find a huge number of different options in the store, but the principle of each of them is almost the same.
Mauerlat and methods of its installation
Tools and materials:
- roulette;
- timber 100*100;
- perforator;
- waterproofing;
- studs, steel rods or wooden wedges.
The entire structure fastening scheme can be seen in Fig. 1:
Figure 1. Scheme for attaching rafters to a brick wall: 1 - Strapping; 2 - Mauerlat; 3 - Waterproofing; 4 - Rafters; 5 - Wire; 6 - Fixing anchor.
- Strapping. This method of fastening is carried out most often, but there are exceptions for studs.
- Mauerlat.
- Waterproofing.
- Rafters.
- Wire.
- Fixing anchor.
At the very beginning you need to install the Mauerlat, because... the design begins with it. Before installing it, a cut brick is laid on the front side in order to cover it later. Some craftsmen place the brick after finishing the work, which is also effective, but takes a little more time. It is better to use penetrating options as waterproofing, but if it is not possible to get them or the price is prohibitive, it is quite possible to get by with roofing felt. After the roofing material is rolled out at its location, you need to burn it with a gas burner.
There are 3 ways to attach the Mauerlat:
- Hairpin. This method is the simplest, because... you need to make a vertical hole in the wall to the depth of 1/2 a stud, pour a little non-hardening mastic into the bottom and immerse a metal rod there. A beam with holes made in the right places is installed on top. The fastening pitch is usually 30-40 cm, because the increase will affect the strength indicators.
- Wooden wedges. Everything is much simpler here, because... When laying bricks, special gaps are left where wedges of the required length will be installed. All that remains is to simply make holes in the timber in the selected places with a drill and fasten them together. The wedges should be made of softwood or more expensive varieties in order to last as long as possible.
- Steel rods. The installation step is 30-40 cm, and the method is identical to wooden analogues. Such rods are much cheaper than wood, and their installation is easier. The only negative is the need to deepen 3 rows of masonry so that lateral pressure does not cause cracks in the roof to appear in the house (working with lightweight materials does not require such precautions, but it is better to be on the safe side).
Related article: Redevelopment of a one-room apartment into a two-room apartment
Some craftsmen heat the waterproofing to a viscous state before laying the Mauerlat, which improves adhesion. This move is not possible when using mastics, because for them it is extremely destructive.
Let's start installation work
You need to start work by drilling a technical hole with a diameter of 7-9 millimeters. Then carefully insert a plastic dowel into it and hammer it in as far as possible with a regular hammer.
Manufacturers created dowels of this type specifically to be able to create a mount on a brick wall. A distinctive feature of this building element is its unique design. Thanks to it, the dowel does not rotate when a screw or nail is inserted into it.
Advantages of a special dowel:
- It is a reliable fastener for attaching heavy objects to hollow brick walls. Therefore, large and heavy items will remain in place, even with additional load.
- It is convenient to use. At the moment when a self-tapping screw or nail is screwed into a dowel, its part located in the cavity of the brick begins to fold into a special knot, which, expanding, occupies the free space. It is for this reason that it is an ideal fastener.
- Versatility of use. It can be used to secure objects even from the outside of the house. Very often, owners of their own homes decorate and protect their front door with canopies. In order to secure it, you need a dowel with a knot.
In addition to the practicality of the visor, it also has a decorative function. It makes the house look more beautiful and well-kept. But in order to attach the canopy to the wall, one dowel is not enough. When carrying out this type of work, it is necessary to arm yourself with other fasteners: corners, screws and self-tapping screws. It is convenient to attach wooden canopies to the corner. In this case, it will be a supporting and connecting element. Attach the corners to the brick wall, preferably with dowels.
Now you know how to make a reliable fastening on a brick wall using a special dowel. Hollow brickwork does not exclude the possibility of having beautiful wall cabinets and shelves.
pluskirpich.ru
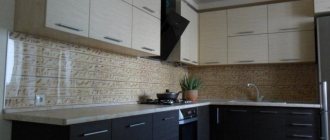
Options for attaching laminate to the wall
There are several types of fastening. They differ in the complexity of execution and additional possibilities in decorating the room.
Frame fastening technology
This method is labor intensive. First you need to fix the lathing on the wall - a structure made of metal or wooden beams. It is fixed to the surface with self-tapping screws. The distance between the slats is 40-50 cm. Laminate boards in the first row are attached to the sheathing with hidden clamps. The second row engages with the first grooves.
This method allows you to attach the laminate without first leveling the wall surface with plaster. It is convenient to hide wires under the wall structure and install sconces and spotlights.
Frame technology for fastening panels
Fastening with glue or liquid nails
This method is the simplest and fastest. Before attaching the finishing material, you need to make sure that the surface being formed is perfectly flat. Otherwise, it is leveled with putty and primed. Stages of laying the material:
- Installation starts from the lower left corner. Glue is applied to the wrong side in a zigzag pattern. Depending on the type of adhesive composition chosen, you may need to attach the board with the glue applied to the wall, then remove it, wait and glue it again, finally.
- A gap of no more than 2 cm is left between the floor and the decorated wall. At the end of the work, it will be hidden under the baseboard.
- Horizontal masonry is periodically checked with a level.
- Each panel glued to the wall must be tapped with a rubber hammer.
- To fit the last board in a row, it is shortened with a hacksaw.
- Laying a new row begins with half of a pre-cut panel in order to maintain a checkerboard pattern.
Fastening with clamps
Clamps are special galvanized staples for fastening laminate and lining to walls and ceilings. They can be flat or serrated, equipped with clamps and holes for screws or nails. They are driven into the board and attached to the sheathing or directly to the wall with self-tapping screws.
The use of clamps is a simple and quick way to install laminate boards. But it is used only for processing walls that can be driven into with a nail or a self-tapping screw. Staples must be selected depending on the thickness of the facing material.
Fastening decorative boards to clamps
Fixation with screws, staples or nails
Eliminating clampers will reduce repair costs. In this case, the screws are screwed into the long ridge of the board, observing a step of 30-40 cm. Before screwing in, you need to drill a hole in the ridge 1 mm smaller than the diameter of the screws, and insert the fastener into it. This technique will prevent the scallop from splitting.
Staples and nails are used in a similar way. But in general, installation with nails is not recommended, since the fasteners are rigid. Neglecting to prepare the holes in the comb often leads to its delamination and damage to the entire work.
Laminate is a convenient and beautiful finishing material that can be laid not only on the floor. It is used to decorate walls and ceilings and create original design solutions.
If you find an error, please select a piece of text and press Ctrl+Enter.
How to attach a wooden beam to a concrete wall?
Having prepared the beam and drilled holes in it for the fastening element, you can begin preparing the wall on which the structure will be mounted.
- First, let's drill a hole. We will need a twist drill of hard alloys, a drill with a Pobedit tip or with a diamond coating.
- To maintain the service life of the drill, periodically cool it in water to avoid overheating.
- Then prepare a wooden plug, dip it in glue, but not water-based, so that the wood does not swell.
- You can also make your own lead plug. To do this, take a sheet of lead, cut a strip suitable for the hole, and twist it into a tube.
- Then we pierce it with a nail and screw a screw in there.
You can also use a monolith made of alabaster or gypsum solution.
Let's take a copper wire and screw it onto a screw in the form of a spiral, then fill the hole with the prepared solution and coat the wire on the screw with it. Without hesitating for a second, in order to avoid the solution drying out, press the screw into the hole to the required depth. Remove the squeezed out excess solution without waiting for it to harden. After 10 minutes, you should remove the screw to prevent it from drying out along with the solution. When the plug becomes a monolith with the wall, you can begin attaching the timber.
Although when it comes to concrete, be it brick or mortar, anchor bolts are the best choice. They will ensure fastening strength.
How to attach a wooden beam to a brick wall?
If you have to work on a brick wall, use only a drill. Drill carefully and slowly, evenly without loosening on the sides, to avoid splitting and scattering of the brick. If you hit concrete, it is better to use a drill with a hammer drill function, this will help crush it. Cases of hitting a hollow brick often occur. How can we be here? It is better to use a dowel that, when twisted, curls into a knot. Carefully screw it into the drilled hole so as not to break its parts.
It is better to screw self-tapping screws into concrete using dowels made of durable plastic. The dowel is laid between the concrete and the self-tapping screw. It can also be pre-lubricated with glue.
An anchor is also perfect for attaching a wooden beam to a brick wall; unlike nails and screws, it can handle any load.
How to attach a wooden beam to a gas block wall?
Before you start attaching a wooden beam to an aerated block, you need to take into account that aerated concrete is an easy-to-work material, as it is quite soft. Therefore, the magnitude of the load on the beam plays a very important role here.
If it is a small beam of light weight, then you can use bolts or self-tapping screws. Wedge-shaped bolts will be more appropriate, because they sit firmly in the material. A screw with threads along the entire length is also suitable.
To fasten heavier structures, shelves or cabinets, metal or plastic dowels are needed.
For fastening solid materials, it is better to use nylon dowels in the center of the object. Hollow materials can be caught at the edges.
When making connections to an aerated concrete surface, it is necessary to take into account that parts made of metal may be destroyed when interacting with the block. So consult with specialists, they will definitely tell you proven fastening elements.
How to attach a wooden beam to a wooden wall?
In this case, the perforated fastening method is common both in roofing and in the furniture industry. Perforated elements are secured with nails, self-tapping screws or self-tapping screws.
Perforated plates connect parts in one plane, for example, roof installation. There are also corners of different widths to strengthen and connect the structure. For auxiliary elements of light weight, mounting tape is suitable.
The most common method of fastening wooden structures is with nails. Liquid nails are often used in everyday life, furniture assembly and construction. Using nails will seem like a very easy way, but we must not forget the technique of hammering a nail. If you use a bolt with a nut at the end, you can easily hammer a nail into any hard-to-reach place. Calculate in advance how long a nail you will need. For a more durable connection of the boards, the nails are driven in at an angle to each other. Wood that is too dry will split faster with a nail. If the timber is too dense, hold the nail in the middle with pliers to prevent it from bending. For large nails, you can pre-drill a hole that will be narrower than itself. Make a small drilling for the cap.
Summarizing
Before fastening the rafters with your own hands, you need to carefully prepare for this process. The wood chosen is predominantly coniferous, the metal is galvanized, and the tools are reliable.
Usually, fastening rafters on an area of 100 m² without assistants takes up to 1 week, so you need to check the weather forecast in advance to avoid getting caught in the rain.
If rains are expected, and the work must be completed ahead of schedule, then during the rainfall the work is stopped and covered with polyethylene, and immediately after its completion, work can continue.
The best posts
- How to make a plasterboard box in the bathroom - step-by-step instructions
- Painting drywall - step-by-step instructions
- Drywall figures or how to make the interior stylish and fashionable
- How to join drywall in corners and the process of building a decorative niche
- Socket boxes for drywall: correct selection and installation
- How to cover a radiator with plasterboard without losing heat in the room
- Grouting drywall joints: materials and techniques for performing the work
- Porcelain tiles for floors: dimensions, weight, thickness and installation; What is the difference between porcelain tiles and ceramic tiles?
Related article: How to make an arch from plasterboard - step-by-step installation and decoration technology
How to attach a wooden beam to a plasterboard wall?
Using drywall you can create various designs of fairly smooth surfaces. At the same time, it is quite fragile, so securing a wooden beam to its surface will be problematic. The use of ordinary nails and self-tapping screws will not lead to the desired result. Even light objects can be torn out, taking the screw with them, and leaving a hole.
To ensure fastening strength, before starting the installation of drywall sheets, lay wooden beams in places where the need for strengthening is expected in the future. Thus, the load will be on the beam itself, so the fastening can be done with the same self-tapping screw. But during installation, it is often not always foreseen what the load will be in a particular place.
There are special fastenings for drywall. Depending on the load on the beam, the type of fastening is chosen.
When using a nylon or metal anchor, first screw it into the drywall with a screwdriver, then secure it with a self-tapping screw. But this method is the weakest, since there is no fixation on the reverse side.
For a stronger fixation, it is better to use a drop-down metal anchor. To do this, insert the folded anchor into the hole. Use a screwdriver to tighten the anchor, it will fold, locking into the sheet of drywall.
In order to secure the beam using a universal plastic dowel, you must perform the following steps:
- drill a hole of suitable diameter;
- insert the dowel into the hole;
- we secure the item we need using a self-tapping screw;
- the dowel is folded into a knot, providing fixation on the reverse side.
The process of attaching timber
Tools
Before fastening a wooden beam to a brick wall, you need to prepare the following materials and tools:
- Electric drill;
- Hammer;
- Bubble level;
- Dowels of the “quick installation” type.
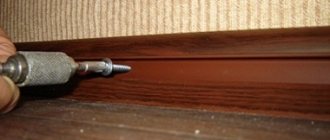
Instructions for securing the timber to the wall surface look like this:
- First you need to find the position in which the beam attached to the wall should be.
- Next you need to make holes for the dowels, which are drilled through the timber. At this step, it is important not to remove the part, so it is better to do the work together, so that one person holds the beam, and the second drills the holes.
The step between the fasteners depends on the cross-section of the beam - the higher it is, the smaller the step should be. For example, if a block with a cross section of 5x5 cm is fixed, the step should be approximately 20 - 30 cm.
Moreover, depending on the cross-section of the bar, the size of the fastener is selected. The largest size is 8×120 mm, and the very small is 6×40 mm. As for the choice of drill, it must correspond to the diameter and length of the dowel.
- Then you need to countersink the holes in order to install the fasteners flush-mounted. To do this, the holes are drilled out a couple of millimeters with a drill corresponding to the diameter of the mounting caps.
Inserting a plastic dowel into the hole
- After that, plastic dowels are placed into the holes with your own hands.
- At the end of the work, nails are placed in the dowels and driven in with a hammer. As a result, the fasteners expand and are firmly fixed in the wall, while holding the part made of wood.
You need to pay attention! The dowel nails have slots for a Phillips screwdriver, but they are not intended to be screwed in. The slots are made only for the purpose of normal fastener removal.
This completes the installation process. It must be said that until recently, before the advent of quick installation, timber was attached to the surface of the walls using ordinary dowels. However, this technology is not currently used, since it is much more complicated and takes more time.
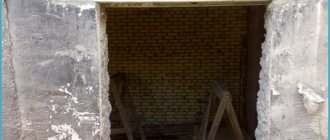
Example of embedding beams
The most reliable fastening is time-tested
When attaching a beam to a concrete wall, of course, the most reliable fastening will be fixation with an anchor.
Reliable fastening of wooden beams has been known since ancient times, when the concept of “quick installation” and “perforator” did not even exist, self-tapping screws and dowels had not yet been invented. A hole was made with a bolt in a wall made of bricks, blocks, or in a ceiling made of reinforced concrete. A large wooden rod was driven into the hole, lubricated with cement. A nail was driven into this rod through a wooden beam. Despite the fact that we now have a choice of various fasteners and elements, modern technology and equipment, this method of fastening, although rigid, is still widespread. It is appropriate to use this method for small loads on the beam.
A softer method is the use of U-shaped brackets for drywall profiles. The positive difference here is the short installation time. But the fastening does not have sufficient rigidity. If you hit a wooden beam with force, the bracket will bend and the surface of the structure will be damaged.
py-sm.com
Fastening timber to concrete and brick walls
You should drill the brick carefully, strictly at a right angle, without “losing” the drill, so as not to split the brick. Splitting can cause the brick to fall off. if a brick gets into the cavity, you will have to use an anchor-type dowel, which, when screwed into the wall, forms a knot, or a spacer dowel. Tighten the dowel carefully. Mechanical anchors for fastening wooden beams to brick walls are much better than self-tapping screws and nails, both technologically and in terms of fastening strength.
For concrete, you need a drill with a hammer drill function and durable plastic dowels for self-tapping screws; sometimes, before driving a plastic dowel into the wall, it is additionally lubricated with glue.
Fastening to aerated concrete and plasterboard walls
Aerated concrete blocks are a soft material; screws with full-length threads are suitable for them, but it is better to use anchors, mechanical or chemical. To properly install an anchor with bending ribs or a wedge-shaped one, pre-drill a hole with a diameter slightly larger than the anchor. One type of anchor is perfect for hollow blocks and blocks made of cellular concrete - foam blocks, gas blocks, etc. The main “parts” of the anchor are a steel sleeve with ribs and a nut at the end. When the screw is screwed into the sleeve, the ribs bend and move apart, forming a “butterfly” that securely holds the anchor inside the material.
Chemical anchors hold even more firmly; they are suitable for all wall materials made of lightweight concrete and plasterboard, and for any wall materials. The principle of operation is the ability of synthetic resins to penetrate deeply into pores and adhere to the base. The weak link of fastening to porous blocks and drywall is not the fastener, but the base material, especially under the action of a vertical load, and chemical anchors help solve these problems. A chemical anchor is inserted using a special gun. The adhesive mass is squeezed into the drilled hole under pressure, and a fastening element is immediately inserted - a threaded pin or rod. The adhesive composition fills the pores of aerated concrete or other porous block, and after hardening it forms a strong and reliable fastening. The pullout force of a chemical anchor from a brick is more than 500 kg. The service life of chemical anchors is tens of years, they do not deform due to temperature changes, and are inert to aggressive environments. The latter is very important when working with aerated concrete, which is aggressive to metals. All fasteners for aerated concrete must have an anti-corrosion coating.
For attaching a block to aerated concrete or plasterboard, the anchor method of fastening is the most durable, although costly. It all depends on the density (grade) of aerated concrete and the required load. To fasten the sheathing, it may be sufficient to use mechanical anchors - wedge-shaped or "spiral nails" type. The latter are convenient because they are mounted into a wall made of aerated concrete, driven in with an ordinary hammer. When driven, the spiral nail is screwed into the block without disturbing its porous structure.
The dowel, which in its working position resembles the spokes of a half-opened umbrella, bears the affectionate name Molly and is excellent for attaching wooden blocks to plasterboard partitions in order to secure paintings, light shelves or lamps on them. Molly is a type of expansion anchor bolt that has a sleeve with longitudinal slots, which, when the thread of the inserted screw is tightened all the way, folds and turns into an umbrella. The load-bearing capacity is excellent, but this fastening has disadvantages - it can only be removed by breaking out part of the partition. In addition, it is impossible to work with Molly in tight spaces.
Basic installation work
Tools and materials:
Gable roof structure: 1 - Rafters; 2 - Screed; 3 - Mauerlat; 4 - Ridge beam.
- timber 80*200;
- steel corner;
- roulette;
- a circular saw;
- pencil and cardboard;
- wire;
- anchors;
- hammer drill
Now the installation of rafters on the walls begins. The rafter system depends on the type of roof chosen, but most often a gable roof is used:
- Rafters.
- Screed.
- Mauerlat.
- Ridge beam.
This option is quite easy to install, and there is no need to make additional partitions under the roof. At the very beginning, screed beams are installed in increments of 0.8-1.2 m, depending on the weight of the roofing materials (for ondulin or reeds, 1.2 m is enough, while for slate - 0.8 m and no more). Fastening to the Mauerlat is carried out using special corners made of galvanized steel. Only now is the wall ready to begin attaching the rafters.
Their length is calculated in such a way that the wall does not limit their length, and the beam extends 50 cm beyond its limits. At the junction of the wood and the wall, you need to cut out triangles that clearly follow the contours of the corner at which the joint occurs. Here it is best to make a cardboard model, from which measurements will be taken, and use a circular saw to cut it.
At the very beginning, 3 beams are grabbed together, 2 are guides, and 1 is a ridge beam. There is no need to grab the ridge beam immediately, so as not to strain the material. You need to lift it in such a way that the corners match perfectly. After one side has been lifted, you need to lift the opposite side and only then fix them tightly using steel corners.
Related article: Toilets with vertical outlet to the floor
Each raised beam is immediately wrapped with galvanized wire, after which the wire is intertwined and taken down. At a distance of 5 rows of masonry, you need to make a hole with a puncher, then string the wire onto the anchor and screw it in until it is completely fixed.
Dimensions of rafter legs.
The fastening of the rafters is completed here, but you need to remember a number of factors:
- When working with a hammer drill, only drills and bits with diamond attachments are used. Any other options will most likely split the material.
- All metal is strictly galvanized. If you attach the rafters to simple steel, then over time it will rust, and along with it the wood will become unusable.
- All wood is carefully treated with an antiseptic against moisture and insects. This step will add up to 20 years of service life.
Fastening the timber to the suspension
In interiors, decorative elements are sometimes used that require the beam to be fixed to the ceiling on a free suspension or to imitate such a suspension. Sometimes beam suspension is needed for structural reasons. This type of fastening is performed using a special suspension designed for a certain load. A suspension system of this type may have the additional ability to adjust the height of the beam suspension.
The suspensions are attached to the ceiling with dowels, and the second part of the fastening is installed on the beam, then the elements are connected. Practice shows that such fastenings, contrary to expectations, can withstand considerable loads. But it’s still better not to have such a risk factor over your head, and for the design, imitate a suspension, and attach the beam securely to the wall. In this case, the suspension system is installed to strengthen the fastening, and for design purposes, “for beauty.”
stroyfora.ru
How to attach a board to a brick wall