Hello, dear readers! Finally, I did it, finished this post. Our topic today is do-it-yourself wall putty. I thought about it two months ago, but I wanted to accumulate more good photos. In the end, anyway, I wasn’t able to shoot everything I wanted. It just so happened. Therefore, I will try to explain some things in text form.
So, putty. What is it and what is it for? In general, this is a dry mixture in powder form or a ready-made creamy mass. Putty is used for final leveling of surfaces for wallpaper or painting. That is, after this process, the surface of the walls or ceilings acquires a quality that will be sufficient to paste wallpaper or paint on them. It is clear that the base for painting must be of especially high quality. When processing for wallpaper, some minor flaws such as pits and grooves are acceptable.
There are also special types of mixtures, for example, for sealing joints of drywall sheets, but today we are not talking about them.
How do putties differ, for example, from plaster compounds?
The most important difference is that the fraction of any putty is much smaller than that of plasters. Accordingly, with their help you can achieve a much better smooth surface. But at the same time, they give a significantly greater volume shrinkage and do not allow the application of a layer thicker than a few millimeters.
For do-it-yourself putty under wallpaper, I recommend using the Vetonit LR+ mixture, and for treating any surfaces for painting, it is advisable to use ready-made Sheetrock putty, although if there are no maximum requirements for the quality of the painted surface, you can get by with the same Vetonit. Even though I am a maximalist, I would putty my ceilings with it - you can’t see the difference from the floor. But for some complex structures made of HA at eye level, I would definitely choose Shitrok. Both of these putties are polymer and are as convenient as possible for the performer. There is no particular difference in the processing technology for wallpaper and painting, just as there is no big difference in what brand to use. Therefore, I will consider the process of plastering walls with Vetonit under wallpaper.
- 2 Tools, materials, accessories
- 3 Wall putty
- 4 Putty on external corners
- 5 Sanding
How to do finishing wall putty with your own hands
Many people consider applying finishing putty to be a very difficult job. Knowing the subtleties and nuances, we can conclude that this is such a simple matter and you can easily do such work with your own hands.
With a special solution, you first need to fill large recesses in several layers. Under no circumstances should you apply the solution in one layer, such work can only ruin everything, and you will need to redo it. The finishing putty of the walls is applied in thin layers. A well-applied first coat will affect the ease of finishing the finish coat. Many specialists, as a rule, treat the bottom layer with a primer before applying the finishing putty.
The solution is applied evenly to the treated surface of 1 m2. Using a large spatula, movements are made in vertical directions.
Finishing putty is used to fill small recesses and roughness after the starting layer. Streaks from the mortar may remain in areas of finishing work. This indicates unevenness and curvature of places on the wall. Such places can be corrected by applying two or three layers of solution.
Choosing putty for final finishing
If you intend to buy a finishing compound for finishing, then you will certainly ask yourself the question of which putty is better? In this case, you should use the basic rule of the builder and buy material for the base and finishing layers from the same manufacturer, regardless of the cost of finishing putty on walls and ceilings.
Surface treatment process
The continuity of materials should be maintained. It would be a completely wrong move to buy materials from different manufacturers for different stages of finishing.
You should also definitely pay attention to such properties as the hygroscopicity of the mixture. And in the event that the application will be made on a porous surface, the surface should be primed before application.
Advice. You should not try to save on the purchase of building materials by excluding primer from the list. Materials for surface finishing are usually hygroscopic, which necessitates the need to prepare the surface for applying a decorative coating.
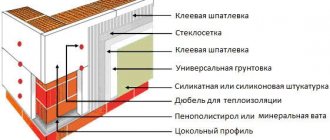
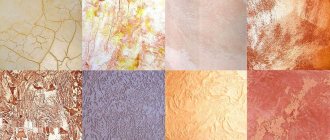
The photo shows a diagram of the arrangement of finishing layers
Finishing putties are compounds that harden fairly quickly, so it is necessary to constantly stir them during the work process so that the mass remains homogeneous, without lumps and pebbles.
To make it easier for the buyer to make his choice in a hardware store, he should rely not only on such a parameter as price, but also know about the existence of several types of putties:
- Cement mortar with ideal hydrophobic properties. This cement-based material is highly resistant to moisture;
- Gypsum or breathable mortar is suitable for rooms with a dry atmosphere, it allows air to pass through perfectly, but cannot fight moisture at all;
- Polymer putty is the most modern option that uses polymer components in its composition.
Cement based finish
Cement mortar
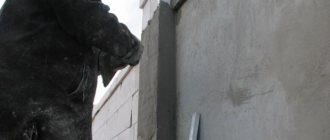
This material is distinguished by increased moisture resistance, which means this material is used in the decoration of bathrooms, kitchens, baths, saunas and gyms. Cement putties are also quite often used for finishing facades. Most buyers are attracted not only by the moisture resistance, but also by the relatively low cost of finishing cement-based wall putty.
The disadvantages of such finishing include the tendency of the composition to shrink and cracks.
Gypsum coating
In the photo - sealing seams with gypsum mortar
Putty, created on a basis of gypsum, which is afraid of moisture, is also very sensitive to its influences. For this reason, gypsum finishing materials are commonly used in residential finishing.
The gypsum surface has a smooth texture and is not subject to effects such as cracking or shrinkage. Those clients who are concerned about how long it takes for the finishing putty to dry on the walls choose the gypsum option. This is due to the fact that such putty dries in only two hours, and the layer can be applied even a little thicker than a layer of other types of putty.
The main distinguishing feature of gypsum solutions is the creation of an environmentally friendly surface that can breathe. It is these properties that determine the popularity of these mixtures, but when purchasing them you should remember that gypsum dries very quickly, which means the life span of the finished solution is very short.
Polymer finishing coating
This building material is ideal for rooms with normal humidity levels and has some advantages:
- Doesn't dry too quickly outdoors;
- Easily applied to the surface;
- Low consumption of material in finishing, because the minimum layer thickness reaches only 0.2 mm;
- Creates a finished coating that does not require further finishing.
Such advantages determine the high cost of this type of material.
The texture of the created surface can be qualitatively influenced by such a factor as the size of the material fraction. The smaller this size, the greater the smoothness of the created coating.
Note! The size of the finishing putty fractions should tend to 0.15 mm (dust fraction size).
Selection and purchase of finishing putty
Prospector finishing putty has proven itself in the market. It has been on sale for 20 years. Packaging occurs in packages of 3, 12 and 20 kg. Its basis is:
- Cement.
- Gypsum.
- Modified additives to perform well in different conditions.
Finishing putty is necessary to fill the remaining roughness and unevenness after applying the starting putty.
The putty consumption per layer is calculated from 0.3mm and the maximum layer can reach 4-5mm.
The solution is prepared once, but then water or mixture cannot be added to it. Therefore, you need to calculate the consumption in advance.
Recently, the polymer putty “Finish” has been in great demand. This option has many advantages, such as:
- Long-term storage in a diluted state.
- The ability to achieve the effect of a perfectly smooth and even wall.
- In case of shrinkage, such putty will not crack.
- High humidity levels are not a problem.
- Suitable for painting and wallpaper.
- Low consumption per m2.
Polymer putty
However, against the background of these advantages, such putty has one drawback - it is very expensive. Accordingly, the cost of repairs will be higher. Finishing polymer putty is sold both ready-made and in dry form. Such putty is packaged in 25 kg dry form and 10 liters of already prepared solution. The packaging contains instructions for use and preparation of the solution.
Consumption per 1 m2 of ready-made solution will be more economical. When purchasing a dry mixture, you need to look at all the components, since deviations from the production technology can lead to cracks on the walls.
How to distinguish the finishing mixture from the usual one
Purpose and consistency are the main differences between the two types of materials. The usual one has coarse-grained fractions. When rubbed, sand-like particles are felt.
Applying the usual mixture is the initial stage of finishing. It can be used to repair large cracks in a concrete surface. What is the best putty if the walls are painted?
The layer thickness can reach 10 cm.
The material is distinguished by its fine-grained fractions. This is the final (finishing) stage of finishing. A layer of working mixture is applied over putty no more than 3 mm thick.
This increases the strength of surfaces.
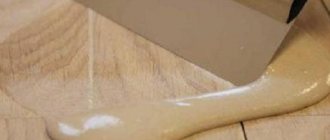
The consistency of the finished mixture is uniform and elastic without any lumps.
Replacing one putty with another is also not recommended. If used to seal deep cracks, it will crack and fall out of the cracks in the concrete walls.
Requirements
Which putty should I choose for walls to be painted? The composition must meet the following requirements :
- The mass should be homogeneous , which will make it possible to form a thin surface layer. Due to this, small imperfections that remain after application will be removed.
- When hardened, the surface should be intact , without cracking.
- It should not flow, stick to the spatula or be pulled behind it.
- The finishing putty is white - there are no other shades in high-quality compositions.
Professionals advise using starting and finishing mixtures of the same brand for work .
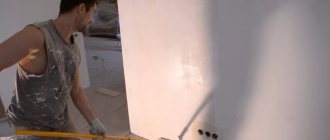
Technology for applying putty to walls
Before applying putty, you need to prepare the wall by wiping the surface with a damp cloth. Such preparation can remove dust and dirt and moisten the surface, which can contribute to improved adhesion to the wall. This preparation is very important, because the putty consumption will be less.
The quality of wall treatment can be affected by the preparation of putty. You need to make sure that no debris gets into the solution and that the putty takes on a homogeneous mass without lumps. The correct proportions must be observed. It may be noted that to correct significant defects, a thick solution is needed.
The surface of the wall can be coated with a primer, but this will require extra costs. Instead of a primer, you can simply moisten the walls or cover them with a solution of PVA glue and water.
Before applying the final layer of putty, the wall can be primed - this will reduce the mixture consumption
The finishing putty should be viscous and adhere to any position on the spatula. The instrument must be wiped with a cloth and kept clean to avoid streaks.
You need to putty without pressing the spatula too hard against the wall, and move it at the smallest angle in relation to the wall. Since this layer is the last, application must be done with special care and diligence.
The difference between surface putty for wallpapering and painting is the quality of the wall. To reduce material consumption, walls that are being prepared for painting should have a perfectly smooth appearance. If there are scratches and even slight curvatures, wallpapering is allowed, but painting will reveal even minor defects on the surface.
The final stage for painting the wall is applying putty. Cleaning is carried out only after the wall has completely dried; depending on the manufacturer and type of putty, it will dry differently, but not less than 12 hours.
Choice of putty
Today, there are many methods that allow you to prepare almost any solution yourself.
It’s just better to abandon such an idea immediately, especially if you don’t have the proper experience in this matter. The point is that you need to create a surface that will hold the wallpaper very well. You also need to take into account that many compositions absorb moisture from the air, which can also have a negative effect on the decorative layer. Therefore, it is better to immediately opt exclusively for materials that are sold in special construction stores. This is the only way to be sure that the walls will be prepared as needed.
What is putty?
| Application area | Mixture characteristics |
| • Specialized finishing material. • Applied before wallpapering. • Removes all joining seams. • Evens out small wall defects. • Serves to create a perfectly smooth coating. | • Can be in the form of a paste mixture that does not require additional preparation. • Dry formulations require prior addition of water. • The elements that make up the material have a fine fraction. |
Accordingly, from the existing pasty and dry materials for preparing walls for wallpaper, it would be better to choose the former. They do not require additional manipulations and can be used immediately after opening. But for large volumes of work they are not very suitable in terms of savings.
Thus, drawing a conclusion about which putty is better based solely on its external characteristics will not be entirely correct. A clear understanding of this issue can only be obtained after a detailed study of the compositions of putty mixtures. And how they interact with wallpapering materials.
Tools for work
A drill with the right attachment is very helpful in preparing the solution; with such a mixer you can quickly make the solution we need, bringing it to a homogeneous mass.
For the work itself, you need two spatulas, the first 18 cm, with which you scoop up the solution in small portions, and a wide spatula 50-60 cm long for uniform application on the wall. If necessary, it is recommended to process corners using a corner spatula. It has an iron blade bent at 90 degrees. Without such a tool, it is very difficult to get a good angle.
A set of tools you will need to putty walls
The final processing of the wall is carried out with two tools - an orbital grinder and a hand-held whetstone. Using a power tool will help save time and provide better processing. An abrasive mesh of a certain grain size is put on these two tools. Mesh No. 150 with paintable grain, does not leave scratches and will get the job done quickly. To treat a wall for wallpapering, a grid numbered 100 or even 80 will be sufficient. It must be remembered that the higher the grid number, the more elaborate the work will be.
Knowing all these nuances, you can make repairs in your apartment without hiring specialists.
- How to create and use flower stencils for walls
- Installation and operation of moisture-resistant panels for bathtubs made of fiberboard, MDF and chipboard
- The advantage of Penetron waterproofing
Types of ready-made putty for walls: which one is better
A well-putty surface is the result of the master’s final work and an indicator of the materials used.
Ready-made putty mixtures allow you to reduce the time of the master for mixing putty.
The most used types of ready-made putties:
- Latex acrylic - applied to any surface, including drywall. Its most widespread use is in finishing surface coating. The elastic solution allows you to make a layer of putty of 1-3 mm.
- Oil-adhesive and adhesive - has a high density, so professionals work with it. It is difficult to apply to the surface, but when dried it has a certain strength.
- Putty with PVA. It has antifungal components, so it is applicable in damp areas.
It is better for a novice master to work with a ready-made solution. It is more plastic, fits well on plaster and retains its qualities after drying.
Starting: the best choice
In addition to ready-made mixtures, dry putty solutions are sold on the market. The starting putty is applied to prepared plastered walls.
The most commonly used putties are:
- cement mortars;
- gypsum mixtures;
- polymer putties.
Cement putty is used in damp rooms. It is coarse-grained, with a gray tint.
Gypsum mixtures are used in a dry room that is heated in winter. It contains quicklime.
Polymer - used in both wet and dry rooms. Has high elasticity.
Manufacturers of starting putty:
- Knauf starting putty is intended for indoor work. It has a plaster base. Due to its environmentally friendly composition, the mixture is used in children's rooms. The disadvantage of putty is that it hardens quickly. The maximum layer of applied solution is 1.5 cm.
- Volma-Standard. Consists of gypsum and mineral compounds. After puttying, you can start gluing. The surface is smooth and durable. The downside is that it sets quickly.
- Osnovit-Ekonsilk is a gypsum base. Designed for dry rooms. Plastic, does not shrink. The thickness of the applied layer is 1 mm, if more, then cracks appear when drying.
By observing the correct preparation of the solution, filling the wall will have a good result.
Finish: how to choose according to the best rating
After the starting putty has dried and the work has been completed, the finishing mixture is applied. The most popular are:
- Prospectors - Finish. The composition includes gypsum and additives. Used in rooms with high humidity. Shrink-resistant, flexible, quick-drying. The downside is the low strength of the surface after drying.
- WEBER LR+. The applied layer is 1-5 mm. the working solution does not harden within 2 days. After drying, a flat, smooth white surface is obtained. Putty is applied both manually and mechanically.
- Sheetrock Superfinish - contains vinyl additives, so the putty has high ductility. A layer of 2 mm dries in 5 hours. However, the master recommends carrying out all subsequent work one day after application. Has shrinkage.
For beginners, experts recommend choosing putty with high plasticity, which will easily transfer from dry to wet layer.
How to choose a good coarse grain
Coarse putty is needed for the initial treatment of the wall after plastering. The most popular are:
- Unis Blik - the composition includes natural materials. Do not use in rooms with high humidity. To putty the surface, a reinforcing mesh is used. There is no shrinkage. Has plasticity, after drying there are no cracks;
- Vgt acrylic universal – based on acrylic. Layer thickness 1-7 mm. Has little shrinkage and good adhesion.
Coarse putties are all types of cement-based mixtures.
Which is better for deep leveling?
Starting putties. With their help, it is possible to eliminate all errors in plastering work and cracks. It is coarse-grained, applied to surfaces up to 20 mm.
Leading manufacturers:
- Knauf NR putty (starter) – gypsum putty, applied in a layer from 4 mm to 15 mm. The main direction is leveling the surface before finishing coating. After mixing, the solution quickly hardens; after 15 minutes, work stops. Does not shrink.
- Ceresit CT 29 starting – performing work on a concrete, brick, cement-sand wall. It is used to seal cracks and recesses left after plastering. The maximum applied layer is 20 mm. Not suitable for use in rooms with high humidity. After mixing, the solution can be used for 50 minutes. It takes 10-15 hours to completely dry on the surface. High strength.
- Kreisel 662 is universal - it contains cement and lime. Apply a thin layer to the surface covered with plaster, as well as without coating. Has high adhesion. Use the mixture in rooms with high humidity. The maximum layer is 3 mm, there is shrinkage.
When cracks are detected, in addition to putty, reinforcing tape must be used. It will prevent the crack from getting bigger.
Which putty to choose for drywall
The plasterboard surface is treated several times. Initially, putty is used for joints together with reinforced tape. The second stage is coating with starting putty.
Craftsmen do not recommend using putty materials from different manufacturers. Knauf is the most popular.
The next stage is covering the surface with finishing putty. Only after one layer has completely dried should we proceed to the next work.
Under the wallpaper, the plasterboard surface is covered with layers of putty for greater strength of the entire structure.
For a neat appearance, because if thin wallpaper is pasted onto sheets without treatment, the color of the wall will appear on the wallpaper.
How to putty on wooden surfaces before wallpapering
Puttying a wooden surface is different from concrete and brick. There are factors influencing the choice of putty mixture for wood:
- high adhesion - the service life of the putty under the wallpaper depends on this;
- the solution must be elastic;
- drying speed.
Types of mortar used for wood surfaces:
- Gypsum based mixture.
- Latex putty.
- A mixture with the addition of acrylic.
- Oil mixture.
- Putty with PVA.
Basically, craftsmen use gypsum mixtures that do not shrink and have good ductility.
Which putty is better to putty on untreated concrete?
A concrete wall generally does not have large differences in plane. Therefore, having skipped plastering, they immediately proceed to puttying with the starting composition.
The base coat consists of several layers. Moreover, the second layer is applied only after the first has completely dried. Cement mixtures are mixed for coating. They shrink, so the layer should not be thick.
The finishing layer should be thin. It is difficult to hide the gray color of the starting material underneath, however, a thin layer makes the surface smooth, ready for wallpapering.
Universal putties are also used. But, apply them in a thin layer 2 times. They are plastic and do not shrink. If the walls are smooth, the differences are 2-5 mm, then the use of mixtures is permissible.
How many coats should be applied to bare concrete walls?
Apply 1 layer of starting putty to a practically flat concrete surface. The layer thickness does not exceed 15 mm. Beginners should use a perforated beacon profile to level the wall. It is fixed to the mixture and the level is adjusted for evenness. Work begins only after the solution under the profile has completely dried.
Attention. If there are wooden slats, they are used as beacons. But, the rail should not be high and jagged, otherwise there will be a ribbed surface.
Starting putty
Even if at first glance the walls seem smooth and need only partial processing, at least two layers of putty should be applied. For plasterboard walls, one layer will be enough, but first you should carefully seal the joints of the material.
Starting putty is intended to eliminate significant differences in walls, hide grooves and holes; the layer thickness in this case can reach 1.5 cm. For starting finishing, a special putty is used, which is intended for filling joints, sealing breathing cracks and joints of floor slabs.
VIDEO: Starting puttying of walls
Advice! To perform the starting putty as efficiently as possible, experts recommend installing a special painting mesh on the wall and evenly distributing the mixture over it.
Each subsequent layer is applied after thoroughly drying and sanding the previous one. If there are no significant defects on the walls, the starting putty stage can be skipped.