Scope of application of concrete mortar
Concrete is a multicomponent mixture. It consists of water, cement, various additives, crushed stone, sand and other fillers. The resulting solution is used to create load-bearing structures (walls, foundations, columns, floors), to form floors, stairs, etc.
Application of different grades of concrete
What is concrete corrosion?
This process begins with the concrete hardening, turning into cement stone, the durability of which is much lower than that of stone fillers. The composition of cement stone includes compounds formed during the hardening process. It has many capillary passages, both open and closed, they can be filled with either water or air. The structure of hardened concrete is very heterogeneous.
In relation to hardened concrete and reinforced concrete, water is aggressive - river, sea, sewage and drainage water, together with acid gases present in the air. Within cities and especially in areas of industrial enterprises, groundwater contains a lot of different impurities that contribute to the corrosion of hardened reinforced concrete. If there are chemical plants in the vicinity, then groundwater will be contaminated with acids, both organic and mineral, nitrates and chlorides, ammonium, copper, zinc, iron and nickel salts, sulfates, and alkalis. In the vicinity of metalworking plants, the soil will be saturated with the products of pickling processes and iron sulfates.
More than groundwater, wastewater from factories and factories is saturated with substances that cause the destruction of cement stone. If untreated water is discharged into rivers, then the water in the rivers becomes aggressive towards concrete structures. Concrete corrosion very often affects hydraulic structures. The air near and at the enterprises themselves also often contains pollutants, such as nitrogen oxides, sulfur dioxide, and hydrogen chloride. The concentration of these gases within the permitted standards does not cause harm to human health, but nevertheless it is enough for concrete structures to begin to collapse.
Corrosion of concrete is very diverse, since there are more than a hundred substances and their compounds that, when in contact with concrete stone, cause its destruction. There are microorganisms called biodestructors that destroy all types of structures. Microorganisms that destroy materials can be in direct contact with them or settle inside porous structures. The worst time for concrete structures is during the metabolic processes of microorganisms, since all the qualities of the material and its service life are significantly reduced. Bioorganisms that produce substances aggressive to concrete are capable of harming concrete even from a distance.
In any liquid or gaseous medium, corrosion of concrete and reinforced concrete does not require additional factors. If there is high humidity in a gaseous environment, this factor accelerates corrosion processes.
Return to contents
What rules should you follow to get a smooth concrete surface?
For many people, getting a smooth concrete slab is very important. The untreated coating has a huge number of shortcomings, which makes it difficult to use. During use, the surface of the concrete begins to become dusty, which is explained by the extraction of small particles of sand and cement. Such a surface has high porosity. Therefore, any spilled liquid is instantly absorbed.
This is why untreated concrete flooring is not used in residential areas as a finishing surface. Most often it is used in the form of a screed. In the future, it serves as the basis for laying the finishing decorative coating. But this technology is not suitable for installing heated floors. In this case, the finishing decorative layer will only hinder the spread of heat.
Smooth concrete floor
How to make a concrete surface ideally smooth?
Making concrete smooth is quite simple if you follow these rules:
How to level a concrete floor with your own hands
- to obtain a smooth surface, beacons, a rule and a trowel are used;
- beacons play the role of guiding elements. Concrete solution is distributed between them;
- The rule is a long narrow ruler. With its help, the solution is distributed between the beacons;
- a smoothing iron is a tool with a perfectly smooth surface. It smooths out all the bulges on the fresh concrete surface;
- To obtain an even more even surface, special ironing units are used;
- After the initial processing of concrete, it is left for a day to set. If irregularities are identified, they are removed with a wide spatula;
- a few hours after pouring, the coating is treated with bulk cement using trowels;
- at more critical facilities, the concrete surface is treated with liquid glass;
- using fluorosilicate, the concrete coating can become mirror-like;
- To give concrete increased smoothness, it is processed using grinding machines with diamond-coated discs.
Before starting your own dismantling
There are a few precautions you need to take before you begin your plan to get rid of old concrete.
- Estimate its thickness . If it is thicker than 10 cm and reinforced with wire mesh or rebar, you will most likely need power tools to break it. Otherwise, hand tools such as sledgehammers and pry bars should be sufficient.
- Call utility companies before breaking up concrete on your private property to make sure there are no cables or gas lines underneath.
- Check if it is connected to the foundation . If so, it will need to be separated before work begins.
Other precautions include safety glasses, earplugs and heavy-duty work gloves. Additionally, steel toe boots will help you protect your feet.
Tools and Equipment You'll Need to Break Concrete
Depending on its thickness and other specifics of the area, you may need different tools. Here is a standard set suitable for most projects:
- Sledgehammer,
- Mount,
- Bolt cutters,
- Jackhammer (for thicker concrete),
- Wheelbarrow,
- Shovel,
- Hoe or pickaxe
- Heavy duty gloves
- Protective glasses,
- Heavy boots
- Respirator,
- Earplugs,
- Polyethylene film.
Smooth concrete floor on your own
To make concrete with your own hands, which will be characterized by increased smoothness and high aesthetic qualities, you need to use microcement. This is a special modern material, which is a special polymer-cement plaster. It has increased wear resistance and is impermeable to moisture.
After using microcement, a high-quality coating is obtained, which in appearance resembles concrete, but has a smoother and more uniform structure. But as a result of using this material, it is not possible to obtain a mirror surface. It will always have some unevenness and roughness.
Properties of microcement and comparison with other materials
To apply this technological scheme yourself, you must adhere to the following instructions:
- A special primer solution, UniPrimer, is applied to the concrete.
- The surface is treated with Durocret-Deco Flex microcement. The thickness of the working layer is 5 mm.
- The solution must be reinforced with fiberglass mesh with a density of more than 160 g/sq. m.
- After the solution has set, the coating is treated with another layer of primer.
- Durocret-Deco Finish microcement is applied to the wet primer. This is what ensures the smoothness of the coating.
- To give the finishing layer increased wear resistance, it can be coated with polyurethane varnish.
Types of concrete corrosion
The physical and chemical effects of the surrounding space on concrete are such that it is destroyed, called corrosion. Many processes occur in the connection between cement and water, an aggressive environment arises, and to protect concrete from corrosion, it is necessary to study the intricacies of this phenomenon. Experts distinguish 3 types of corrosion, but most often destruction occurs under the influence of several types at once:
- Biological corrosion of concrete, implying the formation of large-volume compounds in the concrete stone. This occurs under the influence of various substances that penetrate into concrete. Connections that acquire greater volume inside cause internal stresses and, as a result, cracks in the concrete. Sulfate corrosion is of greatest importance in the study of concrete destruction.
- Physico-chemical forms of concrete corrosion, in which the components of concrete stone dissolve in water. In this case, the dissolution and leaching of calcium hydroxide that was previously present or formed often occurs. Reinforced concrete is eroded by water at different rates. Hydraulic structures have a dense mass in which corrosion occurs slowly, its results are visible only after decades. And in cooling towers that have thin shells, calcium hydroxide is washed out much faster, which is why repairs are required after just a few years. If water is filtered through concrete, decomposition is accelerated many times over, the concrete becomes highly porous, and its strength is reduced by more than half. This process is also called lime leaching or white death, due to the external signs of such destruction. When the material begins to be corroded by an aggressive environment, it becomes covered with a white coating.
- Chemical corrosion, which occurs as a result of the interaction of concrete stone and substances from the environment, often forms easily soluble salts, which are then washed out. Together with substances washed out by water, amorphous masses that have no binding ability are often deposited in concrete masses. Under the influence of these forces, concrete over time turns into a loose porous mass, which collapses very easily.
Corrosion can be called a separate branch of science, which studies all processes called corrosion, means of preventing them, and the resistance of concrete structures to various natural processes. Such a phrase as concrete corrosion sounds unusual, but not only concrete, but also brick, asbestos cement and aerated concrete, foam concrete along with silicate blocks corrode.
Return to contents
How to improve the quality characteristics of concrete and give it color?
To improve the quality of concrete mortar, it is not necessary to buy expensive granite crushed stone or spend money on special cement. It is enough to use plasticizers. A huge number of them are sold on the building materials market at an affordable price.
If you make a solution with plasticizers yourself, you will be able to achieve the following:
Adding plasticizers improves the quality of concrete mortar
- the process of laying concrete mortar into molds is significantly simplified;
- the process of separating the mixture into its constituent parts is prevented;
- the solution can be used at much higher or lower ambient temperatures;
- the concrete hardening time increases or decreases;
- formed products acquire better plasticity;
- the quality of adhesion of the solution to the embedded parts increases;
- concrete acquires hydrophobic properties;
- the finished product acquires increased lightness and porosity.
What plasticizer should I use?
In order not to waste money on purchasing plasticizers, you can replace them with some available means. The most popular of them are:
- washing powder for automatic machines;
- liquid soap;
- slaked lime;
- office glue.
When using such products, it is necessary to take into account that during the process of mixing with the solution they release a huge amount of foam. It is recommended to add a plasticizer after combining sand and cement. If you do this later, the filler will become enveloped, which will not allow you to achieve the desired effect. The amount of plasticizer should be 0.2-3% of the total volume of the solution.
How to give color to concrete?
A smooth concrete floor will be even more attractive if you give it a specific color. This can be achieved by adding a special dye to the solution. This option is preferable for creating structures with increased throughput load.
It is also possible to apply coloring solutions to the finished concrete coating. They dissolve in polymer impregnations that are used to treat surfaces. This ensures better adhesion of the pigment to the base.
Dyes for concrete mortar
Related video: Grouting cement screed
Publications on the topic
Proper leveling of concrete floor
At what temperature can concrete be poured at different times of the year?
Installing a concrete floor on the ground in your home
How to reduce a concrete layer to a certain thickness?
It happens that the screed was poured too thick, and because of this, after repair, a piece of furniture or some structure, for example, a column, may not fit. It is impossible to trim a column; it is easier to trim concrete, but how to do this when the material is very hard? In order to destroy only a certain layer of concrete, for example, 2 centimeters, it is necessary to use a special attachment for an angle grinder, which limits the size of the disc. It’s not easy to get such an attachment, but they appear periodically in construction supermarkets. The nozzle is put on the disk, after which the depth of the slots is set. Before cutting, concrete must be saturated with water to avoid dust, but do not forget about electrical safety measures. Then, when the surface looks like a chocolate bar, you need to use a puncher to break off all the pieces one by one. The surface can be leveled with the same angle grinder, only with a so-called diamond cup.
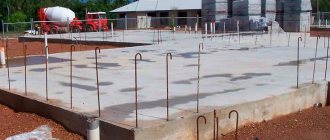
Projects typically use standardized grades of concrete, but sometimes the structural engineer may require the use of concrete with certain features. In these cases, the engineer also specifies the preparation recipe as well as additional tests that must be performed.
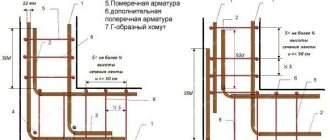
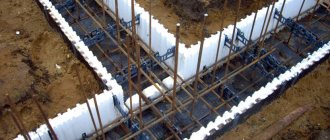
Production and installation of carcasses
Reinforced concrete: Assembly of fittings. Photo: Richard Peter Phototek. After the formwork is made, the frames are positioned in such a way as to provide the minimum coverage required by the design. For this purpose we use spacers, goats, distribution fittings.
Asbestos fence posts with a concrete base.
You are here: Home / Building a House / Asbestos fence posts with a concrete base.
December 5, 2009 / Alexander Posted in Build a House
2 comments
On the Internet I found a wonderful post on building a fence around a site. Fence. Concrete pillars, TISE drill. Author: Vladimir Romanov
Based on the text, I also found the website
vladirom.narod.ru
of this author. I highly recommend checking it out. If I decide on this type of fence, I will definitely use these instructions.
PS The only thing we have is a different depth of soil freezing - 1.2 meters, which I think means that you need to go less into the ground.
Asbestos fence posts with a concrete base.
For several years, the construction site had no fencing; only four wooden posts marked the corners of the site. It's time to start building the fence. According to the experience of our neighbors, and from our own observations, sandy, wet soils in our area contribute to the rapid destruction of supports made of a variety of materials. Concrete turned out to be the most resistant, so it was decided, despite the relatively large labor costs, to make concrete pillars.
| 1 | Wooden poles more than 200 mm thick completely rot in 3-4 years in wet sand at the boundary of air and earth, despite charring and impregnation with waste machine oil. | |
| 2 | In the place chosen for installing the post, first cut off the turf with a sharply sharpened bayonet shovel and remove the roots that will interfere with drilling. The size of the hole is determined by the diameter of the drill, the depth is about the bayonet of the shovel. | |
| 3 | We start work with a regular garden auger; this will save a lot of time and effort. We go as deep as possible with a garden drill. We immediately load the excavated soil into a wheelbarrow so as not to spread dirt on the lawn. | |
| 4 | When the length of the garden drill becomes insufficient, the TISE drill comes into play. It can drill to very great depths, but it is quite difficult to work with it, so we try to do the bulk of the work with a more convenient garden drill. | |
| 5 | Excavation of soil with a heavy drill, and even from great depths, is not an easy task, but we did not find another tool that allows us to do such work. We drill to a depth of soil freezing - about 1.7 m. | |
| 6 | At the end of drilling, we install an expander plow on the drill and make an anchor expansion in the lower part of the well, which prevents the column from being pushed out by the forces of frost heaving. | |
| 7 | Water appears in a drilled well. It makes no sense to lay concrete in water, so work stops for a while to develop concreting technology. | |
| 8 | To isolate the concrete being laid from groundwater, we prepare a tube from a piece of roofing felt, onto the end of which we put a large plastic garbage bag. | |
| 9 | We insert the assembled “shirt” into the well and immediately begin concreting. A low formwork box made from scrap boards prevents the roofing felt tube from opening above the ground level. | |
| 10 | The concrete being laid presses the “jacket” tightly against the walls of the well and displaces the water accumulated at the bottom upward. The folds of the plastic bag are straightened and the expansion in the well is completely filled with concrete. At the same time, the concrete is completely isolated from both water and soil. | |
| 11 | In order not to hold the folded edge of the roofing felt, we insert an old bucket without a bottom into the “shirt” as a funnel. From time to time we bayonet the concrete being laid with a long lath. | |
| 12 | We stop concreting before reaching the top of the well. We insert reinforcement into the freshly laid concrete to the entire depth of the well. The length of the reinforcing bars is slightly less than the full length of the finished column, including the above-ground and underground parts. | |
| 13 | We stretch a cord horizontally along the fence line, limiting the height of the posts. We measure the distance from the cord to the top of the formwork box installed in the center of the well and mark it on the asbestos-cement pipe. The top of the pipe is taken as the reference point. | |
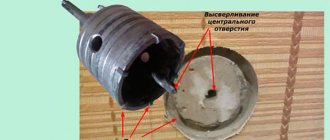
| 14 | In a blank made of asbestos-cement pipe, we drill a through hole with a spear-shaped carbide drill for tiles and ceramics. | |
| 15 | We insert a pin made of a steel rod into the drilled hole and place the pipe on the fittings sticking out of the hole. The pin rests on the formwork box, supporting the pipe in a suspended state. | |
| 16 | With this installation method, the top of all pillars will be placed in line with the tensioned cord, despite possible differences in ground elevations. | |
| 17 | To align the pillars vertically, wooden clamps with a screw clamp were made from scraps of timber. The inner surface of the cutouts in the clamps is lined with soft rubber to tightly grip the pipe and prevent slipping. We clamp the clamps on the posts. | |
| 18 | We attach a very convenient leveling device with three bubble levels to the top of the post. The device is simply attached to steel poles, and on wooden or concrete poles it is held in place with an elastic band. We align the column vertically, focusing on the level indicators. | |
| 19 | We fix the vertical position of the column with struts and continue concreting the upper part of the well. | |
| 20 | We bring the concrete level to the top edge of the “jacket” and leave the installed pipe for a day until the concrete sets securely. The steel kingpin is knocked out before the pipe is finally filled with concrete. | |
| 21 | After the concrete has finished setting, remove the clamps with struts and mark the posts for drilling for installation of threaded rods. The top of all the pillars is at the same level, so the beginning of the marking will be the top of the pillar, and not the stretched cord. | |
| 22 | Following the markings, use a tile drill to drill through holes in the pipes for installing threaded rods. The axes of the holes coincide with the direction of the fence line. | |
| 23 | We insert threaded rods into the drilled holes and fix their position with nuts screwed on both sides. To avoid staining the threads with cement mortar, you can put plastic bags on the ends of the studs, securing them with threads or rubber bands. | |
| 24 | Fill the pipe with concrete. At the top of the column, we form a small “cap” with the excess solution to prevent the accumulation of water. | |
| 25 | After removing the kingpin, we also fill the lower part of the post with concrete to the edges of the “shirt.” Using the solution, we form a slight slope towards the edges for unhindered drainage of precipitation. | |
| 26 | We concreted several pillars simultaneously every day. At the same time, wells with concreted reinforcement and pipes were prepared for half of the pillars, and the other half of the pillars were filled to the top with concrete. | |
| The main “ordinary” fence posts are ready. It remains to install more massive and durable corner (boundary) posts for gates and wickets. | ||
Tags: asbestos pillar, Fence
Corrosion processes in reinforced concrete
Reinforced concrete is most susceptible to corrosion, as it contains a metal frame.
Although the processes occurring in these materials are very similar, the destruction of reinforced concrete is a much more complex process. The difficulty lies in maintaining a metal frame, for which electrochemical corrosion is the enemy. Reinforced concrete is considered to be very strong and durable. This is due to the formation of a passive layer with protective properties during the interaction of the surface of the reinforcement and the alkaline nature of concrete. But at the same time, if concrete is exposed to precipitation containing salts and carbon dioxide for a long time, carbonization occurs, and the environment as a result becomes acidic. As a result, the strength decreases and the building begins to collapse faster.
In order for this type of corrosion to be stopped, it is necessary to introduce special inhibitors into concrete that act specifically on metal corrosion. Such substances can create a film on the surface of the reinforcement inside the concrete, which increases the overall strength. This film does not allow metal and concrete to interact, thus the electrochemical corrosion reaction does not occur. These compounds are added directly to the raw solution before making concrete slabs or applied to finished products. The composition can penetrate 50 mm into concrete.
The process of corrosion destruction is complex and dangerous for reinforced concrete buildings. If you don't take it seriously enough and don't try to prevent and stop its effect, any structure will be destroyed much faster. Projector anodes are also used to protect reinforced concrete. With their help, an electrical contact is created between a frame made of reinforcement and a metal blank, which has more active properties. With electrochemical corrosion, decomposition occurs due to the EMF of the metal with negative values. Until the more reactive metal dissolves, the reinforced concrete frame will be out of danger.
Return to contents
Removing a large ledge in the wall
Today we continue the topic of plastering walls. In the previous lesson, we learned how to determine the most convex point on the wall using the “Helicopter” method, relative to which it is necessary to build the plane of the future wall.
What to do when we have identified the largest protrusion in the wall
After you have found the largest protrusion in the wall, you need to visually evaluate it. There are 2 options here:
- This is a visible visible protrusion of several centimeters.
- This is a large influx on the wall, reaching several tens of centimeters and essentially reflecting the entire structure of the wall.
Removing the largest bump from the wall
If your protrusion is several centimeters, then it needs to be knocked down. This can be done either with a hammer drill or a chisel with a hammer:
The fact is that the volume of plaster you use for leveling, and, in principle, the entire volume of work, directly depends on how well you manage to do this. Millimeters, I would even say microns, play a role here. Imagine that the mound protrudes from the plane of the wall by 3 cm, and you managed to knock it down - you have a flat wall. Now, imagine that it didn’t work out. In this case, you will have to build up your entire huge “six by nine” wall by these unfortunate 3 cm. It will take a decent amount of 30 kg bags of plaster! Therefore, pick up a tool and try to get rid of such a lump, even if it takes several hours! The savings in finance and labor costs in the future are colossal if you manage to level it with the wall.
On my wall, the largest bump was found at the site of the socket, almost in the center of the wall. In the end, I sacrificed the socket, took it out completely and knocked off the bump. I then reinstalled the socket in a new location. And this is what my wall looks like now with the socket removed and the bump knocked down:
Repeating the “Helicopter” method to the next bump
What next, you ask, when you knock down your large ledge in the wall in a few hours? And then take perfectly even bars (level, guides) and again, using the “Helicopter” method from Lesson No. 1, determine the new maximum protruding hillock, which is smaller than the one you just knocked down. Find him and shoot him down again. And repeat this procedure until there is not a single obvious bump left.
Important!
- When you knock down all the bumps, put a mark opposite the place that still remains the most convex. This is important because this is the place where we will place the first beacon!
We don't do anything
If on the wall, instead of a visible bump, you see a huge influx coming from different sides of the wall and spreading over several tens of centimeters, then there is no need to knock down such an influx. This is unreal! Here it is better to simply accept the situation and simply make a mark with a pencil at the most convex place found, also for the future lighthouse.
Step-by-step lessons on plastering walls
Lesson 01. How to plaster walls. General principleLesson 02. How to plaster walls? Tools and materials Lesson 03. Finding the largest bump on a curved wall before plastering Lesson 04. Trying to knock down a large protrusion in the wall Lesson 05. Plumb and building level Lesson 06. How to attach a plaster mesh Lesson 07. How to install the first plaster beacon Lesson 08. How to prepare a plaster mortar Lesson 09. Creating plane of the wall for plastering Lesson 10. Installing all the remaining plaster beacons Lesson 11. The little secret of leveling walls using beacons Lesson 12. Leveling walls with your own hands. What is the distance between the beacons? Lesson 13. What to do if the plaster beacons are bent? Lesson 14. Checking the accuracy of the installation of the plaster beacons Lesson 15. Plastering walls with your own hands Lesson 16. How to remove the beacons after plastering the walls Lesson 17. How to plaster doorways Lesson 18. Warm plaster. How to work with it? Lesson 19. Warm (heat-insulating) plaster. Types and features
rykinekruki.ru