The choice of foundation and its proper arrangement are treated with special care, therefore, for its high-quality production, it is necessary to have complete information about the construction technology and, in particular, how to display zero on the foundation. The foundation plays a decisive role in the operation of any home. This structural element evenly distributes all possible loads created by the structure and is a kind of intermediate layer between the soil and the structure.
Need for leveling
The construction term “zero” implies the alignment of the prepared surface along the horizontal axis with minimal discrepancies in values along its perimeter.
In simple words, the implementation of this measure allows the foundation to evenly distribute the created loads over its entire area.
In the case of curvature of the support, excess pressure is created in a certain area, which has a detrimental effect on the strength of the elements being built and subsequently leads to premature destruction of both the foundation and the base. Leveling should be carried out at the concreting stage, when the solution has not yet begun to harden.
However, sometimes developers lose sight of this point and are faced with the need to draw horizontal lines after the concrete has completely set at the stage of arranging the base. In any of the presented situations, all measurements are carried out with one’s own hands with special care and accuracy, so that the foundation is as level as possible, and the entire building is practical and reliable.
The establishment of horizontal and vertical lines must be carried out not only at the stage of pouring the mortar, but also during the execution of brick or block masonry.
How to level the foundation after pouring - DIY foundation
Due to violations of the work technology when constructing foundations, deviations from linear dimensions may occur.
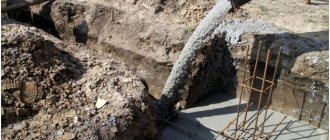
Then the question immediately arises - how to level the foundation and whether it is possible to eliminate the violations. Many home builders, after removing the formwork from a concrete foundation, can see that the geometric dimensions of the foundation structure are very far from the correct normal form and immediately fall into despair. There is no need to despair; there are ways to correct the defects that have arisen and level the foundation. Properly executed strip foundation
Due to violations of the work technology when constructing foundations, deviations from linear dimensions may occur.
Then the question immediately arises - how to level the foundation and whether it is possible to eliminate the violations.
Many home builders, after removing the formwork from a concrete foundation, can see that the geometric dimensions of the foundation structure are very far from the correct normal form and immediately fall into despair. There is no need to despair; there are ways to correct the defects that have arisen and level the foundation.
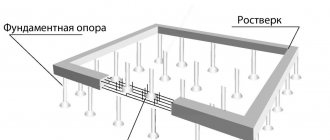
According to the method of construction, foundations for building houses are divided into strip, columnar in the form of individual pillars, monolithic and pile.
When constructing all types of foundations, it is necessary to strictly follow the work technology.
There are no trifles or unnecessary processes in construction, and if at some stage the work technology is violated, then you can end up with an unreliable foundation structure with significant defects.
Pile type of foundation
The reason for the deviation of the linear verticals of the side faces of the foundation may be incorrectly installed or poorly reinforced wooden or panel formwork.
If the formwork panels or boards are not aligned vertically, then when concrete is poured, the foundation walls will be crooked and uneven.
Depending on the magnitude of the deviation from the vertical level, various methods are used to eliminate defects that have arisen:
- If the deviations in the vertical level are insignificant, up to 20 or 30 mm, then in this case it is enough to stuff a metal plaster or reinforcing mesh onto the foundation walls and apply a plaster cement-sand mortar, carefully aligning the side edges of the foundation with the level or plaster beacons.
- Instead of leveling plaster, you can stick extruded polystyrene foam 20 or 50 mm thick onto the curved side wall. In this case, in addition to correcting linear unevenness defects, additional thermal insulation of the foundation walls will be performed.
- In the case of a significant level of curvature of the foundation (more than 50 mm), it is necessary to install the formwork again, attach a metal mesh made of reinforcing steel to the side walls and fill it with concrete mixture.
When pouring a vertical wall, the concrete mixture must be thoroughly compacted so that there are no voids or cavities in the body of the concrete. This procedure can be performed using a construction vibrator or manually with a long piece of reinforcement.
Leveling the side surface of the foundation
The foundation for a building must have not only smooth walls, but also a strictly horizontal surface of the upper part.
When building houses, a dry horizontal gasket waterproofing consisting of two layers of roofing material or other waterproofing material is laid on the upper part of the foundation, and only after that the construction of walls begins.
Unevenness of the upper level of the foundation can occur in several cases:
- Improper preparation of the foundation base. Before installing the formwork for pouring the foundation, it is necessary to make a sand preparation of at least 100 mm, this thickness will allow you to level out the unevenness of the ground. The sand is poured, spilled with water and thoroughly compacted. At this stage, it is easy to achieve a horizontal level for the base of the foundation using a building level. The strength of a spilled water and compacted sand cushion is comparable to the strength of a cement screed of the same thickness. A horizontal sand cushion guarantees a level foundation.
- Inconsistency with the zero level of the foundation level. In construction, the zero level is considered to be the level of the finished floor on the first floor. Builders call the upper part of the foundation of a building, protruding above the surface of the earth, the base of the building. From all these definitions it is clear that the zero level of the foundation is nothing more than the upper level of the base. If the poured foundation is below the design level of the finished floor, then such a foundation must be leveled.
If the upper part of the foundation has a deviation from the horizontal, then the laid waterproofing will not fit tightly, which can cause gradual destruction of the building.
Correction of defects in the horizontal part of the foundation
Leveling the foundation horizontally is possible in several ways.
If the deviation from the upper edge of the base and the design zero mark is within 30 mm, then in this case the following steps must be taken:
- First, it is necessary to mark the zero design elevation of the building. It is recommended to perform this important step using a geodetic instrument - a level. But not everyone has the opportunity to use a level, and not everyone can use it. There is an accessible simple alternative to determining the zero level using a construction hydraulic level, which can easily transfer the design level to all corners of the foundation structure. After determining the “zero” of the building, this level should be transferred to the upper part of the poured foundation.
- If the above value is within 40 mm, then in this case it is necessary to carry out slightly different work to level the horizontalness of the foundation. To bring the base of the house below zero, it is necessary to reinstall the formwork and mark the design zero level on its inside. For this purpose, it is good to use a painting cord - a mark with blue or red pigment and use it to mark the design mark along the entire length of the formwork. After this, fill with high-grade cement-sand mortar, having previously laid reinforcing metal mesh over the entire horizontal surface of the foundation.
- If the deviation is within 50 mm, then in this case the foundation can be brought to zero using brickwork, which can then be easily plastered. The brick must be laid on a layer of cement mortar directly on the horizontal part of the foundation.
Much more labor will be required if there is a significant deviation from the design zero point.
Sometimes inexperienced builders can fill the foundation in such a way that a significant distance of 200 or 300 mm is missing from the zero mark.
To correct this deficiency, in addition to installing formwork, it will be necessary to install a reinforcing belt over the entire area of the horizontal part of the foundation.
The reinforced belt consists of a spatial reinforcement frame and a concrete mixture.
After installing the formwork, the zero level is beaten on it, the spatial reinforcement frame of the reinforced belt is installed and filled with concrete mixture to the intended level.
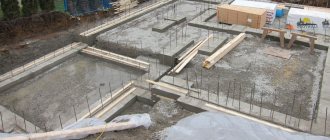
Pouring concrete formwork for a strip foundation
A column foundation is much more economical than a strip foundation and that is why it is preferred when choosing the supporting structure of a building.
We invite you to familiarize yourself with Plastic pools (42 photos): in-ground polypropylene and other models. Do-it-yourself bowl installation for outdoor pools
It is made in the form of separate pillars made of concrete or brick, to which the load from the load-bearing structures of the building is subsequently transferred and therefore increased accuracy is required when constructing this type of foundation. Most often, a columnar foundation is made of brick or cinder block. The following recommendations will help you to display zero on the foundation and how to correct inaccuracies in the horizontal level:
- Columnar foundations, made of brick, are located at a certain pitch on the site of the future construction. To lay out the top of brick foundation pillars on one level, you can resort to using a hydraulic level and sequentially transfer the zero mark to each separate foundation. When determining the deviation from a single design zero level, it is necessary to continue bricklaying to the required height.
- If the deviation value is less than the height of the brick and it is not possible to deduce zero using a brick, then you can lay out high-grade cement mortar on the surface of the foundation pillars using pre-set formwork.
It is quite possible to correct defects and level the foundation, although this will require a lot of effort and time. Correcting deficiencies in construction is always difficult and costly. It is best to carefully familiarize yourself with the technology of work before starting construction work, consistently carry out all stages of construction, and then there will be no annoying shortcomings during the construction of foundations.
- Some subtleties when building a foundation
- Correcting errors Side sides of the foundation
- Top surface
How to level the foundation? This question is asked at a time when the foundation has already been poured, but its surface does not look perfectly flat. As we know, in order to build a house, you need a strong foundation. Modern requirements for it are quite stringent.
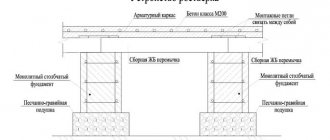
Foundation leveling diagram.
Each of the four surfaces of the foundation should have as level a surface as possible.
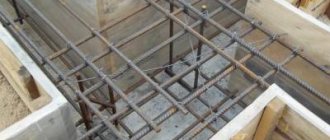
When constructing residential buildings, strip foundations are most often used. Before filling it with cement mortar, gravel is poured into the bottom of the dug trench.
It will become a kind of sand cushion, which will allow you to achieve a smooth surface. Many people mistakenly believe that since this part of the foundation is hidden from view, there is no need to make it level. This is not true.
The fact is that if all four sides are smooth, they will have the same thickness, and this will give maximum strength to the foundation. Typically, the thickness of the air cushion should be about 40-60 cm.
Leveling at the concreting stage
To successfully carry out the activity under study with your own hands, you should prepare the necessary tools and consumables:
- cement (not lower than M200);
- sand;
- reinforcement with a cross section of 10 mm;
- wooden slabs or boards for constructing formwork;
- ax and hammer;
- bayonet and shovel shovels;
- wide trowel and rule;
- hydraulic level;
- cord or rope.
Work order:
- Set the zero point. On the inside of the formwork, in one of the corners, we make a mark, which is the alignment boundary. Using a hydraulic level, we measure the remaining three points in the remaining corners.
If the above-mentioned measuring device is not available, you can use a conventional flexible transparent hose. To establish the desired boundaries, it should be stretched from the marked mark to the opposite corner and filled with water. Having set the level of the future location of the zero plane at the initial point, by finding the fluid balance we find the second point and make a mark. The remaining limit values are found using a similar principle.
- We make two vertical cuts in the formwork along the middle section of the future walls.
- We thread the cords or rope into the prepared cuts and fix them with the necessary tension.
- We pour concrete to the measured zero level and, using the rule, level the composition, evenly distributing it over all corners of the base.
After the concrete mass has hardened, we obtain a perfectly flat foundation surface, on which we proceed to arranging the basement or basement, not forgetting about the mandatory check of the compliance of the horizontals and verticals of each brick or block.
Elimination of irregularities
Their alignment is carried out taking into account the amount of distortion. If the discrepancies are small, you can fix the mesh with staples or dowels and lay a new layer of plaster over it.
We suggest you familiarize yourself with the Foundation on clay, what kind of foundation to build on clay - Stroyfora
If the difference is large enough, resort to the following actions:
- The formwork is set according to the level;
- with slight distortions, the solution is distributed over the void areas formed between the walls of the foundation base and the formwork panels;
- when the gaps exceed five centimeters, it is necessary to apply a reinforcing mesh in the places where concreting is planned.
This method helps to achieve maximum adhesion of liquid concrete and the dried surface of the base.
Control of the evenness of the top can be carried out immediately after pouring the tape or slab; with the side parts you will have to wait until the stone reaches at least 50% of its design strength. If surface irregularities are detected at this time, they should be eliminated.
Side walls
External walls are leveled if the differences are more than 1 centimeter. It would seem that no one sees the underground part of the tape, why give it evenness?
https://www.youtube.com/watch?v=Qi9rey2TkqE
Firstly, the waterproofing simply won’t fit tightly on it, which leads to leaks and rapid destruction/erosion of the wall.
Secondly, the part of the foundation protruding above the ground surface in most cases is the base. Accordingly, wall defects will be visible, which is undesirable.
- The easiest way to level a wall if unevenness is found is by plastering. Moreover, if the level differences exceed 5 cm, a reinforcing mesh should be used, which will improve the non-load-bearing capacity of the facing layer.
- Brick laying of the basement part of the foundation wall. In this case, direct leveling of the side surface of the foundation is not required - it will not be visible behind the brickwork.
- Tiling with adhesive, which can be laid in a thicker layer. This option for masking irregularities is only suitable for walls with small defects.
Top part
Unlike the side part, the upper part must be leveled, because floors and walls will be installed on it. To do this, it is necessary to maintain an exact horizon; a total height difference of no more than 1 cm per 10 meters is allowed.
For all types of foundations, you can check the height of control points using a construction laser level. To do this, a device is installed at one corner, from which a beam emanates in the direction of the second corner, on which a ruler or staff with a mark is installed. It is necessary to record the result on a ruler or staff.
For slab and strip foundations, the algorithm of measures is the same - repeated concreting.
- New formwork is installed on the wall or slab, pressing it tightly to the base.
- Then a concrete solution of a thinner consistency, but of the same brand, is poured into the mold so that it can spread and self-level.
- When the layer thickness is 5 cm or more, it is necessary to lay a reinforcing mesh. Before pouring concrete, the base must be thoroughly wetted to improve adhesion.
Do the same with piles. They are also checked at the horizon, then increased if necessary.
Concreting can be replaced by grinding, but only if the reinforcement of the belt is located at a sufficient depth in the concrete and the defects are shallow. The work is carried out with a grinder, constantly monitoring the horizon level.
If the surface has minor errors or unevenness, then it is enough to level it with liquid concrete according to the rules. When the foundation of the house is made of wood, then it can be successfully leveled with the help of additional boards. And the combined method in such cases consists of using concrete mortar, moss, wooden beams and several balls of brickwork. It is advisable to lay such mixtures on a waterproofing layer.
Top part
The classic way to set zero when the base is ready
Setting zero values on an equipped foundation is a complex procedure that requires knowledge of certain features of building materials and compliance with the technology for increasing compositions. To implement this activity yourself, you should perform the following steps:
- by using a hydraulic level or a transparent flexible hose, we mark the initial zero boundary of the surface (it is more appropriate to indicate the difference in readings in the corners in positive or negative values, for example, +30 or -15, reflecting information, respectively, about the zero value being exceeded by 30 mm and placed below by 15 mm) ;
- according to the upper indicator of the difference in values, we install the formwork with a reserve (the formwork element is made of two boards or panels placed on each side of the foundation; inserts with a length equal to the thickness of the base are mounted between the components);
When pouring concrete in the future, it is important to take into account that the layer thickness should be at least 4-5 cm, since smaller values can lead to a breakdown in the strength of the composition.
- By analogy with the procedure presented above, we make cuts in the formwork and pull the signal rope;
- We carry out concreting of the surface to the measured boundary.
To increase reliability, before pouring concrete formwork, it is necessary, at a minimum, to drill vertical holes in the corners of the hardened base and place reinforcement bars in them, so that their upper edges are at a measured zero level.
Tips and tricks
When establishing the zero limit using a transparent hose, it is necessary to take into account the inertia of the liquid. Before taking measurements, you should wait a short amount of time for the water to calm down and take its final position.
In order to level the places of thin pouring, it is recommended to periodically wet them, ensuring a uniform hardening process, and ensure that the thin layers of concrete do not crack prematurely.
Leveling the top of the foundation
Leveling the foundation horizontally is the most important undertaking. After all, the top is the place where the waterproofing layer and wall masonry are directly fixed. That is why unevenness on the surface of the foundation is simply unacceptable, since it is almost impossible to lay the first row of bricks correctly on such a foundation. To level the frozen foundation, re-installation of the formwork will be required. When performing this task, you must use a level. Also, using a level, you need to determine the highest point of the base. This place will become the settlement point. After the formwork has been installed and all calculations have been completed, it is necessary to prepare a solution, which should be much thinner than standard concrete. To perform work on leveling the horizontal surface of the foundation, the following is used:
- fresh cement mortar of thin consistency;
- special purpose construction level;
- formwork made from boards;
- mesh for reinforcement;
- tools for performing work.
Naturally, it is not difficult to level a horizontal foundation, but it is better when the leveling occurs initially and no topping is required. After all, only a holistic foundation can be the strongest and most reliable. That is why the foundation base must be created carefully and accurately.
Leveling the foundation using brickwork
The presented method is applicable only if the foundation is placed at the same level with the ground surface. After waiting the required time for hardening, we proceed to laying bricks. Using the required number of rows of briquettes, we lay them in several tiers, evenly leveling the surface of the base. The placement of each element is strictly measured by level and plumb relative to the horizon.
Having given time for the equipped wall to dry completely, we cover it with waterproofing material and proceed to the manufacture of the plinth walls.
After completing the described procedures, you should sprinkle the areas of the foundation visible from under the brickwork, first with a small layer of sand and gravel mixture, and then with earth.
To perform the installation work presented, it is advisable to use red brick, which is resistant to moisture and salt deposits. It is recommended to use high-quality cement as a fastening composition.
Articles on the topic
Insulation of a brick house from the outside - mineral wool, polystyrene foam, expanded polystyrene, instructions, advice from masons
Columnar brick foundation - technology, disadvantages, instructions, advice from masons
Reinforcement of brickwork - types, materials, instructions, advice from masons
How to brick a window opening - options, instructions, advice from masons
Electrical wiring diagram in a brick house - how to do the wiring, instructions, advice from masons
Brick partitions - preparation, construction, instructions, advice from masons
How to renovate an old brick house - methods, preparation, instructions, advice from masons
How to rebuild a brick house - options, techniques, instructions, advice from masons
Reviews ()
Why put zero on the foundation with a brick?
In practical terms, displaying 0 on the foundation means giving the upper area of the foundation structure an exclusively horizontal location. It is important to take into account the fact that the level of the foundation is entirely located in one single plane. This need is based on the fact that the pillow performs important functions of the building, namely, it takes on the entire load of the structure. To ensure that the weight is evenly distributed over the entire plane, the upper level is set to zero, thereby avoiding premature destruction of the house.
Among the existing options, the optimal solution is when a concrete base is formed at the initial stage of pouring the structure. It is much easier to justify everything in theory than to implement it in practice, so in practice it is not always possible to derive a horizontal level that would be considered ideal. Often craftsmen deal with errors in their work, and such issues have to be corrected at later stages of work, after the base has been filled with mortar. Therefore, the method of obtaining the zero level using brick or stone is relevant.
Leveling foundations of lightweight construction and in areas with a large slope
Installation of the base of a lightweight structure is carried out by placing bars under the terrace frame until an even horizontal position is obtained. Due to the lack of plane support, this option is undesirable and is used only in some and exceptional cases.
To obtain the required height, you can lay the sand-cement mixture in the lining. Next, you can lay bricks on this layer. This will be the beginning of the base.
Leveling can be done using bricks, expanded clay blocks and mesh for sealing joints.
The construction of foundations in areas with a large slope has some peculiarities. The foundation of the house is erected on a previously prepared bedding consisting of additional soil. The height of the embankment is equal to the difference in height of the upper and lower points of the construction site. When developing a building project, you need to take into account the terrain and choose a construction site that will require a minimum amount of bedding. For the work, low heaving soil with high bearing capacity is recommended.
Another option is to cut off part of the soil to the required height.
With proper planning of foundation leveling, construction can be carried out even in limited landscape space. In this case, you can use the method of dividing the building into separate sections.
When building a private house, strip foundations are often used.
Foundation for an aerated concrete structure
Sheathing the foundation with basement siding
Construction in winter: myth or reality
Foundation on a damp area
Choosing a foundation
As a rule, the foundation is built on a sand cushion, which is placed at the bottom of the trench. In order for the resulting foundation to be smooth and strong, it is necessary to take care of this already at this stage.
Despite the fact that after pouring the concrete, errors may not be visible and only when the building is built, the difference in the height of the cement layer may have an effect. In most cases, everything happens as follows - the base of the foundation is at the same depth, and irregularities appear on its surface. A completely logical question immediately arises: how to level the foundation?
In order to level the strip foundation, formwork is performed. After all, the evenness of the base and enclosing structures of the building will depend on its quality. If any shortcomings are found in them, they can be corrected without any problems. After all, with the help of a solution and a trowel, any errors will be eliminated.
However, do not forget that reinforcing mesh is a good helper in this case. It is packed in places where the foundation “walks” in width, and all flaws are corrected with layers of plaster mortar.
The most important thing is that the surface of the poured concrete strip is absolutely flat. After all, it is on this that the waterproofing layer is laid. If the waterproofing slopes in any direction or waves, that is, the roofing felt sheets do not adhere tightly to the surface of the foundation, this will be the first step towards the process of destruction of the future building. In this regard, if any shortcomings are found in the foundation design, it is recommended to correct them in a timely manner.
Tools and materials
It is customary to begin work on the construction of the foundation with the preparation of all necessary materials and construction equipment. To lay out the structure during the laying process you will need:
The tools you need to prepare are a hydraulic level.
- trowel,
- shovel,
- order,
- jointing,
- mooring cord,
- pick hammer,
- hydraulic level,
- construction level,
- trough,
- concrete mixer,
- metal rod,
- work gloves,
- bricks,
- sand,
- cement,
- lime,
- fittings
The complete list of materials depends on the nature of the work on a particular site.
Check before work
Checking horizontality is necessary to identify defects in the base of the structure.
Before starting any construction activities, it is necessary to check the horizontal level of the surface. To do this you will have to use a construction hydraulic level. The check is carried out from the corners and gradually moves to areas of the base of the structure. If there are differences in the horizon, the necessary notes are taken and the orientation cord is pulled. After this, they move on to the main initial work processes.
How to level to zero when concreting?
The first step is to set the zero point correctly. To do this, a mark is made from the inner area of the formwork, preferably in one of the corners, which will be the alignment boundary. Next, we use the hydraulic level to determine the remaining three points. If such a tool is not available, an ordinary transparent hose will do as an alternative. To mark the corresponding boundaries, the latter is stretched from the marked area to opposite corners, after which water is released. The zero level is fixed at the primary point; in the process of balancing the liquid, a second point is selected and a mark is placed in this place. The remaining points are located according to a similar principle; no difficulties arise at these stages:
- In the finished formwork, it is necessary to make holes for the hose in the middle section of the planned walls.
- A cord or twine is threaded through the holes, after which the structure is fixed until tension appears.
- The zero level is measured and the concrete solution is poured.
- The construction rule is to level the mixture; it is important to distribute it evenly over all areas of the surface.
The level foundation is ready for the construction of the basement.
After the concrete solution has completely hardened, the ideally flat area of the foundation is completely ready for further construction of a basement or possible basement. In this case, do not forget about regularly checking the compliance of the horizontal and vertical levels of each brick row or building block.
Useful tips for construction
- The foundation is the basis of the building. Naturally, the stronger the foundation, the stronger the erected structure.
- An important point is the marking of the future foundation. It is important to set the angles correctly and measure the dimensions of the diagonals.
- In order for the floor surface in the future house to be perfectly level, it is necessary to use a hydraulic level at the stage of laying the foundation.
- Throughout the entire section of the pit, the sand cushion should be of the same depth. It is strictly forbidden to level a pit that has not been leveled in advance using sand.
- Cement mortar is characterized by a heavy mass, and therefore a large number of spacers is a guarantee of strong and durable formwork.
- It is recommended to place a metal frame made of reinforcement inside concrete; the distance from the boundaries of the monolith should be 5 cm.
- Immediately before pouring the cement-sand mortar, it is advisable to take care of the ventilation holes, since poor ventilation and high humidity can destroy the foundation in a short time. In addition, you should take care of the remaining technological openings for communications.
- It is recommended to give preference to high-quality concrete of a good brand. There is no need to skimp on quality.
- When pouring cement-sand mortar, do not forget about air bubbles that can compromise the strength of the structure. In this regard, it is advisable to carefully consider the process of compacting the solution.
- Dampness and heat quickly destroy the foundation structure and plinth, so during rain the hardening cement is covered with a film, and in the heat it is watered.
And finally, don't rush. The cement mortar can completely harden after three weeks, so it is recommended to use this time for rest.
- < Back
- Forward >
The foundation is the foundation of any building. It is to this that the load of the entire structure located above is transferred. In order for the foundation to be reliable and durable, it is necessary to equip it correctly.
What is bringing the foundation to zero? Bringing the foundation to zero means ensuring that its surface in all places is in a single plane, located horizontally.
As mentioned above, the foundation bears the load of the entire building. Bringing this structure to zero is necessary so that it is distributed evenly and does not negatively affect its strength.
It will be easier, faster and more reliable if you do this during the pouring process, and not when the solution has already begun to set. But still, sometimes you have to correct errors late; there are several ways to do this.
In both situations, measurements must be taken extremely carefully and carefully so that the base comes out perfectly level and the entire structure is as strong and reliable as possible.
Leveling is necessary not only when the mortar is poured, but also when the brick base is laid. Due to the uneven ground surface and uneven distribution of concrete, the entire building may become askew in the future. Until the work is completed, you must constantly check yourself using a hydraulic level.
So that you can independently bring the foundation to zero, the photos posted on the page illustrate this process and make it more visual.
How to bring the foundation to zero during the process of pouring the solution? Before starting work you should stock up on:
cement; sand; fittings; boards for the manufacture of formwork structures; with an axe; shovel;
trowel; hammer; cord; hydraulic level; bendable hose. The work is carried out as follows:
First find the zero point. To do this, from inside the formwork, in one of the corners of the foundation, apply a mark with a marker indicating the planned surface level. Next, using a hydraulic level, find the same points in the remaining corners of the foundation. If you don't have a hydraulic level, use a flexible hose to find the points. Stretch it from one corner to another and fill it with water. In this case, you need to ensure that there are no air bubbles inside the hose. Raise one end of the hose to the level of the planned surface at the starting point. Change the location of the other end of the hose until the water in it stops at the edges, but does not flow out. When this happens, fix the hose and make a mark on the formwork - this is the second point you are looking for. Using the same method, find and mark the points in the remaining corners. Now you need to cut the formwork in a vertical direction along all corners of the foundation. The cuts need to be made in twos, placed in the middle of the foundation walls, and led from top to bottom to the level of concrete pouring. Take the cord and pull it through the sawn areas. With these actions, you have designated the zero of the foundation. The next step is to fill the solution prepared in advance to the height marked by the cords passed through the cuts.
How to display zero on a foundation that is already ready? Using a hydraulic level or hose in the manner described above, take the position of one of the corners as the original one. Label all the corners so that the position of each in relation to it is obvious. For example, the mark “+40” will mean that the level of this angle is 40 mm higher than the original level, and the mark “-20” will mean that the angle is 20 mm lower than the original one. Install the formwork. It should consist of a pair of boards, the lower edges of which cover the foundation on both sides, and the upper edges are connected by spacers. Their length must match the thickness of the foundation. Find the zero points at all corners and mark them on the inside of the foundation. In this case, one should proceed from the actual level of location of the corners. Know that the layer of the added solution should not be less than 3-4 cm. If it is too thin, it will not provide sufficient strength to the structure. Now saw through the formwork, proceeding in the same way as described in the fourth paragraph of the previous section. Insert the reinforcement into the formwork, prepare the solution and place it in it, after wetting the surface. When doing this, focus on the cords stretched through the cuts in the formwork. If you are looking for zero points using a hose, be aware of the inertia of the water moving inside it. Before fixing its level, wait a little until it finds its final position.
When you pour the solution and wait for it to dry, make sure that due to its small thickness it does not dry out or crack. To do this, periodically moisten the surface.
Zero foundation using bricks In this case, the foundation is poured to the ground surface. After this, wait the time allowed for hardening. After this, you can begin to build a zero, on which the walls of the structure will subsequently rest.
For work, it is better to choose ordinary red brick, which is not afraid of moisture and salt deposits. Start laying bricks in the first row perpendicular to the direction of the wall. Now you need to complete the task of aligning the zero relative to the horizon line. To achieve this, use a level, plumb line and rope.
Cover the last row of bricks with a strip of roofing felt to provide the necessary insulation from moisture. Secure the material by driving nails around the entire perimeter of the foundation. This must be done before the solution hardens.
At the last stage, it is necessary to sprinkle earth on the section of the foundation that is visible from under the brickwork.
Now the work is finished and you can start building the walls.
Of course, you can remove the correct surface of the foundation after the solution has dried, but it is best to do this right away. Then it will take you much less time and effort, and then you won’t have to doubt the reliability of the design
Methods for leveling the finished base
Often builders need to reach zero on an already formed base of a brick surface. The algorithm of actions looks different than in the first case and consists of the following steps:
- The initial location must be marked with a hydraulic level or a special hose. The corners should be marked so that the location of all is obvious in relation to each other.
- After this, the wooden formwork is installed. It is important to take into account the moment that the design parameters coincide with the thickness of the base.
- Zero marks are measured in the corners, which in the future are transferred to the inside of the foundation.
- The reinforcing mesh is being installed in the formwork. The wooden frame is first sawn.
- A solution is prepared if the consistency of the correct mixture is poured into pre-moistened reinforcement rods.
A hose is used in the process of searching for the location of zero marks. However, it is important to remember the point that the water inside the latter moves by inertia. After the solution is poured into the formwork, it is necessary to ensure that the hose does not dry out from cracking. To avoid such problems, you should regularly moisturize the necessary areas.
Sequence of actions and list of tools
The leveling process can be accomplished using various brick installation options.
- The strip foundation is erected by pouring mortar into wooden formwork. For strength and bonding, reinforcing bars are laid between the layers of mortar. If there is a small difference, a board of the required width is placed under the frame of the house.
- If the difference in height is more than 5 cm, then you need to level the foundation with mortar. It is necessary to re-make the formwork from boards 15-20 cm wide, then attach it to the vertical walls and fill it with mortar. The height of the foundation is adjusted by laying additional reinforcement.
- The final leveling of the foundation is carried out, since a layer of waterproofing is placed on the foundation, which does not adhere well enough to uneven surfaces. If the strip foundation is uneven in width, then lay reinforcing mesh on it, level the surface with mortar and plaster.
- Columnar foundations are used primarily in the construction of lightweight structures and prefabricated structures. It consists of individual pillars dug into the ground. Frame logs or wooden beams are laid on them. Their alignment is done by laying additional rows of bricks.
List of necessary foundation leveling tools:
- roulette;
- hammer;
- Master OK;
- shovel;
- container for preparing cement;
- construction plumb.
Why put zero on the foundation with a brick?
In practical terms, displaying 0 on the foundation means giving the upper area of the foundation structure an exclusively horizontal location. It is important to take into account the fact that the level of the foundation is entirely located in one single plane. This need is based on the fact that the pillow performs important functions of the building, namely, it takes on the entire load of the structure. To ensure that the weight is evenly distributed over the entire plane, the upper level is set to zero, thereby avoiding premature destruction of the house.
Among the existing options, the optimal solution is when a concrete base is formed at the initial stage of pouring the structure. It is much easier to justify everything in theory than to implement it in practice, so in practice it is not always possible to derive a horizontal level that would be considered ideal. Often craftsmen deal with errors in their work, and such issues have to be corrected at later stages of work, after the base has been filled with mortar. Therefore, the method of obtaining the zero level using brick or stone is relevant.
Strip foundation
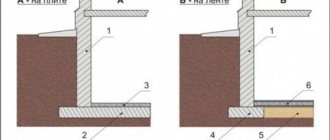
Strengthening the foundation along the perimeter: 1 – sand cushion; 2 – old foundation; 3 – metal mesh; 4 – anchor; 5.- place of destruction; 6 – formwork; 7 – concrete.
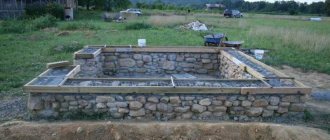
Private houses are built using strip foundations. In order to properly complete the foundation, a sand cushion is placed at the bottom of the trench, on which the foundation is built. To ensure the strength of the foundation, levelness must be taken care of at the very first stages. The difference in the height of the cement plinth will not be immediately noticeable, only after the building is erected. Most often, the base of the foundation is located at the same level, and an unevenness appears on its surface.
In order to level the strip foundation, formwork is made. The evenness of the walls of the base of the structure directly depends on its quality. If flaws are found, they can be easily corrected. Any error will be corrected with a trowel and cement mortar. In places where the base “walks” in width, you need to fill the reinforcing mesh and cover it with cement mortar. It is necessary to ensure that the top layer of the concrete strip is even. Otherwise, the unevenness will prevent the roofing material from fitting tightly to the foundation. It is this factor that will lead to the destruction of the building in the future. It is better to fill all defects and shortcomings with concrete mortar and fix them immediately after detection.
Leveling the strip foundation
To know how to properly level the foundation, you need to determine the largest and smallest points in height on the surface of the concrete strip. This measurement is made using a hydraulic level. If the points are lost correctly, you need to mark them with chalk.
If irregularities are detected, the formwork should be remade. From inside the formwork, using a level, draw horizontal lines. In case of slight distortion, you can immediately fill it with concrete mortar. If the skew exceeds 5 cm, reinforcing mesh is placed in the required places. In order to even out the distortion, a solution of a more liquid consistency is prepared. Considering the possibility of wood contamination, it is better to make beacons from self-tapping screws. Beacons are placed only in places where the tape level is raised. When building walls from timber, distortions are eliminated using wooden dies placed under the beams.
Leveling a columnar foundation
When building lightweight structures, it is correct to use a columnar foundation. This design looks like pillars standing in a certain sequence. The pillars are made of bricks or concrete pillars. In order to know exactly how to level the foundation, you need to know the direction of its skew. Using a water level, you should find which pillars and how much to raise. Record the obtained measurements on the column itself. Brick and concrete posts must be supplemented with concrete mortar. Level the foundation consisting of pipes using formwork and pouring concrete mortar.
Leveling the foundation is very important. Therefore, it is worth performing it with special attention. All defects and irregularities should be corrected immediately. If corrections are not done correctly, this can lead to the rapid destruction of the building.
Tools and materials
It is customary to begin work on the construction of the foundation with the preparation of all necessary materials and construction equipment. To lay out the structure during the laying process you will need:
The tools you need to prepare are a hydraulic level.
- trowel;
- shovel;
- order;
- jointing;
- mooring cord;
- hammer-pick;
- hydraulic level;
- construction level;
- trough;
- concrete mixer;
- metal rod;
- work gloves;
- bricks;
- sand;
- cement;
- lime;
- fittings
The complete list of materials depends on the nature of the work on a particular site.
Types of foundations
According to the method of construction, foundations for building houses are divided into strip, columnar in the form of individual pillars, monolithic and pile. When constructing all types of foundations, it is necessary to strictly follow the work technology. There are no trifles or unnecessary processes in construction, and if at some stage the work technology is violated, then you can end up with an unreliable foundation structure with significant defects.
Pile type of foundation
How to level to zero when concreting?
The first step is to set the zero point correctly. To do this, a mark is made from the inner area of the formwork, preferably in one of the corners, which will be the alignment boundary. Next, we use the hydraulic level to determine the remaining three points. If such a tool is not available, an ordinary transparent hose will do as an alternative. To mark the corresponding boundaries, the latter is stretched from the marked area to opposite corners, after which water is released. The zero level is fixed at the primary point; in the process of balancing the liquid, a second point is selected and a mark is placed in this place. The remaining points are located according to a similar principle; no difficulties arise at these stages:
- In the finished formwork, it is necessary to make holes for the hose in the middle section of the planned walls.
- A cord or twine is threaded through the holes, after which the structure is fixed until tension appears.
- The zero level is measured and the concrete solution is poured.
- The construction rule is to level the mixture; it is important to distribute it evenly over all areas of the surface.
The level foundation is ready for the construction of the basement.
After the concrete solution has completely hardened, the ideally flat area of the foundation is completely ready for further construction of a basement or possible basement. In this case, do not forget about regularly checking the compliance of the horizontal and vertical levels of each brick row or building block.
Leveling the top layer of the foundation
Much more labor will be required if there is a significant deviation from the design zero point. Sometimes inexperienced builders can fill the foundation in such a way that a significant distance of 200 or 300 mm is missing from the zero mark. To correct this deficiency, in addition to installing formwork, it will be necessary to install a reinforcing belt over the entire area of the horizontal part of the foundation. The reinforced belt consists of a spatial reinforcement frame and a concrete mixture.
Pouring concrete formwork for a strip foundation
How to level the foundation after pouring along the horizon? It is believed that such work is considered the most important undertaking, because it is on the base that the waterproofing layer is placed, and it is in direct contact with the load-bearing walls. Taking into account this fact, the presence of the most minimal irregularities on the surface is completely eliminated.
So how to level the foundation to zero? The algorithm of actions is as follows:
- the formwork is reinstalled, the height is checked by the building level;
- Marks are made on the formwork panels, allowing you to monitor that the mortar mass is distributed evenly this time.
You should not mark with a marker or pencil - install beacons from self-tapping screws.
How to level the foundation after pouring? To do this, prepare a fresh solution, the consistency of which should be much thinner than when concreting the main structure.
To correct such an uneven foundation you will need:
- cement;
- shovel;
- sand;
- level and tape measure;
- mesh for reinforcement;
- formwork;
- bricks;
- Master OK.
Using the level, the maximum point in the discrepancies is determined, which is taken as the main guideline for alignment. Remember that this event is more serious than correcting the side surfaces.
The leveling process is carried out with brick stone, which is pre-sawn before laying. The service life of the entire structure depends on the evenness of the surface, so all discrepancies must be eliminated.
To correct problems, you can set up the formwork, determine the pouring boundary, prepare the solution and carry out concreting to the required height.
Leveling the strip foundation after pouring with brick is an excellent option if you plan to install the basement part.
Slab foundation
Leveling such a monolithic foundation before laying is a complex process. When pouring a slab base, it is necessary to carefully prepare the bottom of the pit, lay and compact the foundation pad, and fill it with crushed stone. If defective areas are identified on the plane and along the horizon, additional measures will have to be taken:
- determine the zero point;
- at the required height, set and strengthen the formwork for the foundation, level it horizontally;
- pour the liquid mortar mixture and level its surface with a long rule.
This support structure is considered economical compared to a shallow strip base, and for this reason it is used quite often.
The supports are made of separate pillars from concrete mortar or brick stone. They are subsequently subject to load forces from the entire structure, so the installation of such a foundation requires extreme precision.
How to level out uneven foundations and check its diagonal? To do this, use the following tips:
- Columnar supports, built from brick material, are placed at certain intervals throughout the construction site. To bring the top of the support elements to the same height, you can use a hydraulic level and transfer the zero point to each support element. Having determined the deviations from the general design height parameter, the support is “raised” by the brickwork;
- if the deviation is insignificant and exceeds the height of the brick stone, high-grade concrete is laid on the pillar. Only before this you will have to install the formwork.
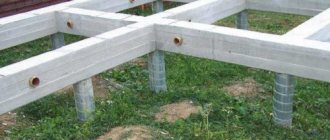
You can and should make a columnar foundation with your own hands when building gazebos, sheds, sheds, decking, firewood sheds, country showers and toilets and other buildings made of wood or lightweight materials. Why dig a deep trench and cement stones if the walls of the building are made of timber and do not weigh so much?
The distance between the foundation pillars depends on the size of the building and the material of the frame. If a wooden beam is installed on the posts, the distance is made smaller, if an iron I-beam is installed, the distance is greater. Usually it is 1 - 2.5 meters. The size of the holes depends on the weight of the building - the heavier it is, the larger the diameter.
We suggest you familiarize yourself with Which foundation is better for a log bathhouse
The distance between the posts along the perimeter and diagonally should be the same. Here you need to be pedantic, the beauty and proportionality of the structure depends on this.
Let's start making holes. We made ours with a garden auger with an auger diameter of 13 cm.
This size was sufficient for our construction. A columnar foundation is usually made to a depth below the freezing point so that soil movements at low temperatures do not damage it. We made 6 holes 1.2 m deep.
Next, pour a layer of sand about 10 cm high into the holes and compact it well.
Since we will frame the future building with timber on top of the columnar foundation, to further facilitate the work it is necessary to level the pillars. To do this, for each hole we will make an individual formwork from boards in the shape of a square with a side length of 20 cm. By measuring the ground level, we will determine the height of each formwork.
To waterproof concrete, insert a piece of roofing material rolled into a tube into each hole.
For the strength of the structure, it will be necessary to secure the timber to a columnar foundation. For these purposes, we took a pin with a diameter of 12 mm and used a grinder to cut 6 pieces 25 cm long. This size will be enough for a strong connection of the structure.
Now everything is ready to pour the columnar foundation with your own hands. Let's prepare a solution by taking 1 part cement and 4 parts sand. Add water to the container and mix everything thoroughly. As a filler we will take 4 parts of crushed stone.
Fill the first hole with the resulting solution and insert a pin into it. We will stick 15 cm of the studs into the concrete, leaving 10 cm on the surface. Let's install it strictly vertically.
We will repeat the same for the five remaining holes. The studs need to be inserted into the solution on the same line to make it easier to attach the harness.
We have done the main work. After a couple of days, when the solution has set, the formwork can be dismantled. The self-made columnar foundation is ready.
In a few more days it will be possible to tie the foundation with timber and continue construction of the building. But that's a completely different story.
To obtain a strictly horizontal surface of a strip foundation, the formwork should be placed along the side walls. After this, a reinforcing mesh is placed inside the formwork on the foundation itself. It may not be used if the unevenness does not exceed 5 cm.
Inside the formwork, horizontal level marks are placed on the walls, along which the concrete mixture is poured. In another case, you can create this level with the sides of the formwork if you set them according to the level. If there is a risk that the marks will be filled with cement, then horizontal thin slats can be sewn in their place.
The unevenness of the horizontal surface of the strip foundation does not play a significant role if the walls of the house are built from logs or timber.
In this case, wooden wedges are placed under the first crown, and the empty space formed between the foundation and the first crown is filled with heat-insulating material.
We have looked at how to level the foundation, now we need to dwell on the question of how to level the side surfaces. There are much fewer difficulties with this than with a horizontal surface. After all, the strength of the foundation itself does not suffer from uneven walls. The only question is aesthetics.
You can level the foundation walls from the outside by simple plastering. For large depressions, more than 5 cm deep, a reinforcing mesh is also filled, over which a cement-sand mortar is applied.
Simultaneously with leveling the side surfaces, the basement of the building can be insulated and subsequently finished with ceramic tiles or siding. Simply put, the alignment of the side walls is achieved using these materials. If you plan to decorate the house with decorative materials in the future, then there is no need to separately level the foundation. A waste of time and money.
Based on the above information, it becomes clear how to level the strip foundation. But there are also other types of foundations - columnar, slab, pile. Let's take a brief look at how these structures are aligned.
Methods for leveling the finished base
Often builders need to reach zero on an already formed base of a brick surface. The algorithm of actions looks different than in the first case and consists of the following steps:
- The initial location must be marked with a hydraulic level or a special hose. The corners should be marked so that the location of all is obvious in relation to each other.
- After this, the wooden formwork is installed. It is important to take into account the moment that the design parameters coincide with the thickness of the base.
- Zero marks are measured in the corners, which in the future are transferred to the inside of the foundation.
- The reinforcing mesh is being installed in the formwork. The wooden frame is first sawn.
- A solution is prepared if the consistency of the correct mixture is poured into pre-moistened reinforcement rods.
A hose is used in the process of searching for the location of zero marks. However, it is important to remember the point that the water inside the latter moves by inertia. After the solution is poured into the formwork, it is necessary to ensure that the hose does not dry out from cracking. To avoid such problems, you should regularly moisturize the necessary areas.
Leveling the foundation depending on the building
Easy construction
For example, for a light structure of small size, the foundation can be leveled by installing a future terrace frame with a lining of various blocks, this is done in order to bring the frame to the required horizontal position. However, this is not entirely correct, since in this case there will be no support along the plane.
You can also plaster more cement and sand mixture into the lining for the required height and then place the plinth on it. Another option is to compensate for the height using several expanded clay concrete blocks - it is recommended to use a piece of mesh to seal the seams.
Heavy construction
If the building is made of stone, the surface can be leveled using a masonry mixture applied to the waterproofing layer. If you get quite large unevenness (about 10 cm), most likely, you will need to reinstall the formwork, as well as add new cement mortar in order to try to bring the foundation “to zero” again.
These procedures are carried out to ensure that the foundation of the building provides a perfectly flat base for the construction of the planned structure, because a flat surface is the key to high-quality construction.
Required material and why reinforcement is needed
To build a solid foundation you will need the following material:
- roofing felt or foam;
- mineral wool or moss;
- wooden beams, boards and ready-made factory panels for formwork;
- sand, fine gravel and cement for preparing the solution;
- small diameter reinforcing bars.
In some cases, especially when leveling prefabricated strip foundations, the horizontal displacement is quite large, and it is necessary to pour an additional foundation. Often this technology is used when restoring an existing foundation, which has shifted over time due to deformation of the reinforcement belt.
If such a problem is found with the foundation, then a reinforcing belt is additionally provided in the formwork. To do this you will need to do the following:
- The surface of the foundation is thoroughly cleaned from adhering dirt and loose concrete.
- The old reinforcing bars of the horizontal belt are exposed.
- The installed formwork provides a horizontal and vertical reinforcing belt connecting to the old foundation. Here it is recommended to use bolted connections, but in some cases arc welding is also allowed.
Horizontal belts are installed at intervals of 30 cm, maybe smaller, but all layers need to be connected. Vertical rods can be installed at intervals of up to half a meter. The finished structure is checked for evenness and filled with concrete of medium consistency.
Aligning the vertical strip foundation
The strength of the building does not depend on the verticality of the foundation walls. This indicator only affects the appearance of the house. Simple plastering will help solve the problem of uneven walls. In those places where the depth of the depressions is more than five centimeters, a reinforcing mesh is installed. To ensure the verticality of the finished plaster, you can use a rule, slats or a building level. If you plan to finish or decorate the outer part of the foundation, then it is not necessary to plaster the surface separately. The plane is leveled using finishing materials.
Another case is a serious deviation from the vertical, skew. If such a problem arises, the formwork is re-erected along the finished foundation. If the distance between them is more than 0.5 meters, then a reinforcing frame will be required. This will help create a solid foundation for the house being built.
Alignment of strip and column foundations
Both construction options must be erected especially evenly and accurately, since further construction and service of the building depend on the foundation. The strip foundation should be leveled not only laterally, but also horizontally. Professionals recommend not only leveling the base, but also insulating it. Columnar foundations are used for the construction of dachas on uneven terrain. This type of base should also be as precise as possible. To level a columnar foundation you must:
- determine the magnitude of the difference in indicators between the fixed pillars;
- install formwork for each pile;
- determine the same pouring height on all formworks and fix it with a mark;
- install the formwork, lay the reinforcing belt and pour the prepared concrete solution;
- leave the piles to dry, remove the formwork;
- Fix waterproofing material on each column.
Experts say that the foundation must be installed in accordance with regulatory requirements, that is, correctly. Follow simple recommendations, and you will create the foundation for a summer house or bathhouse with your own hands.
How to properly level the base with concrete mortar
The process consists of several stages of varying importance, and materials that are optimal for leveling vertical and horizontal surfaces are used. Thus, depending on the characteristics of the base and the type of unevenness, sometimes it is enough to just plaster and level the surface. But this is only possible if the difference is insignificant and is more characterized by unevenness. And if the height difference is significant, then a whole technology is used:
- First, the surface is cleaned from adhering dirt and stones.
- Then formwork is erected from wood or roofing felt. Here it is recommended to do horizontal and vertical strapping so that the formwork itself is as level as possible. In this case, the highest and lowest points of the base are determined where the alignment is carried out. Considering that the entire structure will be filled with concrete, it is better to mark key points on the formwork.
- On the inside of the formwork, where the concrete strip of the supporting structure runs, horizontal lines are drawn using a level and filled with concrete. If the distortions are minor, then it is better to use a more liquid solution. And, if the distortions are significant, then it is better to fill it with a thick solution.
After pouring the concrete, the base is left to dry for several days and the formwork is dismantled. In some cases, you can leave it, because the outer surface is perfectly flat. You can install a layer of waterproofing on the formwork and stick polystyrene foam for thermal insulation.
Leveling the sides of foundations
Incorrectly aligned formwork in the vertical plane or errors when laying columns will certainly lead to deviation of the side faces of the foundations. Moreover, due to the low load-bearing capacity of these structural elements, the requirements for the process are not high; these works can easily be performed even without sufficient experience in construction work.
Differences are less than 10-15 mm
If the differences do not exceed 10-15 mm, the problem can be solved by simple plastering. At the same time, for more reliable adhesion of the finishing layer to the base, we recommend using steel or plastic reinforcing mesh. The process must be carried out in the following sequence:
- Determine the scale of the problem using a building level or plumb line, checking the outer slopes in several places in increments of no more than a meter;
- Distribute the mesh over the surface to be leveled and secure it with steel dowels or plastic dowels with self-tapping screws screwed into them;
- Apply a layer of cement mortar to the fixed reinforcement, throwing it with a trowel from a sufficient distance, which will improve adhesion to the concrete, brick or block surface;
- Rub the layer of plaster over the surface of the foundation with a float or trowel, giving it the desired flatness and verticality.
Differences greater than 30 mm
If the differences exceed 30-50 mm, the problem must be solved in another way, since in this case it is necessary to level the foundation not only from an aesthetic point of view, but also from a practical one. It consists of re-installing panel formwork made from sheet wood materials or edged boards and additionally pouring a new portion of concrete mixture. To do this, first determine the zero point - the place that protrudes most beyond the strip foundation or columns.
Having carefully checked the verticality, fix the new formwork and fill the free space with fresh concrete mixture. First, for better adhesion to the finished base, secure the reinforcing mesh on its surface in several layers in the manner described above.
Instead of plastering and re-concreting, other methods can be used to impart verticality to the side surface of the strip or columnar base of the future structure. To do this, you can use facing bricks, which simultaneously finish the surface of the base and level it. Special plastic siding can also visually impart flatness and verticality to the basement part of the foundation. When installing it, it is enough to make a wooden sheathing taking into account the desired position and perform installation.