Features of creating a roof project
Errors when creating a rafter system can lead to roof collapse and leaks. At the design stage, it is important to correctly set the angle of the roof so that it can withstand the load from snow and other precipitation. In addition, you need to consider the distance between the elements so that the roof has an optimal weight.
When preparing your project, pay attention to the following points:
- roof shape;
- roofing material used;
- locations of internal supports;
- rafter system;
- at what angle the roof slope will be located;
- distance between walls.
How to fasten rafters if a Mauerlat is used
You can do without a Mauerlat in frame and wooden houses, but sometimes it is a mandatory part of the structure. For example, when using foam concrete blocks and similar materials for walls:
- transfer of moisture from the walls to the rafter system;
- features of the material due to which the fasteners do not linger in it;
- fragility of walls;
- inability to support the roof without using a Mauerlat.
If the house is built from a material that does not shrink, it is advisable to use a rigid fastening, otherwise the connection may have a degree of freedom. The rafter system is first attached to the mauerlat, and at the free ends it is connected to the floor beams.
Attaching the rafters to the frame
The rafter system on the log house is installed according to a certain algorithm. This is due to many factors. Firstly, a structure made of wood has its own geometric dimensions, which can change during the shrinkage process. Secondly, air humidity can affect fastening. It is imperative to check the last crown for horizontality so that the rafters lie correctly and the load transfer to the structure is uniform.
The installation locations of the rafters must be marked. If the gables are made of timber and logs or timbers, then the ridge beam will rest on them, in this case the technology for fastening the rafters will differ from rigid fixation, where metal corners or notches are used.
Rigid mount
For a rigid connection, you will need to cut out a rafter beam or use a retaining strip. This type of fastening is used both to create a shed roof and for other types of construction.
The step-by-step execution of the cutting method is as follows:
- Cut out all the blanks according to the template. To begin, install the beam for the future rafter leg with a certain angle (laid in the project), and then mark the location of the notch. Its depth should be no more than a third of the height of the bar. After making one rafter leg, use it as a sample. You will need to make the rest identical. It is important not to make a mistake at this stage.
- Place each rafter leg with a saddle on the Mauerlat and secure with nails. First, hammer two at an angle to each other, from the sides of the rafter system. The third one must be driven vertically - it ensures the strength of the structure.
This way you will get a rigid rafter connection that can withstand any load. Remember that cutting cannot be done in the Mauerlat, as this will weaken it. Look carefully at the photo to understand how to correctly cut and assemble rigid fasteners.
There is another method of rigid fastening: when using it, meter-long bars are hemmed to the rafter legs, which rest against the mauerlat. They must be secured with metal corners.
Supporting rafters on floor beams
When choosing a roof, the owner of a future private house often chooses an inexpensive option with two slopes. The practical and simple design of such a roof is reliable, durable and provides good protection from bad weather. Let's look at how the rafter system of a gable roof is structured - the most important element of its design.
A gable roof is a roof in which two rectangular flat slopes are connected at the top at an angle. In this case, triangular openings remain on the sides. The pediments are inserted there.
In order for the structure to be strong, reliable and serve for a long time, various retaining and supporting elements are used in it.
The most important of them is the rafter system of a gable roof, to which, in fact, this material is dedicated.
Structural elements of gable roofs
In general, all these elements of gable roofs are boards, bars and beams of various lengths, shapes and sections. Let's look at them all in order.
Mauerlat
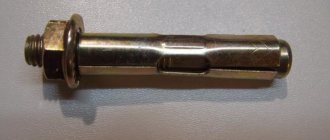
This is a coniferous beam with a square cross-section, the size of which is usually 10 or 15 centimeters. It is placed along each of the load-bearing walls, attached to them with threaded rods or anchors. The purpose of this element is to uniformly transfer the load from the legs of the rafters to the load-bearing walls.
Rafter leg
This is a beam with cross-sectional dimensions of 15 centimeters by 5 (or 10) centimeters. It is from these elements that our triangular roof contour is assembled, which bears the brunt of wind, hail, snow and other vicissitudes of the weather.
In order to adequately withstand these loads, the rafter legs are positioned in increments of 0.6 to 1.2 meters. The heavier the roof is supposed to be, the shorter this distance.
In addition, the pitch of the rafters, in some cases, will depend on the design features of the roofing used.
Sill
The square beam for this element has the same cross-section as for the Mauerlat - 10/10 or 15/15 centimeters. It is placed horizontally on the internal load-bearing wall in order to evenly distribute the load from the roof racks.
Puff
This element is used for hanging rafter systems. It completes the triangle of rafter legs, preventing it from unraveling.
Racks
The timber for them is taken square, the same as for the previous element. The racks are placed vertically, taking the load from the ridge and transferring it to the load-bearing wall inside the house.
Struts
These elements act as a transmission link between the rafter legs and the load-bearing elements. By connecting the tie and struts, you get a truss - a very strong element. Even with a large span, the truss will withstand all loads.
Lathing
Sheathing bars (or boards) are placed perpendicular to the legs of the rafters. By transferring the entire weight of the roof to the rafter legs, this structural element additionally holds them together.
It is preferable to take edged bars or boards for arranging the sheathing. But for lack of anything better, an unedged board will do, but with the bark removed.
Well, in the case of a soft roofing covering (for example, bitumen-based tiles), the sheathing is made continuous. To do this, take moisture-resistant plywood sheets.
Roof ridge
The ridge is the upper part of the roof connecting two roof slopes. It is formed by connecting the rafter legs at the top of the roof. It is located horizontally.
Eaves
This element, protruding from the walls at a distance of approximately 40 centimeters, prevents rain flows from wetting these walls.
fillies
And again the “horse” name. These structural elements of the gable roof truss system are needed to organize the roof overhang. The need for them appears only when the rafter legs are too short and there is not enough for an overhang. Then these legs are lengthened with fillets, which are boards of a slightly smaller cross-section.
Types of rafter systems for gable roofs
There are only two of these systems: hanging type and layered type. The first ones are used when the outer walls of the house are 10 meters or less from each other.
There is one more condition - between these very walls there should not be a load-bearing wall dividing the house in two. Otherwise, you need to use layered rafters. When a house under construction is divided not by a load-bearing wall, but by columns, two rafter systems are installed at once.
Rafters located at an angle will rest on the columns, and hanging rafters will fit perfectly between them.
Hanging type rafter system
This gable roof truss system is characterized by the fact that the rafters rest on the side walls. The bad thing is that this creates a bursting load that can damage the walls over time.
To prevent this from happening, the legs of the rafters are connected with a tie. As a result, a rigid triangle is formed that is not subject to deformation under loads.
Often, floor beams are used instead of ties; this is especially true when it is necessary to equip an attic space under the roof.
The advantage of this system is that it is not necessary to attach the Mauerlat. In addition, those parts of the structure where the legs of the rafters rest on the walls are quite simply mounted. A board laid through the insulation layer will help make the truss level and stable, providing a larger support area. Next, we will consider the main types of hanging rafters. All of them are three-joint.
#1. A simple triangular three-jointed arch.
This is the simplest structure, representing a closed triangle, the two upper sides of which are subject to bending load. The tie in such a design does not work only in tension and is not a load-bearing structure, so it can be replaced with a steel tie.
At the same time, there are several solutions for organizing the design of the cornice assembly. These are orthogonal frontal notches, as well as the use of plank or plate fastenings.
#2. A triangular, three-hinged arch reinforced with a headstock or pendant.
This option was used only before, when building large industrial or agricultural premises with a span of more than 6 meters. This scheme is not suitable for private houses. Its principle is that the weight of the tightening (composed of individual short elements) is borne by the skate.
These elements are connected to each other and to the suspension clamp using a cut (oblique or straight). Bolts are used for fastening. The wooden pendant is called the headstock, and the iron pendant is called the heavy pendant. This part hangs on the cornice assembly, and the tie is attached to its bottom through wooden trims.
Adapters are clamps that regulate the deflection of the tightening if it sag.
#3. Triangular three-hinged arch with raised drawstring.
If you want to equip an attic space under the roof, then this scheme is perfect. Here we place the stretcher not at the bottom, tightening the legs of the rafters, but at the top.
Raising it higher, we increase the tensile load. Well, the rafters are held on the beams of the Mauerlat according to the principle of a slider. The load is uniform and the system is stable.
To do this, the edges of the rafters must protrude beyond the boundaries of the external walls of the house.
To prevent the tie from sagging, it is often balanced with a suspension. This is especially important if you plan to make a suspended ceiling or lay layers of insulation. With a short tightening, the pendant is attached to the crossbar and ridge by nailing two boards; with a long tightening, several pendants are made. For heavy loads, clamps are used for fastening. If necessary, they also connect two parts of a composite tightening.
#4. Three-hinged triangular arch with crossbar.
Sliding type mount
The movable joint is used for houses made of timber, logs and other materials that shrink. If in such a house you make a rigid joint between the rafter legs and the mauerlat, over time the entire structure may collapse. When there are errors in construction, deformation begins from the walls of houses and is transmitted further.
For a sliding connection, it is a good idea to purchase a special fastener called a “sled” from any hardware store. You can also purchase corners with unusual holes for connection (oblong shape). The rafters are attached to all roof elements using clamps and brackets.
How to make a mount with floor beams
Attaching the rafters to the floor beams, which protrude 40 centimeters from the walls, can be done by cutting down using the double tooth method. This is quite simple to do: at the end of each rafter leg, cut out something like a step. The same lock needs to be cut out on the beam. Tighten the connection of these elements using a bolt and a clamp.
There is another way to install the junction of rafters and floor beams - using overlays made of boards. They are secured using self-tapping screws or nails with special notches. Distributing the load from the rafters between the mauerlat and the floor beams makes the roof more durable.
The main types of connections found when arranging a rafter system
The approach to how to fasten the rafters is determined depending on the location of the fastening point:
- rafters and mauerlat;
- two bars when increasing the length of the rafters;
- rafters and additional structural elements that strengthen the roofing system.
Scheme of rigid fastening of rafters to the Mauerlat
Rigid fastening of rafters is used when it is necessary to create a strong connection between the rafter base and the Mauerlat. An important requirement: the fastening should not be affected by factors such as torque, sliding, turning, etc. an effort.
The strength of the structure is ensured by:
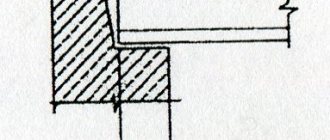
- equipping the rafter leg with a gash - the so-called “saddle”;
- equipping the fastening unit with a stripe in the form of a support bar.
How to properly attach the rafters to the Mauerlat using this method? First, using a template, a recess (“saddle”) is created on the rafter leg in order to further place the rafter on the mauerlat. It is prohibited to make any cuts on the Mauerlat, because violating the integrity of this element can significantly reduce the load-bearing capacity of the entire rafter system!
After the rafter leg and the mauerlat are joined, the elements are fastened using three nails: two are driven into the sides of the rafters at an angle to the rafters and to each other, and the third is strictly vertical in the middle. A more reliable method of fastening is metal corners, which are fixed with nails with special protrusions on the leg.
The knot will be made even stronger by the supporting block, which is mounted under the rafter leg and rests against the mauerlat.
Photo of fastening the rafters to the Mauerlat
Attaching the rafters to the mauerlat
photo of attaching the rafters to the Mauerlat
photo of attaching the rafters to the Mauerlat
photo of attaching the rafters to the Mauerlat
photo of attaching the rafters to the Mauerlat
photo of attaching the rafters to the Mauerlat
photo of attaching the rafters to the Mauerlat
photo of attaching the rafters to the Mauerlat
photo of attaching the rafters to the Mauerlat
Sliding rafter technology
Those who are interested in how to fasten rafters when arranging the roof of a house made of timber or rounded logs will want to know about sliding fastening. A rigid connection between the mauerlat and rafters is not suitable in this case, because wooden houses necessarily shrink in the first few years after construction. If the roof is not given some room to move in the direction of expansion/contraction, it may become deformed or even collapse.
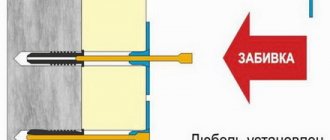
With this method of fastening, the mauerlat and rafters are connected using special “sled” fittings or corners with elongated holes for nails.
Photo of the sliding fastening of rafters to the Mauerlat
Video about the sliding method of fastening and its installation:
Installation of rafters on beams (when arranging a roof without a Mauerlat)
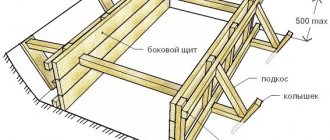
If you are planning to install a simple roof for a wooden house, the rafters can be attached to the floor beams. However, keep in mind that the distribution of the load from the roof will be point-wise and not distributed, as with a Mauerlat. With this constructive solution, the floor beams should protrude beyond the contour of the walls by about 40 cm. To ensure that all rafters are fixed at the same angle to the beams, a string is pulled across the latter, which will serve as a guide for cutting out grooves for installing rafter legs.
To make the fastening unit more durable, cuts are made both at the base of the rafter leg and in the floor beam. In the first case it is a “tooth with a spike”, in the second it is a socket for a spike. To avoid reducing the load-bearing capacity of the beam, the nest should have a depth of no more than 1/3-1/4 of its width.
Next, the rafter legs inserted into the grooves are fixed to the beams using metal fittings: angles or bolts with nuts.
Fastening the rafters in the upper (ridge) part
At this stage, you can act according to one of three schemes:
- fasten the upper parts of the rafters, cut at the required angle (ideally according to a template), end-to-end using long nails, or even better, metal plates;
- fasten the rafters with an overlap using a bolt and nut, studs or nails. This method is considered more reliable than the first because the rafters have a larger contact area;
- fasten the rafters end-to-end and secure them to the ridge purlin. This scheme differs from the first method in that there is also a ridge beam. In this case, the “saddle” is made not only on the rafter leg, but also on the upper part, which will rest on the ridge girder. If the ridge is large, it may require additional supports, which is completely unsuitable for attics that will be used as living quarters.
Extension of rafters
As a rule, standard lumber has a length of up to 6 m. If the slope of your roof is longer, it is necessary to build up, or lengthen the rafters. Here, too, you can act differently:
- using the method of oblique cutting (at an angle of 45°) and connecting parts of the rafters with a bolt with a diameter of at least 12 mm;
- end-to-end, strengthening the connection with overlay beams fixed with nails in a checkerboard pattern;
- overlapping, observing the intersection of rafter sections of at least 1 meter in length and the arrangement of fastening fittings in a checkerboard pattern.
Several axioms regarding fastening rafters
how to fasten the rafters himself, based on the design features of the roof, the building as a whole, as well as the climatic conditions of the region (wind strength, snowiness in winter, etc.). However, there are several rules that must be followed in any case:
- Use high-quality mounting hardware. If you want your roof to be durable and safe, you shouldn't skimp.
- The most reliable types of fastening are metal corners, plates, bolted and stud connections. Nails and screws are accessories for temporary fastening of rafters.
- When building a wooden house, be sure to use a sliding connection between the rafters and the mauerlat or wall to avoid deformation of the roof during the shrinkage of the building in the first few years of operation.
- Make cuts on the rafters carefully so that in the future you do not have to use liners or cut out extra centimeters/millimeters already in place. The ideal option is to use a template. Please note that if the roof is complex and the rafters will be attached to the mauerlat at different angles, each type of arrangement will require its own template. For all cases, the rule applies: the depth of the cut should be 1/3-1/4 of the width of the rafter leg.
- If you choose bolts with nuts as fastening hardware, be sure to use washers and other sealants that prevent the bolt head from “sinking” into the wood.
Thus, the arrangement of the rafter system of a house should be approached extremely carefully and responsibly. There should be no place for haste here. Before the actual installation work begins, the rafter system must be designed, and the locations of all fastening units must be determined. You should always have a sufficient number of good quality fasteners at your disposal. Only with this approach can we guarantee the strength and reliability of the roof, the absence of deformations and serious damage during the operation of the house. Build wisely and with soul, and you will definitely succeed!
You probably already understand in general terms how to build a roof. But how not to build it - look in this video:
Don't forget to share this article with your friends! Perhaps someone will find it very useful!
Similar news:
- Do-it-yourself soft roofing: selection of materials, installation, repairs. Photos and...
- Roof overhangs: what are they, why are they needed and how are they properly designed?
- Installation of sheathing: we equip a reliable base for different types of roofing
- Additional elements for metal roofing
- Insulating the outside walls of a house yourself
- Do-it-yourself heating of a private house
Features of the construction of the rafter system during frame construction
In the construction of light frame structures, rafters can be attached directly to the floor beams without a Mauerlat. Step-by-step instructions for carrying out this work are as follows:
- When you start working with the rafter system, you must have walls and a rough ceiling erected. Install additional supports during the work.
- Connect the ceiling beams and the top trim. Secure them.
- Install the rafters. To strengthen their block, you can use double vertical posts.
- Using racks, attach the rafter legs to the walls. After this part of the work, you can begin lathing and installing the roof.