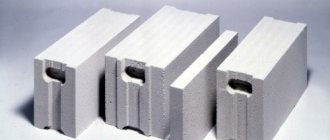
Foam blocks as a material for construction
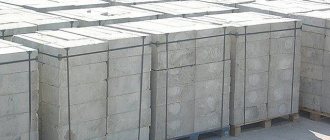
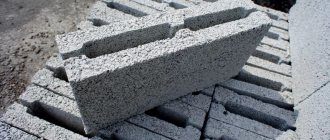
Foam block is a fairly new building material, consisting of cement mortar with the addition of foaming agents. Thanks to this, foam blocks have a number of useful properties, and in some cases they outperform other building materials.
The undeniable advantages of foam blocks include their excellent thermal insulation properties and good resistance to moisture penetration. This material is environmentally friendly and does not require special coatings for protection. Foam blocks, compared, for example, with bricks, are quite light, which allows you to save on laying the foundation for high loads. And finally, the total cost of building a house from foam blocks with your own hands will be much lower than from brick or other materials.
Waterproofing, installation of Mauerlat and installation of rafter system
When building the roof of a house from foam blocks with your own hands, you can use ordinary roofing felt as waterproofing between the Mauerlat and the wall. The layer should be located around the perimeter of the walls; it does not need to be fixed. Mauerlat is a wooden beam fixed around the perimeter of the walls. It is strengthened with anchor bolts; their diameter should be 12 mm or more. Holes are pre-drilled for them. The ends of the anchors are bent into a hook to prevent further pulling out. On sale you can find anchors with a spacer system. The distance between fasteners is 15 cm.
The attachment points are at an equal distance between the rafter legs. If you want to build a house from foam blocks with your own hands without experience, you should definitely read the recommendations of specialists. They mention that the attic roof can have two slopes. In this case, you will need two Mauerlats. A square beam with a side of 15 or 20 cm can be used as this element.
The skeleton of the roof is the rafter system. All loads such as rain and wind fall on it. It is better to use larch or pine, the humidity of each of which should not be more than 23%. In order to eliminate the negative consequences caused by the proliferation of microorganisms, it is necessary to impregnate the wood.
When choosing rafters, you should pay attention to the fact that they can be layered or hanging. If the span between the walls does not exceed 6 m, then layered ones can be used. When the span is twice as large, layered ones are used only if additional support is installed.
Hanging rafters are suitable if the span between the walls reaches 12 m. The installation of additional support is not provided for. When building a house from foam blocks with your own hands, you must take into account that the distance between the rafters is 60 cm. It is important to ensure that there are holes for installing windows. The beams for the rafter legs will have a square cross-section with a side of 10 cm. The length can be determined taking into account the slope of the slopes and the dimensions of the house.
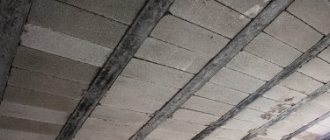
Building a house from foam blocks with your own hands involves installing floor beams. For this, boards, timber and logs can be used. The first one is placed on the edge. A certain distance must be maintained between the beams; these elements are installed in the grooves selected in the walls. Their ends are waterproofed with roofing felt, which is laid in two layers. After laying the beams, they are additionally secured with anchor bolts.
Preparatory work
Preparatory work at the construction site consists of clearing it of debris, unnecessary items and importing building materials. You will need access to electricity and water. If possible, you should bring to the construction site only those materials that are needed at a specific stage of work, so as not to clutter the work space.
The first stage of construction will be laying the foundation, for which it is necessary to remove approximately 10 cm of the top layer of soil and thoroughly clear the soil of stones. It is advisable to thoroughly grind the soil to make it shrink more densely. It is critical to keep any foreign objects out of the soil as this can lead to foundation problems.
Laying the foundation
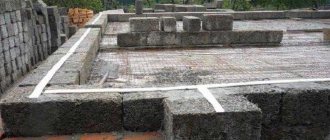
The best option for a house made of foam blocks is a strip foundation - this is the simplest and most versatile option for building a house with your own hands. Work begins with markings: using pegs and ropes, they mark the boundaries of the future foundation.
Next, they begin digging trenches. It is necessary to retreat approximately 20-30 cm from the pegs, but if the soil on the site is quite dense, then you can limit yourself to the exact dimensions of the ropes. However, a supply never hurts, although it will require more cement.
As for the depth of the trench, you should focus on the freezing depth of the soil in your area. Such data can be obtained from specialists. Digging a trench below the freezing level is necessary so that the foundation firmly takes its position, because over time the structure will sag a little.
Next, move on to the “pillows” tab. This is a special layer of crushed stone, sand, pebbles or broken bricks on which the concrete foundation layer will be laid directly. The height of the pillow should be at least 10 cm, and preferably 15-20 cm. To increase the density, the “pillow” must be watered and compacted properly. Note that you will not need an even pillow, that is, there is no need to maintain the ideal shapes of this stage. However, it is also not worth making very large differences so that the concrete, during its pouring, can be evenly distributed over the area with approximately the same layer thickness.
It is imperative to carry out reinforcement - the procedure involves installing steel reinforcement around the perimeter of the created trench. You should get a kind of frame that will add strength to the concrete structure.
After reinforcement, formwork is carried out - laying boards (or other flat materials) along the edges of the trench, which will directly shape the future foundation and keep the concrete from spreading.
To mix and pour concrete, you need to have a concrete mixer and several assistants on hand, since the work needs to be done quite quickly. The initial hardening time of concrete is about 3 hours, so during this time you should try to completely fill the entire foundation. It is necessary to avoid options when fresh concrete gets into places where the already poured concrete has set a little, as this can lead to cracks in the foundation.
When building a house with your own hands from foam blocks, you should take into account the time it takes for the concrete foundation to completely harden. Depending on weather conditions and ambient temperature, it can be about a month. It is recommended to cover the foundation with plastic film to retain moisture and harden evenly. This rule is especially relevant at insufficiently high temperatures. The norm for construction is considered to be a temperature of about 20-25 degrees above zero.
Pitched roofs
If you decide to build a residential building from foam blocks or aerated concrete, then most often it uses pitched roofs. The installation of such a roof is much simpler; a larger range of roofing materials is available. Also, pitched roofs have better technical characteristics.
Most often, the following materials are used as coating in such houses:
- profiled sheet;
- ondulin;
- soft tiles;
- galvanized sheet;
- composite tiles;
- metal tiles
Let's take a closer look at the most common roofing materials.
Profiled sheet
Foam block country houses are most often covered with corrugated board. Typically, profiles with a wave height of 21 mm are used for these purposes. They are attached to a wooden sheathing laid along the rafter system. To fix the sheets, galvanized self-tapping screws with rubber sealing washers are used.
Profiled sheets are laid from the eaves to the ridge with an overlap of adjacent strips by 10-30 cm, depending on the slope of the slope. The overlap of sheets in one row is 1-2 waves. The advantages of this material include the following:
- light weight;
- acceptable price;
- large selection of colors;
- minimum amount of waste;
- ease of installation;
- weather resistance;
- durability.
Metal tiles
Thanks to the longitudinal and transverse waves, the material is very similar to natural tiles, but much lighter. Installation of metal tiles is very similar to the principles of installation of corrugated sheets. It is attached to the sheathing using self-tapping screws screwed into the gutter.
Thanks to the special coating, metal tiles are especially resistant to weather influences, solar radiation, and corrosion. The coating has a long-lasting color and beautiful shine. However, during installation on a complex roof, the percentage of material waste can increase to 50.
Soft tiles
This material is made in the form of individual shingles. This is a multi-layer coating made of modified bitumen based on fiberglass. This material is distinguished by an abundance of colors and attractiveness.
Soft tiles are mounted on a continuous sheathing made of OSB, moisture-resistant plywood or boards. The material is first glued to the base, and then additionally fixed with nails. The joints must be treated with mastic. The service life of the soft coating reaches 50 years.
Comments:
- How to install a flat roof on a house made of aerated concrete?
- Roof construction using bitumen-based polymer materials
- Roof installation using membranes
- How to make a roof from profiled sheets?
- How to install a metal roof?
A roof for a house made of aerated concrete can be installed in various ways. This element of the house is its enclosing structure. It protects premises from external influences. The roof of any structure consists of the following layers: a supporting structure (rafter system) and a covering of several layers of waterproofing. The base will take on the load from the weight of the coating, snow and wind. All this will be transferred to the walls of the house. A coating of several layers will protect the structure from precipitation, wind and frost.
A house made of aerated concrete has low thermal conductivity and is resistant to moisture.
The roof of aerated concrete houses can be flat or pitched. The flat design has a slope of 1.5-2.5%. The angle will depend on the material used and the number of layers.
A pitched roof can also have a different angle of inclination, everything will depend on the materials used. Soft roofs have a lower slope (less than 50%). If materials are used in sheets that are characterized by increased hardness, then an inclination of up to 90° can be made.
For the top covering, you can use different roofing materials. The choice will depend on the following factors:
- type of roof;
- Terms of Use;
- climate.
The supporting structure of the roof can be made of a slab of concrete or reinforced concrete or a screed made of sheet materials. For a pitched roof, you should use a rafter system that is made of metal or wood.
Items that will be needed:
- roofing material;
- bars;
- insulation material;
- primer;
- mineral chips;
- self-tapping screws
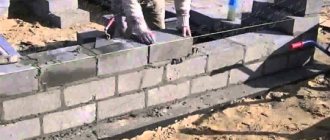
Walling
It’s not difficult to build a house with your own hands from foam blocks, but when building walls you should be careful and clearly calculate the verticals and horizontals. Before starting work, it is necessary to lay a waterproofing layer on the foundation.
The foam blocks are laid in the same order as in the case of bricks - this is called dressing. Each subsequent block must be shifted by half the length of the lower one. This will ensure the overall strength of the structure.
The foam blocks are connected using a special adhesive solution. It is imperative to check the accuracy of the installation; for this, a laser level or level is used.
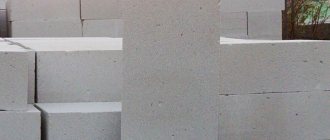
In order for a house made of foam blocks to last a long time and for cracks to not appear in the walls, they must be reinforced. To do this, it is necessary to cut special grooves (4x4 cm) on the surface of the first row of blocks. The distance from the edge of the block should be at least 6 cm. Having made two parallel grooves in the blocks, gently fill them with construction glue and place reinforcement of a suitable diameter there. A similar procedure should be repeated every 4 rows of laying foam blocks.
Do not forget that above door and window openings it is necessary to lay corners along the edges of the blocks. The corners should protrude beyond the edges by about 5-6 cm to ensure structural strength.
How to install a metal roof?
Metal tiles should be secured to the sheathing. The sheathing is made of bars measuring 4x9 cm, 3.2x10 cm. The boards are installed in increments of 30-35 cm. Along the valleys and cornices, the sheathing should be installed as a continuous flooring. Metal tiles are fixed into gutters under the transverse ribs of the sheets. Self-tapping screws should be used during fastening. Approximately 6-7 fasteners will be needed per 1 m². The skates are sealed using special sealing elements.
It is quite simple to install a roof for a house made of aerated concrete; you just need to choose the appropriate material.
Roof
Roofing work should begin a few days after the walls are erected, so that the mass gluing the foam blocks hardens well. As a rule, when building houses from foam blocks, wooden attic structures are used, since they are much lighter than other options. The shape of the roof is chosen as desired - in most cases it will be a gable option.
First of all, a special thick beam called a mauerlat is laid on the upper edge of the existing walls. It acts as a load-bearing element for the entire attic structure.
Next, the rafters are laid - it is best to immediately assemble the attic box on the ground, and then lift and install it on the house. Here you need to be careful and evaluate the future weight of the roof covering. If it is large enough (for example, the roof is covered with natural tiles), then the step between the rafters should be small. In other words, the greater the weight of the roofing, the smaller the pitch between the installed rafters should be.
Pay attention to the reliable connection of parts at the joints. The structure should not be allowed to “walk.” For this purpose, crossbars are used - special reinforcing elements that are installed between the joints. Along each rafter it is necessary to install slats that will provide a ventilation gap between the supports and the roofing.
To insulate and insulate the structure, a special film and mineral wool are used. This stage of work should not be skipped, since insulation significantly increases the service life of the roof and also prevents the accumulation of moisture in the attic.
Choose the finishing coating based on your own preferences. Metal tiles are considered one of the most popular materials today, and you may want to use them. Be sure to provide for the possibility of installing gutters, without which the walls of the house and the surrounding area will constantly be flooded with water when it rains.
Building a house from foam blocks from foundation to roof with your own hands
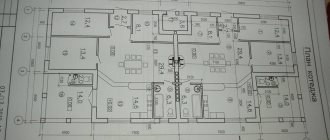
Before starting construction, you need to order a house design or buy a ready-made one. Many companies sell standard projects, the cost of which is much lower than that of individual ones. The price reduction is due to the fact that a once developed project is sold to several developers at once.
Most likely, you will need to pay extra to adapt the project to the climatic conditions and geographical location of the site. You should not try to save on this point - the stability and durability of the structure will depend on it. Correct calculations by a qualified specialist will save the residents of the house from many problems in the future.
It is necessary to take into account a number of additional conditions, including connection to communications: water supply, sewerage, gas. It is necessary to prepare a place for storing building materials and make a change house for yourself and other workers - it is practically impossible to carry out the entire scope of work on building a house alone. Don’t waste time, hire professionals or ask friends for help.
It is imperative to arrange a water source before starting all work. It is best to drill a well. Water is needed for most stages. It will be useful after construction is completed.
You can calculate the approximate cost of a house made of foam concrete blocks based on several factors:
- building size;
- number of partitions;
- construction region.
In the Northern regions, costs for construction and consumables, insulation and delivery to the construction site are usually higher. In central Russia, the price per cubic meter of foam block (28 pieces) is ≈2900-3600 rubles. depending on the manufacturer. The approximate cost of a “box” of a one-story house 10x12 m, taking into account the walls, foundation, basement and roof frame, will vary in the region of 300-600 thousand rubles. The price of roofing, windows and doors for a house made of foam concrete depends only on the wishes of the developer.
The following expenses must also be included in the estimate:
By refusing the help of a professional construction team, you can save quite a lot. In this case, the cost of building a house from foam blocks with your own hands will average 1.5-2 million rubles.
You can build a house from foam blocks inexpensively, saving on finishing materials and the number of rooms.
The best foundation option for a house made of foam blocks, according to experts, is a strip foundation. First you need to make markings according to the selected project and only then dig. Trenches can be created using construction equipment or manually. It all depends on the budget and size of the future building. In some cases, it will be more convenient to carry out all the work yourself (it is expensive to hire special equipment, there is no need due to the small size of the pit, there is no convenient access).
The depth of the pit must be indicated in the project; it depends on the region and the depth of soil freezing. Usually the figure is from 30 to 170 cm. On average, four people can dig trenches for the foundation of a 10x12 m house in two weeks.
In the trenches it is necessary to make a cushion under the concrete foundation. This will be a weighted part, which in case of any disasters will give stability to the house. Another purpose is protection from groundwater and natural movement of the earth. The cushion should consist of 30 cm of sand and a layer of crushed stone of the same thickness.
The next stage of creating a foundation is welding the reinforcement cage. The vertical rods must be securely strengthened in the cushion, and horizontal reinforcement must be welded between them. It is best to make a double frame so that there is a reinforcing belt on the outside and inside of the foundation, connected to each other at the top and bottom in the manner of a lattice. The more parts there are and the better they are connected, the stronger the resulting foundation.
Next, formwork is created from boards connected into even panels. With their help, the walls of the trench are strengthened on both sides before pouring the concrete mixture. All panels must be positioned evenly, without gaps between them, so that the foundation is also level, with the correct geometric shapes.
The panels should protrude from the pit at the same distance as the foundation should rise. They need to be fastened on top with transverse boards. Asbestos pipes are laid down across the trench to provide future ventilation under the house. The ends must be plugged with rags to prevent concrete from getting inside.
The width of the strip foundation is usually from 30 to 50 cm, and the height is not less than 70 cm. To create such a structure, you need to prepare concrete at the rate of one unit of M500 cement, three units of sand and some crushed stone. A small layer without crushed stone is poured from the very bottom and only then a homogeneous mass is laid. During the process, you need to make sure that there are no air cushions left. Usually they come out, but in some cases cavities may remain.
Hardening of the concrete base occurs within 7-10 days. During this time, it is worth ensuring the delivery of building materials for the walls. There is no need to buy everything at once and litter the free space. It is better to leave room for maneuver, then it will be more convenient to work.
If you plan to make a basement, then the technology is approximately the same, only you will have to dig a whole pit, use the same technology to make a strip foundation using panels (external and internal walls) and pour a concrete floor with a cushion. A special waterproofing layer and reinforcing mesh are laid under the floor.
Alternatively, you can use block walls for the basement and reinforce them with a layer of concrete on top. Then, on the outside, they also need to be covered with a waterproofing layer and be sure to use external and internal supports for the floor, ceiling, and basement slabs. In this case, drainage pipes are installed in the basement floor.
The floor is best made of concrete slabs. They need to be covered with a layer of concrete on top and waterproofing material installed.
Before starting to lay the walls, you need to lay a waterproofing layer on the foundation. Next, according to the instructions, mix the adhesive solution and stock up with a notched spatula. After this comes the most crucial moment - laying the first layer of foam blocks. The geometric shape of the box and the quality of all subsequent rows depend on the first row.
The first layer is laid out as evenly as possible, coating each foam block with the solution from below and on the sides. After completing the row, you need to check it using a level or laser level. If there are any irregularities, a note is left in this place. Then you will need to grind off the protrusions according to the plane marks so that the surface of the entire row is perfectly flat.
How to attach a roof to a foam block: options and components
The rafter system of a pitched roof has a number of advantages that make it a good choice for installation on auxiliary buildings, garages, and extensions to the main building.
The installation of a pitched roof on buildings of various types is beneficial due to a number of factors:
- low weight of the structure;
- low construction cost;
- simple installation technology;
- possibility of using a wide range of structural and roofing materials;
- ease of installation of the drainage system and chimney.
The roof design with one slope can be used in the construction of a house to implement original design ideas. In addition, this is a favorite option for the roof frame of outbuildings, garages, bathhouses, sheds and verandas.
When building a detached garage made of brick, the base for installing the roofing material can be concrete slabs or a metal structure. But no less often a rafter system is built from wooden elements. You can calculate rafters for small buildings yourself; in difficult cases, it is recommended to contact professionals.
The construction scheme for a pitched roof is extremely simple: the rafters span the span between the end walls of the building. The angle of inclination of the slope is determined by the difference in height of the walls. To achieve this difference in height, two methods can be used:
- masonry of one of the opposite load-bearing walls is carried out to a greater height;
- Special supports are mounted on one of the walls, on which a purlin is laid to support the upper ends of the rafters.
The first option is most suitable when constructing a structure from piece materials. The second method allows you to save building materials from which walls are built.
A roof structure with one slope should have a slope of no more than 50-60°. The optimal value is considered to be an angle of 18-35°, but specific parameters should be selected taking into account various factors.
The rafter system must withstand its own weight and high external loads - wind and snow. The intensity of the loads directly depends on the angle of the slopes.
The pitch of the rafters also affects the reliability of the roof. The smaller the pitch, the higher the calculated load that the roof can withstand. But if the installation step of the rafter legs is unreasonably small, this leads to an increase in the weight of the structure, and, accordingly, the load on the walls and foundation of the building. Too large a rafter pitch will not allow you to create a roof that is resistant to external influences.
The design calculation can be done manually, but it is more convenient to do this using a special program. The developed project should reflect not only the pitch, dimensions and sections of the elements, but also the execution diagrams of the roof frame components.
The rafters of a pitched roof for small spans are made of boards or beams. If the span exceeds 4.5 meters, extended rafter legs may be necessary.
Timber and boards for the manufacture of a rafter system for a garage or other building must be well dried and free of damage that affects the strength characteristics. Before installation, prepared wooden elements must be treated with a fire-retardant compound to protect the frame from accidental fire and extend its service life.
The truss system of a garage roof during the construction of a lean-to structure may vary depending on the characteristics of the building. On a small structure, it is enough to simply lay the rafters, resting them on the top of the opposite walls, made of bricks or blocks.
If the construction of a garage with an attic is planned, then in this case it is necessary to lay beams across the span (step - 1-1.5 m), which will serve as the basis for the floor.
The rafters, as in the first case, are attached to opposite walls, but are additionally reinforced with struts - this allows for the necessary rigidity of the garage roof frame.
note
If the box of the structure is constructed of brick, the ends of the beams and rafters of the garage shed roof can be laid in special nests provided in the walls.
In this case, the beams are attached to the long walls, and the rafters are attached to the end walls. The tall wall should be the wall with the garage door.
Waterproofing made of rolled bitumen-containing material is pre-installed into the nests.
Wooden rafters for a pitched roof can be mounted directly on the walls of the structure if a small span is being covered and the pitch of the rafters is sufficient to accept and distribute the load fairly evenly. In other cases, the rafter legs are attached to the mauerlat.
But since the garage is a building with light loads, the support beam under the rafters can be laid directly on the upper edge of the wall and secured with anchors and rolled wire embedded in the masonry.
Mauerlat requires reliable waterproofing made from rolled materials.
The reinforced belt of the wall under a pitched roof is made of reinforced concrete. To equip it, you need to make plank formwork, secure reinforcement in it and install studs. The height of the embedded fasteners should allow subsequent laying of a mauerlat beam with pre-drilled holes for studs on top of the monolithic beam and fastening with nuts equipped with wide washers.
If a garage or other building is built from timber or logs, the function of the mauerlat is performed by the top frame of the log house. The installation pitch of rafter legs on a pitched roof is most often 60-70cm - this parameter makes it possible to use almost any piece or roll material for the roof, provided that the appropriate type of sheathing is installed.
In order for the rafter system to allow the installation of a roof that can protect building structures from the effects of precipitation, the rafter legs must protrude 30-40 cm beyond the edge of the wall, forming an overhang.
A residential or commercial extension is a building adjacent to the main building. Most often, a pitched roof is erected over it, adjacent to the wall of the main building or its roof.
Fastening the rafters of a lean-to roof of an extension differs to some extent from installing a roof frame on a free-standing structure.
The main difference concerns the installation of the upper part of the rafters - the lower ends of the rafter legs are attached to the Mauerlat or a special support using standard methods.
Important
Before erecting a shed roof for an extension, it is important to determine the required slope angle. In accordance with the obtained value of the required difference between the front wall of the extension and the rear, a wooden structure made of timber with a cross-section of at least 150×150 mm is mounted. Particular attention must be paid to the connection of the frame for the rafters with the wall of the main building.
We suggest you familiarize yourself with Installation of a shower cabin with a high tray
It is not recommended to use rigid fastening, since adjacent buildings may have different shrinkage rates, which over time will lead to the formation of cracks in the walls.
The construction of such a ligament usually involves the use of an elastic layer between the support beam for the rafters and the wall. The beam can be laid on columnar supports or a timber frame.
The gap of 2-3 cm between the beam and the wall (expansion joint) should be filled with polyurethane foam or other elastic material with low thermal conductivity. It is allowed to attach the beam to the wall using anchors.
If it is required that the roof of the extension adjoins not the wall, but the roof of the main building, it is advisable to think in advance about what technology will be used to install the rafter system.
To ensure maximum reliability of the shed roof of a new building, it is recommended to completely dismantle the adjacent roof slope of the main building in order to install new rafters from the ridge of the main roof to the mauerlat of the extension. It is necessary to provide for the extension of the rafters beyond the plane of the extension wall for the installation of a cornice.
Another option involves connecting the rafters of the extension to the rafters of the main roof at a certain distance from its ridge. In this case, the roof joining device requires the dismantling of only part of the main roof slope.
When choosing the angle of inclination of the roof of the extension, you should pay attention to the following points:
- the greater the angle of inclination of the rafters, the less the danger of accumulation of rainwater or snow mass that has “moved” from the main roof;
- the rafters of an extension located on the south side may have a smaller slope than a similar structure on the north side, because The sun promotes intense evaporation of moisture.
Wooden rafters for a pitched roof are sensitive to moisture. The junction of the rafter legs to the wall or main roof should be carefully sealed - for this purpose, a roofing apron is installed.
Thematic video allows you to learn how to properly fasten the components when constructing a pitched roof.
When building a house, one of the most critical cycles of work is the installation of the roof. It is important to control thermal insulation, waterproofing and reliable fastening of all structures. It is important to securely fix the mauerlat beam, which can be attached to a brick wall in several ways.
A beam with a cross section of 100x100 or 150x150 mm is suitable as this element. It is designed to perform the following functions:
- securing rafter legs;
- ensuring the rafters work together;
- uniform distribution of load from individual elements on the wall.
You can avoid installing a Mauerlat only if you provide a support pad under each inclined beam of the slope, but such installation is too labor-intensive.
Position of the Mauerlat in the roof
Before attaching the Mauerlat to a brick wall, you need to prepare. The first stage of preparation is carried out when laying walls. There are two options for finishing the brickwork:
- The masonry of the external walls of the house ends at one level. This results in a horizontal edge of the wall. The Mauerlat is laid on the inside. After completion of the work, the outer edge is filled with expanded clay concrete or insulated with heat-insulating material.
- The laying of the external walls ends with a ledge. The outer part is made higher than the inner one. This creates additional resistance to thrust and ensures thermal insulation of the structure. This option is preferable when building a private house.
Houses made of aerated concrete: roof fastening the Mauerlat to aerated concrete
| Mounting type | Peculiarities |
| Steel wire Fastening the Mauerlat to the wire | Creation stages:
For maximum reliability, it is recommended that such fastening be made under each rafter. Advantages:
Flaws:
|
| Anchors attached to the armored belt Fastening for the Mauerlat to the armored belt | Anchors are special bolts attached to an armored belt in the upper rim of aerated concrete blocks. Creation stages:
To ensure reliable fastening, the upper parts of the threaded anchors must protrude beyond the edge of the Mauerlat by at least 40 mm. Advantages:
Flaws:
|
| Studs, anchors, dowels (fixing aerated concrete into the mass without reinforcement) Stud for securing the roof of an aerated concrete house | Fastening elements of this type are spacer, driven, special, universal and spring. There are different options for dowels, studs and anchors, but they are all similar in principle of operation and design. The procedure for installing them in aerated concrete is no different from conventional dowels for concrete and brick:
The lower part of the fastening elements has special teeth/segments/petals, which, as they are twisted, greatly expand and abut (the entire lower part of the dowel/anchor can also expand conically), thereby fixing the structure in the mass of the aerated concrete block. Advantages:
Flaws:
|
| Stud with cementation Fastening the stud in aerated concrete | The fixation method is similar to fastening using reinforced anchors. The difference is that the stud is installed into the hole of the aerated block and then it is poured with concrete without a reinforcing belt. The design of such a stud (the part that will be concreted) must have an extension (you can use, for example, a regular bolt with the head down) or an L-shaped bend or a T-shaped branch. Installation steps:
A roof for a house made of aerated concrete blocks, fixed in this way, can withstand heavy wind and other types of loads. The main advantage of cemented studs is strength, rigidity and immobility of fixation. Disadvantage: Additional equipment (for drilling) is required, cost, time and labor. |
| Chemical anchor Chemical anchor for fastening the Mauerlat | The principle of operation of this type of fastener for the roof of a house made of aerated concrete is based on the adhesion and subsequent solidification of a chemical substance with the mass of aerated concrete and fixing the anchor. Installation procedure:
Advantages:
Flaws:
|
We invite you to familiarize yourself with Building a sauna from foam blocks with your own hands
Fixing studs in concrete to secure the roof of an aerated concrete house
Tree
Wooden mauerlat on a house made of aerated concrete
Mauerlat made of boards for an aerated concrete house
- General requirements for roofs of aerated concrete buildings
- Flat roof
- Mastic
- Bitumen-polymer roofing
- Polymer membrane
- Pitched roofs
- Profiled sheet
- Metal tiles
- Soft tiles
DIY foam block house
- 1 Foundation
- 2 Wall masonry
- 3 Floors
- 4 Roofing a house made of foam blocks
- 5 Installation of slate covering
- 6 Videos
A foam block house is an excellent solution for every developer. Such a structure is distinguished among buildings made from other materials by its relatively low cost, minimal construction time, and resistance to rotting processes and fire. Block walls are warm and reliable. In this article we will tell you how to properly make a house from foam blocks with your own hands.
Flat roof
In this section we will tell you how to make a flat roof in a house made of aerated concrete with your own hands. A small country house built from gas blocks can be covered with a flat combined roof, that is, without installing an attic. The design of such a roof consists of the following components:
- Wooden beams are used as a supporting frame.
- Thermal insulation material is laid between these load-bearing elements. To do this, the beams are first hemmed from below with boards. A layer of vapor barrier is laid on them, and then insulation.
- Next, a layer of waterproofing is laid on top of the insulation, which is stapled to the beams.
- After this, you should make a wooden sheathing and lay one of the sheet materials on it: OSB, moisture-resistant plywood, fiber cement boards or flat slate.
- Next comes a layer of waterproofing coating. To do this, you can use a polymer membrane, mastic or bitumen-polymer roll products.
Mastic
When making a flat roof for a house made of aerated concrete with your own hands, you can make a roof from polymer mastic. With its help it is easy to create a multi-layer continuous waterproof coating. It must be additionally reinforced with fiberglass mesh, polyester fiber, fiberglass, etc. The mastic is applied to a carefully prepared and cleaned base. If you are making a roof over a small house, then mastic is ideal as a coating because it is easy to apply and dries quickly, forming a waterproof coating.
Advice: It is not recommended to install a mastic roof on your own over a large house, since it is difficult to obtain a uniform coating and maintain the same thickness of the mastic layer over the entire coverage area.
Bitumen-polymer roofing
A flat roof for a house made of aerated concrete made of bitumen-polymer materials is made with a two-layer coating. The roll material is fixed using mastic or a gas torch. For better adhesion to the base, it is treated with a special primer.
When performing a bitumen-polymer roof, the following rules are adhered to:
- Strips of material are glued along the cornice from bottom to top. Each subsequent strip should overlap the previous one by 10 cm. When laying the second layer, it is necessary to ensure that the seams move half the width of the roll, but not less than 20 cm.
- It is prohibited to connect the roof to vertical structures at right angles. To do this, you need to make special flanges to achieve an angle of 45°. The junction height is at least 35 cm.
- The top layer of the roll coating must have a protective coating in the form of mineral chips.
- If you are building a residential building from foam blocks, then for the roof it is better to choose rolled material with a strong reinforcing base. The strongest of them is considered to be polyester, followed by fiberglass and the weakest base is fiberglass.
Attention! In winter, it is prohibited to move on a roof made of bitumen roll materials and remove snow drifts from an unused roof.
Polymer membrane
A flat roof for a house made of foam blocks can be covered with the following types of membranes:
- EPDM is a flexible synthetic rubber coating that adheres to the substrate, just like bitumen-based roll materials. Rubber glue is used for fixation. Also, such a membrane can be attached using the ballast method, loading it with tiles or gravel on top.
- TPO is a material based on thermoplastic polyolefins. This product is quite durable and chemical resistant. Used in ballast and roofing systems.
- PVC is a product made from a reinforcing layer and plasticized polyvinyl chloride. This is a durable, low-flammable material that is resistant to UV radiation. The membrane strips are glued together with hot air and can be fixed to the base using ballast or mechanical fastenings.
Foundation
Foundation diagram
First of all, a foundation is created that can support a house made of foam blocks:
- We make calculations of the width and depth of the formwork system. The width is equal to the cross-section of the structure being built, and the lowest point depends on the climatic conditions of the area and the degree of soil freezing. The depth of the foundation must be at least 500 mm.
- Next, a trench is dug, the depth of which is about two meters.
- Coarse sand (300 mm) is placed at the bottom of the trench. Then the sand cushion is moistened with water and compacted well.
- To give the foundation precise shapes, formwork is placed and strips of roofing felt are secured.
- A fastening belt made of reinforcement is installed along the perimeter of the trench.
- After which you can fill the foundation with a special solution (5 parts of crushed stone, 3 parts of sand, and 1 part of cement).
- We move the formwork, increasing the construction of the foundation. During pouring for laying sewerage systems, asbestos pipes are laid in places specified according to the scheme.
- Every 50 cm the concrete solution should be compacted.
- The foundation will “mature” for at least a month. During hardening, cover it from ultraviolet radiation and periodically moisten it with water.
- It is necessary to roll out moisture-proofing material on top of the concrete structure.
- A blind area is constructed on the outside; its width is from one to two meters and its height is 150 mm. This is done so that natural precipitation is removed from the first floor or basement. It must be divided into sections to prevent various deformations or ruptures.
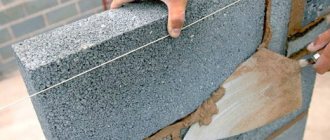
Wall masonry
Masonry walls made of foam concrete
Foam concrete blocks are superior to brick in terms of heat conservation and sound insulation, but at the same time, huge jointing between foam blocks reduces these indicators to a minimum, and “thermal gaps” are formed.
Diagram of a foam concrete wall
During masonry, it is necessary to comply with all construction standards for construction, in other words, reinforce the places under door and window openings, supporting lintels, etc. using fiberglass weaves. Thus, a house made of foam blocks can be insulated.
It is necessary to lay the 1st row very carefully, checking the verticality and horizontality of the structure with a water level. It is not difficult to correct unevenness, since foam blocks are easy to process - sawing, planing and much more.
Reinforcement of a house made of foam blocks
To install the reinforcement, holes of 0.3 × 0.3 m are cut on the surface of the foam block using a circular saw. After which they are filled with a special adhesive solution. In the plank formwork form, a 0.2 m reinforcement tie is made along the top row of blocks.
External insulation is carried out with glass wool insulation or polystyrene foam 5 cm wide. This is necessary so that the walls “breathe”. The first row is laid using cement mortar, the second - with special glue. The height of the base should be 0.4 m.
Next, the mineral sheets are secured from the outside with plastic anchors. Wind and waterproof material should be secured on top of them. The facade wall is laid on cement mortar using the principle of spoon masonry. In this case, a splice row is placed every four rows of spoons. In order to increase air circulation, it is necessary to separate the front masonry and the main wall with a five-centimeter interval.
When faced with brick cladding, the façade masonry should be tied into blocks every 5 rows using flexible anchors and fiberglass material (when using rigid materials, cracks may form).
Facing a house made of foam blocks with facing bricks
For the construction of any structure, you can use thermally efficient blocks that combine three layers simultaneously: expanded clay concrete, expanded polystyrene and concrete. Dye is added to the outside, and the front side resembles the texture and color of any stone or facing material.
Floors
Overlap
The design of the floor is carried out according to a ready-made diagram, which gives an idea of the interaction of the load of the beam, the dimensions of the span and the cross-section of the beams. You can use boards connected with screws. The ends are sawn off at a certain angle - 60 degrees. Then it is treated with an antiseptic and wrapped in bitumen.
Initially, the final beam beams are laid, then the rest. Beams measuring 200 mm or more are placed on the wall structure. The above-basement structure should be thermally insulated with a special film and insulation. A metal sheathing is attached above the beams. Then a mesh of fiberglass and mineral insulation is applied. On the top floor, sheets of plywood and balsa fiber are attached. Finally, we cover the floor with wood chip sheets.
Roofing a house made of foam blocks
Roofing a house made of foam concrete
It is necessary to build a rigid structure using timber sheathing and supplementing it with trusses. A certain distance should be maintained between the rafters - from 600 to 900 mm, the dimensions of the rafters are from 50 to 150 and from 100 to 150 mm. They are installed at an angle of 20 degrees.
Galvanized iron is better suited for a ridge, but it also makes a good valley. To continue the “life” of a slate roof, you need to paint it with a water-dispersion coating. In this case, the service life of the roofing material can be increased by 1.5 times.
Selection of material or tools
Three people can put a gable roof into working position, with a house width of 10 meters. To do this, the starting material is first prepared, which includes:
- ceiling wooden beams;
- rafters;
- lathing material;
- roofing felt;
- slate or other roofing material;
- nails;
- hammer, electric or gasoline saw.
The listed tools and materials are enough to build the roof of a house with an area of 10x10 meters in a week.
Installation of slate covering
- The boards are attached at right angles to the rafter legs. Their dimensions are 2.5x10 cm and the interval is 0.2 m.
- Then the corner edges of the slate sheets are cut off. This is done in order to prevent layering at the joints.
- Next you need to make holes at a distance of 0.1 m from the edge. Please note that the diameter of the hole must exceed the diameter of the nail.
- The slate is attached using round-headed nails.
- You need to start nailing the slate from the bottom row. The holes are prepared in advance.
A house made of foam blocks is warm, reliable and stable. You can live in such a building with the same comfort as in a brick one. The building withstands the vagaries of the weather and is capable of comfortable living in it.
Building a house from foam blocks with your own hands
Foam block, as a building material, has a number of advantages that make it popular for low-rise construction.
— Environmental friendliness — Large size — Light weight — Low cost
A house made of foam blocks can be built much faster than a house made of bricks, and the cost of building a house made of foam blocks will be cheaper. It is easier to lay the foam block, and it is light in weight. Due to the fact that the foam block is light in weight, there is no need to build a massive foundation. Usually, even for a two-story house, a shallow strip foundation is built. This reduces the cost of cement sand and crushed stone.
The construction of a house from foam blocks, just like the construction of any house, begins with the construction of a foundation.
Materials for pitched roofing
In the construction of houses made of aerated concrete, pitched roofs have become widespread. This is due to a simpler roof structure, a wide selection of roofing materials, and better technical properties.
The most common roofing materials used in low-rise construction of aerated concrete houses are:
- profiled sheet;
- soft tiles:
- metal tiles;
- composite tiles;
- ondulin;
- smooth galvanized sheet.
Corrugated sheet roofing
Scheme of the structure of a gable roof.
Profiled sheets are produced by rolling a smooth galvanized sheet using rollers. Sheets are available in lengths up to 12 m and widths up to 1.05 m. The wave height can be different. For private houses made of aerated concrete, the most acceptable profile is 21 mm high.
Profiled sheets are attached to a rafter system consisting of beams and sheathing. The sheets are fixed to the sheathing using self-tapping screws or nails installed in the wave. The installation of the roof begins with the installation of valleys and eaves strips. After this, the installation of profiled sheets is carried out, which are laid from bottom to top with an overlap in the longitudinal and transverse directions. The final stage is the installation of end strips, ridges, junction strips, ventilation and passage elements.
Cutting the material is carried out using a hacksaw, hand-held power saw or scissors. The sections must be treated with special paint, which will protect the sheets from corrosion. You cannot use an angle grinder, as excessive overheating will cause the paint and varnish protective layer of the corrugated sheet to burn out.
When working with profiled sheets, even when installing a complex roof for a house made of aerated concrete, a minimal amount of waste is generated. The advantages of corrugated sheeting also include the low cost of the material, a wide range of colors, ease of installation, durability, and resistance to various external influences.
Metal roof
Diagram of a house made of aerated concrete.
Metal tiles are metal sheets 2.5-4 m long and 1.15-1.185 m wide. A distinctive feature is the presence of waves in both the longitudinal and transverse directions. This device makes the roofing material similar to traditional tiles.
The metal tiles are attached to the sheathing. For the lathing, bars measuring 40x90 mm, 32x100 mm, boards 180x25 mm with a pitch of 300-350 mm are used. Along the valleys and cornices, the sheathing is installed as a continuous flooring. Sheets of metal tiles are attached to a groove under the transverse edge of the sheet. Fastening is carried out using self-tapping screws, the average consumption is 6-8 pieces per 1 sq.m. Otherwise, the installation of the material is similar to the installation of corrugated sheets. The skates are additionally sealed using ridge seals.
Metal tiles have a different coating, which makes the material resistant to weathering, corrosion, and gives the coating color fastness and shine.
When installing a roof made of metal tiles, a large percentage of material waste occurs, which increases as the shape of the roof of a house made of aerated concrete becomes more complex. In some cases, waste can reach 50%.
Soft tiles
Soft tiles are individual shingles 1 m long and 250-350 mm wide. The material has a multi-layer structure: the bottom layer is made of modified bitumen with glue applied to it, the central layer is fiberglass, the top layer is modified bitumen with a decorative coating of mineral chips. Soft tiles are distinguished by a wide variety of colors and attractive appearance.
Installation of flexible tiles is carried out on a continuous sheathing made of plywood, boards, or OSB. First, the eaves strips are attached to the roof, then the valley carpets are installed. The laying of shingles must begin from the ridge-eaves part. The covering is first glued to the base and then further secured with roofing nails. The joints between the shingles are treated with mastic. The final stage of installation of flexible tiles is the installation of ridges, walk-through and ventilation passages, and end strips.
The service life of soft tiles is 25-50 years. The roofing material is ideal for constructing roofs of complex shapes. Trimming after work is 3-5%. When installing the coating, it is worth considering that you cannot work with it at temperatures below -5 degrees.
Ondulin coating
Ondulin is a corrugated sheet with a bitumen base. The material has a reinforcing layer of roofing cardboard or cellulose fibers. The surface of ondulin is coated with resin and mineral pigment. Standard dimensions of a sheet of material are length 2 m, width 0.96 m, thickness 3 mm. There are 10 waves per one such sheet.
Ondulin belongs to economy class roofing materials. The coating is inexpensive, has a fairly simple appearance, and its service life does not exceed 15 years. The reinforcing layer of ondulin is susceptible to rotting, and bitumen has low flexibility on the timber.
Installation of ondulin is similar to installation of profiled sheets. The material is also attached to the sheathing using roofing screws with a painted head or roofing nails.
It is inappropriate to use ondulin when constructing the roof of a house made of aerated concrete. It is better to use this roofing material for installing roofs of country houses and various outbuildings.
Foundation construction
At the place where the building will stand, you need to use ropes to mark the places for digging trenches. The depth of the trenches can be from 50 cm to 1 meter. Crushed stone and then sand are poured into the bottom of the dug trench. Each layer is well compacted.
Then the formwork is installed, which must be lined with polyethylene or roofing felt. A frame is installed in the formwork, connected from reinforcement 10-12 mm thick, and then concrete is poured. The ratio of cement to sand and crushed stone when preparing the solution should be 1/3/5. The cement used is grade M400, no lower.
The foundation is poured at a time and gains its strength within 4-6 weeks. After this, you can begin building the walls.
Strip foundation is one of the most common types of foundations. The depth of the strip foundation can be from 50 cm to 1.5 m or more. For light-weight buildings (for example, for houses made of foam blocks), a shallow strip foundation (depth: from 50 cm to 1 m) is perfect. For heavy buildings and houses with a basement, a recessed strip foundation is used, the trenches of which are dug to the depth of soil freezing. This article describes in more detail the foundation for a house made of foam blocks.
How to install a flat roof on a house made of aerated concrete?
In most cases, flat roofs are installed combined; an attic space is not provided for. OSB, plywood sheets, flat slate or fiber cement slabs can be used as base material. The sheets should be laid on a wooden frame along the supporting strips. Insulation material is laid between the racks.
Scheme of a flat roof for a house made of aerated concrete.
Polymer materials or bitumen-based membranes can be used as waterproofing material.
Flat roofs of aerated concrete houses can be made of mastic, which forms a solid film of several layers. The coating will need to be reinforced with a material with a base that does not rot. Before applying mastic, you will need to prepare the surface.
To do this, you will need to remove all debris and dust. After this, the composition is applied to the surface. The disadvantage of this method of waterproofing is that the coating will be uneven. The installation of waterproofing of this type is not simple, since it is quite difficult to maintain the same thickness over the entire surface.
Construction of walls from foam blocks
Before laying the blocks, you need to put two layers of roofing felt on the foundation. Then moisture from the concrete will not penetrate the walls.
In order to build a wall with your own hands, you will need the following materials and tools:
- Foam blocks
- Cement and sand
- Construction trowel
- Level and plumb
The solution is prepared from 1 part cement and 4 parts sand. The sand needs to be sifted so that there are no pebbles in it.
Laying should begin from the corners. It is necessary to use a level and plumb line to ensure that the corners are even. It is also necessary to lay out the slopes of door and window openings evenly.
When the corners are ready, a cord is stretched between the two lower foam blocks, along which the first row is laid out. If you need half or a quarter of a block, then it is sawed with a grinder. Foam blocks are very easy to saw. They can be given any shape.
When the first row is laid out, the cord is pulled tight again and the second row is carefully laid out along it. The blocks of each subsequent row are placed so as to cover the seams at the bottom. When the wall is raised to the required height, a reinforced concrete belt is built on top, which will give it additional strength. To do this, formwork is constructed and concrete solution is poured there, the same as when making the foundation. That is 1/3/4. Cement, sand, crushed stone. After the belt is ready, you can begin the construction of the floor.
Floor installation and ceiling construction
In order not to create additional load on the foundation, it is not recommended to use concrete foam block floors in a house. It is better to make the floors wooden. For this, either timber or round timber is used. It is recommended to coat the ends of the beams that will lie on the concrete belt with bitumen or wrap them with roofing felt.
A structure called a “black ceiling” is mounted on the beams. To do this, take any wooden waste and cover the entire space between the beams. Then a layer of clay mixed with straw is placed on top.
If it is planned to build a two-story house, then only the beams are installed and the construction of the walls of the second floor continues. A wooden floor is then laid on the beams.
When the clay dries, it will serve as the floor of the attic. It serves as good insulation, but you can pour an additional thin layer of expanded clay on top. The roof rafters are attached to the ends of the floor beams. The roof is covered with any roofing material.
Interior and exterior decoration of the house
Foam blocks do not need insulation, as they retain heat well. But in the northern regions, walls can be insulated by gluing sheets of insulation on them. The insulation is glued using a special glue. It is applied with five dots on a sheet of material. Coat the edges of the sheet with glue.
If the house is not insulated using foam blocks, you can begin finishing the interior of the house. Foam blocks can be finished in any way.
You can plaster the walls and stick wallpaper on them, or you can simply paint them with water-based paint. This material takes nails well, so you can fill the sheathing and cover the walls with plasterboard. The ceiling is also covered with plasterboard or plywood. The sheathing is mounted level on the floor beams and sheets are nailed to it. The joints are carefully puttied or covered with decorative slats.
If you choose to paint or wallpaper, you will first need to install the electrical wiring. It has already been mentioned that the foam block is easy to saw, so using a wall chaser, grooves are cut in it for the electrical cable. It is better to mount it in a special protective casing.
It is necessary to provide junction boxes so that the electrical wiring can be easily repaired. The places where switches and sockets will be installed are also cut out.
If the walls are covered with plasterboard, then the wiring is mounted on the surface of the wall made of foam blocks. In a protective casing. When the sheets of drywall are attached, she will be behind them.
The outside of the house can be plastered, or you can use facing bricks. You can cover the walls with siding or choose a different type of cladding.
Before starting construction, you need to calculate the foam blocks for the house. To do this, you need to know the length, thickness, height of all walls (external and internal) and the dimensions of the foam blocks themselves. And also, if the house has complex architectural elements (wall bends, for example), then all parts of these elements are measured separately and the resulting result is summed up.
In order for the calculation to be as accurate as possible, you need to have a house design before calculating. Will the house be one-story or two-story? It all depends on your goals and financial situation. Read about one-story houses made of foam blocks in this article, about two-story houses here.
You can build a house from foam blocks yourself, using a minimum of hired labor. At least, one person can easily build walls from this material. More and more people are choosing foam blocks precisely because they are quick and easy to build with. In addition, no chemicals are used in the production of foam block and it is considered a pure material.
As already mentioned, nails are easily driven into the block, so when decorating the interior of the house there are no difficulties in hanging a shelf or a picture.