The feasibility of using a foundation on piles
The foundation for a house of this type is usually used on weak soils (peat, loam) or heaving soils. It is advisable to arrange such a foundation in those areas in which geological conditions are generally considered unfavorable. It is somewhat more expensive than the strip and column ones, and its design is more complex. However, in terms of reliability, pile foundations are significantly superior to the latter.
Mistakes when reinforcing and how to avoid them
It is recommended to install a pile foundation on the following types of ground surface:
- Sand
- Clay soil
- swampy area
- Soil subject to frequent movement
- Saline
- Peat
- Silty soil
We suggest you familiarize yourself with: Foundation for a stove in a bathhouse
Do not reinforce corners by crossing reinforcement
There are a number of mistakes related to reinforcement that inexperienced builders make in order to save money or simply due to ignorance of building codes and regulations. Below are the most frequently repeated ones.
In order for the grillage to be as resistant to any negative factors as possible and to properly perform its functions, when carrying out work you should strictly adhere to the technology specified in the standards. You should also avoid common mistakes:
- Not a complete formwork structure.
- Welding fittings that are unsuitable for this purpose or fittings that are too small in diameter.
- Leakage of concrete milk due to the lack of polyethylene coating of the poured structure.
- Incorrect reinforcement of the pile foundation grillage; the drawing was made without the necessary calculations.
- The distance between the horizontal bars is too large.
- The absence of a pressure-absorbing cushion between the piles.
Design features of a pile-grillage foundation
The supports in this type of foundation are piles buried to the level of durable soil layers. This ensures the stability of the building and eliminates the risk of cracks in the walls. A grillage is used as a connecting element for the supports. It is a concrete strip either buried in the ground or raised above the ground. There are several varieties of such foundations for buildings.
The grillage is an integral element of the foundation on piles. With its help, it is possible to evenly distribute the load and create a solid foundation. These can be beams or slabs that lie on top of the pillars. There are prefabricated, monolithic-cast and prefabricated-monolithic grillages. For the construction of low buildings, monolithic grillages are most often used.
To install the piles, it is necessary to prepare the seats. This involves the use of special equipment for industrial buildings and a construction drill for private homes. Piles can be driven into the ground or installed in holes in increments of 1.5 to 2 m. The wells must have a depth that is 0.3-0.5 m deeper than the freezing mark. Before pouring the solution, you need to insert rolled roofing material into the holes for waterproofing.
The formwork is made of plywood or boards more than 2.5 cm thick. The grillage should have a height of more than 0.3 m with a width exceeding the diameter of the piles by 0.1 m. First, markings are made along the perimeter of the formwork using 50x50 mm bars. They are hammered in increments of 0.5-0.8 m and connected using wire. The lower strips for fixing the formwork, which are boards 3-4 cm thick, are screwed with self-tapping screws. Then the side walls are attached to the bars. In the middle, the formwork is covered with a film to prevent the concrete mixture from leaking out.
Reinforcement is performed in 2 rows. The rods must be covered with concrete by 30 mm. This is achieved by laying the bottom row of reinforcement on bars 30 mm high. To fasten reinforcement rows, wire and smooth reinforcement are used. The height of the reinforced concrete grillage determines the gap between the rows.
For filling, it is better to use a ready-made mixture. First, the piles are concreted. For tamping, a vibrator or a wooden beam is used. The piles gain strength in about a week. Then you can pour the concrete solution into the formwork. The grillage must be carefully compacted to eliminate voids in the concrete. To level the surface, use special metal rulers.
A few hours after concreting, the surface is moistened with water and covered with polyethylene film. The formwork can be removed after the concrete has completely hardened, and the walls can be erected after 4 weeks. To waterproof the grillage, you can coat the foundation with bitumen mastic, use appropriate materials in rolls, apply liquid rubber using a spray bottle, or use penetrating solutions to treat the foundation.
Varieties of pile-grillage foundations by type of piles and grillage
A pile-rattle foundation can be erected using several types of supports:
- Standing. It is this variety that allows you to “rest” the house on the dense lower layers of soil.
- Hanging. Sometimes a reliable layer of earth is too deep, and drilling holes under it is too expensive. In these cases, hanging piles are used, the design of which allows for reliable support due to the frictional force with the soil located on the sides.
- Screw. These piles look like large drills and have a sharp tip as well as blades. They simply screw into the soil, compacting it. This type of support is considered the most reliable. A screw foundation can withstand significant loads.
Binding tapes can be monolithic, prefabricated and prefabricated-monolithic.
Piles for grillage
- There are many types of piles, and most of them are designed for one specific type of soil, and therefore you need to make a choice.
- Professionals advise immediately leveling the ground on the site so that any remaining bumps do not interfere with installation in the future.
- By the way, a foundation on screw piles with a concrete grillage is made according to a special plan called a “pile field”, and in this plan all the exact distances between the supports are indicated, and all loads are fully taken into account.
- In addition, the concrete grillage on screw piles in the project is listed as a monolithic foundation, so individual parts of such a structure cannot be used in the production of other buildings, even if there is a feeling that they fit perfectly.
Pros and cons of using such a base
The main advantages of foundations of this type include:
- No need for a drainage system.
- In the event that the tape is located above the ground, there is no need for expensive excavation work.
Among other things, when using this type of foundation, there is no need to carry out complex preparation of the construction site: clear the soil of grass, carefully level it, etc.
The disadvantages of this type of foundation for a house include only some complexity in the arrangement of the grillage located above the ground surface. In this case, when building a structure such as a foundation with your own hands, sometimes it becomes necessary to fill the space between the piles with brick or concrete (removal devices), which increases the cost of the entire structure and increases time costs.
Monolithic grillage. Design Basics
Home > Tips on building structures >
Monolithic grillage. Design Basics
Methods for connecting grillage to piles
Protection of the grillage from corrosion
Protection of the grillage from frost heaving
Metal grillage
Work plan for grillage design:
- Obtain diagrams of piles and loads on the grillage;
- Drawing the outline of the grillage;
- Dimensioning;
- Calculation of grillage, determination of reinforcement area;
- Section markings;
- Drawing sections along the grillage;
- Design of interface nodes for grillage frames;
- Calculation of volumes of materials. Filling out the specification;
- Design of the text part.
Possible controversial issues and difficulties that may arise when designing a grillage:
How to calculate reinforcement in a monolithic strip grillage?
Answer: Design Guide for Pile Foundations. Appendix 9 Calculation of reinforced concrete strip grillages for pile foundations for brick and large-block walls
- Grillages under the walls of brick and large-block buildings, supported by reinforced concrete piles located in one or two rows, must be designed for operational loads and for loads arising during the construction period.
- Calculation of the grillage for operational loads should be carried out from the condition of load distribution in the form of triangles with the largest ordinate p, tf/m, above the axis of the pile, which is determined by the formula
p=qo*L / a
where L is the distance between the axes of the piles along the line of the row or rows, m;
qo – uniformly distributed load from the building at the level of the bottom of the grillage (weight of walls, ceilings, grillage and payload), tf/m;
a is the length of the half-base of the load diagram, m, determined by the formula
a=3.14*√(Ep*Ip/Ek*bk)
where Er is the elastic modulus of the grillage concrete, kgf/cm2;
Iр – moment of inertia of the grillage section, cm4;
Ek – modulus of elasticity of the wall masonry above the grillage, kgf/cm2;
bк – width of the wall resting on the grillage (width of the base), m.
- The largest ordinate of the load diagram above the pile face p0, tf/m, can be determined by the formula
p=qo*Lp / a
Lp – design span, m, taken equal to 1.05 Lсв, (where Lсв – clear distance between piles, m.)
For various load patterns, the calculated bending moments Mop and Mpr are determined using the formulas given in table. 1
The class of concrete, as a rule, for foundations should not exceed B15. Reinforcement for foundations, as a rule, is accepted with a minimum diameter of 12 mm, even if the calculation turns out to be smaller.
How to reinforce a monolithic strip grillage?
When designing, pay attention to the protective layer of concrete, table 10.1 SP 63.13330.2012; the protective layer should not be less than that value, but should not greatly exceed it, to save concrete. Depending on the type of preparation, the thickness of the protective layer of concrete for the lower reinforcement is assigned, 70 mm and 35 mm, respectively (clause 5.5 of SNiP 2.03.01-84*).
Provide additional reinforcement in the corners and intersections of the tapes to ensure a rigid connection in accordance with the requirement of clause 8.9 of SP 50-101-2004 (Prefabricated monolithic and monolithic foundations of all walls must be rigidly connected to each other and combined into a system of cross tapes). A rigid connection can be made by analogy with the interconnection of beams and columns; see the corner reinforcement diagrams in SP 63.13330.2012, clause 10.4.1. The application of the proposed solutions in a monolithic grillage is shown in the figure.
What preparation should be provided for a monolithic grillage? How many layers, from what material and what thickness?
Preparation for the foundation is carried out from compacted crushed stone or lean concrete” - clause 13.2.22 SP 50-101-2004 “Design and installation of foundations and foundations of buildings and structures”. In what cases the use of crushed stone or concrete preparation is not specified in the regulatory documents. The thickness of crushed stone preparation is usually taken to be 150-200 mm, for concrete preparation B15 100 mm. Which option to accept depends on the specific task. If we are talking about a foundation slab or grillage, reinforced with spatial frames, “heavy” meshes, then for technological and design reasons it is preferable to provide concrete preparation: the frames and meshes of the foundation slab are not deformed on it, you can mark the axes, tie reinforcement outlets to them, there is no leakage of cement laitance from the working reinforcement of the lower plane of the slab, etc. When preparing crushed stone, it is necessary to provide for pouring it with bitumen until it is completely saturated or a film is formed; it is more difficult to place frames and meshes on the clamps, the working height of the CP and meshes is reduced, etc. When concreting in winter conditions, it is also preferable to have a concrete preparation - it can be heated with cords, a heater, you can use concrete with anti-frost additives, but it is much more problematic to warm up and pour bitumen on frozen crushed stone. According to our current practice, concrete preparation is mainly used - the quality of reinforcement and concrete work in this case is noticeably higher.
Guidelines for the design of concrete and reinforced concrete structures made of heavy concrete (without prestressing)
3.24. Under monolithic foundations, regardless of soil conditions (except for rocky soils), it is always recommended to provide concrete preparation with a thickness of 100 mm from M50 grade concrete, and under prefabricated foundations - from a 100 mm layer of medium-grained sand. If it is necessary to construct foundations on rocky soils, a leveling layer on the soil of M50 concrete should be provided.
Share this article with friends
Author of the article: Alexey Kamanin Design engineer with a specialty in PGS. Engineer of the Year 2013 of the Tyumen region in the construction industry. Design experience since 2008. Get a free basic AutoCAD video course from Alexey >>
Other articles by the author
Other lessons on the topic
LIRA SAPR introduction to the program
In this article we will get acquainted with the LIRA program interface, and also calculate a beam on two supports with a uniformly distributed load. Lira program commands discussed in the lesson: Selecting a design feature Creating a new file Arranging nodes Creating bars Installing fasteners Assigning rigidities Applying loads Static calculation Reading calculation results Saving a calculation file. Watch the video tutorial for more details. […]
Floors in AutoCAD
Lessons on LIRA SAPR. Click>>> Hollow-core floor slabs 4.8–6.3 m long (PK brand) with a pitch of 0.3 m, a width of 1, 1.2 and 1.5 m and a height of 220 mm are made of heavy concrete. The strength class of concrete is determined by the manufacturer. The reinforcement of the slab in the lower (stretched) zone is made of high-strength wire of a periodic profile with a diameter of 5 mm with pronounced anchor heads, along the edges of the […]
Questions and answers on author's supervision
Lessons on LIRA SAPR. Click>>> Find out more: Author's supervision work experience Can author's supervision be carried out by another organization (that did not carry out the project)? In accordance with SP 11-110-99 3.5 Designer is an individual or legal entity who, as a rule, has developed working documentation for the construction of an object and carries out designer supervision. Design supervision work can be carried out by a third party, i.e. monitoring […]
Marking for the foundation
Any bases and foundations are arranged with preliminary marking. In the case of a pile-screw structure, two main methods can be used: the “Egyptian triangle” and “two curves”.
At the first stage, pegs are installed at two corners of the future building. It's best to do this on the long side. A straight line is drawn between them on the ground. Marking in both ways is done using a rope. In order to find the remaining two angles using the “Egyptian triangle” method, you need to tie knots on it at a distance of 3, 4 and 5 meters. Next, the first two nodes are connected with a nail. After this, the rope is attached with a knot to one of the pegs so that a 4 m segment lies on the drawn line, and is tensioned. A line is drawn along a 3 m segment. Next, the width of the house is measured on it and the third peg is driven in. The fourth angle is found in exactly the same way.
It is even easier to mark using the “two curves” method for a pile, strip or column foundation. In this case, equal distances are measured from one of the two stakes in both directions. Rods are driven in at these places. A nail is tied to the rope. Its other end is attached to one of the rods. After this, an arc is drawn on the ground with a nail. Then the rope is tied to the second rod and a second semicircle is drawn. The intersection point of the two arcs is connected by a line with a peg and the width of the building is marked on it.
At the next stage, all four stakes are connected with a non-elastic cord. Next, four more stakes are driven inside the resulting quadrangle and a cord is pulled between them, thus marking the internal contour of the foundation.
Then the locations of future pits are marked. First, stakes are installed on one side of the building (two for each hole), and then strictly opposite them - on the other. When you carry out accurate markings, you will subsequently get a smooth and reliable foundation for the house.
Reinforcement of slab and monolithic grillage
To strengthen the foundation and give it strength, a reinforced grillage is used. In order to independently install a slab-type structure, you must perform the following steps:
- Preparation of reinforcement mesh. To work, you need to purchase special rods with a diameter of 1 cm. The reinforcement is used to tie foundation piles to each other. The optimal distance is half a meter. A mesh is formed from horizontal and vertical rods. It is fastened using a special hook with metal wire.
- The reinforcement is applied in 2 layers, between which it is recommended to lay a layer of protective agent.
- Because The pile foundation is heterogeneous; when installing the reinforcing mesh, it is necessary to maintain a distance. It is formed by tying together parts of reinforcement. It is recommended to monitor the strength and reliability of the structure.
- Next, the protruding vertical parts of the reinforcement should be tied to the foundation piles. It is recommended to use metal wire for this procedure.
The monolithic grillage must be tied to the piles in the upper and lower parts.
Typical reinforcement scheme for this type of foundation
If you need to reinforce a monolithic grillage, then laying horizontal chords is done in two separate rows at a distance of 20-30 cm. Between the chords you need to provide longitudinal communication lines with wire or reinforcement, connect the joints with bolted clamps, welding is not recommended due to the deformation of the steel.
We invite you to familiarize yourself with: Floor on the ground on a strip foundation
When calculating reinforcement, the number of horizontal chords is taken into account, as well as the presence of vertical connecting groups.
As a rule, verticals are installed in increments of 20 cm, but this rule is sometimes circumvented by using more powerful wire.
As a rule, vertical rods are connected to a horizontal belt also with flexible wire. The reinforcement will be completed when all the rods have been laid and connected to each other and the bottom layer has been carefully protected. If all the rules and recommendations are followed correctly, then you can begin pouring the grillage with concrete mortar.
When calculating the required amount of reinforcement, you need to use the type and shape of the future foundation. These characteristics of a reinforced concrete foundation can be obtained by determining the future load on the foundation and the load-bearing characteristics of the soil. Here, ribbed rods are often used in horizontal and vertical belts; this is class A3 reinforcement with a thickness of 10 mm.
But when arranging reinforcing belts, you can use rods of greater thickness. After all, the thicker they are, the stronger the foundation will be. Also, when making calculations, the designer must take into account the soil characteristics, the type of future building, its height and perimeter. If the soil is dense, the degree of deformation of the base will be less.
Pit preparation
Pits for piles must be installed at the corners of the building, under the intersection of the walls. The step between piles is usually about one and a half meters. When constructing holes yourself, they are usually made using a hand drill. Their depth depends on the degree of soil freezing and the water level underground. This parameter is also calculated based on the depth of hard soil layers. Typically the length of the pits is about 1.5-2 m. A sand cushion is placed on their bottom. With its use, much more reliable foundations are obtained. SNiP require the use of a cushion with a thickness of at least 10 cm. Asbestos-cement pipes with a diameter of 20-25 cm rest against it. They should be placed strictly vertically, using a building level. The pipes will act as formwork. In addition, asbestos cement is a very good waterproofing material. There is no need to remove them after pouring.
The foundation for a house can also be built on square piles. They are usually arranged when there is no need for too much deepening. In this case, the supports have a larger cross-section and are waterproofed with ordinary roofing felt. To do this, it is sewn into a pipe and placed in a hole. Next, a square formwork is installed above each pit.
Production of a reinforcing system for a monolithic grillage
- Reinforcing rod 8 mm.
- Welding machine.
- Crochet hook.
- Bulgarian.
- Roulette.
- Hammer.
Two completely different frames are made for strip and slab frames.
Scheme of the construction of a concrete grillage.
For the strip grillage, a square frame is made that passes through all the tunnels, but at the same time does not reach the walls by only 5 cm on the sides and 2 cm on the bottom and top.
To create it, you will first need to lay out 2 rods in parallel (if possible, the rods should have the length of the entire required wall of the house), after which they are welded together with perpendicular rods in increments of 15 cm. After which the procedure is repeated, because 1 more such strip will be needed.
These 2 battens can be connected using 25 cm rods, each of which should form a kind of ring with the existing “perpendicular” brothers.
During installation, the tunnels are also connected to each other by welding.
The slab option will take much more time and effort, but it can be easily carried out even under the scorching sun, because It is not physically difficult, and no technique is required.
The process begins in a similar way, but not 2 rods are laid, but the number that is required for a full-fledged sheathing, the step between them will be as much as 20 cm. Such a large interval is explained by the absence of the need to create too strong and heavy systems, which allows you to save a little.
Then another layer of rods is laid out perpendicularly with a similar pitch, after which the connecting work can begin. All joints are made with wire to ensure the highest quality. To twist 2 rods together, you need to reproduce the following:
- Take a wire, the length of which is 40-45 cm, and align it with the nearest rod.
- Fold in half, but do not press the sides together.
- Tie the joint of the rods diagonally, then thread 2 edges on one side, into the loop on the other and pull them up.
- Finally tighten with a special hook, but it is important not to overtighten.
With an operational approach, 150-180 matings per hour are obtained.
1 more lathing is repeated in a similar way, after which you need to make a system that will hold all this mass in weight. Staples are suitable for this system; the length of the rod for each of them will be 75 cm. The rod is simply bent in half, but in order to remain stable.
The grillage structure in the sheathing also has similar features.
- Using a perforator, a hole (5 cm) is made in the columns exactly in the center, into which a piece of reinforcement 10 cm long is immersed.
- In the places where the walls will be installed, you need to weld (tie) 1 pin in increments of 1 m. The rod should extend 5-6 cm into the masonry.
These measures are needed to connect the grillage with the foundation, and then with the house.
Pillar reinforcement
The piles are reinforced with four 12 mm rods connected into a single structure with transverse clamps. Welding should not be used in the manufacture of a metal frame. Otherwise, the seams will begin to rust very quickly. Connections are made with ordinary wire. In any case, the rods should protrude approximately 20 cm above the surface of the column. This is necessary so that in the future it would be possible to connect the reinforcement of the supports with the reinforcement of the grillage. Asbestos-cement pipes should extend approximately 15 cm into the thickness of the concrete strip.
How to make a foundation. Mixing concrete and pouring pillars
For a pile-grillage foundation, cement of a grade of at least 300 is used. But it is still better to use four hundred. Sand and crushed stone are used as filler. It is important to get the proportions right. The volumetric ratio of cement*sand*crushed stone depends on the characteristics of the soil and the layout of the building. Usually, for mixing one part of cement, take three parts of sand and five parts of crushed stone.
It is best to mix concrete using a concrete mixer. In this case, it turns out to be more uniform and of higher quality. For a small building, kneading can also be done manually. First, mix the dry ingredients thoroughly. Then add water and mix again. The density of the concrete mixture should be such that it does not flow from the shovel and does not fall apart into separate pieces.
The pillars are filled with the mixture, compacting it with a vibrating rammer. It is best to do this in layers several tens of centimeters thick. If a vibrating rammer is not at hand, this operation can be performed with an ordinary wooden stake, piercing the solution in several places. The main thing is to ensure that there are no air bubbles left in the concrete.
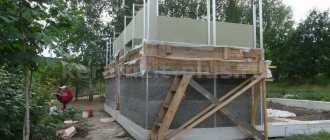
Installation of formwork under the grillage
If the grillage is buried, a trench is dug under it simultaneously with the holes for the pillars. A layer of sand of at least 10 cm is poured into it, and then the formwork is installed. They knock it down using wooden shields. 2.5 mm boards are stuffed onto the bars. The nail heads must be located from the inside of the structure. The bars are dug into the ground and the shields are installed vertically. The formwork walls are secured with supports from the outside and spacers from the inside, installing them between the panels. For reliable fixation in a vertical position, you can additionally use wire twists. To do this, the beams of the shields located opposite each other are connected in pairs. After tying, a metal rod is inserted into the wire and they begin to twist it, thereby tightening the walls of the formwork. It is important to make the spacers absolutely identical in length, which should be equal to the width of the grillage.
The best foundation is obtained if the grillage is located above the ground. With this solution, the forces of spring heaving will not act on it. In this case, the formwork is raised on supports, and a bottom of boards is additionally arranged in it. Before installing the raised belt, you should wait a week after placing the concrete in the holes.
Grillage reinforcement
The grillage reinforcement is also knitted from 12 mm rods using wire. Usually it is made on two levels. It should be laid along the entire length of the tape. In order to cover it with concrete from below, square pieces of bars 5 cm thick are laid at the bottom of the formwork or trench, serving as “stands”. The tied reinforcement should also not reach 5 cm from the top of the formwork. The concrete layer on the sides should be the same. The grillage reinforcement should be connected to the pile reinforcement using wire.
Materials for grillage
The main material for piles is reinforced concrete. The design of the device consists of interconnected wood and metal, and can also be made of reinforced concrete or metal.
If the piles are made of wood, then it is recommended to construct the structure from wooden beams. A steel base requires a beam structure. However, experts recommend reinforced concrete as a building material. Because only it is able to withstand long-term loads and is not subject to destruction.
We suggest you read: How to clean a chimney from soot using folk remedies
Pouring the grillage
The grillage is poured using a concrete mixture of the same composition as the pillars. It is best to perform this operation in one go. The top of the poured concrete is carefully leveled using a building level.
The formwork from the buried grillage can be removed in a couple of days. If it is raised above the ground, it is left for at least two weeks. For half a month, concrete should be sprayed with water daily in the morning and evening to prevent surface cracks from appearing.
Waterproofing
The pile-grillage foundation will finally mature in a month. After this, you can begin waterproofing the grillage. Its top is coated with bitumen mastic and a strip of roofing material is applied to it. Next, it is also coated and a second one is glued. At this point, the grillage arrangement can be considered complete. At the next stage, they begin to construct the walls. After their construction, the foundation is usually supplemented with a fence.
Pickup device
A fence is a structure that covers the distance between the piles under the grillage. Its device allows you to make the floors in the house warmer. The fact is that with such a fence, cold air does not flow under the building, and therefore it does not cool down so much from below. In addition, if there is a fence, snow will not get under the house and water will not leak. In addition, such fencing makes the appearance of the building complete and attractive.
The backing of a structure such as a pile-grillage foundation can be made of brick, concrete slabs, stone or wood. The optimal material in terms of practicality and cost is considered to be a 20-25 mm edged board. In this case, the cladding is done by fastening it to posts with dowels. Sometimes the boards are installed vertically. In this case, a shallow trench is dug along the perimeter of the building into which sand is poured. A 50*50 mm beam with grooves made in it for the boards is laid on the resulting cushion. Each such segment is attached with an angle to the post on both sides. All elements of a wooden fence are necessarily impregnated with antiseptic compounds.
Wooden piles
In the Russian outback, wooden piles are still sometimes installed under houses. Such supports are also widely used in the construction of various types of light outbuildings - barns, bathhouses, summer kitchens, etc. Typically, piles are made of oak or larch. They dig holes for them in the same way as for reinforced concrete ones. At the same time, a “heel” is installed at the bottom - a flat stone or a concrete “bed”. Sometimes a cross with struts is also used as a support. It is made from two boards 70 cm long. Such a cross not only increases the stability of the post, but also prevents it from being pushed out of the ground during spring heaving. It is secured with metal staples.
When arranging a pile-grillage foundation for a wooden house or shed, you must follow some rules:
- Before installation, the pillars are treated with antiseptic compounds. You can sprinkle them, for example, with sodium fluoride or fluoride.
- In addition, the supports are wrapped in roofing felt. This will prevent wood-to-wood contact. As a result, it will not rot. In addition, in this case the soil will not freeze to the post in winter, but during heaving it will slide along the surface of the post without lifting it up. After a few years, the soil seems to “get used” to moving without a pillar. If the wrapper breaks, the post will not be pushed out.
As you can see, building a pile foundation with your own hands is somewhat more difficult than a regular strip foundation. However, if desired, it is quite possible to build it. If you do not violate the required technologies, you will definitely have a reliable, practical and very durable foundation for your house. Good luck and patience to you!