fastening stringers
To attach the stringers to the wall, the author uses wood grouse 10x150 and dowels 14x140, spacing them at least three by two meters in length.
If you are not very confident in the accuracy of the project, then it is better to start installing the frame from the top, from the ceiling. Then the error in the length or height of the staircase will go to its beginning and the position of the first, usually free, step will change. There is nothing good about this, but if you have to choose, then let the different height or tread size be on the first step, and not on the last. The invitation level is already designed differently from the ordinary level.
After installing the wall frame parts, you can install the internal ones together with the post assembly. In this project, as mentioned earlier, a 100×100 steel corner runs along the bottom of the opening, so the stringer is screwed to it from below, as if it were a very strong support. This fastening method is an exception to the rule; usually the stringer is attached to the ceiling through auxiliary parts. Internal stringers and pillars must be set in accordance with the already installed external ones in terms of level and square so that the steps lie horizontally and at a given (usually right) angle to the wall. Be sure to check the verticality of the support posts with a level. At this stage, it is already convenient to try on the steps and use them as a template for installation. To temporarily secure stringers to poles and other structures, clamps are used, installed through spacers and auxiliary bars 100x100x200. You usually need a lot of clamps; you can never get by with just a couple of pieces. All connections of frame parts must be glued with assembly glue (liquid nails).
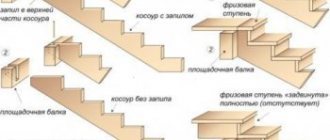
Methods for attaching a wooden stringer
There are many ways to fasten a wooden stringer in its upper part. One of the most reliable and common methods of installation to an opening is to install a notch in the support beam, into which the edge of the stringer is then inserted. Sometimes a rectangular cut is made both in the beam and in the stringer. It is more convenient to make an inclined cut only in a beam that will correspond to the slope of the bowstring. The cut should not be too large, because this weakens its cross-section.
Installation of a wooden stringer can be done using metal fasteners. Using angles, beam supports and bolts, the edge of the bowstring can be secured to the beam with a high degree of reliability. This works best in cases where the staircase has small or light flights, a steep slope, or transfers most of the load to the lower support point. If a heavy flight is being constructed, with thick steps, risers, hemming and massive railings, then it is better to arrange for direct support of the stringer on the beam using cuts.
There are different types of staircases on stringers. The string can be placed along the edges or one central string can be made in the middle of the stairs. A balustrade or fencing using a stringer is mounted directly on the steps.
Attaching steps and risers to the string can be done using glue, dowels, screws and other fasteners. How to attach the steps in a particular case is decided depending on the heaviness of the staircase, its shape and angle of inclination. You cannot use nails for installation, because over time they become loose and their connection to the wood weakens.
Return to contents
Staircase - stringers and landing.
It is convenient to place the pillars on the floor through a support platform 80 mm larger than the cross-section of the pillar, i.e. 40 mm per side. In these indentations you can drill holes to attach the post to the floor. In some cases, the pole must be secured to the floor with self-tapping screws, but sometimes this is not required, then it is enough to press “liquid nails” into the indicated holes and close them on top with a decorative plug.
Attaching steps to stringers and bowstrings was described in detail in previous chapters. When installing parts, it is difficult to obtain an exact fit (hairline seam), so you have to constantly use silicone-acrylic sealant in the color of the steps. The thinner the gap it closes, the better; the maximum width of the seam should be no more than a millimeter, if more, adjust the parts. The sealant must be rubbed in, since it hardens due to moisture, with a wet cloth. Constantly change it to a new one so as not to smear the remaining paste around the seam. When installing steps, usually one of the team members only grouts the joints.
The article is posted in the category: Manufacturing of modern stairs
We fasten stairs using four methods: on bowstrings, on stringers, in the string-stringing method and using bolts. The latter is used relatively rarely due to its high cost. It is only suitable for hardwood stairs. The rest are very popular due to their practicality and the ability to implement a variety of ideas.
Fastening the stringers of the lower flight of stairs (7 photos)
We will continue to examine the issue of constructing stringers for stairs with our own hands and consider such issues as installing and fastening stringers for the lower flight of stairs.
In order to install the stringers in place, it is necessary to prepare them for fastening both to the intermediate platform and to the foundation of the stairs.
First, on the diagram we will show the places and method of fastening the stringers of the lower flight of stairs.
At the intermediate platform, the stringers of the lower flight of stairs (A) are attached to the extensions (B). This method of fastening is necessary to ensure a staircase inclination angle of 36°, as well as the height and width of the stringers according to previously carried out calculations of steps for the stairs, where the stringer width is 269 mm and the stringer height is 194 mm. You can also see that the stringers are attached to the foundation of the stairs through a plate (B) attached to their lower part. Using this method of installing the lower flight of stairs, we will first do the following:
- Installation and fastening of extensions (B) to the intermediate platform.
- Install and secure the support plates (B) to the bottom of the stringers.
Attaching stringers to the site
Let's start with the installation and fastening of extensions to the intermediate platform. Extensions can be made from a profile pipe that was used to construct stringers. The length of each extension is 226.6 mm (rounded to 227 mm).
When the extension blanks are ready, you can begin attaching them to the consoles of the intermediate platform. First, we fix the extension (A), the ends of the extension (1 and 2) should be flush with the ends of the consoles (B and D). We maintain the perpendicularity of the location of the extensions, and the angle should be 90°.
In the same way we attach the second extension (B). The distance between the extensions should be equal to 680 mm; to control the distance between the extensions, you can use a template (for example, a piece of timber with straight ends). Using a template, it will be easier to control the distance between the extensions along their entire height. We fasten the extensions to the consoles of the intermediate platform by welding.
How to sheathe a house with a metal profile - sheathing a house with a metal profile (9 photos)
Attaching stringers to the staircase foundation
Now that the intermediate platform is prepared for installing the stringers for the lower flight of stairs, we proceed to the next step - installing the support plates to the bottom of the stringers.
The plates can be made from scraps of sheet iron with a thickness of at least 5 mm. In order to secure the consoles to the base of the stairs through the plate, it is necessary to make four through holes in them with a diameter that allows you to freely install through them, for example, an 18 mm anchor pin. In this case, holes in the plate can be drilled using a 19 mm drill.
The size of the plates in our case can be made as follows: the width of the plates is 160 mm, the length of the plates is 340 mm. Next, according to the specified dimensions, we cut out two plates from sheet iron and mark the installation locations for the anchor pins.
Marking future holes for anchor studs can be done as follows:
- From the end (B) we measure 25 mm and draw the X axis.
- From the end (B) we measure 25 mm and draw the Y axis.
- At the intersection of the axes we get the center of the hole (marked with a yellow dot in the figure).
Using the same method, we determine the center of the remaining holes in the base plate. After marking the center of all holes, we proceed to constructing through holes of the diameter we need, in our case the diameter of the holes is 19 mm.
In the figure, a yellow rectangle marks the place where the plate is installed on the lower part of the stringer. As you can see, the distance from all four ends of the plate to the sides of the rectangle is equal, 50 mm each, but these are not mandatory dimensions and they can have different values, that is, the plate can be attached to the stringer not necessarily with a symmetrical protrusion of the plate beyond its dimensions.
The last step left before we begin installing the stringers is to attach the plates to the bottom of the stringers. The place where the plate is to be installed on the stringer is marked with a rectangle (yellow), so along the lines of the rectangle we will install the plate on the bevel of the stringer and secure it by welding.
“Tow or sealant” or “Tow and sealant”? (4 photos)
The stringers are ready for installation. If you carried out the work of installing the stringers alone, then it is advisable to involve an assistant to install the stringers, since when installing the stringers they need to be aligned relative to each other, you will have to attach the stringer to the intermediate platform in a canopy, there are no supports, and it will be enough to perform all these and other actions alone still problematic. For an example of installing stringers, in our case there will be one assistant, now you can start doing the work.
Installation and fastening of the right stringer
We will start the installation with the right stringer, which will be located next to the wall of the house, since in this case it will be easier for us to control the dimensions that need to be maintained during the work, and it will also simplify the task of installing the left stringer.
Before we begin installing the stringer, it is necessary to make a mark on the extension, that is, to indicate the height of the upper frieze step. To do this, from the upper end of the console of the intermediate platform, measure down 194 mm along the extension and draw a marking line, after which we install the stringer in place, orienting the upper part of the stringer relative to the marking line.
Next, we align the sides (A and B) so that they are in the same plane and only after that we attach the stringer to the extension, but only in several places (MS - welding points), since we will still need to align the stringer at an equal distance from walls along its entire length.
After the upper part of the stringer is fixed to the extension, we align the stringer relative to the wall, maintaining a distance between them of 50 mm*. When the stringer is leveled, we check the distance from the front end of the extension to its bottom point; in our case, this distance should be equal to 1677 mm (±0.5 mm).
* - 50mm - the estimated distance from the stairs to the wall (without finishing) which was included in the calculation of the stairs.
Do-it-yourself warm floor under laminate - features and installation (7 photos)
We attach the right stringer to the base of the staircase using anchor pins through the holes in the support plate, while again checking that the ends (A and B) of the extension and the stringer are in the same plane, and only after that we attach the stringer to the extension with a permanent weld.
Note: It is also advisable to control the horizontality of the steps of the stringer; this will serve as an additional guarantee that the stringer is installed level, and during the further installation of the stairs we will not have problems performing the work.
Installation and fastening of the left stringer
When the right stringer is installed, you can begin to install and secure the left stringer. The principle of its installation and the order of work are the same as when installing the right stringer, only the reference point will no longer be the wall of the house, but the installed right stringer.
Since the installation principle does not differ, we will indicate the dimensions that must be maintained during installation work. When installing the left stringer, we control the size of 194 mm - this is the height of the rise of the upper frieze step; it should be equal for both stringers.
We also need to maintain a distance of 800 mm between the stringers, this is the distance from the outer ends of the stringer (the width of the flight of stairs). As with the installation of the left stringer, it is necessary that the ends (A and B) of the extension and the stringer are in the same plane.
I also recommend another way to control the installation of stringers. Using a building level, in our case the length of the tool must be at least 800 mm, we determine the horizontality of the supporting sides of the stringer for installing the steps.
If there are deviations from the horizon line, they must be eliminated, otherwise the steps will have a slope or skew and this may cause some discomfort when moving along such steps. Next, we proceed to installing the support corners (lintels) for the steps of the stairs.
LiveJournal
Stairs on bowstrings
Bowstrings are support beams located on the sides of the steps. The steps are attached to them from the inside from the side. The bowstrings are secured with special ties that make the structure rigid and reliable.
A bowstring staircase can have one straight flight, with winder steps or with an intermediate platform. Straight stairs are quite simple, both in manufacture and in installation. But a staircase on bowstrings with winder steps requires very high qualifications, both from the master and from the designer. L-shaped staircases with a 90-degree turn allow you to incorporate a gentle curve into the design of the bowstring at the turn and add grace to such a design. Bowstring stairs with intermediate platforms look very massive. Their marches usually contain the same number of steps.
There are two types of ladders on strings:
- With risers – “closed”. They look reliable and massive.
- “Open” without risers. Visually they seem lighter.
With the correct calculation of the geometry of the structure and its strength characteristics, the load-bearing capacity of both options is the same.
Methods for attaching bowstrings to step elements
- Grooves. They are formed on the inside of the bowstrings. The depth of the grooves is up to 20 mm. Accuracy of marking is important to avoid distortions.
- Wooden blocks that are fixed to the inside of the bowstring.
How to accurately calculate a stringer for a staircase
Whatever material the staircase is made from, to calculate it it is necessary to take into account the main parameters:
- height of the structure;
- dimensions of the projection of the flight of stairs on the floor;
- internal parameters of the staircase, that is, the width and height of the opening;
- mounting depth and number of treads, including winder treads;
- riser height.
Made of wood
Before you start calculating stairs on stringers, you need to set some parameters. To determine the height of the overall structure, it is necessary to measure the distance from the floor level on the first floor to the same position on the second. According to standards, this parameter must be at least 2 m. The length of the projection on the floor is determined by the dimensions of the room. Therefore, the design of a wooden staircase on stringers must be thought through at the stage of preparing the house plan.
Related article: Features of monolithic stairs: their types, rules for reinforcement and installation
Length calculation
The length of the stringer is set geometrically. It is necessary to remember the school geometry course and apply the Pythagorean theorem. The square of the floor projection is added to the square of the height of the staircase structure: H²+L²=P², where P is the length of the staircase. The square root is taken from the result obtained and the length of the support is obtained. For example, with a height of 3 m and a projection of 4.2 m, they calculate 3² + 4.2² = 26.64 - this is P², and obtain the length of the stringer, which is equal to 5 m 16 cm.
Calculation of the number of steps
Before making a stringer for the stairs with your own hands, start calculating the number of treads, which, accordingly, is equal to the number of steps. To do this, the length of the support is divided by the depth of the step. In a specific example, the depth parameter is 280 mm. Accordingly, we divide 5016 mm by 280 mm and get almost 18 steps. Now we determine the height of the riser. The height of the structure of 3000 mm is divided into 18 steps and the result is a rounded parameter equal to 167 mm.
For comfortable operation of the structure, you should adhere to the standards according to which the height of the riser should not exceed 220 mm.
Calculation of a broken stringer
A broken-type stringer with winder steps is calculated using a similar technology, but for each flight separately. To do this, it is necessary to determine at what height there will be changes in the direction of the march.
In the video: how to calculate a staircase (steps and stringers).
Made of metal
There are quite a few options for constructing a staircase on metal supports, but the most popular is a broken stringer. It is quite possible to assemble it with your own hands; you need to make the correct calculations and select good equipment for welding work. If you have difficulty making calculations, you can use an online calculator.
Calculation of the number of steps
To determine the number of steps for a staircase on a metal stringer, you must first calculate the length of the hypotenuse of a right triangle, the legs of which are the height of the staircase and the projection of the floor. The result obtained is divided by the depth of the step. The result is the number of steps for a staircase on a metal stringer.
Length calculation
A special feature of a staircase on a metal stringer is the presence of a frame consisting of individual elements that are welded together. In order to obtain the required length, it is necessary to correctly calculate the number of steps, the depth of the steps and the height of the risers.
These parameters determine the dimensions of the elements from which the iron frame of the ladder is welded. Some of them play the role of a tread, others - a riser. In this regard, the main task is to determine their sizes.
The dimensions of the tread blanks correspond to the depth of the step plus the width of the metal profile.
To determine the dimensions of the riser, the same profile width is added to its height. On the side in which the workpieces will be welded together, it is necessary to make a cut at an angle of 45. In this way, the ladder is installed on two metal stringers.
In the video: making a broken metal stringer for stairs.
Fastening interior stairs on stringers
The base of the staircase, mounted on stringers, is one or two load-bearing beams (stringers). They can be made of metal, wood or reinforced concrete. The stringer is securely attached to the support - the interfloor ceiling or floor. After installing the stringer, the remaining elements of the staircase are attached to it. Stringers may differ slightly in shape, but their essence is always the same - the step is placed on top, thus both visually expanding the flight of stairs and providing us with opportunities for various interesting design solutions.
Staircases on stringers also come in two types:
Features of the stairs
- Reliability without bulk.
- Modern look.
- The ability to bypass a radiator, window sill, etc., if you place the stringers closer to the middle of the steps.
- If necessary, the steps are easily replaced.
Bowstring-string stairs
The combined option is popular due to its practicality. This method ensures protection of the wall surface from mechanical stress, because she has a bowstring installed. A stringer is mounted along the outer edge, which gives the structure lightness. Such designs, of course, are more complex than entirely stringer or entirely bowstring staircases, but they also look much more luxurious.
Staircase on metal stringers
Due to the high maximum load, this type of metal bowstring helps to obtain structures with different shapes as a result of work. Such a staircase is a complex, but at the same time a more reliable option. If you choose wooden steps, mount them on the resulting platform using bolts or countersunk screws. If you decide to work with metal steps, then weld them to the fillets.
Attaching a metal stringer to a beam.
You can weld a metal stringer to a reinforced concrete floor. Another option is steel beams. At a certain angle, cut the transverse edge of the stringer attached to the landing structure. Plates or corners with holes made in them, made of steel, are welded to the ends. The place formed on the transverse edge of the supporting structure of the staircase is connected with bolts or anchors to the beam if the stringer is mounted to a reinforced concrete slab. At the bottom, the supporting element is sometimes installed to the transverse side of the platform, in other cases it is laid at the top (horizontally). In some places, the supporting elements are fixed to each other with an angle. Its length must be equal to the width of the stairs. In this way, the structure acquires the necessary additional rigidity.
Stairs on rails
A bolt is a device that achieves the effect of “suspending” a ladder. Bolts (assemblies of bolts, nuts and bushings) connect the steps to each other and ensure the rigidity of the flight. The load-bearing wall must be strong and made of wood, brick, concrete. If the wall is not strong enough, the bolt ladder is first attached to the bowstring and to the reinforced (introduced) embedded element into the wall.
The main design feature of staircases on rails is the absence of a frame. The pain bears heavy loads. The reliability of the staircase and its appearance depend on the strength of the supporting units. Therefore, bolts are made only in specialized production from special grades of steel. The knots should not unwind spontaneously; Another prerequisite is the ability to adjust the height.
Features of staircases on rails
- Possibility of installation in limited space.
- "Airy" appearance.
- Special requirements for the premises in which they will be installed.
- The relatively high cost of installing stairs compared to other methods.
Painting stairs Why stairs creak Metal stairs Spiral staircases Wood species Wooden handrails Balusters
Construction of stairs on wooden stringers
Wooden stairs are made from pine and oak, less often - from cedar, larch, mahogany, Oregon pine and araucaria (Brazilian pine). High-density oak wood is strong and reliable. Coniferous wood is softer than oak, but more convenient to process. It is better not to use coniferous wood, especially spruce, for making steps; due to their softness, they wear out quickly. The humidity of the wood used to make the stairs must correspond to the humidity of the room in which it will be located.
Stringers are usually made from boards 50–70 mm thick and at least 250–300 mm wide. It is extremely difficult to find a smooth and knot-free board of this width from a single solid wood. Therefore, for the manufacture of stringers, it is best to use laminated boards; they do not have knots, are not subject to twisting and cracking, and their width is sufficient for making cuts.
Treads made of solid single or two narrow tongue-and-groove boards are laid on stepped cutouts in the stringers. The thickness of the tread depends on the width of the march. For steps with a length of 800, 1000, 1200 mm, boards with a thickness of 40, 50 and 60 mm are used, respectively. The thickness of the tread relates to the width of the flight, approximately 1 to 20. Deviation from this proportion is possible only in the direction of thickening the tread or the number of stringers under the steps increases - up to three or four pieces. The staircase can also be made on one reliable, powerful stringer. The boards used to make treads are sharpened and sanded with sandpaper. The front edge of the tread can protrude up to 50 mm relative to the plane of the riser; this protrusion is usually rounded. The ends of the treads are hemmed with planed timber, puttied and painted or covered with veneer.
There are no special requirements for the wood of risers; they are made from planed boards 18–25 mm thick. The ends of the riser boards, like the ends of the treads, are left open to give them a more beautiful appearance; they are sawn at an angle of 45°. It is recommended to make treads and risers from the same type of wood.
Particular attention should be paid to the reliability of the stringers. From one blank you can cut stringers of different geometries. Stringers that do not have cuts at the points of support on the platform beams (Fig. 34) are more reliable, since they have fewer weakened sections and there is no likelihood of wood chipping at the point of support. But such stringers require a higher platform beam for installation, which reduces the height of the passage under the stairs. The presence of an upper frieze step in the staircase frees up the developer’s hands when designing the staircase. This step can completely repeat the size of an ordinary step, be narrower, or be absent altogether. In other words, the upper frieze step, together with the stringers, can be pushed into the landing beam, which means that, without changing the slope of the flight of stairs, it becomes possible to vary the horizontal dimensions of the staircase. However, at the same time, the height of the landing beam increases, the fastening points become more complicated and the height of the passage under the stairs decreases. Therefore, if there are upper frieze steps in the staircase, stringers are more often used, the upper end of which is cut, thus partially compensating for the increase in the height of the landing beam.
The lower part of the stringers rests on the floor beams of the lower floor or, in the case of using a two-flight staircase, on the beams of the interfloor platform. This part of the stairs may be on beams directed in relation to the stairs, both longitudinally and transversely. When supporting the stringer on the transverse beams, the knot is solved similarly to the upper part, that is, either the stringer or the beam can be sawed down (Fig. 35). If the stringers get on the longitudinal beams, they can be mounted against the balusters that were previously sawn into the beam and securely fastened. In another embodiment, two longitudinal beams are connected to each other by an additional transverse bar, against which the lower part of the stringers rests.
It is important to pay attention to the fact that any cutting (cutting) of wooden elements in practice means a weakening of the original sections. A poorly executed unit can lead to structural failure. If you have a choice of various design solutions for assemblies, it is better to abandon tie-ins in favor of assemblies using steel fasteners (angles, clamps, bolts, etc.). The stringers can be rested top and bottom against the building structures of the floors, while you can completely abandon any fasteners (where will they go from space), but this option is only possible if the stops at the top and bottom of the stringers are absolutely rigid and do not imply no progress, which in many cases is almost impossible to achieve. Typically, stairs are built using a non-thrust option, similar to the schemes of layered rafter systems.
To make a stringer, you need a flat board with a thickness of 40 mm and a width of 300 mm. When making straight flights of stairs (with identical stringers), a stencil is used to mark the cutouts for the steps. It can be made from a small sheet of plywood and two wooden slats. From the corner of the plywood sheet, distances are measured corresponding to the calculated ones: the width of the tread and the height of the riser (Fig. 36). The resulting points are connected by a straight line along which slats are installed and fastened with nails on both sides of the sheet. Next, according to this stencil, the corresponding grooves are marked and cut out in the stringer.
When making stairs with winder steps, the stringers on both sides of the stairs are of different geometries. In this case, the cutouts in the stringers are marked according to the size of each step. It should be taken into account that the height of the risers remains unchanged, but the width of the tread changes, therefore, the angle of inclination of the stairs also changes. On the inside of the stairs, steps with a narrow part of the tread are installed, and on the outside - with a wide part of the tread. The staircase is obtained from the inside with a steeper rise than from the outside, but at the same time its stringers remain parallel to each other, only the length of the cut, which characterizes the tread of the step, changes in them. The template for marking must be made with movable guides and reconfigured each time when marking the next winder stage.
If the cuts in the stringers are too deep and weaken the structure of the stairs, it is advisable to install three or four stringers under the steps.
Stringer scheme
Some home interior design rules require certain decisions. This also applies to the staircase structure. In cases where different types of stringers are used, the main requirement remains their reliability and location under the steps. When viewed from the side, only the end parts of the steps should be visible. To achieve the desired result, we will present several diagrams that will help you complete the installation work yourself.
With one
Many users have chosen a flight of stairs, which is installed with one steel stringer. In private buildings, this type of support is used for spiral, straight, rotary and other types of stairs. The materials are also different. Products can be made of metal, wood or concrete. A single stringer is located directly in the center of the flight under the ladder. It can be an ordinary metal pipe.
With two
A staircase supported by two stringers is the most common design. Most often, supports are made of wood and placed on the sides of the structure parallel to each other. This type of staircase transition is not difficult to implement. The scheme with two stringers is used both for single-flight stairs and for two or more flights.
Related article: Making a wooden ladder: calculations and instructions for self-assembly
With three
For stairs that have significant dimensions, for example, with a width of more than 1.5 m, a support consisting of three stringers is used. This is the so-called combination of two side and one central element. One side string can act as a bowstring. In this case, it is important to make accurate calculations. Below is an example of a diagram of a wooden staircase on three stringers.
Making an internal wooden staircase for a country house with your own hands
The number of stringers is also increased when thin boards are used as treads, in order to avoid their deflection under operational load.
It is quite difficult to find boards wide enough, straight and without knots for making stepped stringers, so there is another design solution. On top of the stringer, additional wooden elements are installed - fillies, on which the details of the steps are in turn attached. The fillies can be triangular in shape and installed directly on the upper longitudinal edge of the stringer. The fillies are fastened to the stringers using dowels, which are installed in pre-selected grooves in the adjacent elements. The dowels are fixed in the grooves with glue. To increase the reliability of attaching fillies to stringers, a more complex scheme is used. In this case, a small cutout is cut out in the stringer and fillets of complex shape are used (Fig. 37). To attach the fillies to the stringer according to this scheme, dowels and glue are also used.
It is better to connect treads and risers (Fig. 38) with screws and glue, since the nail connection weakens over time. The tread and riser are fastened with screws, flush into the groove, or using an additional triangular strip. In addition, you can use all kinds of overhead strips and metal corners to fasten the wooden parts of the stairs. A reliable and durable connection is obtained with a nailless connection - using wooden dowels. When joining wooden parts made from hardwood, dowels from softwood are used, and vice versa, dowels from hardwood are used to join parts from softwood. Otherwise, the dowel, instead of connecting the parts, will split them.
A staircase with a central stringer (Fig. 39) does not clutter up the room and can become an interior decoration. The only support for the staircase is the central stringer, made of timber with a cross-section of 340×200 mm. You can make your own timber by gluing together several boards and placing them under a press. Then the glued boards are strengthened with transverse wooden dowels or bolts. Oak, larch, and pine wood are suitable materials for this structure and its finishing. If the stringer is positioned steeply, when the staircase is used as an auxiliary ladder (for example, to an attic or mezzanine), the lower end of the stringer is attached to the floor, and the upper end, with the help of bolts and dowels, to the beam supporting the structure of the platform. Such a staircase does not require cuts; the method of its installation is close to the method of installing a stepladder, that is, the main task is to strengthen the bottom of the ladder from sliding and the top from falling to the side. When reducing the angle of inclination of the stringer, it is better to fasten the top of the stairs using one of the methods shown in Figures 34 and 38.
Triangular fragments of the stringer are cut out according to a template so as to maintain the parallelism of the platforms on which the steps will be installed. The cuts and corners are leveled with a rasp or a grinder, then the stringer is installed in place, attached to the floor and to the platform beam with self-wedging dowels and bolts with washers, recessed into the wood.
Duck step steps can be used for an auxiliary staircase. The steps are made of planed boards. After marking, holes with chamfers for fastening are drilled. Each step is securely fastened with four bolts and washers to the stringer or to an additional cross beam. The cross beam, in turn, is attached to the half-tree stringer. To intercept the pulling moment when a load occurs on the console of the transverse beam, in addition to the cut, these beams are strengthened to the stringer with four wooden dowels. The chamfers with recessed bolt heads are covered with synthetic mastic or wood putty of the same color as the main structure, and then the entire structure is covered with a layer of colorless varnish.
If there is insufficient space allocated for the stairs, there is a need to install winder turning steps (Fig. 40). The complexity of constructing such a staircase increases dramatically. In fact, this staircase is a hybrid of two straight single-flight staircases and an element of a spiral staircase.
The central support post of the spiral staircase fragment is also a baluster for enclosing a straight flight. The winder steps are cut with their narrow end into the body of the central support, so the size of its cross-section is taken to be slightly larger than that of conventional balusters. In addition to the steps, the internal stringers of the straight elements of the stairs are cut into the central support. External stringers of straight stairs and stringers of a spiral staircase are spliced together with a jagged tenon, and if the stringer is thick enough, with a hidden tenon. All inserts and splices of wooden stairs are carried out with special care and always with the use of glue.
It should be added that almost all of the above regarding stairs on stringers can be applied to stairs on bowstrings and vice versa.
How to secure a ladder: main types of ladders and methods of securing them
Today, stairs are an essential part of a country house or cottage. In most cases, stairs are made according to the customer’s drawings, and thanks to the unification of the structure, they can be easily installed in a prepared place in the building, and assembled before that at the construction site. As a rule, patterned wrought-iron staircases do not require any other assembly methods than conventional ones, except perhaps a few more precautions. But this is not what you will read about in this article. Here we will try to introduce you to the different types of stairs, and also tell you about the most common types of fastenings that are used in modern construction. And we are sure that after reading this information you will not have any problems with how to secure the stairs.
Methods for attaching steps to a stringer
There are several ways to attach steps to a wooden stringer:
- On a sawn tread. The step is attached to a tread cut into the stringer beam. For fastening, dowels with wood glue or self-tapping screws are used.
- On a filly. A special stop is installed on the stringer beam, which serves as the basis for the step. The filly is attached to the stringer using pins, dowels, self-tapping screws or screws.
- On a steel support. In this case, the step is fastened to a steel part, which is attached to the stringer using self-tapping screws or bolts.
- On Boltsa. The latter are a small support leg, which serves as the basis for installing the step.
Steps on a metal stringer are installed only on a fillet welded to the stringer.
Features of fastening stairs
The ladder must be secured so that it is reliable and durable, because the safety of its operation depends on this. Accordingly, it is recommended to trust the installation of stairs to people with proper experience and those who do this professionally.
The method of attaching stairs to a structure directly depends on the type of structure, its weight and massiveness, as well as the material of the walls and stairs. For example, aluminum stairs are attached to the wall using bottom fasteners. If you don’t get hung up on the fact that there are individual staircase designs that require non-standard solutions in fastening systems, then most flights of stairs are attached to the ceiling, walls and floor.
It is important to consider that the ladder must bear your weight during descent and ascent, as well as its own weight, so you should not forget about the wall material. It is recommended to install stairs in rooms where the walls are concrete or made of strong timber or brick. Moreover, such walls should have a thickness of 25 cm.
Fastening Me stringer to a hollow core slab
In a word, the staircase is attached to load-bearing walls, or simply the strongest walls of the building. Remember that stairs cannot be mounted on asbestos-cement or plasterboard walls. Also on this list are walls laid out in one brick.
If the main elements of the staircase that carry out the load-bearing function are not fastenings, but a support pillar (used mainly for spiral staircases), then the lower part of the support must be secured to a hole that is prepared in advance in the concrete floor screed. It is important to install a steel anchor in this place for a more durable fastening. If the house has a wooden floor, then it is recommended to install the post in such a way that its weight rests against the beam.
If the floor in your house is made of wood, the flight of stairs should fit neatly and without distortions onto the floor beam. Special fastening systems fix the flight of stairs to the beam.
Fixing stairs to various types of interfloor ceilings
The quality of the material of the staircase structure is of great importance for its reliability and safety. But the strength of fixation of all its elements among themselves, as well as the correct fastening of the staircase to the ceiling, inter-flight platforms, floor and walls play a much larger role.
The interfloor ceiling when installing stairs can be made of various materials:
- Wood – the most common type of flooring is wooden beams.
- Reinforced concrete slabs.
- Steel beams are rarely used in private construction.
Depending on the type of load-bearing structures of the floor, various methods of fixing staircase structures to them are possible.
Interfloor ceilings on wooden beams
If the floors in the house are made on wooden beams, then the flight of stairs should be laid on the beam without distortions. Its fixation is carried out using special fastening systems, depending on the material of the staircase and the type of its supports.
The supports of the staircase structure in the form or stringer are directly adjacent to the floor or platform between the spans, transferring all the loads to them.
- If fastened incorrectly, cracks may form in the wooden elements of the supports. This quite often happens when fixing a bowstring or stringer with beams and slabs into a lock.
- Both vertical and horizontal loads act on the lower support of the structure. The same thing happens when the support is tightly fixed to the ceiling.
- If the bowstring or stringer rests on the ceiling only with its horizontal part, then the upper support will only be subject to vertical loads from the stairs. Consequently, the risk of cracks in the march is minimized.
- A gap of about 1 cm is required between the vertical end of the supporting element and the load-bearing structures of the floor.
Fixing wooden stringers to longitudinal or transverse wooden beams can be done with a notch on the staircase support, or on the beam element.
There are a lot of options for fixing stair structures to wooden beams. Often the choice of a specific method depends on various nuances of the product itself and how the opening in the ceiling under the stairs is made.
Common types of stairs and methods of attaching them
Let's see what the main types of stairs are, and also look at the options for their possible attachment to a structure, so that you don't have any questions, for example, how to fix the stairs:
- If the staircase is a straight and single-flight structure, then its upper end must be attached to the ceiling, and the lower end must be fixed to the floor of the first floor. This is a stable fastening system and does not require intermediate fixations.
- If the staircase has one turn, then it is necessary to fix it with fasteners to the wall.
- Accordingly, if the staircase has two turns, then not only additional fastenings are needed on the floor and the upper end of the flight of stairs, but also a support pillar.
- If the staircase is a complex structure with many branches and turns, then it is necessary to create through fastenings on the string, stringers, and steps.
To fasten a flight of stairs and its elements, types of fasteners such as tenon, mechanical, and adhesive can be used. Additionally, for more reliable fixation, the span elements are glued before fastening.
And it is worth recalling that the main safety factor for a staircase is not so much the quality of the construction material and its execution, but the quality of the fasteners and the correct installation. Therefore, it is recommended to trust the installation of staircases to a team of professionals.
The design of prefabricated reinforced concrete stairs mainly consists of stacked reinforced concrete steps laid on metal stringers made of channels or I-beams. This type of construction is the most reliable and durable compared to wood. Prefabricated concrete stairs can be installed both indoors and outdoors. A concrete staircase using beautiful high-quality finishing materials can decorate the interior of both private and public buildings.
Prefabricated concrete staircases on metal stringers are made on site at the construction site. Stringers are welded to the platform beams or connected using bolts. The landings on this type of stairs are made of ready-made reinforced concrete slabs or a monolithic slab resting on a landing beam is poured.
The steps are mounted on stringers, the seams are filled with cement-sand mortar. In public buildings, metal stringers are painted or treated with some kind of fire-retardant material and then finished with plasterboard. Prefabricated concrete stairs are assembled from reinforced concrete steps, which can be triangular, rectangular or in the shape of a right angle, the stairs are finished with natural stone or ceramic tiles. When lining stairs used outdoors in winter, it is worth providing treads with corrugated tiles to prevent people from falling. There is a fairly wide selection of this type of tile on sale.
Fastening the treads
After choosing the type of staircase, it is equally important to decide on the option for attaching the steps. When considering a wooden staircase in lateral projection, two types can be distinguished:
- stepped;
- with fillies.
The stepped base is prepared relatively quickly: after marking the solid material, grooves are cut out in it. When choosing the second option, the “fillies” and the beam are prepared separately, after which they are fastened with bolts, dowels or using “dowel” bars. Instead of fillies, it is also possible to use curved steel supports, support legs and other options, as shown in the figure below:
Figure No. 4: Mounting methods.
In most cases, metal structures are used because they are lighter and more compact compared to their wooden counterparts. Moreover, even with a sufficient lifting height, one stringer is enough to support the weight.
With any selected material, 2 options for preparing fastening points with steps are possible. In the first case, the “sole” (support) is fixedly attached to the load-bearing part by bolting, anchoring or welding; in the second, grooves are cut or a composite assembly with grooves is assembled.
Manufacturing and installation of stringers
Also nowadays, treads with electric heating are produced for external stairs, preventing the formation of ice.
Prices for installation of prefabricated concrete steps on steel stringers
TERM-38-01-002-01 Production of beams and stringers. MONORAILS, BEAMS AND OTHER SIMILAR STRUCTURES OF INDUSTRIAL BUILDINGS, ASSEMBLY USING A MOTOR-ROAD CRANE HP=66% (HP = 228 rub.) SP=65% (SP = 225 rub.)
TER- 09- 03- 002- 12 UK TER IZD.3 TB7 P7 Kozp = 1.15 Cam = 1.15 OP P1.9.16; APPENDIX 9.3 P2 Kozp = 1.1 INSTALLATION OF BEAMS, COVERING BEAMS, COVERINGS AND FOR INSTALLATION OF EQUIPMENT OF MULTISTORY BUILDINGS WITH BUILDING HEIGHTS UP TO 25 M (ON THE TERRITORIES OF OPERATING ENTERPRISES WITH AN EXTENSIVE NETWORK OF TRANSPORTATION AND ENGINEERING COMMITTEES MUNICATIONS AND CONSTRAINT CONDITIONS FOR STORAGE OF MATERIALS) - ON FOR REINFORCED CONCRETE AND STONE SUPPORTS Kam=1.3 Kzpm=1.3 (Adjustment for market value) HP=90% (NR = 383 rub.) SP=85% (SP = 362 rub.)
TER- 13- 03- 002- 04 OP P1.13.7 Kozp = 1.1 PRIMING METAL SURFACES AT ONE TIME WITH GF-021 PRIMER (MANUALLY) HP = 90% (NR = 32 rub.) SP = 70% (SP = 25 rub.)
TER- 07- 05- 015- 01 UK TER IZD.3 TB7 P7 Kozp = 1.15 Kam = 1.15 CONSTRUCTION OF STAIRS ON A READY BASE FROM INDIVIDUAL SMOOTH STEPS (ON THE TERRITORIES OF OPERATING ENTERPRISES WITH AN EXTENSIVE NETWORK OF TRANS SPORTS AND ENGINEERING COMMUNICATIONS AND CONSTRAINTS CONDITIONS FOR STORAGE OF MATERIALS) Cam=1.3 Kzpm=1.3 (Adjustment for market value) HP=155% (NR = 3351 rub.) SP=100% (SP = 2162 rub.) 1.53
100m steps of the SSC01-103-1061 Stroycen, May 2014 Stair Stairs 15- 1 / Concrete B15 (M200), volume 0.066 m3, consumption of Ar-ry 1.59 kg / (series 1.050.9-4.93) 102
Construction of monolithic steps and platforms for prefabricated concrete stairs Construction of wooden formwork for monolithic steps and platforms on prefabricated concrete stairs Construction of a foundation from FBS blocks