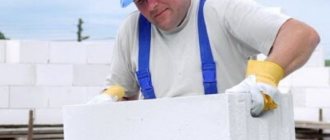
In construction today, materials such as brick or wood are often found, and more modern materials are gradually gaining popularity. One of these materials is foam concrete, whose feature is a large number of pores. Achieved through special admixtures. Building blocks, called “foam blocks,” are made from foam concrete; they are used in construction to build walls; the article will describe how to lay the blocks with your own hands correctly.
Rules and nuances of installing walls made of foam blocks with your own hands
Material such as foam blocks first appeared in Sweden at the beginning of the last century. In our country, similar products are used for installing walls of private country houses, constructing garages, and constructing fencing for balconies and loggias. The popularity of cellular blocks among developers is determined by their precise overall dimensions, low weight, high installation speed, and excellent technical characteristics of the material. Even an inexperienced builder can lay foam blocks, but before installing the walls it is necessary:
- Lay high-quality waterproofing on the foundation, which will prevent the destruction of the blocks.
- Maintain horizontal position when laying products (this can be achieved by adjusting the layer of cement mortar). A correctly installed first row of foam blocks allows you to align subsequent products on thin seams of the adhesive mixture.
When laying the first and subsequent rows of blocks on the mortar, it is necessary to take into account the purpose of the enclosing structures. Walls can be main, load-bearing and non-load-bearing (interior partitions).
Characteristics
First, you need to carefully consider the performance characteristics of the foam block. This building material is practically eternal, since it is not subject to rotting, and its margin of strength and reliability is the same as that of stone. On the other hand, they are not at all afraid of dampness; the house will not be cold or hot. Thus, it becomes clear that this is an ideal material for building a cozy and comfortable home.
Another feature of foam blocks is their light weight. Therefore, before starting to build a house, it is necessary to decide on the foundation. It is clear that you should not create a powerful foundation for a wall from this material, because it will turn out to be relatively light. So, you can quite reasonably save on the foundation.
Masonry of external load-bearing walls
It is recommended to lay foam blocks on a pre-leveled base. If there is a significant difference in height, it is recommended to use a cement-sand mortar for this purpose. After leveling, waterproofing is laid on the base.
Laying foam blocks with your own hands begins with preparing the products. To do this you need:
- eliminate irregularities and chips;
- remove burrs using a grater or drywall plane;
- set aside heavily damaged blocks and leave them for later trimming.
Walling
The construction of walls begins from the corners. For better adhesion, the lower part of the blocks is pre-moistened with water. First, they are leveled in height, and then in the horizontal plane. The first row is covered with a layer of waterproofing mixture.
All subsequent rows are connected with an adhesive solution. It is prepared from a dry mixture, which is poured into water and mixed using a mixer. Apply the glue with a special toothed ladle.
The laying of foam blocks is carried out with each subsequent row offset by at least half of their height, which facilitates reliable dressing.
Installation of the first row
The first products are fixed on cement mortar at the corners of the future building, and the first of them is installed in the highest part of the base on a thin layer of the mixture. Lighthouse masonry elements are considered basic, so their installation must be carried out with special care.
Important! When installing a corner block, make a protrusion above the base within 3-5 centimeters. This gap will prevent the accumulation of moisture at low tide. Thus, the masonry will remain dry and will not be subject to destruction as a result of moisture saturation and exposure to negative temperatures.
When fixing the side wall elements, it is recommended to use a building level. Correction of their position is carried out with a rubber hammer. After installing several rows of lighthouse blocks, nails are forced into the seams and the cord is pulled. If there is a significant distance between the corner parts (more than 6 meters), it is recommended to use intermediate guides.
The first row of foam concrete is laid on a cement-sand mixture using a trowel, all subsequent versts on the adhesive mixture using a notched trowel or a special tool, a carriage.
Note! The construction mixture is spread not only on the horizontal surface, but also on the side edges of the products. The vertical seam must be filled with mortar without fail. Failure to comply with this rule will lead to the appearance of voids, accumulation of moisture and destruction of the product under the influence of negative temperatures.
When laying foam blocks on a regular mortar, the thickness of the horizontal seam should be within 1-1.5 centimeters, the vertical gap should be about 1 centimeter. If there is a perfectly leveled surface, masonry can be done using glue. In this case, the thickness of the gaps between adjacent elements is determined according to the manufacturer’s recommendations.
Advice! When the surface of the block is wetted with water, its adhesion to the glue will increase. This recommendation is valid for installation in the warm season.
If necessary, blocks are cut to the required dimensions. A product with a thickness of 5 centimeters or less looks ugly. To eliminate this unpleasant moment, you can increase the thickness of the seams. After laying the product on the solution, it can be further adjusted over a short period of time. Subsequently, unevenness is eliminated using a drywall float or a special plane.
Installation of the second row
The second and all subsequent rows of walls begin to be laid from the corners after measuring the deviation from the vertical and horizontal position. When performing such work, the cord is moved to a higher block and secured in the seam. An adhesive mixture is used to lay all subsequent rows, which saves material and work time.
It is not recommended to lay foam blocks with gaps crossing at an angle of 90 degrees; such seams only weaken the masonry. For high-quality dressing of seams, the products are shifted at least 25% of the length. The ideal option is to bandage half the size of the element.
The second and subsequent rows of blocks are laid on glue. The thickness of the building mixture should be within 5 millimeters. The glue is applied with a notched trowel, spreading evenly over the surfaces. After laying and preliminary leveling, the thickness of the seam will decrease to 3 millimeters.
During work, the horizontal and vertical position of the blocks is adjusted using a plumb line and a building level. To improve the load-bearing capacity of the wall, reinforcement is carried out every 3-5 rows of blocks. To do this, grooves of the required depth are made in the products and reinforcement is laid. Attention should be paid to the fact that the metal rods should not extend beyond the surface of the blocks.
When laying foam concrete with your own hands, you must comply with a number of requirements:
- The adhesive composition or cement-sand mortar must be prepared in small portions, because such substances retain their performance characteristics for 1.5-2 hours after mixing.
- The blocks are adjusted within 10-15 minutes after installation. When doing DIY work, use mixtures with maximum adjustment time. In this case, an inexperienced builder will have more time to level the masonry. When using a high-quality solution, it will be problematic to correct the block without damage.
- Work on the installation of foam concrete walls must be carried out during the warm season from spring to mid-autumn, at temperatures from +5 to +25 degrees.
- To simplify installation, the surface of the blocks is moistened. After such procedures, the adhesion of the porous surface improves.
- You can apply an even layer of glue using a notched trowel.
It should be noted that finishing work is carried out only a month after the walls are installed. This is due to significant shrinkage of foam blocks, up to 3 millimeters per meter of length.
Useful information about foam blocks
Manufactured using special technology without the use of materials that cost a lot, which makes such blocks a fairly inexpensive material used in the construction of houses.
This will be a budget option, because their price is not high:
- This is an environmentally friendly material. But if you wish, you can make a rather cozy home.
- They do not burn and firefighters will not have any questions when putting the premises into operation.
- Easy to install. All the work can be done with your own hands and it will take less time than using brick or wood.
In addition to high efficiency indicators, the foam block has the following properties:
- Thanks to good sound insulation, there is no need to carry out additional work in this direction;
- In terms of environmental friendliness, this material is similar to wood;
- The pores allow air to pass through perfectly, which allows the entire structure to breathe;
- The optimal shape makes it possible to create structures of any complexity;
- They are easy to cut, which reduces the time for laying out and allows you to implement any design solution;
- Ideal shapes allow the use of glue rather than cement mortar for joining;
- Finishing on the outside and inside is carried out with little consumption of materials, since after installation a flat surface remains;
- Resistant to high temperatures - when heated, the material does not burst, and its structure remains the same.
In terms of its properties, foam block is an alternative to wood and brick, but at the same time it costs several times less. It is this moment that makes such blocks popular.
Today it is used for the construction of cottages, kindergartens, schools and so on. After carefully studying all the characteristics, you can begin to build a house from foam blocks.
How to tie stitches
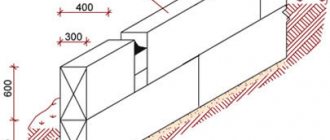
The load-bearing walls of a residential building can be laid out in one or two rows of blocks. Products with standard overall dimensions of 20*30*60 centimeters are not enough for the construction of enclosing structures, so they are laid in two rows and reinforced with mesh. When laying foam blocks with butts, the products must be placed in a perpendicular position relative to the main masonry. If the length of the material exceeds the width of the supporting structure, trimming is done.
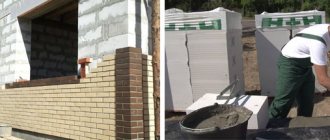
When laying foam concrete flat, the rows are mounted parallel to each other and connected to each other using flexible connections. Sometimes the main masonry of the walls is combined with brick cladding; here the materials are reinforced with metal mesh. The corner part also needs to be bandaged. It is considered normal to place a vertical seam in the middle of the foam block.
When installing internal load-bearing walls, individual blocks can be joined as follows:
- With bandaging to the full depth of the part. Here the first foam block intersects with the masonry of the outer wall.
- With combination on part of the element. In this case, the product is wedged into the main masonry by 15-20 centimeters.
- With joining of material. In this case, dressing is not used; the foam block is placed close to the outer wall.
Experienced builders recommend using the first option for laying foam concrete walls. In other cases, reinforcement is inserted into the masonry of the outer wall every 3 rows of blocks.
Characteristics of foam blocks for construction
A high-quality foam block has certain parameters, which can be determined experimentally when purchasing:
Installation diagram of a foam block wall: 1 – clamp, 2 – wall, 3 – foam block.
- Foam blocks have clear and even edges with certain dimensions. When purchasing tongue-and-groove blocks, you should remember this and, if necessary, check these parameters. To do this, place several blocks on a flat surface close to each other. If adjacent foam blocks do not form irregularities and depressions between themselves, then this batch of building materials is of high quality.
- The strength of tongue-and-groove blocks corresponds to a high level, and therefore aerated concrete should not crumble or break. To determine this parameter, you should try rubbing a piece of the block between your fingers. If this succeeds without difficulty, then the foam block is of poor quality. It does not contain enough binding substance - cement, which will negatively affect the strength of the building.
- Cracks on the block indicate improper drying conditions. This defect can lead to destruction of the foam block.
- Another way to ensure the quality of a building material is to examine the structure of the chips from above and below. If the structure in different parts of the block is different, this is a defective material that has the wrong manufacturing technology.
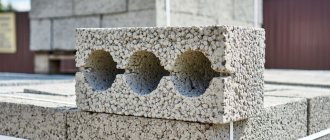
- The pores in the gas silicate block should be small, uniform and evenly distributed. The diameter of the bubbles should not exceed 1 mm and have a spherical shape.
- There should be no grease marks on the surface. The block must have a uniform color both inside and outside.
- High-quality packaging also indicates the image of the manufacturer. This means that the package of blocks must be wrapped in plastic film and placed on a pallet. Otherwise, foam blocks may lose their qualities under the influence of precipitation and high humidity.
A house made of tongue-and-groove blocks has many advantages:
Scheme of masonry of foam block walls of residential buildings.
- good thermoregulation: warm in winter and cool in summer;
- good breathability, which prevents the appearance of mold and mildew;
- soundproofing;
- fire resistance;
- savings on heating due to excellent thermal insulation of walls;
- the evenness of walls made of gas silicate blocks due to their precise dimensions;
- Due to the porosity of the material, walls can be built thinner than with brickwork.
What mistakes can occur when installing foam concrete walls?
When laying blocks with your own hands, an inexperienced builder may make the following mistakes:
- Incorrect installation of the first row of products will lead to the need to lay a thick layer of adhesive mixture on subsequent rows; the supporting structure may shift vertically.
- Carrying out work in humid weather and freezing temperatures often causes wall destruction.
- Incorrect application of the mixture and incomplete filling of the joints. Such actions lead to loss of the wall’s thermal insulation qualities and loss of strength.
- Lack of preparatory work to clean surfaces from construction debris and dust. Poor quality connection of parts leads to cracks in the structure.
- The lack of reinforcement causes a general weakening of the wall.
Soil shrinkage will inevitably lead to the appearance of cracks on the surface of the supporting structure, so window and door openings must be reinforced. To prevent the occurrence of point loads from floor slabs in the upper structure, it is necessary to create an armored belt.
How much does it cost to build a house?
Many users are interested in the question of the cost of laying walls from foam blocks. When making such calculations, it is necessary to take into account the price of wall material and mortar, if the work is done by hand, as well as the cost of hiring builders when ordering such services.
First, you need to calculate the total volume of the walls according to a pre-compiled project and calculate the required number of blocks per m3. You should pay attention to the fact that one cube of material with standard overall dimensions of 60*30*20 centimeters costs 2500-3200 rubles. To this indicator it is necessary to add the price of glue. According to experts, the consumption of adhesive composition per m3 of masonry is in the range of 20-30 kilograms, which is another 200-250 rubles. Taking into account the cost of foam blocks, glue, reinforcement, cement and other expenses, one m3 of masonry will cost 3000-3500 rubles.
What is a foam block?
The foam block consists of a mixture of concrete and a synthetic or organic foaming agent. When the components are mechanically mixed, air bubbles are evenly distributed in the solution, and after it hardens, a durable but relatively lightweight building material is obtained. A partition made of foam blocks, the price of which depends on the strength class, will in any case be cheaper than a brick structure.
Foam concrete composition:
- cement;
- sand;
- water;
- foaming agent
Advantages of foam concrete blocks:
- high sound and heat insulation properties;
- environmental friendliness;
- fire resistance;
- large size - the parameters of the foam block allow you to quickly lay out an interior wall and reduce the cost of a binding solution;
- low volumetric weight;
- porous structure of the material - thanks to this property, partitions made of foam blocks “breathe” and there is no sweating effect;
- ease of processing - the material can be cut both with power tools and with a simple hacksaw, which allows you to create partitions of various shapes and lay utility lines without much effort;
- easy installation;
- wear resistance;
- affordable price.
Disadvantages of foam block:
- fragility of the material - if improperly transported, it may be damaged;
- the need to waterproof walls - porous concrete has a high degree of vapor permeability and water absorption;
- restrictions on the load of partitions - problems may arise when attaching massive, heavy objects to it.
About foam concrete blocks
If you decide to build walls with foam blocks, you need to choose the right building material. Building structural units made of porous concrete in most cases have dimensions of 60x30x20 cm (length, width, thickness, respectively), although other dimensions are possible. When choosing a building material, you should pay attention to the uniformity of the structure, the correctness of the geometric shapes, the presence of chips, broken corners, and other damage. High-quality building blocks must be free of visible defects.
Standard blocks are produced with a continuous structure and a smooth surface on all sides. Larger foam blocks may have technological voids, side pockets for easy hand grip, and tongue/groove type joint locks. These elements make the building material lighter and make it easier to work with it yourself
In addition to the main masonry blocks, you will need special U-shaped foam blocks for the construction of a reinforcing reinforced belt, the total length of which should slightly exceed the perimeter of the building for one-story construction and two perimeters for the construction of two floors (the first reinforcement of the structure for the interfloor ceiling, the second for the roof structure).
Additional materials
High-quality laying of foam blocks involves the use of the following materials:
- masonry mortar;
- reinforcing mesh;
- reinforcing steel bar;
- waterproofing agents.
Masonry solutions
Above the first row, a ready-made polymer-cement mixture is used for laying foam concrete, sold in paper bags of 25 kg packaging. To prepare a working solution (construction adhesive), just mix the mixture with water in the proportions indicated on the package with a hand-held construction mixer.
Important. For laying foam blocks, it is necessary to use only special glue intended for these purposes. It is incorrect to use polymer-cement mixtures for other purposes (for installing tiles, polystyrene slabs, basalt insulation mats, etc.).
To lay the first row of foam concrete, you will need a classic cement-sand mortar in a ratio of 1:3. Often, a lime version of the mortar is used for this, when a third part (by volume) of slaked lime (paste) is added to the cement-sand mixture.
Reinforcing materials
Foam concrete has good compressive strength, but its fracture and tensile strength characteristics require additional reinforcement. For this purpose, reinforcing masonry mesh and reinforcing steel rods are used. They are not mounted continuously. Fiberglass mesh should be laid between the blocks in 3-4 rows, and steel reinforcement (rods with a diameter of 8-10 mm are used) in places of greatest load (corners, openings). If it is necessary to construct a reinforcing belt, you will additionally need steel reinforcement and tying wire to create a continuous reinforcing structure.
Waterproofing
Waterproofing materials are needed to create a moisture barrier between the foundation (basement) and the first row of foam concrete. Considering the porosity of wall building materials and the ability to actively absorb moisture, in this case there are increased requirements for waterproofing. Double protection is usually used - first a layer of bitumen mastic on the surface of the base, then 2-3 layers of rolled waterproofing material (roofing felt, waterproofing material, etc.)
Tools and devices for laying foam concrete walls
Considering the peculiarity of laying foam concrete blocks, you will need an appropriate set of special and general construction tools. The first include:
- specific plastic trowels with a comb (can be replaced with a regular notched trowel);
- wall chaser for making longitudinal recesses on the surface of foam concrete;
- hand saw for cutting and fitting blocks;
- flat sanding boards for removing large and small irregularities and protrusions;
- a square to facilitate precise cutting of cellular building materials;
- hammer with rubber working part;
- small paint spatula.
General construction tools that will be useful when laying foam blocks with your own hands include:
- bubble level;
- laser level (water level);
- strong thread or fishing line;
- a construction mixer or drill (perforator) with an appropriate attachment for preparing construction adhesive.
To lay the first row you will need an ordinary trowel, a container for preparing cement-sand mortar and available tools. If you have a concrete mixer, the solution is prepared in it.
Technology of laying foam concrete blocks
By the time the construction of foam concrete walls begins, a foundation must be built. The first mandatory action should be the creation of a water barrier between the base of the building and the future wall. To do this, the contacting surface of the foundation is generously covered with a coating containing bitumen, after which several layers of roofing felt are laid. Only after creating a reliable waterproofing barrier is the masonry of walls made of foam blocks, which includes several technological processes.
First row
The foundation surface is rarely ideal, differing in horizontal projection by 1-3 cm, and sometimes more. The task of the foam blocks laid in the first row is to create a surface that is as horizontally level as possible, allowing subsequent laying of building materials with a minimum of seams using polymer-cement glue.
Before installing corner blocks, you need to determine the degree of deviation of the foundation surface from the horizontal, for which a water level or a laser level is used. A cement-sand mortar is prepared, which can be used to adjust the thickness of the seam. The greater the difference between different sections relative to the horizontal plane, the thicker the solution becomes.
The block is placed first at the highest corner of the foundation, and the smallest possible masonry joint is formed. Using control of the horizontal level, the remaining corner elements of the masonry are then laid. As a result, the surface of the foam blocks laid in the corners should correspond as much as possible to one horizontal line, while the blocks themselves must be leveled in all projections.
On a note. Forming the corners of the first row is a very important task, the result of which determines further work, so there is no need to rush, and if errors are detected, it is better to redo it.
After making sure that the corners are positioned correctly, cords are stretched between them, which serve as a guide when laying the order. Vertical seams, even when forming the first row, are closed with glue, so it is necessary that the master has both solutions and the appropriate tool at hand.
Second and subsequent rows
In the future, during construction, only assembly adhesive is used. For better adhesion (gluing) of foam concrete surfaces, they must be cleaned of dust as much as possible and coated with a thin layer of mortar. Only after this is glue applied, a uniform layer is formed using a comb and the masonry elements are pressed. Masonry adhesive is very flexible, so excessive force is not recommended. The blocks are gradually seated to the required level by lightly tapping with a rubber hammer.
Another feature of the adhesive mounting solution is the long initial setting time (1-3 hours depending on the humidity of the material, the consistency of the glue and the air temperature), so the blocks are laid in one row around the perimeter. The next row of blocks is placed after the glue in the previous seam has set.
When forming seams, some of the glue comes to the surface. The solution should be removed immediately with a spatula. If the glue is not cleaned off very carefully, by the time the next row is laid, the solution dries out and forms unevenness on the masonry surface, preventing the formation of a thin horizontal seam. To remove glue tubercles, you should have a special board with an attached abrasive on hand.
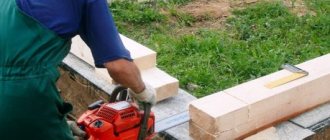
If necessary, cut off a fragment of a block, use a special hacksaw and a square. The latter allows you to create a cut surface geometry similar to the factory one. If problems arise with the evenness of the cut, it is more advisable to direct the cut edge towards the openings (here small unevenness is not a problem, and besides, they can always be straightened upon completion of the masonry).
How to build a house from foam concrete
Many people believe that building walls from foam blocks is a simple task; you just need to lay the blocks one on top of the other and thoroughly lubricate them with the solution. In practice, everything is somewhat more complicated. Firstly, you need to know how to place the blocks according to a certain pattern, and secondly, there are other nuances. It’s probably worth starting with the preparatory stage.
What preparatory work is needed
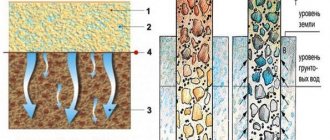
The construction of walls, of course, must be preceded by the construction of a foundation. As already mentioned, structures made of foam concrete are not very heavy, so the most optimal type of foundation will be a strip foundation: despite its simplicity of design, it is characterized by sufficient strength and durability. The only drawback of strip foundations is their inability to adapt to loose soils, as well as to soils with an abundance of groundwater. The preparatory work is as follows:
- The surface is carefully leveled. This is usually done using a float. Deviations from the horizontal are detected using a water level or level.
- Then comes the turn of the foam concrete blocks themselves: it is necessary to remove all chips, irregularities, and burrs. It is important that the blocks fit together as closely as possible.
- The next step will be to ensure waterproofing: the foundation for this is covered with a layer of bitumen mastic, then sheets of roofing material are laid in two layers. Here, too, it is important to know how to lay out the material: sheets of roofing material must be overlapped.
Sometimes, for convenience, guides are also installed - slats made of wood or metal, used to prevent the walls from deviating from the vertical. The height of the guides is usually about one and a half meters. As the walls are built, they move upward.
How does the wall construction process work?
When the preparatory stage is completed, you can begin the construction of walls made of foam blocks. This process involves the following steps:
Laying the first row of blocks. How long the walls will last largely depends on how well the first row is laid. Therefore, you should carefully check all parameters with building levels, preventing the wall from deviating horizontally or vertically. Typically, the first row of blocks is fastened together with cement, and the subsequent rows with special glue. As for the layout, spoon masonry walls are most preferable. The thickness of the blocks is quite large, so that the masonry can even be made of one block. Although some believe that the optimal wall thickness is achieved when building in two blocks.
Starting from the second layer, foam blocks must be reinforced. This ensures increased reliability and durability of the structure. Grooves are made in the blocks along the entire length, and a reinforcement rod is placed there. Then everything is filled with a fastening solution: cement or glue. Already from the second row of foam blocks, a doorway is marked.
- The remaining rows of foam concrete blocks are placed in the same way as the second one. As for window and door openings, they are made using reinforced concrete lintels.
The technology is not complicated, but everything must be done with maximum care and accuracy. One of the most important points is to constantly check the verticality and horizontality of the walls using a building level . If the building is skewed, the load will be uneven, which may cause a crack to appear in the wall over time.
Masonry reinforcement
It is believed that the reinforcing mesh placed in every 3-4 masonry joint sufficiently strengthens the wall structure erected with foam concrete. It is not recommended to lay reinforcing fiberglass mesh less often; it is possible more often, but it is not advisable in terms of excessive consumption of reinforcing material and slowdown of work. The reinforcing mesh is laid like this.
- The surface of the previous row is cleaned and the resulting dust is removed.
- The surface is coated with a thin layer of glue, on top of which a mesh is laid.
- Glue is applied to the reinforcing fabric and a uniform layer is formed.
- The next row of blocks is laid.
When laying in this way, the reinforcing mesh appears in the thickness of the seam, strengthening both adjacent rows of foam blocks.
For large-scale construction, it is recommended to use steel rods instead of mesh using the same laying pattern. In order to lay the rods in the previous row of foam blocks, grooves (grooves) are made in their surface using a special wall cutter. The depth of the longitudinal recesses should be sufficient to ensure that the rods do not protrude above the masonry surface. Two grooves are made with a distance of 5-6 cm from the edge of the blocks. Before laying the reinforcement, the recesses are cleaned and filled with glue.
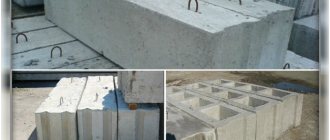
Before installing floor slabs or basic roof elements, it is necessary to create a reinforcing reinforced belt. To do this, it is convenient to use U-blocks, which are ready-made formwork into which a reinforcing structure is laid and filled with concrete. In the absence of U-shaped masonry elements, a low (12-20 cm) vertical formwork from boards is created on top of the masonry.
Construction of an external wall
The process of constructing external and internal walls is somewhat different. Therefore, below we will consider each operation separately.
We will conditionally divide the construction of external walls into six steps:
Preparing the base
A house, garage, barn or any other foam block building needs a high-quality foundation. The latter is erected in the same way as when constructing walls made of brick or other materials.
As an example, let us briefly consider the structure of a strip foundation. The instructions for filling it look like this:
- The area is cleared of the top plant layer;
- Then the markings of the future structure are applied. To do this, they usually drive in pegs and stretch twines between them. The marking of internal load-bearing walls is also carried out.
- Along the perimeter of the site, as well as in the area where the load-bearing walls are located, dig trenches to a depth below freezing of the soil. The depth depends on your region; in central Russia it averages one and a half meters;
- Level the walls of the trenches. Their width should be 10 centimeters greater than the thickness of the walls;
- Fill the bottom of the trenches with a layer of crushed stone 15 centimeters thick.
- Fill the prepared formwork with concrete grade M200-M250;
- Level the surface of the concrete with a trowel. In this case, it is necessary to ensure a horizontal plane;
- After three days, dismantle the formwork;
- After the concrete has hardened, treat the surface with bitumen mastic and lay roofing material on top.
You can start building walls after the concrete has gained strength. If construction deadlines are running out, it is better not to pour concrete, but to use foundation blocks.
Preparation of foam blocks and other materials
First of all, I note that not all types of foam blocks, or gas blocks, are suitable for the construction of load-bearing walls. Not everyone knows that the material can be autoclaved or non-autoclaved.
For load-bearing walls, I recommend using autoclave blocks, as their quality is higher - they are stronger and have a more accurate geometry. In addition, aerated concrete, like regular concrete, differs in strength grade. For load-bearing walls, it is necessary to use aerated concrete blocks of a grade not lower than M500 B2.5.
Often houses are built using frame technology, in which the entire load-bearing load is taken by a reinforced concrete frame or columns. For such walls, you can use blocks of the M400 or even 300 brand, since they essentially perform the same function as partitions.
In addition to the blocks themselves, you will need:
- Masonry mixture - it is advisable to use special glue for aerated blocks;
- Fittings with a diameter of 10 mm;
- U-shaped blocks for connecting jumpers;
- Cement and sand.
When purchasing glue, pay attention to the date of manufacture and expiration date. As a rule, adhesive mixtures cannot be stored for long. Expired adhesive can cause a decrease in the strength of the structure.
Instead of glue, you can use ordinary cement-sand mortar, but it will have to be applied in a thicker layer. Such a layer between each row will subsequently serve as a cold bridge.
As for the tools, you will need a standard masonry set:
- Trowel and notched trowel;
- Level and plumb lines;
- Glue container;
- Twine.
In addition, to cut the blocks you will need a hacksaw, as well as a special device for making grooves.
Laying the first row
Now we begin building the walls. The first row is laid out as follows:
- If the foundation surface is not perfectly flat, find the highest corner and start laying from there;
- Apply a layer of cement to the surface of the foundation with a trowel;
- Place the block and level it. To adjust the position of the block, use a rubber mallet;
- Lay the blocks at the remaining corners in the same way;
- Stretch beacon twines between the blocks;
- Make sure that the beacons are tensioned in the same plane. You can adjust the level of the blocks using a solution.
It is allowed to level differences not exceeding 3 cm with cement mortar. If the level of differences is higher, it is necessary to remove the zero with concrete.
- Apply cement to the surface of the foundation. Treat the end of the block with glue using a notched trowel;
- Place the intermediate block close to the corner block and level its position with a level.
The entire first row of blocks is laid according to this principle.
Laying the second row and bandaging the corners
So, the beginning has already been made for our walls. Now you need to lay the second row correctly. The principle is the same as when laying the first row - first the blocks are installed in the corners, then the beacon cords are transferred to the row above.
Don't forget to bandage the corners. If, for example, you laid the first block of the bottom row along the side wall, then in this corner, lay the block of the second row along the end wall. As a result, all the blocks will shift and the result will be a bandaging of not only the corners, but also the entire masonry.
In this way the third and fourth row of blocks are laid.
Reinforcement of the fourth row
Every fourth row must be reinforced so that the walls can withstand the load to which they will be subjected during the operation of the building. Reinforcement is carried out as follows:
- Place reinforcement in the grooves. At the joint areas, provide an overlap of at least 20 cm;
- Fill the grooves with cement mortar.
The joint of the reinforcement should not be at the corners. The reinforcement can only be joined on flat sections of the wall.
According to this principle, not only foam blocks are laid, but also other similar materials, such as polystyrene concrete blocks, expanded clay concrete blocks, porous ceramic blocks, etc. The only thing is that these materials, unlike foam blocks, do not require reinforcement.
Thus, it is necessary to build up the wall to the designed height. The main thing is to remember to reinforce every fourth row.
Arrangement of openings and armored belts
To make window and door openings, it is necessary to make lintels. For these purposes, special U-shaped blocks are used, which are made in the form of trays.
The jumpers are installed as follows:
- Make formwork - lay a board on the wall above the opening and support it with timber racks;
- Lay the blocks so that they overlap the walls by 25 centimeters.
- Make a reinforcement frame in the same way as for the foundation, but smaller in size;
- Fill the tray with concrete.
As a result, the opening will receive a concrete monolithic lintel, the formwork for which is aerated concrete trays. The same principle is used to make an armored belt for laying the ceiling or roof slab. We'll talk more about the construction of floors below.
How to lay the floor
The ceiling in a house made of foam blocks can be anything - wooden, metal or slab. But, in any case, it fits only on the armored belt. As with the installation of lintels, the minimum length of the platform on which the ceiling must rest is 25 cm.
It must be said that to make an armored belt it is not necessary to use U-shaped trays. Instead, ordinary formwork will do. Otherwise, the work is carried out in the same way as when installing floors on walls made of concrete or brick.
If wooden beams are used, they must be waterproofed with roofing felt. Also, be sure to provide a thermal air gap of about a centimeter, as shown in the diagram above.
That's all the information about the construction of external walls.
Development stages
A general idea of the process of building a house from foam concrete blocks is given by the video:
Video: DIY foam block house
Variations of technology are possible, depending on local conditions and own capabilities. Foam concrete (aerated concrete) is a material that is very tolerant of fairly strong deviations from the approved rules for working with it, which largely explains its popularity. The purpose of this publication is to give the reader an idea of the technological aspects and operations that must be followed and performed accurately so that the house will stand, remaining warm and comfortable, for at least 70 years, provided that the local geology and soil mechanics may change significantly during this time. In general, according to the data collected to date, the durability of buildings made of foam concrete/aerated concrete can exceed 150 years without major repairs.
Construction of a house made of foam blocks (gas blocks) includes the following steps:
- Surveys at the site of future construction;
- Choosing the type of foundation;
- Determining the feasibility of building on your own;
- Selection of material for the supporting structure (box);
- Design;
- Zero cycle and laying the foundation;
- Selecting a wall laying scheme;
- Construction of the box, including load-bearing partitions and ceilings, see below;
- Construction of the roof crossbar (supporting structure);
- Roof decking;
- Technological break for box shrinkage;
- Exterior finishing (cladding);
- Installation of interior partitions;
- Installation of floors, including heat and sound insulation;
- Installation of windows and doors;
- Interior finishing, including flooring.
Note: when they say “A house made of foam blocks in 6 (10, 15) days!”, this is, excuse me, a scam. Two or three people can actually install a box made of aerated concrete in a week. But - on an established foundation, which takes a year. And then a technical break is needed for dry shrinkage of the masonry, from 1 month. for aerated concrete and up to a year for foam concrete. The latter, in addition, needs breaks of 2-3 days after every 3-4 rows of masonry, so that the mortar sets and the next blocks do not slip.
A few words about finishing and insulation
Do not forget that after erecting the walls, it is advisable to finish the outside as quickly as possible, since foam concrete strongly absorbs moisture. It can be covered with siding, brick or even regular plaster. If you do not finish the walls on time, the process of their destruction will begin in the first winter.
A new building made of aerated concrete shrinks for some time. Therefore, for exterior decoration it is still preferable to use siding, which is not afraid of any movement of the walls.
In addition, if you are going to use the house in the winter, insulate the walls. This will also increase the durability of your home. The only thing is that the insulation must be placed on the side of the facade.
It makes sense to insulate a room from the inside only if it is not possible to do work from the outside, for example, if you want to insulate a balcony in an apartment.
Why insulate walls? If this is not done, the dew point will be inside the aerated concrete. Accordingly, it will begin to become damp and collapse in winter.
Insulation of a house made of foam blocks
If we have not convinced you of the advisability of building a wall 2 blocks thick, such a house needs insulation, otherwise the cost of its maintenance will quickly do it for us. And the money spent on expensive finishing cannot be returned in full, even if you use easily removable materials for it.
Most tips for insulating and finishing such a house come down to facing it with brick and placing basalt wool blocks in the gap between it and blocks.
And some advisers recommend doing it from the inside. These recommendations are fundamentally incorrect. In the case of external insulation with cotton wool in winter, there will definitely come a period when the external brick of any thickness freezes completely. Further, the insulation will initially prevent low temperatures from penetrating deep into the wall. Then moisture will certainly condense on the inner surface of the brick, which, having penetrated its pores, will begin its destructive effect. In addition, it will be actively absorbed by hydrophilic cotton wool and, as a result, will turn it into a wet, sometimes matted and sagging, bridge of cold. Everything will just stop working.
Insulation from the inside will lead to much worse consequences even faster. In this case, condensation will occur on the wall behind the insulation, which will ultimately lead to the same loss of insulation effect, but will additionally expose your home to mold and mildew. We have had the opportunity to observe the results of such errors many times.
The best option would be to fill the space between the brick and the wall with polyurethane foam or gluing various thermal panels onto polyurethane glue or foam applied continuously. You can find a description of a simple device for feeding and applying foam in this article.
If there are no gaps or voids, physical loss of water will be impossible. The dew point will be located in the wall mass. Without insulation, there are many finishing options, just remember that the fasteners in the foam block do not hold well, so place it at an angle.
And from the inside - plaster, cover with plasterboard, but remember: on any cellular concrete, microcracks may appear over time, so choose finishing options that are guaranteed to hide this defect.
We recommend other articles on the topic