Advantages and disadvantages of a cinder block foundation
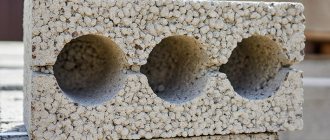
First, you need to decide what a cinder block is. This building material is produced by vibration pressing using components such as cement and filler (sand, slag, crushed stone or screenings, broken bricks, etc.). Due to its porous composition, cinder block conducts heat well and has low frost resistance. In addition, it weighs quite a lot. It is mainly used in the construction of low-rise buildings, as it is of little use as a structural building material. The disadvantages of cinder blocks also include low sound insulation, the content of toxic substances and not very high strength. Most of the shortcomings of this material can be eliminated using long-established technologies. For example, low heat resistance can be leveled by installing insulating panels, and high water absorption rates can be reduced by reliably waterproofing the walls and the base of the foundation.
The advantages of the material include low cost, low consumption of cement for masonry, simplicity and speed of construction work, and versatility of the material.
As a result, cinder blocks are often used in construction. Large dimensions and a cost in the range of 50 rubles per piece make it possible to fit construction work within budgetary limits, especially if you carry out the work yourself.
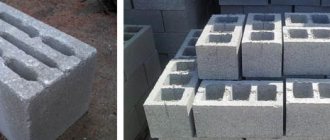
Cinder block can be hollow or solid. A hollow block is used to construct walls, since their heat and sound insulation rates are higher. A solid cinder block with crushed stone filler is more durable and can be used for laying a foundation.
Return to contents
Advantages of a cinder block foundation
- such a foundation can be erected independently without losing in terms of durability and strength;
- Construction time and quantity of concrete are significantly reduced;
- when using cinder block there is no need to erect formwork;
- cinder block does not shrink.
Return to contents
Disadvantages of a cinder block foundation
- It is not recommended to build houses weighing more than 100 tons on such a foundation.
- Due to its high density, cinder block is a fairly heavy material, so lifting equipment may be required.
- It is impossible to build such a foundation on heaving soils (clayey, loam, sandy loam, etc.) due to the possibility of its displacement in the horizontal plane.
- Due to its hygroscopic characteristics, the construction of a cinder block foundation is also not recommended on wet soil and in high-lying surface waters. In addition, the groundwater level must be below the freezing line.
Return to contents
How to cover the base around the perimeter of the house (concrete)
Often the foundation strip for the basement floor is made of concrete. The following distinctive features are characteristic of a concrete building element:
- quite high cost of material;
- the need to manufacture a special strong mold;
- installation of steel reinforcement;
- use of special equipment;
- long service life of hardened slabs;
- the need for waterproofing work;
- unsatisfactory resistance to moisture.
To finish a strip foundation, reinforced forms are created around its perimeter, where reinforcement is placed, and then a liquid composition is poured. It subsequently hardens, and a monolithic structure is obtained. The arrangement can also be carried out using slabs previously ordered to suit the size, however, in this case, special equipment will be required for installation.
The plinth can be closed in various ways
Expanded clay concrete
Better quality material for finishing strip foundations. Let's consider the main characteristics of this building element:
- improved strength of the hardened monolithic structure;
- quite high cost of material;
- as with concrete, steel reinforcement is required;
- a special frame is needed so that the composition takes on the intended shape;
- requires the use of special equipment;
- In addition to cement, the composition includes expanded clay;
- long service life of monolithic structures;
- the material is more resistant to moisture.
As with ordinary concrete, you need to make a reinforced frame around the entire perimeter, place reinforcement here, and then pour the mixture. In the end, all that remains is to wait for it to completely harden. Monolithic slabs can be custom-made to suit the appropriate dimensions, but installation will require special equipment.
Important. Although expanded clay concrete is resistant to constant exposure to moisture, it is recommended to carry out external waterproofing work to minimize the risk of water entering the room.
The construction of wall structures for the basement floor from FBS blocks allows you to solve several problems at once. Let's consider the main characteristic differences of this material:
- relatively large dimensions;
- specially created for arranging the foundation;
- the composition includes durable components that can withstand high loads;
- the blocks are characterized by resistance to moisture;
- products are easy to install;
- blocks can be processed to the required shape and size;
- relatively low cost of such products.
The foundation is quite often built from just these components, since due to its high density and strength, the material can easily withstand any load, which often allows even gross construction mistakes to be forgiven.
cinder block
Slag concrete for the base allows you to build a strong and moisture-resistant structure in a short period of time. Let's look at the main characteristics of a cinder block foundation:
- The products are inexpensive by modern standards.
- The building elements are relatively small in size.
- The material is easy to process and install.
- There is no need to do waterproofing work.
- Cinder block is distinguished by high strength.
- Building elements can easily withstand heavy loads.
- Quite a long service life of the products.
All these characteristics make cinder block an indispensable material for arranging the basement floor of a strip foundation, especially when it comes to budget construction, where it is not possible to use special equipment and auxiliary equipment.
Important. For a finished strip base, a controversial issue often arises about what to make the base out of. Here you can use various design components, but first of all you should evaluate your financial capabilities and the characteristic features of the components for construction.
Technology for constructing a cinder block foundation
When constructing such a foundation, the following stages are distinguished:
- For the strip base it is necessary to dig a trench. A pit needs to be built under the columnar foundation.
- A layer of sand and gravel is poured onto the bottom of the trench or pit, on which roofing material is spread, which serves as the basis for waterproofing the lower part of the foundation. In addition to roofing felt, you can use bitumen, bitumen mastic, waterproofing, and fiberglass.
- A ready-made reinforced concrete block (type BF or FL) is mounted on roofing felt, or a reinforced base with a 10x10 cm grid is poured with M300 concrete. This is done because wall blocks cannot bend and react to changes in the soil.
- Next, the 1st row of blocks (with a strip base) or the 1st layer of blocks (with a columnar base) is laid.
- Subsequent rows are laid staggered (from the corners to the center), connecting them with layers of fastening mortar 1 cm thick. These actions are repeated until the base reaches the grillage.
- The upper part of the strip base is strengthened with a reinforcing belt poured over the surface of the blocks of the last row. The top of a columnar foundation is made of reinforced concrete, wood or metal.
- At the end, the foundation walls are covered with a layer of mastic, onto which polystyrene foam panels or other heat-insulating material are glued.
- After this, the pit is filled in and work begins on the construction of the walls of the structure.
Important! The foundation walls must be insulated without fail (even if the structure being built will be located on dry ground). It is necessary to protect not only the vertical planes of the cinder blocks, but also to lay a horizontal layer between the underground and above-ground parts of the building. This helps prevent excessive wetting of the walls of the house with capillary moisture.
Return to contents
Work on the formation of a monolithic belt from slag
Slag compaction scheme: a) manual compaction; b) compaction using mechanics.
Filling the slag and compacting it is perhaps the most crucial moment in arranging this type of foundation. In order for the slag to harden into a solid base, it must be covered in layers. Each layer will need to be shed with a large amount of water to ensure compaction of the particles and their adhesion .
First, a 25 cm layer of slag is poured around the entire perimeter of the formwork. Next, this layer is thoroughly watered. After this, you need to wait about 1 hour so that the cement particles contained in the slag begin to set. Then the next 25 cm of slag is poured in, which is generously watered and compacted. The next layers are made 30 cm each, watered with water and compacted. It is better to make the above-ground part of the foundation from concrete to ensure reliable adhesion of the future structure to the foundation.
The upper concrete strip should be approximately 20-25 cm. For the second strip, it is necessary to make a separate reinforcing mesh, which is installed on top of the already filled slag foundation, and so that its lower ends extend approximately 15 cm into it. The reinforcing mesh must be installed immediately after the last layer of slag is poured with water.
Next, the foundation must be allowed to settle for at least 12 hours. Only after the specified time has passed, the top layer of concrete is poured. To compact concrete, you should use a vibrating plate. After about 3-5 days, you can begin finishing the foundation, since during this time the slag and top concrete will completely set, forming a monolithic base.
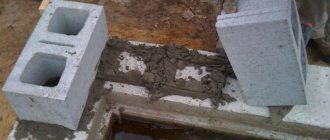
How to prepare a solution for cinder blocks
The cinder blocks are fastened with cement mortar. A prerequisite for constructing a base of blocks is to securely fasten them together using cement mortar. The mixture should be prepared immediately before erecting the walls.
To work with a material such as cinder block, the solution must be strong and plastic.
To obtain the desired consistency and plasticity, you should add red clay to it in the proportion of 1/3 of a bucket to 4 buckets of a mixture of cement and sand.
To prepare a soft and homogeneous mixture, the solution should be mixed, maintaining the correct ratio of components.
First you need to mix the dry ingredients, then gradually add water to the resulting mixture, while mixing everything thoroughly. Typically, cement and sand should be taken in a ratio of 1:4 (i.e., 1 part of cement goes to 4 parts of sand), but since cinder blocks do not like moisture, to increase the strength of the masonry, it is better to prepare a mixture in a ratio of 1:3. It is necessary to add water gradually, carefully controlling the consistency of the solution. The finished mixture must be consumed within 1-1.5 hours.
To prepare a cement-sand mortar, you should take M400 or M500 cement. Sand can be taken from both river and quarry. Quarry sand itself contains clay, so the solution is plastic and more convenient to work with. You can work with clean river sand, adding clay in the above proportion or any detergent (washing powder or dishwashing detergent at the rate of 400-450 g per 80-100 l).
You can also add store-bought plasticizer to the solution. A well-prepared mixture is the key to high-quality masonry, but a hard mortar makes the work much more difficult, and too greasy a mortar literally sticks to the spatula.
A country house begins with a foundation
First of all, we had to dig a trench for the foundation. The soil was clay, and the dimensions of the trench turned out to be small: 50 cm wide and 50 cm deep.
I decided to make a strip foundation from brick fragments up to 7 cm in size (note that the brick crushed stone must be clean, free of dust and small crumbs). The entire country house was built on clean water.
River sand was poured into an even layer at the bottom of the trench (layer thickness 15-20 mm). I laid halves of bricks on the sand with gaps of 3-5 mm, and poured prepared brick crushed stone on top in a layer 10 cm thick (Fig. 2).
In an oblong box I prepared a dry mixture of cement and sand in a ratio of 1:5 (by volume). Before preparing the solution, cement and sand were always thoroughly mixed dry until a homogeneous mixture was formed.
Since sand and cement in the solution quickly settle, the foundation was poured from a bucket. That is, first, dry solution (1/2 bucket) was poured into a bucket, and at the edge of the trench, stirring the mixture, water was added to the bucket to the top. Having prepared the solution, he immediately poured the entire bucket onto the crushed stone. In this case, the entire solution must pass through the crushed stone. If a mound of solution forms on top, it means the solution is thick. You need to pour the solution from the bucket not into one place, but along the perimeter of the entire foundation every 30-40 cm to ensure uniform pouring. After the first layer is completely filled, it would be good to place at least one thread of thick wire in the middle of the trench along the entire perimeter. I myself used thin heating pipes as fittings.
It would be nice to pour the entire foundation flush with the ground in one day. When filling the trench with mortar, I laid it in three layers. In the top layer, 5-10 cm from the surface, I provided another reinforcement. Do not forget, of course, to check the “horizontalness” of the foundation by level, spirit level, etc. On the outside of the house, I made an overlap with two whole bricks, thereby expanding the foundation by 10 cm. That is, now its width has become 60 cm, and the height of the foundation increases by 2 brick thicknesses. Now, on the inside of the foundation, we will strengthen the formwork board and fill the gap between the overlap bricks and the formwork with slag-sand-cement concrete. Concrete components (slag, sand, cement) are taken in a ratio of 6:1:1. I recommend dosing the solution components in buckets.
First, you should mix the cement and sand well, and then mix this mixture with the slag. Water is added to the concrete depending on the moisture content of the sand and slag, but keep in mind that the solution (don’t forget to do the latter!) should not be liquid and it could be compacted. After pouring concrete into the foundation formwork flush with the top brick of the overlap, we make an even screed of cement mortar 10-15 mm thick on top. When preparing a mortar for screed, take 4-5 parts of sand for 1 part of cement.
After 2-3 days, you can lay waterproofing on top of the screed, for example, from roofing felt (preferably with one continuous strip without breaks). If you have to join the ends, you need to do it overlapping so that the ends of the roofing material overlap each other by at least 50-60 cm. The best waterproofing is obtained from roofing felt or roofing felt laid on hot bitumen, that is, a layer of heated bitumen is applied to the concrete screed , and roofing felt is laid on the bitumen. It is safer, of course, to stick another layer onto the first layer of roofing material using the same bitumen. The sides of the roofing material must hang down from the sides of the foundation by at least 5 cm.
Base
So, the foundation is finished. Now the base part is next (Fig. 3). Like the above-ground part of the foundation, we make the outer side of the base with a brick lining, which can be folded from uneven halves, of course, laying them with the uneven parts inward, which will improve their bonding with the concrete. The height of the base is usually 60-75 cm.
Note that the higher the base, the better the underground will be ventilated.
Of course, before starting the construction of the basement, it is necessary to lay a cement screed 5-10 cm thick on the waterproofing of the foundation. Be sure to provide windows in the basement for ventilation of the underground. During concreting, mesh (wire or made from reinforcement) can be fixed in the windows. At the top of the plinth, as on the foundation, a cement screed is made, waterproofing is laid with skillful hands, and again a cement screed is carefully leveled with a trowel. The composition of cinder concrete for the base is the same as for the upper part of the foundation. Walls
First of all, for future walls it is necessary to construct formwork from wooden panels 40-45 cm high (Fig. 4). It is better to dig the stands that secure the shields into the ground. The distance between the posts, of course, depends on the thickness of the boards in the formwork panels and the width of the walls (don’t forget 5 cm for the gap). The main requirement for the formwork is that when tamping its boards do not bend, which will become clear during the first tamping together with the backfill.
The racks on top are knocked down with slats, but shields can also be fastened together.
The sides are fixed using wedges driven between the shields and racks into a gap, which is also necessary for more convenient removal and installation of the shields in another place. As a rule, the walls of houses are usually made of monolithic concrete, but due to a shortage of cement, the author decided to experiment and built walls of slag-cement concrete not solid, but with channels.
But in general, country houses made of slag-lime-cement concrete are better. Lime prevents the walls from becoming damp, and they will be warmer. If there is not enough lime, you can limit yourself to lime concrete from the waterproofing to the windows. In principle, slag-lime-cement concrete can be composed of components taken in a ratio of 10: 1: 1 (by volume).
Slaked lime should be filtered through a fine metal mesh to avoid lumps and diluted with water to better mix the concrete composition. It is more convenient to add water little by little using a watering can.
But let's return to the walls. The author concreted a country house using only two panels, so that a lot of material for formwork was not required, and it is easy to work with such panels. After installing the formwork (panels), the concrete is first spread in a continuous layer 10-12 cm thick over a cement screed and compacted. Then a piece of plywood or thick rigid sheet 35-40 cm high and 50 cm long is placed on this layer at a distance of 10-15 cm from the shield (Fig. 5). The gap between the board and the plywood is carefully filled with concrete. The layer should be of such a height that, once carefully compacted, it will not collapse if the plywood is removed. You can fill the free space between the plywood and the board with backfill, and then, carefully removing the plywood, repeat the operation at the opposite board, but do the backfill flush with the layer of already laid concrete. While working, make sure that the backfill does not get into the concrete.
In the walls, transverse partitions 10-15 cm wide are made every 30-50 cm. It is not necessary that the partitions coincide. The resulting square voids are filled with fine slag, preferably from non-coking coals, and expanded clay.
To create voids, it is convenient to use a special plywood box with slightly beveled walls to make it easier to remove the box from the wall after pouring the concrete (Fig. 6).
The corners of the house are monolithic - 50X50 cm. In the doorway the wall thickness is 25 cm, in the window - like the walls. To decorate windows with platbands, you will need additional formwork (Fig. 7), consisting of two vertical boards (a distance equal to the width of the brick is provided between the boards). With the help of this formwork, bricks were strengthened in the sidewalls of the platbands, which, protruding from the wall, form a kind of platband, giving the window an elegant look. So, on a brick window sill, in the space between the formwork boards, a spacer is placed with a height of 65 mm and a thickness equal to the thickness of the formwork board.
Two halves of bricks are installed on the spacer in the space between the boards (dry), then the spacer and the whole brick are placed on them again. Again, a spacer, half a brick, etc. are placed on it.
The bricks are inserted during the concreting process, with the mortar being laid pressing them against the board, which is nailed to the outer sides of the additional formwork boards.
The bottom of the window sill is made like the basement of the house.
Window and door openings are covered with monolithic lintels, for which formwork is made in the form of a box. At the bottom of the formwork, to prevent water from flowing out of it, plastic film, roofing felt, and glassine are laid. It is necessary to lay wire reinforcement in the lintels (5-6 pieces), the ends of the reinforcement should be bent and extend onto the walls by at least 25-30 cm. The height of the lintels is 12-15 cm. Concrete is prepared on sand.
The cornice is laid with brick lining, like a plinth.
Under the ceiling beams - matrices - a platform of slag-sand-cement concrete (6:1:1) with a thickness of 10-12 cm is laid (Fig. 8). A frame of logs is placed on the beams, into which the rafters are cut.
Slag concrete mixtures are deservedly popular not only in industrial, but also in private low-rise construction. This is due to the characteristics of this material. Slag added to concrete is obtained as a secondary material in the metallurgical industry.
For a long time, granular material was considered simply waste, but world practice has proven its feasibility for use in construction. Slag concrete is lighter than sand and gravel and is distinguished by its durability, resistance to temperature fluctuations, and sound insulation properties.
It is the metallurgical material mixed with cement that has the greatest strength. Lime, gypsum or even clay can also act as a binding agent. Two types of granulated slag are actively used:
- with small grains (0.5-1.5 mm) – the result is fairly heavy, high-strength concrete with good thermal conductivity;
- with large grains (20-30 mm) - concrete is lighter, provides good thermal insulation, but is slightly less durable.
It is not recommended to use varieties larger than 6 mm, since the durability of such concrete will be unsatisfactory. It is preferable to replace finer fractions with sand. for construction it must be as clean as possible, without admixtures of clay, soil, or organic elements.
Considering the properties of concrete with different fractions, to create external walls, large and small grains are often mixed in a ratio of 7:3, respectively. For internal partitions, you can take one more fine slag. If you want to get the most durable mixture after hardening, it is advisable to completely remove the 12 mm fraction and replace 20% of the finest slag with sand.
Construction of a slag foundation
Based on the above, it can be noted that:
- You should not build heavy buildings on a slag foundation;
- the structure of the hardened slag along the perimeter of the belt may be heterogeneous;
- the material must not be soaked before work begins;
- It is quite difficult to select high-quality waste from metallurgical production, relying on external signs;
- the finished structure is afraid of water, so it requires good waterproofing.
All these factors should be taken into account when constructing a slag foundation. But first of all, it is necessary to carry out preparatory work, which consists of clearing the area of foreign objects, removing the fertile layer and moving it to another place, marking it, and also digging a trench. For formwork you will need to stock up on solid boards and nails, and to remove communications - pipe scraps.
The depth of laying the foundation strip is taken depending on the soil freezing index. A trench is dug taking into account the construction of a crushed stone cushion 30 cm thick. To ensure better stability of the underground structure, it is laid with mandatory compaction of the bottom of the excavation and layer-by-layer compaction of crushed stone.
To reduce the risk of foundation destruction due to soil movements, deepening it by at least 1.2 m will help. The height of the trench, in this case, will be at least 1.5 m.
The formwork box is constructed based on the fact that the width of the slag foundation should be at least 60cm. In this case, the need to raise the shields above ground level by at least 25 cm should be taken into account. To strengthen the structure, internal and external struts are installed on the box, and pieces of pipes are mounted at the communication outlets.
An important point is the correct determination of the position of the metal casings in the wooden box relative to the sewer and water outlets. Failure to comply with this condition will subsequently lead to the need to punch through the foundation tape, which is not permissible for a slag monolith.
It is recommended to lay a knitted reinforcing mesh at the bottom of the foundation. It will allow the base to become a single whole and help distribute the load more evenly. For its manufacture, reinforcing bars with a variable cross-section are used, treated with an anti-corrosion compound to avoid the occurrence of metal rusting. A frame is not installed in the body of the slag foundation in order to improve the compaction of bulk material.
Forming the tape
The most critical stage in the construction of a foundation is the correct filling of slag into the trench and careful compaction of the laid layers.
- The first condition is that the thickness of the lower and middle layers should be 20-25 cm, and the upper ones can be increased by 5 cm.
- The second condition is to pour plenty of water or cement laitance onto each layer. The liquid is selected depending on the content of binder components in the slag.
- The third condition is conscientious compaction of all layers without exception.
- The fourth condition is the installation of an upper reinforced belt, which ensures a strong connection between the underground and above-ground parts of the structure.
Impregnation of the slag with water guarantees the best quality of compaction, which helps compact the porous structure of the material. As a result, a fairly strong adhesion of particles occurs. Some craftsmen suggest, in case of low cement content in the slag, pouring the binder directly into the trench, mixed with waste from metallurgical production. Others advise using cement laitance instead of water. Surely both methods have a right to exist.
After laying and compacting each layer, take a break of about an hour to allow the cement to set. Then they begin to fill the next layer.
Without waiting for the last layer of slag to set, a reinforcing mesh is laid on it with the lower rods buried in the backfilled foundation. After this, the structure is left for approximately 12-16 hours. At the last stage, an upper concrete belt with a thickness of at least 20-30 cm is made. To do this, the concrete mixture is poured into the formwork to the design mark with mandatory compaction.
Protection device
After the curing process of the underground structure is completed, waterproofing begins. It should be understood that the durability and reliability of the slag foundation will depend on the quality of protection. It has a porous structure and quickly becomes saturated with moisture, so insulation work must be approached responsibly.
To carefully remove the formwork and gain free access to the surface of the structure, it is necessary to clear the area around its perimeter. This is done when the slopes are too close to the foundation. If there is enough space, you can skip this preparatory stage.
- plaster – helps compensate for porosity of surfaces, seals microcracks and covers sinks;
- liquid rubber - creates an impenetrable, water-repellent layer, evenly distributed through spraying.
Without additional protection, plaster cannot guarantee complete waterproofness, as it is prone to cracking.
In addition to vertical protection, two horizontal layers of waterproofing should be provided. The first of them is carried out before filling the slag, and the second is laid between the upper concrete belt and the wall. For their construction, in both cases, roll materials are used, the reliability of which is ensured by bitumen mastic. It must be remembered that the junction of vertical and horizontal waterproofing must be airtight.
After erecting the foundation part, you should not immediately load it with the above-ground superstructure. The optimal “rest” period for the structure is at least six months.
What exactly is slag?
If after this question medical associations begin to flash in your head, then it’s not a problem: this term is also used in the medical field. But now we are talking about construction. And from the point of view of construction, slag is the solid residue that appears after the completion of the process of smelting metal from ore. Well, or after the coal is burned. There are other options, but in this case we will not dwell on them. If we talk about what building materials are made from slag, then these are usually tiles and bricks.
Also, you are probably familiar (well, or I’ll introduce you now) with such a building stone as cinder block. This is a small, let’s say, slab that is prepared using slag concrete mortar. The binding element in cinder blocks is cement.
So, a small educational program has been completed. Now that you have a general idea of the subject, you can move on to a more practical part. The point is this: sometimes, already in the process of building a house, developers turn a blind eye to the quality of the slag that is chosen for the walls. Like, there is cement, it will connect everything. This is where the mistake lies. Slag is not just a filler. It affects both the properties of lime and the properties of cement. Hence, as one well-known Duchess said, the moral: this is a high-flying bird (in the sense that the slag must be of high quality).
Now here's what. Cinder block walls and other cinder walls can behave differently over the years, meaning they can suffer varying degrees of complexity and severity of damage over time. Therefore, before repairing slag walls
, you need to carefully evaluate how worn the material is. Then it will be easy to choose repair options.
How to prepare cinder concrete
Before starting to prepare the mixture (about a few hours), it is necessary to moisten the slag with water to improve the durability of the future concrete. Next, you need to mix the components in one of the above proportions and mix well. After adding water, the solution should be kneaded until smooth. To obtain an average grade of concrete, you can use 4-5 parts of slag (fractional mixture), 2 parts of cement and 2 parts of sand.
It is advisable to use the finished mass within an hour, the maximum processing time is 1.5 hours. A cheaper solution can be made by mixing cement with lime in a 3:1 ratio. The walls of the house can be erected using the cast-in-place method (monolithic structure) or from prepared cinder blocks.
Piermer of strip foundation made of cinder blocks
A cinder block foundation is one of the popular and cheapest options for constructing a foundation, but is it worth using it when building a house?
Many people believe that this is a great option to save money, but they do not take into account the nuances of using this particular construction option. Before making a full decision, it is worth studying as fully as possible the features of cinder block as a building material.
Choosing a quality cinder block
Cinder block construction is an inexpensive and durable structure. For large volumes of construction, cinder block material is considered optimal in terms of price-quality ratio, practical and easy to install, which does not require experience in construction work.
The hollow cavities of the material well insulate the house from the penetration of cold, which will make the rooms warm and comfortable.
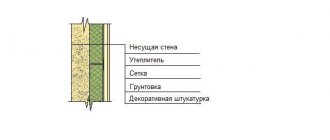
But there are also some disadvantages, in particular hydrophobia. Therefore, if a decision is made to build a house using this material, it is necessary to carefully plaster the walls, applying a layer of up to 20 mm on each side.
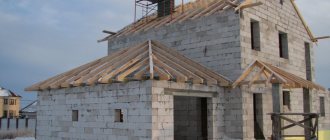
The cinder block foundation itself also requires special work - it is made higher and the base is equipped. Layers of waterproofing are placed between the base and the first row of walls.
The house is covered from precipitation, or better yet, the roof is installed immediately to avoid damage to the material. Given the ease of working with cinder blocks, the speed of building a house may well allow it to be done quite quickly.
When purchasing material, you need to know and assess its quality and safety. Poor-quality manufacturers use combustion waste, for example, resins, as a filler in production.
This material is not good enough, and then the choice falls on brick chips, expanded clay or sawdust. When purchasing blocks, the strength of blocks for construction can be checked by lifting it 1.5 m and releasing it.
If the material is broken, then it is not worth purchasing it, since even small cracks are unacceptable. Also an indicator of strength are cracks and chips on the surface, which are immediately noticeable upon visual inspection of the blocks.
Possible advantages and disadvantages of this choice
Cinder block is a porous material that is created by mixing aggregate and cement. Broken brick, slag, sand, and crushed stone are used as filler, so the cost of producing one block is minimal. In addition, the material is quite durable, so it can withstand enormous weight. When arranging the foundation, these 2 factors are taken into account, but many people forget about several more important nuances:
- Cinder blocks are very heavy - so much so that it is difficult for one person to transport them individually. It is because of this that additional costs may arise for the rental of special equipment.
- It is also worth noting that the block has a porous structure, which is why the material does not tolerate frost well and does not contribute in any way to insulating the structure. To overcome this drawback, it is necessary to use good waterproofing and insulation, and this is an additional cost.
- Under no circumstances should a cinder block foundation be erected on loose soil such as loam, since the building will shift under its own weight.
- It is not recommended to place buildings with foundations made of this material in areas with high humidity and groundwater close to the soil.
- Do not forget that slag is a toxic substance that is extremely harmful to human health.
As you can see, this material has many disadvantages. Are there advantages that can overcome them? In fact, there are several points that can slightly offset the costs:
- The blocks are large, so less material is required to assemble the structure. In addition, the cost of a cinder block is pennies, which allows you to allocate a good part of the budget to compensate for shortcomings.
- No special skills are required to lay rows of cinder blocks, so you can lay them yourself.
- If you properly protect the foundation for a cinder block, it will remain in use for a very long time—several decades.
- It takes less time to arrange the foundation; no formwork is needed.
- No shrinkage.
So there is a certain sense in making a foundation for a house from cinder block, but to compensate for all the shortcomings of this choice, you will have to spend a significant amount on additional materials.
What to make a base for a strip base from
A strip foundation for a basement or ground floor can be finished with various materials. The most common construction devices that allow you to quickly and efficiently equip this part of the building:
- Using concrete. This is a universal liquid composition that takes different forms and is also reliable and durable.
- Using expanded clay concrete. A more expensive and improved composition, which also hardens naturally, forming appropriate structures.
- FBS. Dense foundation blocks have improved characteristics and are easy to process.
- Using cinder blocks. A relatively inexpensive and durable material that allows you to quickly build a surface on a strip foundation.
Also, in some cases, bricks with special waterproofing impregnation can be used, however, due to its high cost, this building element is used quite rarely.
Important. Depending on which building element is chosen to cover the foundation, the technological process for arranging the structure must be followed. We should not forget about waterproofing.
In this video you will learn more about the block foundation:
Features of working with the material
First of all, you need to choose the right types of slag blocks for installing the foundation. There is hollow material - it is not needed, but instead you will need to purchase a cinder block with crushed stone filler. This variety is the most durable, and everything else can be adjusted with additional materials. The foundation for the house must be started during the dry season and try to complete the main work before the rainy season. The more moisture accumulates inside the blocks before winter, the worse it is for the entire structure. Taking into account the features of the masonry, the size of the block and other little details, even one person can complete the installation of the foundation for a solid house in less than a week. You should immediately take care of protection from moisture, otherwise there is a risk that all the work will be done in vain when it suddenly rains. Next, you will need to very quickly build a wall, make at least a rough roof so that the building is protected from moisture as much as possible and from all sides. It is worth examining in more detail some of the features of installation work and the sequence of their implementation.
What kind of slag can be used?
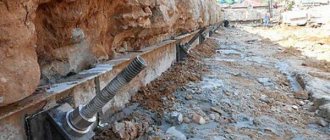
Scheme of operation of the drainage system.
Not every type of slag is suitable for building a foundation. To build a foundation, you can only use heavy waste slag, obtained as a waste product at metal foundries. As a rule, good slag has a crumbly or even dusty structure. The more dust in the slag, the stronger the foundation will be, since when such material is poured with water, it becomes possible to compact it well, thereby reducing the porosity of the final monolithic foundation block.
The slag produced from steel mills has a gray tint. This indicates the presence of cement particles in it. It is very important to find slag that has not been reprocessed. A material that has been recycled completely loses its hardening properties. The thing is that during the recycling of slag, cement is obtained, that is, the remaining waste after such processing will be almost completely devoid of the binding element, which means that the foundation simply will not harden and become a monolithic structure.
An ideal foundation slag must contain at least 30% cement particles in order for the hardening process to be successful.
In addition, it is important to remember that the slag should have the smallest fraction possible, so it must be sieved before backfilling.
Scheme of a trench for the foundation.
Separately, it is worth mentioning that to build a foundation you need to take fresh slag, which was obtained quite recently. Popularly, such slag is called hot, since it is actually warm and even smokes. Only fresh dump slag can harden and acquire load-bearing capacity. The slag produced during the operation of thermal power plants and other similar enterprises must absolutely not be used for the construction of foundations. As a rule, only a foundation made from dump slag is strong enough to support the weight of the building, so any other material option will not work. A distinctive feature of fresh dump slag is its friability.
Making a cinder block foundation
To make a foundation for a house from cinder block or any other material, you will need to follow a clear sequence of work.
- Of course, it all starts with digging trenches and laying a sand and gravel bed.
- One layer of roofing felt is laid on top of the sand and gravel cushion. In addition to roofing felt, other options such as waterproofing fiberglass and bitumen are also suitable.
- A reinforced concrete block (reinforced concrete block) is mounted on roofing felt. 1 row or layer of cinder blocks is laid on top.
- Next, you need to lay the blocks from the corners to the center, connecting them with cement mortar. The step between elements should be no more than 1 cm.
- A reinforcing belt is made on top of the last row. The top of the column should be made of wood, metal or reinforced concrete.
- When the main part of the foundation is completed, it needs to be protected with a layer of waterproofing, or mastic can be used. A layer of insulation is mounted on top of the waterproofing material. It is recommended to install moisture protection on all possible sides so that moisture does not penetrate to the cinder blocks in any possible way.
- Now the trenches can be safely filled in and the construction of walls can begin.
The foundation for a cinder block house is ready. This design can support a two- and three-story house without much damage.
Stages of work execution
You should start by choosing the right types of cinder blocks for the foundation. Hollow material will not suit us, but blocks filled with crushed stone will come in handy. This variety is characterized by maximum strength; everything else is adjusted using additional materials.
Taking into account the peculiarities of masonry work, the parameters of the blocks and other little things, one person can handle the construction of a cinder block foundation for a decent house with his own hands within a week. You just have to solve the issue of protecting the foundation from moisture, quickly erect walls and make a roof.
We suggest you familiarize yourself with How to lay a cinder block correctly: video, recommendations
To equip the foundation for a house, you will need to follow a strict sequence of actions:
- first, a trench is dug and a bed of sand and gravel is laid;
- it is covered with roofing felt material in one layer. Instead, it is allowed to use bitumen or fiberglass.
When building a foundation from cinder blocks for a house with your own hands, you should understand that it must form a solid and durable structure, in which each element is connected with sand-cement mortar with a seam thickness of no more than one centimeter.
To prepare the mortar mass, use cement material M400, clean sand, and add clay or plasticizer components.
In most cases, the proportional relationship looks like this:
- cement - one share;
- sand - four shares;
- a third of the share of clay for every four is a sand-cement mixture.
The dry ingredients taken in the required quantities are mixed, then water is added. At the same time, mix the solution thoroughly to achieve the desired consistency and obtain a plastic mass.
Masonry work
Reinforced concrete blocks are installed on the roofing felt strip. On top of them, the first row of cinder block material begins to be laid out. Subsequent rows are laid out from the corners to the center; a solution is used to connect them. Reinforcement is performed on top of the last row.
As soon as the main part of the cinder block strip foundation is completed, mastic is used, on top of which the insulating material is mounted. Water protection should be provided on each side to prevent its penetration into the blocks.
The trench is filled in and construction of the walls begins.
This is how the foundation for a wooden house is made. The design will fully support an object with two or even three floors. For a barn, greenhouse and other outbuildings, you can build simpler foundations - columnar foundations made of cinder blocks.
How to arrange a cinder block plinth for a concrete foundation?
If you want to mount a cinder block plinth with your own hands, you will need to purchase a lot of additional materials. Here is the main list:
- crushed stone, sand, gravel, cement;
- fittings, you can take thicker rods;
- plasticizer for the mixture;
- cinder blocks;
- vapor barrier film;
- waterproofing;
- insulation, you can use mineral wool.
This set is necessary to ensure maximum structural strength to prevent cracks from occurring over time. In addition, the foundation itself for the house must protrude at least 0.7 m above the ground. This measure is necessary to prevent the cinder blocks from absorbing moisture in the base. The procedure for arranging a plinth made of cinder blocks with your own hands looks like this:
- The first step is to dig trenches, then fill them with sand and gravel in layers of 25 cm each.
- Next, we make the formwork, install the reinforcing mesh and fill everything with concrete. The recommended mixture composition is Portland cement, fine-grained sand and fine crushed stone in a ratio of 1:3:3.
- Laying the cinder block plinth begins 1 week after pouring the concrete mass. The height of the structure is 3 blocks. Before laying the plinth, it is necessary to lay a hydro- and vapor barrier to separate the foundation from the cinder block. To lay the plinth, a mixture of plasticizer and cement is used.
Basic rules for building a basement
The cinder block plinth above the foundation should be the same width as the base. This applies if there is a strip foundation. In the case of a columnar foundation, the basement cannot be thick.
On gravel, sandy or rocky soils, such removal is done above the ground, and if the soil has a clayey composition, it is laid 25-35 cm deep, having previously arranged a cushion of 30 cm. All surfaces of the base are leveled.
During construction, it is also important to take into account the presence of void space between the soil, walls and floors of the basement. This ensures free circulation of air in the underground room - vents measuring about 15 sq. cm are left at a height of 20 cm on each side.
Preparation of mortar for cinder block structures
In order for the foundation cinder block to form a solid, reliable structure, the elements must be connected with plastic cement mortar. Because of this same feature, the step between adjacent elements should be approximately 1 cm.
The base is cement and sand, and the plastic substance can be red clay or a plasticizer. M400 grade cement is used, and sand can be taken from the river. The differences between the two thickener options are minor, so if there is no plasticizer, you can use clay, and vice versa. The proportions for the solution do not change.
To prepare the mixture, it is recommended to mix the dry ingredients, and only then start adding water. You cannot add water to an already diluted solution, otherwise the mixture will turn out to be very liquid. When adding water, you need to stir the mixture thoroughly to get the required consistency. The solution should not be very viscous or liquid: a certain balance must be maintained in order to obtain a plastic mass.
After preparation, the solution should be used within 1-1.5 hours.
Cinder block production method
A typical slag block is made by casting a special solution into a standardized mold, followed by vibrocompression of the semi-finished product. The solution used is a mixture consisting of the dry part (sand, cement, waste slag or broken bricks) and water.
Moreover, by making a foundation from dump slag, or rather a block for a foundation, the consumer of such products solves two problems at once: it helps to recycle secondary raw materials (essentially non-toxic waste from some kind of production) and reduces the cost of building materials. In the end, both people and nature benefit.
Assortment and standard sizes of cinder block
The range of slag foundation blocks consists of monolithic and hollow products. Moreover, blocks with internal voids are manufactured in the form of cast “shells” with a void content of 28 to 40 percent. Well, the shape of the hollow cells divides the assortment of such blocks into five varieties.
Monolithic products are used only for the construction of the foundation, while hollow structures can be used to build both load-bearing and interior walls. The reason for this selectivity is the insufficient heat resistance of monolithic blocks. And an empty product filled with foam concrete or loose insulation retains heat no worse than a regular foam block.
Moreover, the foundation for a wall-type cinder block can be constructed from the same material - a monolithic block of slag. After all, the total weight of a structure built from a hollow block will be significantly less than the weight of a brick or monolithic house.
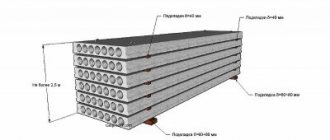
The dimensions of the foundation block (length, width, height) are standard - 390 by 190 by 188 millimeters.
Advantages and disadvantages of cinder block
The list of advantages of slag blocks should include the following properties:
- Cheap - almost half of this building material consists of waste.
- Strength - a block base can support a structure weighing up to 100 tons.
- Frost resistance - a hollow block holds the body no worse than a foam concrete product.
In addition, due to the relatively small mass and fairly large dimensions of the cinder block, the construction of a foundation or walls from a similar material is faster than similar work based on laying bricks or installing reinforced concrete products.
The disadvantages of cinder block include the following characteristics:
- Insufficient hydrophobicity. Such a block absorbs moisture from the soil and atmosphere. And this property does not have the best effect on the durability of the product.
- High thermal conductivity of monolithic products. An entire block, without voids, cannot prevent unwanted heat exchange between the heated room and the street.
- Insufficient strength in the transverse direction. A foundation wall made of such blocks cannot support the lateral load. Therefore, such foundations are not installed in seismic zones or places where there is a risk of movement of soil layers.
However, some of the disadvantages of cinder block can be eliminated by using long-established technologies for these purposes. For example, low heat resistance is leveled out by installing insulating panels. And the tendency to absorb moisture is eliminated with the help of reliable waterproofing of the walls and the base of the foundation.
Is it possible to use slag when pouring a foundation?
I saw that they poured the foundation and used only slag, cement, sand and broken bricks for backfilling, is it possible to do this or not and why.
- 6 Replies
- 6 Similar questions
Of course, $1000 is not bad money, and I would like to save it. But not while building the foundation! You are going to build a house, if not for centuries, then at least for 2-3 generations, and the slag when pouring the foundation may not meet your expectations. So, having saved the proverbial thousand at the beginning of construction, you can lose more when problems begin in the form of warped walls, cracks in the walls, or even worse.
In no case do I recommend using slag when pouring the foundation, either for a one-story house or for a house with several floors. Such a foundation can be used, as a last resort, for a barn or other utility room. Yes, in the past, foundations were sometimes built this way, but, firstly, the range of building materials was extremely low, and secondly, houses were built much more modestly than modern cottages.
the building was approximately 6*5, one-story, brick and had been standing for about six years and so far everything seemed to be fine, I needed to build a new coal fire, so I thought maybe I could also fill it with slag, especially since there is slag and the coal fire is not big.
Although the savings are small, for the same 10x10 house it reaches about 1000 USD. Since when did 1000 Washingtons become not money? About the cinder blocks. To avoid costs, you should follow the rule: the depth is about 1 m, plus there should be a reinforcement tie on top. Also, hot slag should be used. And then, a reliable foundation for a small building is provided!
Slag is no longer as profitable to use as it used to be. 2-3 years ago it cost twice, or even three times less. That's when many houses were built using slag concrete. Now the difference in price is not so great compared to other, more reliable building materials. In addition, the quality of the resulting slag foundation is greatly influenced by the soil, as well as the location of groundwater. And if you suddenly decide, then the maximum is to use slag for 1.5-2 storey small houses (6x8 or 10x10). In this case, the slag should be compacted in layers with cement added between the layers. You can't break such a foundation.
It depends on what building. The use of slag is a common occurrence in modern construction. In most cases - due to saving money. Where you saw such a foundation being poured, what kind of construction was planned in the future? If it's a one-story house, then it's fine. But still, a concrete strip is necessary.
Hello. I'm going to start building a new house, since the one I live in is located
I decided to start building a house. I will build a house from thermoblocks, and I’m also thinking of doing
Hello. I will be very glad if you can tell a provincial resident the technology for mixing concrete
Good afternoon, I have a question for foundation specialists. More precisely, I am forced to ask for help in
The choice of foundation is always hotly discussed in all families where the construction of a house begins and our
I bought myself a summer cottage with a house, and now I’m doing some minor renovations. Well, that is, I bring