Cladding the foundation of a house: which material is better?
In general, foundation finishing options can be divided into “wet” and “dry”. “Wet” foundation finishing includes:
- stone – natural, artificial.
The first two materials are applied in liquid form, the rest are placed on mortar or glue. The most reliable is considered to be facing the foundation with stone or tiles. Aesthetically, impressive finishes include stone, tiles and decorative plaster. These three varieties provide the base with high-quality protection from mechanical damage, melt and groundwater. Disadvantage: complicated installation.
The price of all materials, except simple plaster, is quite high. The downside of simple plaster is that it will crumble and the coating will have to be renewed regularly.
“Dry” finishing of the foundation of the house:
These materials are installed using a frame method and secured mechanically. Their advantage is the ability to make a ventilated base: an air gap remains between the insulation and the coating, through which condensation is removed from the wall. But in terms of reliability, dry finishing is inferior to wet: the panels do not fit tightly to the wall, and the cladding is easily damaged mechanically.
From an aesthetic point of view, siding is a winning material: there are many colors and textures, including natural stone and marble. But based on considerations of reliability and durability, the correct answer to the question of how to decorate the foundation of a house outside is natural stone or tiles.
Plastic panels
Covering the foundation with siding
Recently, decorative finishing of the base with various panels has taken precedence in finishing materials. The range of applications, appearance and design is quite wide. Walls, columns, and pediments can be decorated with them without any problems.
Let's try to figure it out in more detail. Covering the foundation with plastic panels is the fastest of all ways to cover the basement of a house. Finishing the foundation with them does not require any special skills other than marking and installing the frame, but there are options that can be glued directly to the wall.
- PVC panels are two-layer strips, parts made of polyvinyl chloride with different widths and lengths. Standard: 950*615 mm. With the thickness of relief convexities up to 8 cm.
- Siding panels. The standard size can vary: for siding from 2000 to 4000, with a width of 180-228-300 mm. Finish size 205 mm. There are corners in the system, external and internal. Transition and starting bar. The kit is calculated individually for each individual installation. The foundation is faced taking into account the strengthening of the supporting structure.
Cladding panels for the lower part of the foundation are mounted differently from stone or tile. They are placed on screws, screwed to vertical profiles made of galvanized steel. The profile pitch is chosen according to the material, the span length of the base, but not less than 600 mm, between the profile. In this case, the screws do not press down by 1-2 mm, the siding should move along the grooves by 5-7 mm.
Tip: If the ambient temperature is below 0 °C, then you cannot work with siding or panels, they become fragile. PVC panels should not be confused with plastic for interior use. It is not used for finishing the outside of a building due to the lack of technological holes and due to its poor resistance to ultraviolet radiation and frost.
How to cover the foundation of a house
How to cover the foundation of a house depends not only on price, performance and aesthetics, but also on the complexity of installation. In some cases, cladding can be easily done with your own hands, in others it is better to hire professionals. Let us briefly consider the installation of foundation cladding for several coatings.
Plaster
1. Clean, degrease and prime the surface.
2. Secure the plaster mesh with dowels with wide heads at the rate of 16-20 points per square.
3. Install metal profile beacons on the mortar with a pitch of no more than 5 meters. The distance to the corners is 30 cm.
4. After hardening, pour the solution between the beacons and level it using the rule.
5. Leave for 6 hours, remove the beacons, and rub the wall with a plaster float.
6. After hardening (at least two weeks), putty and paint the surface or cover it with decorative plaster.
When using insulation, the procedure is different:
1. Prepare the surface, prime it.
2. Lay polystyrene foam boards on façade adhesive for EPS.
3. Using the same glue, glue the reinforcing fiberglass mesh to the surface of the slabs.
Tile
1. Clean and prime the surface.
2. Carefully remove with plaster: if the wall is uneven, the tiles are likely to peel off.
3. Dry. Glue alkali-resistant fiberglass mesh to the plaster.
4. Install a support profile along the lower edge of the future masonry.
5. Lay the tiles with tile adhesive for facade work (“Ceresit” or similar). Laying can be done with continuous vertical seams, with staggered seams in adjacent rows, diagonally.
6. Dry. Treat the seams with grout to match the tiles or in a contrasting color, and grout them with a rubber cord.
Siding
1. Clean the surface from dirt and repair cracks. It is not necessary to remove it carefully.
2. Strengthen the metal profiles of the frame on the wall vertically and level (it is not recommended to use wooden beams for sheathing on the plinth, it will rot). Secure with dowels.
3. Place polystyrene foam boards between the profiles on the glue. The protruding flanges of the profiles must be wider than the slabs.
4. Install a windproof membrane over the structure.
5. Install horizontally at the level of the siding panel. The panels are connected to each other with a locking fastening; they are fixed to the frame with metal screws.
6. Corners are treated with corner strips. A few millimeters are left between the panel cut and the corner of the shaped element for thermal expansion.
Corrugated sheet
For the basement part of the wall, choose sheets of at least C13 (corrugation height 13 mm, steel thickness 0.7), galvanized and polymer-coated. The sheets should be cut using metal scissors. It is not advisable to use a grinder because... in this case, the polymer layer will suffer. The waves are placed vertically.
1. Clean the base, treat with bitumen mastic or roll waterproofing.
2. Install a guide profile at the bottom of the plinth.
3. Install a frame made of metal profiles. The planks are secured with dowels to hangers.
For insulation, PPS slabs can be laid between the posts.
5. The sheets are attached to the sheathing with metal screws with rubber or EPDM gaskets. Installation starts from the corner.
6. The gaps at the joints are closed with additional parts. The corners are decorated with corners from the corrugated sheeting kit, and the vents around the perimeter are sheathed with finishing strips.
Regardless of the cladding material, a flashing is installed on the protruding plinth after installation of the covering is completed.
Siding for the foundation
Such material as siding, made on the basis of polyvinyl chloride, has fairly good characteristics. Recently it has become increasingly popular. Siding is distinguished by its practicality, variety of assortment and long service life. In addition, it has universal properties and is suitable for finishing any surface.
Siding is available in a wide color palette, has many shapes and patterns, so even the most demanding consumer will find a material to suit their taste. In addition, the ease of installation of the material will not cause difficulties and the homeowner can design the base on his own. In general, the cladding technology comes down to the fact that siding sheets are attached to the surface of a wooden sheathing using galvanized nails. In this case, the panels should not be pressed tightly against each other. A detailed description of the siding cladding technique can be seen by following the link: https://stroiremdoma.ru/otdelka-fundamenta-cokolnym-sajjdingom-svoimi-rukami/
How to decorate the basement of a house: from exclusive to budget options with step-by-step instructions
The foundation usually protrudes above the ground. This part must be decorated not only for aesthetic, but also for practical purposes. In this material from Homius.ru we will talk about how to decorate the basement of a house. We will look at the six most popular options with detailed installation instructions.
Finishing the foundation is an important part of the design of the façade of a building.
Rules for fastening siding
Installation of basement siding
The fastening technique itself consists of several stages:
- First, a frame of slats is applied to the base from the outside. The verticality of the installed sheathing is checked with a level. The first thing is to install the corner elements. Then they move on to facing the entire base. Laying the panels begins from the corner.
Siding panels are installed along the foundation of the house, with all panels installed from left to right.
Special membranes are used under the panels, which are sold together with the panels. It is easy to calculate how many panels you will need. It is enough to divide the width of the wall by the length of one panel.
You can also finish it with plastic panels. Of course, the panels are of worse quality than natural materials, but there is less fuss with them. And they are much cheaper than other finishing materials.
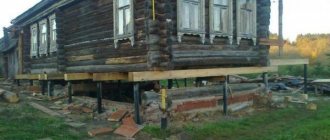
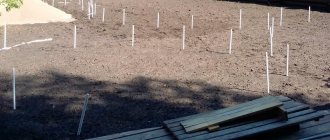
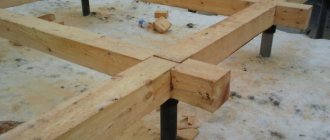
Even screw-pile and column-type foundations that rise above the ground need to be sheathed.
It is not only possible to process the plinths of such foundations, but even necessary. The cladding of such a house protects the floors from cold and dampness, hiding the emptiness underneath. And a house with a basement looks more attractive, it doesn’t resemble a hut on chicken legs.
- Date: 06/16/2015 Rating: 15
To protect the external walls of the house as much as possible and make them attractive, it is necessary to use special finishing materials.
They are applied not only to the facade of the building, but also to the base. This allows you to get an attractive, reliable surface, protected from moisture and temperature changes. Finishing the foundation of a wooden house differs in that it is necessary to protect the wooden structures of the walls as much as possible from excess moisture.
Finishing the foundation protects a wooden house from excess moisture.
Why do you need to finish the base?
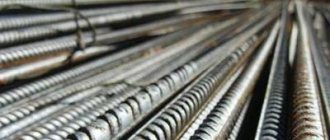
A strip foundation is a concrete mixture with metal or fiberglass reinforcement and a filler of crushed stone and gravel. Firstly, such a surface looks unattractive, even if its edges are perfectly smooth. And they are rarely even, depending on what formwork was used when pouring. Usually there are traces from shields and boards.
Concrete is subject to the influence of external factors, and the plinth is subject to a special load, because here both water comes and snowdrifts lie
Basics of self-finishing the basement of a private house
Before we talk about how to cover the base of a house from the outside, let's focus on the basics. First, installation of the cladding can be dry or wet. In the first case, the material is attached to the frame or directly to the concrete surface using fasteners. The second option requires the installation of lathing and the use of building mixtures.
The second important point is that you need to take into account the climate of your region.
The finishing material must withstand temperatures that are critical for your areas, and at the same time not collapse or deform.
It is important that the plinth sheathing does not absorb water and does not allow it to pass to the surface of the foundation. Another nuance is that the cladding should not lose its qualities under the influence of reagents used in winter.
Advice! Taking into account the operating conditions of the facing material, its choice must be approached with full responsibility, trusting trusted manufacturers who guarantee the quality and durability of the product.
Using basement siding
Decorative panels for the foundation can be made of polypropylene. It has a stronger base and is more resistant to environmental influences. The reason for these properties are the special stabilizers contained in the material. In addition, such panels are thicker.
The products have an affordable price, which is slightly higher than the cost of vinyl material. The service life of such cladding can reach several decades. It does not lose its performance characteristics and attractive appearance.
With the help of basement siding you can imitate almost any covering. This allows you to use it to realize the most daring artistic ideas.
No special skills are required to install the basement covering. This finishing can be done using minimal labor in a short time.
Features of the selection and use of natural stone for cladding the base
Natural stone is considered the most respectable and expensive finishing material. Construction professionals recommend not using loose rocks, such as shell rock and limestone, to decorate the base. They will soon lose their presentable appearance.
Dense frost-resistant material, preferably dark in color, is suitable for this purpose.
On a dark background, splashes and smudges from water and dirt will not be so noticeable
Igneous gabbro and granite are best suited in this regard.
Important! When finishing with natural stone, an important condition is reliable sealing of joints and seams. If defects are allowed, moisture will seep through the cladding and destroy the base.
Features of choosing natural stone for exterior decoration
Natural stone must match the design of the facade in color and texture. But besides this, there are other requirements. If the stones themselves are very heavy, they need additional fasteners for strong fixation. It is also important to know that silicate rocks (quartzite and sandstone) are incompatible with carbonate rocks (marble, limestone). Their chemical components react with each other. The result is gradual mutual destruction.
Any natural stone expands and contracts under the influence of temperature fluctuations. If you don't make a gap in the masonry, it will collapse. Moreover, the size of the gaps should be correlated with the type of stone
Master class on plinth cladding with natural stone
Now let's see how the whole process looks in practice.
| Illustration | Description of action |
| A metal mesh must be secured to the surface of the base. It will firmly fix the solution. | |
| Pre-lay out the torn stones for the plinth on the ground in the order in which you will place them on the vertical surface. Natural stone does not have two identical parts, so you need to assemble the cladding like putting together a puzzle. | |
| The parts that will be on the bottom and top need to be cut so that there is a straight line. Use a grinder with a special stone-cutting wheel for this. | |
| To cover the base with natural stone, prepare a solution of sand and cement. The consistency should be quite dense. It is better to wet the stones a little before installation. | |
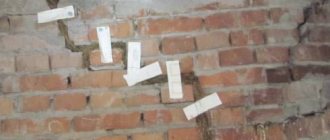
| To form gaps between stones, insert wooden or stone choppers. Start laying from bottom to top. | |
| After the stones are firmly fixed to the base, remove the chokes and fill the gaps with mortar. |
Natural and artificial stone
Stone cladding option
Stone is the most elegant material for finishing the basement of a house. With its help, an imitation of masonry made of brick, hewn or smooth stone is created.
In terms of originality and monumentality, the stone cladding of the plinth has no equal. The variety of concepts and textures allows you to create a unique coating for any, even the most demanding taste.
Advantages
- Design. A variety of color and texture solutions makes it possible to bring even the most daring ideas to life. The cladding can have a harmonious geometric pattern or create a chaotic composition, depending on the type of stone and the imagination of the master. With the help of stone, the base can be decorated in either brightly colorful or strictly monochromatic colors;
- Strength. Both natural and artificial stone, due to their origin, have a fairly high strength potential. They are inert to aggressive environments, ultraviolet radiation and other negative factors. Stone cladding can last for a very long time, remaining in its original form.
Note! The strength of this material is largely determined by the type of stone - depending on its origin, it can be either extremely high or relatively fragile.
Types of facing stone
Flaws
- Price. Natural stone is one of the most expensive finishing materials. Despite the relatively small area of the plinth, its design will cost you a fairly large sum. An artificial stone substitute somewhat mitigates this drawback, but even in this case, the cost of this material will be quite high;
- Cold. Facing stone can hardly be called an insulating material, since the degree of its thermal conductivity is quite high, especially for products of natural origin. Accordingly, it is not advisable to use it to improve the thermal insulation characteristics of the base.
If you prefer luxury and good quality, stone cladding will be the most optimal solution for you. The originality and uniqueness of this material more than covers the high cost of the material.
However, if your plans do not include large expenses or the base needs additional insulation, this option is clearly not for you.
The nuances of facing the base with artificial stone
Artificial stone will cost you much less than natural stone. This feature attracts many developers. In addition, the artificial material has regular geometric shapes, and this greatly simplifies the laying. All you need to do is trim the tiles a little in the corners using a grinder.
Artificial material is attractive in its variety of shades, shapes and textures:
This stone has less weight compared to natural stone, so less mortar is required. Modern artificial materials are not inferior to natural ones in moisture resistance and durability. Their only drawback is their slightly unnatural appearance. But now you can find collections that can only be distinguished upon closer inspection.
How to choose an artificial stone for a plinth
Don't try to buy the cheapest material. As a rule, its quality leaves much to be desired. It is best to use stones cast in silicone molds; they most accurately imitate the natural texture. Before paying for the shipment, study the color of the stones: the paint should not bleed into other shades. The stones should not have holes or cracks or inclusions of foreign particles.
The inside of the stones should have grooves for adhesion to the mortar, and the edges should have clear contours for quality joints on the wall.
The finishing of the base with artificial stone in wooden houses looks especially good
Advice! Take cladding collections that contain corner stones. This will greatly simplify installation.
Video instructions for finishing the plinth with artificial stone
The technology for decorating a facade with artificial stone is not much different from working with natural stone. But there are some nuances, and you can learn about them in this video - how to finish the basement of a house with your own hands:
Application of PVC products
PVC products are called vinyl. They are manufactured in the form of two-layer parts. Polyvinyl chloride is used in their production. As a result of the two-layer coating, high strength and reliability are ensured.
With the help of one of the layers, the physical properties of the finish are preserved, and with the help of the other, the cladding is protected from the influence of adverse influences. Such coatings have universal characteristics.
You can learn more about PVC products for cladding the base by watching the video:
Installation can be carried out in any part of the structure. Vinyl does not rot and is not affected by mold. Temperature changes are not scary for him. The material cannot be damaged by microorganisms and parasites.
This coating provides good protection against dampness. It does not require constant care. If necessary, the material can be cleaned with ordinary water.
Why is it necessary to finish the basement of a house?
To protect the base from the negative influence of natural phenomena and various mechanical damage, it is necessary to pay attention to its finishing. Without finishing, it will not perform its main protective function. Since the base is integral with the facade of the building, it performs not only a protective, but also a decorative function.
Thanks to modern finishing materials and construction technologies, it is possible to ensure that the base of the house will be protected and will not require major repairs for a long time.
What type of plinth finish should I choose?
All finishing materials for plinth cladding have their advantages and disadvantages. When choosing a facing material, remember that when interacting with precipitation, it must retain its durable and aesthetic qualities.
Do not forget that the texture of the basement of the building must be combined with the walls and the entire structure as a whole. The choice depends, first of all, on the design features of the building, personal preferences and financial capabilities.
Since there is a large selection of materials available, this allows you to create exactly the home decor that suits the personal preferences and intentions of the designer.
Base finishing technology
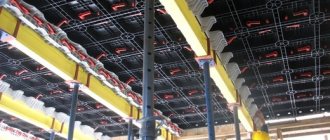
The technology for finishing the base will depend on the chosen finishing material. As a rule, the finishing technology takes place in three stages: installation of the frame, laying of insulation, fastening of the finishing material.
Of course, one of the simplest finishing options is plastering. It is required to apply a layer of durable plaster to the surface of the base. You can do this work yourself.
It is easier to cladding with artificial stone, since the material is light in weight and additional reinforcement of the base of the building is not required. Therefore, the cladding process is significantly simplified, and the time required to prepare and complete the work is reduced.
Properly performed plinth cladding using good materials will ensure the desired microclimate inside the house and extend the life of the building.
Finishing order
Each type of facing material has its own installation nuances. Initially, we will talk about the preparatory work for decorative finishing of the foundation of a house, which is almost no different.
They are necessary to further protect and insulate the base of the building.
Hydro and thermal insulation
Waterproofing is a necessary process to protect the foundation from moisture. In order to extend the service life of the foundation and protect it from leakage, the surface of the base is treated with special waterproofing agents. But before starting this work, it is still necessary to level the surface of the base.
Before leveling the surface, you need to clean it from dirt; a brush with metal teeth will help you with this. The most popular way to align the base with beacons. It is necessary to install guides and carry out this work along them. The best material for leveling is cement mortar. It is applied in several stages using a trowel. After each applied layer, the surface must be allowed to dry for 1-2 days. And then you can move on to waterproofing.
Two types of waterproofing are used to finish the foundation:
- liquid bitumen - applied with a roller to the surface of the base. This protective agent is quite difficult to work with, since the liquid must be constantly heated and it dries quickly;
- technocol - easy to install. Presented in the form of sheets that are glued using a gas torch. But this one is less reliable than the previous one.
Use a protective mask when performing waterproofing work. These products emit fumes that are harmful to human health.
The insulation for finishing the foundation can be either polystyrene foam or penoplex, which is presented in the form of foam. Installation of insulation is quite simple. The plates are fastened with special dowel nails. The insulation should be installed from the corners of the base and vertically. It is necessary that they fit tightly to each other.
Preparation
The next stage of facing the foundation after installing the insulation is the final leveling. Before finishing, the surface is leveled using mortar and mesh. The mesh is attached to the slabs with glue (mortar) overlapping at joints of 10-12 cm. And then the mortar is applied in two layers. Often, so-called acro glue is used to final level the surface. The solution should be prepared carefully according to the instructions. And it is applied using a regular spatula.
A fiberglass-based reinforcing mesh is used to cover the foundation. A regular mesh, which is intended for interior work, is not suitable. After the solution has completely dried, it is necessary to treat the surface with a primer. It must be applied using a fleecy roller. The primer solution should also be purchased specifically for facade work.
Facing
Decorative finishing of the foundation with siding and plastic panels is carried out using guide profiles that are attached to the wall with self-tapping screws. Metal guides are best suited for cladding the foundation; they do not require special processing, unlike wooden ones. If you install the panels horizontally, then attach the profiles vertically and vice versa. Mostly siding and plastic panels have a puzzle fastening system. The first panel is secured to the profile using bolts or rivets, and all subsequent panels are snapped onto the previous one.
Stone and slabs are glued using a special solution. For each type of material, one or another glue is suitable. Laying the foundation should begin from the bottom up, this also applies to panels. By following all the above recommendations, you can easily finish the foundation with your own hands. As you can see, this process cannot be rushed. To ensure that your base is reliably protected, choose only high-quality materials and carry out installation work following all instructions.
Main stages
The entire process of facing the plinth can be divided into the preparatory stage and the actual installation of the finish:
- Preparatory stage. Before installation, the surface of the plinth must be prepared for further finishing. To do this, the base must be cleaned of accumulated dust and dirt, any cracks and defects that have appeared must be filled with putty, and the surface must be leveled.
- A layer of waterproofing and installation of a thermal insulation layer are required.
- Then you need to prime the surface of the base.
- When all the preparatory work is completed, you can begin the procedure of finishing the base with facing materials. In most cases, it will be necessary to install an additional frame that will support the structure and give it strength.
Materials for finishing and covering the base
The most popular materials for finishing the basement of buildings
The materials used for cladding and cladding the basement of the house can be roughly classified into two groups. The first is facing coatings, the installation of which is carried out on a liquid base in the form of plaster, cement-sand mixture, etc. The second is facing coverings, which are installed on a pre-assembled frame or sheathing.
This is a conditional division, since the use of various materials, first of all, depends on the cost and requirements that are placed on it.
In your case, taking into account that cladding the basement of the house should be inexpensive and accessible, you can use the following materials:
- plaster is the most affordable and easiest way to finish and improve the base. The plaster has good vapor permeability, the ability to be applied over insulation, a wide selection of colors and decorative layers;
- imitation of stone - performed using plaster or cement-sand mortar. It is easy to implement with the ability to create an absolutely exclusive surface. Application is possible both on “bare” concrete and on thermal insulation;
- basement siding - polyvinyl chloride panels with the ability to imitate almost any finishing coating. Mounted on a supporting frame. At the installation stage, it is possible to perform heat and waterproofing work;
- brick - allows you to create high-quality and reliable protection with the possibility of installing a full-fledged thermal insulation layer and a ventilated gap. Requires high-quality support and adherence to masonry technology. Can be replaced with facing slabs that imitate natural brick and are mounted with a special adhesive composition;
- base thermal panel - visually resembles base siding attached to an expanded polystyrene board. It is advisable to use when both a heat-insulating layer and finishing work are required.
These are not all the coatings that can be used in work, but they are quite sufficient for cladding the base of both a brick and a wooden structure. If we also take into account the time costs, then it makes sense to collect and prepare a sufficient amount of natural stone.
This approach is not simple, but can be used in areas where you can independently obtain stone such as limestone, shell rock or sandstone.
For the situation described, it can be recommended to finish the base of a brick house with plaster or imitation stone, and for a wooden structure to cover it with base siding.
Below is a table that takes into account the average cost of cladding material. For the calculation, 1 sq/m2 was taken as a more convenient value for assessment.
| Material | Cost, rub) |
| Starter plaster, 1 kg | 210-350 |
| Decorative plaster, 1 kg | 350-500 |
| Basement siding, 1 m2 | 380-600 |
| Facing brick, 1 pc. | 7-10 |
| Cladding slabs, 1 m2 | 660-900 |
| Base thermal panel, 2 mm | 1100-1600 |
Finishing materials for foundations - market diversity
Speaking about finishing the foundation, we mean, of course, not the part that is in the ground, because at that level, insulation is enough for protection, and decoration is not required at all. We are talking about the basement, it is this small strip at the bottom of the house that needs protection from environmental factors, and, of course, it must be decorated, because the grayness of concrete does not give the house completeness and neatness. How can you cover the foundation?
Today there are many materials, in addition to the simplest and most inconspicuous plastering of walls. You can put in a little effort and you will get great results. Finishing materials for the foundation can be natural or artificial. The former include stone and brick, the latter – artificial stone, various types of tiles, siding and panels. Brick already looks somehow old-fashioned, so it is rarely used, probably when blocks are obtained for free.
Natural stone, on the contrary, is very expensive, but extremely beautiful and representative, so you can only see it on elite houses. Moreover, finishing with it is not the easiest process; it is a very heavy material, and often simple glue is not enough; it is attached to anchors or special fasteners. Artificial stone is lighter in weight compared to its natural counterpart and is more affordable; sometimes it is even made with your own hands right on the construction site. Ceramic tiles are not always as durable as the basement of the house requires, but something like porcelain tiles is already noticeably lighter on your wallet.
Therefore, the most popular options were finishing with siding and special panels for the plinth. Finishing the foundation of a house with siding has for some time been the leading method of protection and decoration; this material is lightweight, affordable, and has many colors and textures. In addition, the artificial material from which this finish is made is almost not susceptible to aging, even under the influence of all atmospheric factors known to nature. For a long time this was the most popular type of finishing, but now a competitor has appeared - facade panels. They are called basement siding in another way, what is the difference, let’s speculate.