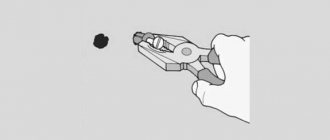
Drilling wood, metal, concrete and other materials is widely used in production and at home. In this case, a problem often arises: how to sharpen a drill? If you only drill into wood, you don’t have to think about the quality of the tool. At home, it can serve regularly for several years without additional sharpening. When drilling metal, you need to ensure the sharpness of the device, since you cannot drill metal with a blunt instrument. You can slightly increase its service life by changing the rotation speed, its feed rate, using good cooling and other factors. But over time, the tool may become dull again. How to sharpen a drill correctly?
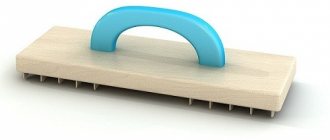
Image 1. Basic elements of a drill.
Equipment requirements
The only equipment we have is an electric sharpening machine. But just because it exists does not mean that you can sharpen drills on it. It is necessary that the sharpening disk has the correct shape - that is, the shape of a cylinder with a smooth, not rounded edge. A convex edge with ground edges may result in incorrect sharpening.
If the disk is very worn out, it is better to replace it with a new one or correct it with a special CBN “pencil”, if you have one on the farm. It is very good if the disk is balanced and does not produce beats or vibrations (in fact, this is a mandatory norm). Only the peripheral surface of the disk is involved in the work, not its ends.
There is a temptation to use the flat side surface of the disk. But after several sharpenings it will lose its shape and fixing the stone after that will be much more difficult.
Sharpening auger for concrete
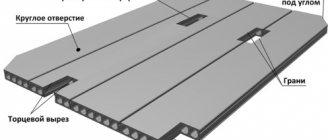
The hammer drill has a carbide plate as the cutting part, inserted into a slot at the working end and secured with solder. A normally sharpened drill has clear cutting edges with a sharpening angle of about 90 0 and an angle between the edges at the apex of 130–140 0.
With standard sharpening, the front edge of the cutting edge (directed in the direction of rotation) is inclined to the drill axis at an angle of 30 0, and the rear edge is inclined at an angle of 60 0. When manually sharpening, without special tools, you can focus on the entire, unworn part of the edges and reproduce their angles of inclination.
Sharpening process
We start sharpening from the front edges. We position the drill near the peripheral surface of the stone so that the cutting edge is parallel to the axis of the sharpener and directed upward, and the edge is parallel to the surface, and lightly press the drill against the sharpener for a short time. A clearly visible mark remains on the metal, which shows whether its position was chosen correctly. The plane of the test section should coincide with the plane of the edge, and the spot of the section should be located in the center of its unworn part, without significant displacement. Having found the correct position experimentally, remember it and begin sharpening.
Parallelism is not difficult to achieve if you bring the cutting edge to the surface of the stone and navigate along the gap left before contact.
You should not immediately achieve a sharp edge. Remember that you still have to grind down the back edge, and then the edge will “fall into place.”
First, the front edges are sharpened one after another. Then you need to check their symmetry. This is done visually, in the light, by placing the drill head near the edge of an object. The edge should be smooth or concave, but symmetrical. You can make a special template for testing. If there is asymmetry, a shorter edge is additionally ground down.
After this, the back edges of the edges are also ground down one by one, followed by checking for symmetry. The symmetry of the arrangement of the edges is also checked when viewed from the end, along the axis of the drill. When sharpened correctly, they are parallel, and between them there remains a bridge about 0.2–3 mm long, depending on the diameter.
If, as a result of processing, the cutting edges do not become sharp, there are visible roundings or cavities on them, the entire sharpening cycle must be repeated.
Add-ons
When sharpening, it is important not to overheat the tool. To cool, it is periodically dipped in water. A container of water should be kept near the machine. Do not press the drill against the sharpener for a long time. It is better to work with short touches, about 2–4 s, with breaks for the same amount of time. In this case, excess heat has time to be removed by the body of the drill and the risk of overheating the edge is reduced.
To work on soft materials without impact, for example on brick or tile, the cutting edges are brought “to zero”, without a jumper, and their sharpening angle is reduced to 30–35 0.
Types of sharpening
The process itself is divided into three types:
1. Sharpening the front surface of a straight tooth
The tooth and abrasive wheel are installed perpendicular to each other, taking into account that the saw itself must have a horizontal position. If the machine does not have an angular tilt scale, you can use a pendulum inclinometer. Next, you need to securely fix the tools.
The process itself is the contact of the abrasive wheel and the ground surface back and forth through a mechanism in the machine, while simultaneously pressing the tooth against the wheel manually. This process is repeated with each saw tooth.
For convenience, you can make a mark on the tooth from which sharpening began.
2. Sharpening a tooth beveled along the front surface
This type of sharpening involves performing the same actions as before, with the difference that the angle of inclination must be changed in accordance with the location of the teeth. You can measure the inclination with a pendulum inclinometer. First, positive angles are sharpened through the tooth.
Read also: Scraper conveyor operating principle
Next comes the process itself:
- Every second soldering point is sharpened;
- Then the angle changes to negative;
- The remaining teeth are processed.
- Back sharpening
This process provides the ability to change the position of the disk so that the back plane of the braze is in contact with the abrasive wheel.
If you don’t have a sharpening machine, you can make everything yourself. How to sharpen a disc with your own hands:
- Make a support for the saw that will fix the saw. This device must firmly hold the saw, otherwise the process will pose a danger to the performer;
- Adapt a stand on which the disk itself will be located (if necessary, the angle of inclination can be changed with the supports);
Important! The abrasive saw and saw blade must be perpendicular to each other.
- Attach the circular saw in its center so that it is in contact with the wheel in the desired position (to maintain the same back and front sharpening angles).
It should be remembered that after sharpening, there should be no chips, cracks, gaps or other defects on the pobedite teeth. If no glare is visible on the cutter, then the job is done correctly.
It is also necessary to pay attention that the sharpened tooth plane and the subsequently processed material are dependent on each other - if the workpiece material is hard, then the soldering should not be too sharp.
Sharpening circular saws is a mandatory activity during the operation of this equipment. Wood processing requires the master to have tools with appropriate cutting properties at his disposal. Just like sharpening chainsaws, circular saws require extra attention. If the shortcomings are not corrected in time, over time the tool will begin to become dull much faster.
How to hold the drill while processing
Since, according to the conditions of the task, we do not have devices for precise positioning of drills, all hope is in our own hands. There are several simple techniques to achieve a “steady hand.”
It is best if, when sharpening a drill, you can rest it on a tool rest - a special “table” fixed in front of the sharpener. If you cannot achieve the desired position with direct support on the tool rest, you can hold the workpiece in your hands, but be sure to lean on it:
- fingers on the rest;
- with your wrist or hand on a workbench, on your knee, on any stable and conveniently located object;
- elbow or forearm on a workbench or knee.
As a last resort, you can simply press your elbows to your sides, forming a triangle with your arms and torso. But in any case, you need to find a way to hold the tool as tightly as possible with minimal effort.
When fixing the drill during operation, you should remember its position not only visually, but also by the sensations in your hands. Muscular, kinesthetic memory may be more accurate than visual control.
To maintain sharpening symmetry, it is useful to move to the second edge by turning the drill around the longitudinal axis, without changing the position of the hands and body. If you don't need a cooling break.
Sharpening a drill for metal
When sharpening drills for metal, only the back surfaces of the cutting edges are ground down. These surfaces have a rounded shape (with a drill diameter of less than 3 mm - flat) with a decrease relative to the edge of about 10 0. The cutting edges converge to the top of the drill at an angle of 116 - 120 0 (sharpening angle). For brass, copper, soft bronze, this angle is increased to 125–130 0, for aluminum - up to 140 0.
Sharpening
When sharpening, the drill is held with both hands. One near the sharpener, the other by the shank. The fingers of the hand closest to the sharpener (leading) rest on the rest. If it is not there, you need to find any support, as described above.
The drill is positioned at an angle to the working surface of the grindstone: 60 0 horizontally (half the angle at the apex) and about 10 0 vertically. The sharpened cutting edge is directed upward and located horizontally, parallel to the axis of the stone. The position can be selected when the machine is turned off, according to the shape of the gaps between the edge and the sharpener when viewed from above, and between the sharpener and the back surface when viewed from the side. To more accurately set the sharpening angle, you can draw a clearly visible line on the tool rest at the desired angle.
When sharpening, the drill is pressed against the sharpener by the cutting edge, and then, without changing the pressure and horizontal angle, it is tilted with the shank down until the back surface is completely processed. In this case, the position of the leading hand does not change. After 1–3 such passes, the drill is rotated around the longitudinal axis by 180 0, and the operation is repeated for the second edge. The tool is rotated only with your fingers, without changing the position of your hands.
Wood drill sharpening
There are several types of drills for drilling wood and wood-based materials. Here we will consider the most universal and common - spiral.
Features of drilling wood
A twist drill for wood differs little in design from its counterpart for metal. Even the cutting part may be the same. But wood has a fibrous structure. When drilling it, the cutters in different directions interact with the material differently. The consequence of this may be scuffing and chipping on the surface of the workpiece. To avoid this and get a neat, even hole, use a special sharpening of the drill, with a center and trimmers.
The first to come into contact with the material is the centerpiece - a narrow spike located along the axis of the drill. As it goes deeper, it centers the tool and keeps it from moving laterally. Then the scorers come into play - the side incisors protruding above the cutting edges. They cut wood fibers along the contour of the hole and prevent the spread of flakes beyond its boundaries. The contoured, virtually isolated material is extracted by the main blades.
Geometry of the working part
The angles of inclination of the center faces to the drill axis are 10 0, the inclination of the inner edges of the scorers is 30 0, the outer edges of the scorers coincide with the side surface of the drill. The angle of depression of the rear surface of the cutting edges is 25 0 . The height of the centerpiece and scorers above the cutting edges depends on the diameter of the drill, but the scorers are always lower.
For example, a drill with a diameter of 10 mm should have a center height of 3.5–4.5 mm, and scorers should be 1 mm high. The width of the base of the center is about 1.5 mm. For recommended parameters for different diameters, see Tables 1 and 2 of Appendix 1 to GOST 22053-76.
What to sharpen
To perform such a complex sharpening you need a specially shaped stone. If you have a “pencil” for straightening abrasive discs, you can give a standard sharpening disc a trapezoidal profile (grind one edge to a cone) and use this stone for sharpening only wood drills.
You can also use a grinder disc by installing it on a sharpening machine. For different mounting diameters, an adapter can be ordered. Another option is to use a grinder. But it must be securely fastened.
Sharpening is a familiar job
The process of sharpening a wood drill is, in principle, no different from sharpening other drills. The same techniques are used for selecting the desired angles, fixing the tool and controlling symmetry. If you just need to sharpen a dull drill, then with good equipment there should not be any big difficulties. If you need to make a wood drill from a standard one, then you should first practice on old drills, which you don’t mind using lime for training.
Important Rules
Turning drills for metal does not cause any difficulties for experienced home craftsmen. But there are still several important rules:
- The main requirement that should be adhered to when developing the design of a turning machine: the product must remain stationary and not rotate around its axis. If it turns even a degree, the alignment will have to be repeated again.
- The surface of the wheel or sharpening disk must be perfectly flat. Therefore, it must be adjusted periodically with CBN nozzles.
- At the end of the work, the restored tool for drilling metal should be allowed to cool in natural conditions and only then check the geometric parameters using a template.
The lengths of the cutting edges should differ from one another by no more than 0.1–0.3 mm. This rule is especially important for small diameter tools.
Proper sharpening of auger for concrete sds
A concrete drill is a specially designed drill whose cutting part is made of alloys based on tungsten and titanium. A drill of this design is designed to drill brick, concrete, stone and marble. A properly sharpened sds drill is the key to quick drilling and savings. The drill has two functions simultaneously:
- It acts as a twist drill.
- Breaks material like a chisel.
Most often, concrete drills are a rod with a soldered tip made of carbide material.
Unlike a drill for concrete and stone, the sds plus drill is used when working with a hammer drill. The tool is affected not only by the force in the plane of rotation, but also by the impact force. The drill operates under very harsh conditions.
During operation, any cutting tool becomes dull, including drills and drills. Tools heat up and drilling time increases.
In a hammer drill, the drill also experiences shock load and the question arises of how to sharpen the drill for concrete.
A few tips during the drilling process to extend the life of the concrete drill:
- Constantly monitor the heating of the tool, preventing it from overheating.
- Do not cool a heated drill or drill by sudden immersion in water.
- When drilling ceramic tiles, do not use the hammer drill mode.
Features of sharpening step drills
Step drills for metal are produced in several designs, each model is designed for making holes with a diameter of 4–32 mm. This is an expensive, but very high-quality tool that can last up to 2 years even with intensive use.
According to the manufacturer's recommendations, it is possible to sharpen step drills for metal, but only some models. The rest cannot be restored or subsequently reused.
Unlike conventional drills, cone drills are not easy to sharpen: if the job is done incorrectly, the cutting edge of the tool may become unusable.
To bring the stepped cutter back to life, sandpaper is used, which is wrapped around a special rotating disk. In this case, processing can be carried out either using an end milling machine or by hand. The first option is used for products with spiral grooves, the second - for tools with straight cavities.
Have you ever encountered the need to sharpen a metal drill at home? Did everything work out for you or did you encounter any difficulties? Please share your own experience in the comments.
Tips for sharpening a drill bit at home
Before you learn how to sharpen a drill or drill for concrete, you need to clarify the main design features of the tool.
The working edge of the drill is formed by the convergence of the front and rear edges. The angle between the front edge and the axis of the drill is 30°. The angle between the rear edge and the axis of the drill has a value of 60°.
The working edges of the drill should form an angle of 120°.
This is what a sharpened drill looks like
There is an opinion that the sds+ drill for concrete does not require sharpening and is replaced with a new one after complete wear. This version is especially warmly supported by workers in construction tool stores.
But by learning how to sharpen a drill or auger correctly, you will see that the life of the drill can be significantly extended.
Sharpening a drill involves setting the cutting edge of the drill to the desired shape. Both the front and back edges of the drill are sharpened.
When inserting a drill into a material, only the cutting edges of the tool should work, and the back of the drill should not touch the surface being processed.
At any time during the drilling process, the back surface of the drill must have a gap with the surface being machined.
Otherwise, the tool not only drills poorly, but also quickly heats up, becomes dull, and collapses.
Important tips on how to sharpen a metal drill correctly.
Differences in working teeth by geometric shape
The tooth has several working planes. The front plane “A” together with the rear “B” at the intersection form the main cutting edge “1”. At the intersection of the plane's thin lines with the side "B" auxiliary edges "2" and "3" are formed.
Schematic representation of a blade cutting edge
To effectively work with materials, various types of cutting teeth have been developed.
- Basic shape – straight tooth
Designed for rough and fast cutting. The cut quality is low, so it is not suitable for fine work and jointing of hard materials.
Read also: How can you glue plastic tightly together?
This shape of the cutting edge allows you to make smooth, precise cuts and is well suited for composite materials, for example, chipboard with double-sided lamination. There are practically no chips left on hard surfaces. Teeth with a beveled back surface are excellent at cutting hard workpieces, but at the same time they become dull faster. The slope alternates, so a canvas with this shape is called alternately beveled. Both the trailing and leading edges can be beveled.
The main advantage is slow dulling. Such working teeth alternate with straight ones, working in a complex manner. The trapezoid is slightly higher than the main tooth, and, as it were, cuts through the material “roughly,” making it easier for the straight edge to work. Used for cutting plastics and materials with durable double-sided laminate.
Discs with conical teeth are auxiliary. With their help, a preliminary cut is made in the laminate to prevent the formation of chips when cutting. Not used as a stand-alone tool.
In addition, the front plane of the teeth may have a concave shape. These saws are designed for cross cuts. The concave plane and sharp edge cut the transverse fibers of the material like a sickle.
Sharpening circular saws with your own hands video
There are discs with alternating active and passive teeth. Passive ones have a negative sharpening angle.
Work order
The wheel must be installed on the sharpening machine. Sharpening on a sharpening machine is carried out in strict compliance with safety precautions. The thrust bearing is installed with minimal clearance, work is performed without gloves, and the eyes are protected by a special shield or glasses.
Before sharpening, it is necessary to correct the peripheral surface of the wheel using a CBN insert, that is, to level the sharpening surface of the stone.
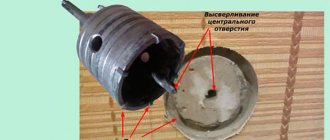
Before moving on to the answer to the question of how to sharpen a drill bit for concrete at home, let’s take a closer look at the sharpening process.
Drill bit with insert for working on concrete
We will carry out standard sharpening of drill bits for concrete.
Having secured the device, place the drill on it and bring it to the surface of the sharpening stone so that the cutting edge is parallel to the plane of the sharpening stone.
We sharpen both edges, checking their symmetry for clearance and the angle between them at 120°.
Let's move on to sharpening the leading edges
The drill rests on a fixture that provides an angle of 30°. The drill is brought to the stone plane to be sharpened at an angle of 30° and the front edge is sharpened.
Turning the drill 180°, we also sharpen the second front edge.
Now the drill must be brought to the surface of the stone to be sharpened at an angle of 60°. This is achieved by placing the drill on another part of the fixture.
Sharpening the rear edges is done in a similar way. If after sharpening you end up with cutting edges of different sizes, sharpening should be repeated in full.
To fully understand the sharpening process on a sharpening machine, watch the instructional video. Everything is clear with the sharpening machine. Or you can use a used diamond blade for an angle grinder.
But in order to sharpen a drill on a grinder, the latter must be carefully secured.
To ensure high-quality sharpening of the drill, it is necessary to equip the machine with a thrust bearing, on which the drill should rest when sharpening. A piece of corner, firmly attached to a grinder or table, can serve as a thrust bearing.
If the diamond disc is not placed on the grinder, then it can be easily secured by performing the simple manipulations shown in the video about sharpening the drill. When sharpening, it is necessary to give the back surface of the drill the required shape. The cutting edges of the drill are sharpened and the back surface is removed. Any point on the back surface of the drill should not touch the material being processed.
A few words about devices
Devices can be made not only from a wooden block, but also from a corner.
The main task is to ensure that the drill being sharpened is fed to the sharpening plane with the required angles.
By the way, devices made from a corner are more accurate, reliable and durable.
When sharpening, special precision in maintaining angles is not required. But the symmetry and dimensions of the cutting edges must be observed.
Sharpening methods
You can use a saw sharpener or improvised tools.
There are three main sharpening methods, where a specific device is used and the rules for processing discs are followed. It is difficult to say which of them is the most correct. After trying each method, you can draw certain conclusions for yourself.
- Classical;
- Full profile;
- Sharpening the edges of the teeth.
We will talk about each of them separately.
Classical
This sharpening technique has been used for a long time, which is why it got its name.
- Sharpening begins from the back surface of the disc.
- The front part, which runs into the material when cutting, remains in its unchanged position.
- Processing can be carried out directly on a circular saw or remove the saw wheel by placing it in a vice.
- If you sharpen on a circular saw, be sure to disconnect the machine from the power supply.
- To secure the disc, use a pair of bars that will secure the circle like wedges. The bars must be pressed tightly against the workpiece to prevent it from moving during turning.
- Using a felt-tip pen, place a mark on the first tooth you will start with.
- Perform a certain number of movements with the sharpening device on the first tooth. Remember their number.
- For all subsequent teeth, repeat movements similar in quantity and intensity.
- Upon completion of sharpening, be sure to check the functionality of the updated saw with your own hands. If there is no extraneous noise or vibration and the disk machine behaves stably, you have managed to do the job correctly.
Read also: 220 volt designation on sockets
Alternative solutions
Alternative sharpening methods include the two methods we described above. They are quite effective, which is why they are often used by craftsmen.
- Full profile saw blade processing. Among all turning methods, this method can be considered the most accurate and high-quality. This is due to the fact that specialized sharpening machines are used for full-profile sharpening. A special circle is selected by size and in one approach passes the entire cavity between the teeth of the disk, while capturing the surface of the adjacent cutting edge. This method of turning saw blades avoids the possibility of tooth deformation. The only drawback of the sharpening method is that to process saws of different profiles you will need to use the corresponding different wheels.
- Turning the edges of teeth. The popularity of this method of turning circular saw tools is explained by the fact that it can be used at a professional level and in ordinary home conditions. If sharpening is carried out using a machine, you will need to purchase the appropriate abrasive wheels to match the parameters of your saw blades. But it is optimal for most owners of circular saws to use the home processing method. This is due to the fact that often it is not necessary to carry out a large amount of work, and all processing of the cutting edges is carried out with a needle file. To effectively sharpen a product, sometimes it is enough to make 4-5 movements with a high-quality needle file. This will give the teeth the required degree of sharpness.
How to sharpen a drill for metal and concrete with your own hands
It does not require special proof that the drill during operation loses the sharpness of the cutting part, that is, simply put, it becomes dull. A dull drill isn't a problem until it's needed. Then it suddenly turns out that it is impossible to work with a worn or dull drill. We can only regret that the geometry and size of the drill were not restored in time. This article will tell you how to sharpen a twist drill and a hard-tipped drill bit for drilling concrete.
How to sharpen a twist drill correctly
You don’t have to worry about sharpening a wood drill; you can work with such a drill for many months and even years without any sharpening. Unfortunately, the same cannot be said about a metal drill, which must be sharp. That is, you can drill metal only with a sharp, well-sharpened drill.
Loss of drill sharpness is characterized by a sharp creak at the beginning of drilling. A drill that is not sharpened in time generates more heat and thus wears out even faster than a sharp one.
You can sharpen a drill on special machines or using devices. Naturally, if possible, it is preferable to do this on special equipment. But in a home workshop, as a rule, there are no such machines, so you have to use a regular electric sharpening machine with a stone.
Main components of a twist drill.
So, let's look at how to sharpen a drill for metal? The type of sharpening depends on the shape that should be given to the back surface of the drill and can be single-plane, two-plane, conical, cylindrical and helical.
The drill is sharpened along the back edges. Both teeth (feathers) of the drill should be sharpened exactly the same. It's not easy to do this manually. It is also not easy to manually maintain the desired shape of the back edge and the desired back angle.
1. Single-plane drill sharpening is characterized by the fact that the back surface of the pen is made in the form of a single plane. The rear angle ranges from 28-30°. The drill is simply attached to the circle, so that the cutting part runs parallel to the circle and sharpening is carried out without rotating or moving the drill. With such sharpening, the cutting edges of the drill may become chipped during drilling, which is a disadvantage of this sharpening method. This is the easiest method of manual sharpening, which can be used for a thin drill with a diameter of up to 3 mm.
2. Drills with a diameter of more than 3 mm are preferably sharpened conically. It is difficult to perform such sharpening manually without skills, but it is possible. The drill is taken with the left hand by the working part as close as possible to the fence cone, and with the right hand by the tail. The drill is pressed against the end of the grinding stone by the cutting edge and the back surface, and is slightly rocked with the right hand, creating a conical surface on the back feather edge. During sharpening, the drill does not come off the stone, hand movements are slow and smooth. For the second pen everything is repeated in the same way.
Move the drill with its cutting edge to the grinding wheel.
We swing the drill down and then up again.
When sharpening, you should try to maintain the original shape of the factory surface of the rear part as much as possible in order to maintain the desired rear angles. If sharpening is done correctly, then it is quite sufficient for drills with a diameter of up to 10 mm. For diameters above 10 mm, this sharpening can be improved by sharpening the front surface, as shown in the photo:
Front surface point.
What is the point of a point? By reducing the rake angle and increasing the cutting edge angle, chipping resistance increases, which increases drill life. In addition, the width of the transverse edge becomes smaller. The transverse edge does not drill, but scrapes the metal in the central part of the hole. The second picture clearly shows that here it is shortened, which makes drilling easier.
For drills with a selected small clearance angle, you can further sharpen the flank. In this case, the drill rubs less in the drill hole with its back surface. See photo:
Rear surface undercut.
In production conditions, after sharpening, as a rule, finishing is done, which smoothes the surface, removing small nicks. A drill that has been fine-tuned wears out less than a simply sharpened drill. If possible, fine-tuning should be done.
Sharpening accessories
To reduce work time and improve its quality, it is important to choose a device that allows you to hold the cutting tool motionless. Normal sharpening of drills for metal largely depends on the accuracy of setting the required angle and the ability to regulate the feed during the turning process.
Most devices allow you to sharpen cutting tools measuring 3–19 mm. To restore spiral-shaped products, both specialized and ordinary machines with an electric drive and a feed system are used, which you can assemble yourself and install in a garage or utility room.
To work at home, there is no point in buying expensive professional equipment: you can limit yourself to a grinding wheel paired with a holder, or even straighten the product manually.
Using a grinder
In addition to the machine itself, the work also requires a vice in which the cutting tool to be adjusted is fixed.
To sharpen metal drills with a grinder, you must follow the following sequence of work:
- clamp the product vertically in a vice;
- first treat the rear edge until signs of wear are removed;
- grind the working edge to 120°.
To prevent overheating of the drill, its contact with the grinding disc should last no more than 1–2 seconds. The effect is achieved by repeatedly removing a thin layer of metal from the working edge.
To establish the sharpening angle, you can use a plastic template that is periodically applied to the surface.
Sharpening on a grindstone
Sharpening on a grinding wheel is considered a more convenient and safer method compared to a grinder.
If experience does not allow you to determine the level of wear of a metal drill and adjust it on a sharpener “by eye,” you need to use a special device - a holder installed near the working disk. To prevent movement, the clamp is securely attached using a bolted connection.
On a turning machine, sharpening drills for metal is not difficult at all.
The tool is secured in the clamp, the sharpener is turned on, and the working edges are lightly pressed against the wheel at the desired angle. If there are small nicks before turning, they should be removed evenly from all sides.
The machine should be operated with caution. Drills of large diameters can heat up to significant temperatures, which leads to a decrease in the strength characteristics of the metal.
Using a drill attachment
It is possible to sharpen drills of medium diameters (4–10 mm) efficiently and quickly without a sharpening wheel, using standard drill attachments.
Sharpening is done in this order:
- a nozzle is placed on the drill;
- a drill is installed in a hole of the required diameter;
- the drill is turned on, the product is turned on one side;
- To adjust the opposite cutting edge, the tool is rotated 180°.
The use of the nozzle has some features:
- High-quality and effective sharpening is possible only for slightly dull drills. If there are deep damages, usually caused by significant overheating of the metal, it will not be possible to restore the instrument.
- Fixed sharpening angle. The attachment is only suitable for drills used for working with certain materials.
Despite the existing design flaws, the use of attachments can significantly speed up and simplify the restoration of the working edges of a metal drill. The popularity is also due to the low cost of the devices.
Sharpening with a file or needle file
It is impossible to sharpen a drill used for metal processing with a file or needle file for two reasons:
- Hardness of the material. Even the best file will wear out before it can fix the cutting tool.
- When using diamond or abrasive stones, it is impossible to manually maintain the desired angle.
How to sharpen a pobedite drill bit
Even a victorious drill can sometimes become dull. Signs of a dull drill include overheating during operation, excessive squealing, and ineffective drilling. If it is not possible to buy new drills every time, you decide to try sharpening a Pobedit drill, then follow our advice and you will succeed.
- — a dull pobedit drill;
- — a sharpening machine with a diamond stone or an electric sharpener;
- - coolant.
Make sure the drill bit can be sharpened. To do this, measure the length of the cutting part of the drill; if it is more than 10 mm, then sharpening is possible. You won’t be able to sharpen a Victory drill bit with a regular emery stone, so take a sharpening machine, preferably with a diamond sharpening stone, or a sharpener driven by an electric motor. To speed up drilling, reduce the number of revolutions per second (angular speed), since this is the basic rule of processing: the harder the material, the lower the speed should be. Sharpen the drill with short touches to the emery stone. Constantly monitor the sharpening process, as Pobedit drills sharpen quite quickly. When sharpening the drill bit, be as precise as possible. Make sure that the cutting sides of the drill are the same size, otherwise the offset center of the axis of rotation will lead to uneven operation and, as a result, an enlarged uneven hole. Check the correct ratio of the front and back angles of the cutting edge in the direction of rotation of the drill. Don’t forget, the harder the material, the greater the sharpening angle should be – up to 170°. Be careful not to heat the drill bit as heat can cause the carbide inserts to crack and peel off. To prevent this from happening, cool the drill from time to time with a liquid, such as plain water. If the tip does become very hot (turns red), do not lower it into the liquid; sudden hypothermia will cause it to immediately crack. Give it the opportunity to cool gradually, in the air. Be prepared for the fact that you will not be able to achieve the efficiency of a new drill, since the method of sharpening a drill differs for different brands of Pobedit, and it is impossible to reproduce all the requirements at home. If you were unable to sharpen the drill properly, just buy new drills in the store and treat them more carefully in the future. To make drills last longer, follow all the manufacturers' recommendations, use concrete drills for working with concrete, and metal drills for metal. Avoid overheating when working; moisten the drill with water. Don't try to drill a hole the first time. How to sharpen a pobedite drill bit
Sharpening drills with pobedite tips
After some time of use, pobedit drills require sharpening. A dull tool gets very hot and the quality of drilling becomes worse. For sharpening, a conventional machine is used, but with a diamond stone. Water is used for cooling. You can safely sharpen tools with a soldering height of 1 cm or more. The tool to be sharpened is brought to the diamond stone and briefly touched. The process is similar to working with small diameter drills. The harder the material for drilling, the higher the sharpening angles should be. Do not overheat the drill. This can cause detachment of the pobedite plates.
How to sharpen a drill for metal and concrete with your own hands
You don’t have to worry about sharpening a wood drill; you can work with such a drill for many months and even years without any sharpening. Unfortunately, the same cannot be said about a metal drill, which must be sharp. That is, you can drill metal only with a sharp, well-sharpened drill.
Loss of drill sharpness is characterized by a sharp creak at the beginning of drilling. A drill that is not sharpened in time generates more heat and thus wears out even faster than a sharp one.
You can sharpen a drill on special machines or using devices. Naturally, if possible, it is preferable to do this on special equipment. But in a home workshop, as a rule, there are no such machines, so you have to use a regular electric sharpening machine with a stone.
Main components of a twist drill.
So, let's look at how to sharpen a drill for metal? The type of sharpening depends on the shape that should be given to the back surface of the drill and can be single-plane, two-plane, conical, cylindrical and helical.
The drill is sharpened along the back edges. Both teeth (feathers) of the drill should be sharpened exactly the same. It's not easy to do this manually. It is also not easy to manually maintain the desired shape of the back edge and the desired back angle.
1. Single-plane drill sharpening is characterized by the fact that the back surface of the pen is made in the form of a single plane. The rear angle ranges from 28-30°. The drill is simply attached to the circle, so that the cutting part runs parallel to the circle and sharpening is carried out without rotating or moving the drill. With such sharpening, the cutting edges of the drill may become chipped during drilling, which is a disadvantage of this sharpening method. This is the easiest method of manual sharpening, which can be used for a thin drill with a diameter of up to 3 mm.
2. Drills with a diameter of more than 3 mm are preferably sharpened conically. It is difficult to perform such sharpening manually without skills, but it is possible. The drill is taken with the left hand by the working part as close as possible to the fence cone, and with the right hand by the tail. The drill is pressed against the end of the grinding stone by the cutting edge and the back surface, and is slightly rocked with the right hand, creating a conical surface on the back feather edge. During sharpening, the drill does not come off the stone, hand movements are slow and smooth. For the second pen everything is repeated in the same way.
Move the drill with its cutting edge to the grinding wheel.
We swing the drill down and then up again.
When sharpening, you should try to maintain the original shape of the factory surface of the rear part as much as possible in order to maintain the desired rear angles. If sharpening is done correctly, then it is quite sufficient for drills with a diameter of up to 10 mm. For diameters above 10 mm, this sharpening can be improved by sharpening the front surface, as shown in the photo:
Front surface point.
What is the point of a point? By reducing the rake angle and increasing the cutting edge angle, chipping resistance increases, which increases drill life. In addition, the width of the transverse edge becomes smaller. The transverse edge does not drill, but scrapes the metal in the central part of the hole. The second picture clearly shows that here it is shortened, which makes drilling easier.
For drills with a selected small clearance angle, you can further sharpen the flank. In this case, the drill rubs less in the drill hole with its back surface. See photo:
Rear surface undercut.
In production conditions, after sharpening, as a rule, finishing is done, which smoothes the surface, removing small nicks. A drill that has been fine-tuned wears out less than a simply sharpened drill. If possible, fine-tuning should be done.
For finishing, you need to use grinding round stones made of green silicon carbide (grade 63C, grit 5-6, hardness M3-SM1) on a bakelite bond, as well as wheels made of CBN LO (grit 6-8) on a bakelite bond.
Below we present to your attention an excellent selection of training videos by watching which you will definitely be able to sharpen your drills.