At the zero-cycle stage, communications input nodes should be provided in the slab and strip foundations. There are usually two engineering systems underground - water supply and drainage. Therefore, it is necessary to place a sleeve under the sewer and water supply pipe.
The gas pipeline entry point is located at a height of 1.2 - 1.8 m from the level of the blind area, therefore it is not considered when designing foundations. Electricity can be supplied to the cottage either by air or underground. In the latter case, the depth of the cable is 0.7 m minimum, so the sleeve for its passage must be laid before concreting the tape or slab.
To lay the pipelines of life support systems inside the cottage, it is necessary to make an input at a certain level, in accordance with the standards SP 31.13330 and SP 32.13330. The structural features of foundations should be taken into account to ensure the highest possible maintainability of engineering systems.
Requirements SP 31.13330 (water supply)
The sleeves are placed in the foundation when installing the formwork; it is not recommended to make holes after the concrete structure has gained strength by impact. When designing nodes for passing a water supply through a foundation slab or strip, it is necessary to take into account:
- the minimum permissible diameter of the communication pipe (sleeve) is 50 mm;
- to accommodate linear expansions during seasonal temperature changes, compensators should be used;
- the laying depth must exceed the soil freezing mark by 0.5 m, or polystyrene shells or heating cables are used to heat pipes;
- it is necessary to take into account the load on the soil from transport traffic;
- the entry hole in the supporting structures must be at least 0.2 mm larger than the diameter of the pipe; tightness is ensured by an oil seal at high groundwater levels or elastic materials in dry soils.
Water supply can only be installed vertically in floating slabs. In the underground, basement floor of a recessed strip foundation, the pipes enter horizontally. When using MZLF or NZLF, the main line passes under the tape, rises vertically inside and passes through the ceiling or floor along the ground.
Standards SP 32.13330 (sewerage)
The laying of a sewer pipe through the enclosing structures of the cottage must meet the following requirements:
- minimum depth of 0.7 m from the blind area to avoid mechanical damage from vehicle traffic, people, soil cultivation;
- insulation with a heating cable, polystyrene foam shells when laid above the freezing mark;
- the outlet should be 1.5 - 5 m from the water supply with a sewer diameter of up to 20 cm, larger than this size, respectively;
- the slope of the sleeve or hole in the tape is 4 - 7 degrees to ensure gravity flow.
Important! Unlike water supply systems, wastewater leaves the house, so it always has a higher temperature and freezes less. The thickness of the insulation can be reduced compared to water supply.
Recessed strip foundation
When installing the formwork for a deep strip foundation, sleeves for communications are laid taking into account the above requirements:
Water pipes:
It is necessary to take into account the shortest route between the source of water intake (well, well of the central water supply) and the bathroom, toilet, kitchen inside the building. Laying depth is 1 - 2.7 m, depending on the availability of heating and the climate of the region.
In monolithic strips, pipes of a suitable diameter are passed through the formwork to form a hole, or metal sleeves are immediately laid. In foundations made of FBS blocks, technological openings are left, filled with bricks, the sleeve is embedded in the masonry.
At the groundwater level 1 m below the base of the tape, the joints are sealed with waterproof solutions and plastic materials. In wet soils, rubber or silicone seals are used.
Sewage pipe:
The depth of the liners is 0.7 - 1.5 m, depending on the depth of freezing and the septic tank. Sealing is similar to the previous option. For external drainage circuits, red-brown PVC pipes are used, which have greater ring rigidity.
Important! To increase the maintainability of communications for water supply, a metal-plastic pipe of 25 - 40 mm is often used, passing inside the HDPE pipe. If necessary, the internal line can be easily removed for replacement with a new main without digging a trench.
Shallow and non-buried tape
Due to the fact that the depth of communications is greater than the depth of MZLF and NZLF, water supply and sewerage pipes pass under the base of the foundation, the underlying layer. However, on heaving soils, for shallow-depth belts, it is mandatory to install wall, ring drainage.
According to SP 18.13330, the vertical clear distance between the outer surfaces of the mains must be more than 20 cm if it is a sewer system or 40 cm for a water supply system. Moreover, drainage must be carried out under the water supply.
The installation of engineering systems is carried out before the production of the underlying layer. The mains are routed to the risers of engineering systems through the floor on the ground or the ceiling inside the house.
Important! In this case, the maintainability of life support systems is quite high. However, laying a metal-plastic water supply system into a HDPE pipe will make it possible to do repairs without excavation work.
Slab foundation
If the foundation of a cottage project is a floating slab, the wiring of communications in the building area must be completed before the preparation of the underlying layer, or, in extreme cases, before the installation of reinforcing mesh. This is due to the specifics of the technology:
- the formwork is installed after filling the foundation pad and pouring the footing;
- If you lay water supply and sewerage pipes before installing the formwork, it is easy to make a mistake about the exit points of the risers, which may end up inside the wall or too far from it.
Therefore, the introduction of engineering systems usually begins after the foundation has acquired concrete shape, thanks to the formwork. Under the perimeter of a heated house or an insulated slab of a building for seasonal use, the soil cannot freeze.
However, already at the border of the building’s blind area the ground freezes to a depth of 1–2 m, depending on the region. Therefore, the water pipe is pulled in 2 - 2.7 m trenches to the cottage, then a slope is made to the riser, placing the main at an angle.
Laying a sewer system in this way is prohibited, which is due to the following factors: when the slope increases beyond 7 degrees, the self-cleaning properties of the drains sharply decrease, the liquid goes into the septic tank faster, large fractions are not completely removed by it, which leads to blockages. Therefore, the sewerage system is laid at a uniform angle from the riser to the septic tank along the entire length of the pipe. The technology used for this is:
- the trench at the intersection with the foundation has a minimum depth of 0.7 m;
- from the house to the septic tank an acceptable slope of 4 - 7 degrees is created;
- if the angle inside the building is greater than this value, the wastewater is collected inside the building in horizontal lines and discharged through a vertical riser to the external sewer pipe.
Important! If the foundation slab is poured by a specialized company, a hidden work certificate is required. The ability to clean communications should be provided by hatches, ladders or revisions from the inside, and wells from the outside. It is recommended to use cast iron or propylene pipes and fittings, which provide a service life of 70 - 120 years. Instead of 80 - 90 degree bends, it is better to install two elbows at 45 degrees.
Pile, column foundation
Unlike strip and slab structures, columnar and pile foundations have a grillage that does not come into contact with the ground, even when it is buried in the soil. There is always a technological gap of 10–20 cm between the slabs, beams and the ground surface, protected on the sides by sheet materials. This is necessary so that when the soil swells, it does not tear the grillage away from the pillars or piles.
Thus, for a low ground or underground grillage, the input of communications is completely identical to the MZLF and NZLF. For a high grillage, additional insulation of engineering systems inside the underground will be required:
- the sewer pipe is buried in the ground at least 0.7 m, wrapped in several layers of mineral wool, shells made of extruded polystyrene foam, or a self-regulating heating cable is used; a vertical riser is connected to the horizontal line of external drainage from the house to the septic tank by two 45-degree bends;
- the water supply is carried into the house in a similar way, the depth of installation increases to 1 - 2.7 m, depending on the insulation of the engineering system used.
Important! To extend the sewerage outlet and water supply inlet, the trenches for these communications must be located at an equal distance from the pillars or piles. When backfilling, it is necessary to compact every 15–20 cm layer so that the foundation elements do not lose their load-bearing capacity and the entire structure loses its spatial rigidity.
Principles of planning utilities in a private house
Principles for the construction of any engineering communications in the house:
- Mandatory accurate calculations, graphical recording of all proposed work - before work, purchasing materials, you need to make careful measurements of the construction site. The parameters are recorded on the plan of the house or plot. Based on the final goals, the amount of materials and time to complete the work are calculated.
Most of the work on laying communications to a residential building is possible only in warm weather. There must be no significant precipitation. Otherwise, excavation work will be difficult, and the foundation may be damaged due to exposure to atmospheric moisture and temperature changes.
- Taking into account the current and future (increased) needs of residents is often expressed in adding 25-30% of power. For example, knowing the diameter of the water inlet and outlet pipes, you can correlate the volume with that required for the simultaneous operation of household appliances and amenities (kitchen sink, dishwasher, washing machine, bathtub, jacuzzi).
- Adding an additional safety margin - you should not strive for minor savings and rely on the assurances of manufacturers. In the case of utilities, it is better to overpay a little than to carry out a major overhaul of the foundation of the house after 5-10 years of operation. This can cost at least 15-20% of the cost of the entire house.
- Mandatory provision of maintainability of the system, the ability to monitor condition, routine maintenance - no matter how reliable the materials and equipment are, it is necessary to provide for ongoing monitoring and sudden repairs. In the case of sewerage, this is done with inlet sleeves, inspection hatches, caissons, and pits. These measures will allow you to quickly carry out repairs and restore the system.
External line
External sewerage begins with a pipeline from the foundation
. The wastewater is discharged to a septic tank, cesspool or filter structure. At each turn of the pipe, revisions are installed (adapters with covers, with which you can quickly clear the blockage). There is also an inspection well and a ventilation hood located outside.
Ventilation is removed from the riser through a fan pipe. Due to strong foreign odors, it cannot be installed near windows, with access to the yard or near smokers. strictly forbidden to connect it with a regular ventilation shaft.
. Instead of an umbrella, you can use a special vacuum valve at the top of the riser (not to be confused with a check valve!).
Sewerage wiring under the foundation
Types of foundations common in private house-building practice:
- Tape
- Columnar
- Slab
Each of them has a number of differences, including for laying sewers.
Diamond drilling of holes in the strip base
Strip foundation
For private households, strip foundations can be divided into two subtypes:
- Shallow depth - lies at a depth less than the soil freezing level, usually 1.4-1.5 meters. It is erected on soils that are not prone to frost heaving, subsidence or on a massive cushion.
- Standard - the laying depth exceeds the freezing level by 0.4-0.5 meters. Used on different soils. The subspecies is massive and expensive. Requires significant material and labor costs, traditional because of its simplicity and reliability.
If the base is strip, shallow, sewer, other pipes are introduced into the house underneath it. They lay a deep trench, dig outer and inner pits. Sometimes inclined drilling is used. The location of communications must be below the freezing level.
The standard tape to go around from below to enter sewerage and water supply is too labor-intensive. Either inclined drilling is used, or a hole is made in the foundation. The pipes are carried with insert sleeves.
Sometimes inclined drilling is the only way to connect communications due to the excessive thickness and hardness of the base. Or due to design features - when drilling the base of a structure significantly weakens it.
Inserting a sewer pipe under the USP
Columnar (pile) foundation
A columnar or pile foundation is the simplest for connecting communications. The reason is the peculiarities of the supporting elements, between which there is enough free space. The main thing when digging trenches is not to get too close to the piles. The minimum distance to them is 1-1.5 meters. The passage must be equidistant from adjacent supports.
The main difficulty is the mandatory thermal insulation of the drainage pipe - in the underground of houses with a columnar foundation the temperature is close to atmospheric. For thermal insulation, you can use ready-made cylindrical elements, sheet material made of PVC or polyethylene foam. The main thing is to correlate the thickness of the thermal insulation with the possible temperatures. For additional insurance against freezing, a pipe heating circuit (with power supply) is often used.
Sealing of communications inputs at high groundwater levels
Slab foundation
The foundation requires the correct entry of utilities. The reason is the impossibility of large-scale changes in the base structure after pouring. A hard, brittle slab foundation (USHP, other types) cannot withstand impacts (for example, from a hammer drill). Additional introduction of a new sewer line or modification of an old one is not possible.
Laying of sewer pipes is carried out after backfilling and compaction of the sand cushion. A recess is cut into it with a hand tool into which communications are placed. It is not recommended to do this in advance, before compaction - it can damage metal and plastic.
There is an opinion that it is possible to introduce a new sewer line under such a foundation by digging out a deep pit and drilling holes with a diamond drill. But extreme caution will be required; there is no guarantee of the safety of the structure. The foundation rises seasonally and falls in the vertical plane; interventions lead to distortion and destruction.
The entry of sewerage, water supply, and other communications into a house with a slab foundation is carried out strictly vertically, at the moment before pouring the foundation. Casing sleeves required. For sewerage - when wiring through a slab, for water supply, others - for the entire underground part.
Wiring under a shallow strip base
Pros and cons of a slab foundation, comparison with USP
The slab foundation and USHP are approximately similar in structural design, but there are also significant differences, to a greater extent this concerns the insulation that is laid under the foundation, which is not used in a conventional slab foundation.
To determine the most suitable type of foundation for your home, you need to consider the pros and cons of a slab foundation, and then the differences from USP.
Advantages of a slab foundation:
- reduced construction cost compared to a Swedish stove;
- ease of installation;
- high strength indicators, since contact with the ground occurs over the entire area;
- the platform of the slab is common throughout the house, so deformation is not dangerous for it, since part of the load will simply be transferred to a larger area;
- the ability to use the slab as a rough covering for the basement;
- there is no need to go very deep into the ground, which reduces the cost of equipment and labor;
There are significantly fewer disadvantages, but they also exist:
- the need for additional floor insulation after construction for a comfortable indoor microclimate;
- increased costs for concrete and reinforcement compared to traditional types of foundations;
- the need to use equipment to pour large volumes of concrete;
- financial disadvantage of using a slab foundation on sloped areas due to the significant consumption of concrete.
As you can see, the difference between a slab foundation and a USHP is only in the absence of a layer of insulation under the base, as well as the need for additional insulation of the floor of such a foundation. This type of foundation is well suited for seasonal buildings, as well as bathhouses, but for houses with permanent residence such a foundation has become quite outdated.
Preparation
After careful planning and calculations, we proceed to the practical preparation of pipe laying:
- They draw up a detailed plan for the sewerage system and an estimate of the necessary materials. If the householder is not confident in his knowledge, it is better to contact a certified specialist.
- Preliminary excavation work - digging a pit, a supply trench. It is possible to involve small-sized construction equipment, and not just manual labor.
- Prepare tools and materials. Required: hammer drill or drill with a diamond bit. You will need an angle grinder with discs for metal and concrete, a powerful drill with a set of drills for stone and metal. The main thing is to protect the eyes, respiratory organs, and hands (glasses, face shield, respirator, leggings).
For the street circuit of the drainage network, you need to choose orange plastic pipes. In addition to them, there are steel, cast iron, asbestos-cement, and ceramic. Disadvantages - cost, difficulty of installation on your own without auxiliary equipment.
To be on the safe side, the joints can be sealed with silicone glue (for plumbing, they contain additives that protect against the effects of fungus and aggressive chemicals). The internal network is assembled from gray plastic pipes - cheaper, they perform well in indoor conditions.
Entry diagram through strip foundation
Selection of pipes and diameters
with a diameter of 5 cm are used to drain wastewater from plumbing fixtures.
. The pipe from the toilet should have a cross-section of 10-11 cm, which will help avoid blockages.
To organize a sewer system in a private house, cast iron, reinforced concrete or plastic pipes can be used .
The latter are more acceptable due to their strength, durability, corrosion resistance and smooth surface.
External (PVC)
Designed for external networks. They are distinguished by their characteristic orange or yellow-brown color. Despite the relative cheapness, these pipes have sufficient strength, which allows their use for both external and hidden installation
. For them, cold welding is recommended. All turns are made using fittings and bends.
Internal (polypropylene)
For internal communications they are light gray in color and have different technical parameters, depending on the manufacturer and model. Their common features:
- Single or multi-layer.
- Foam propylene is protected by an aluminum coating and a polymer layer.
- The connection is made by welding or using special fittings.
Stages of work
Regardless of the type of foundation, the stages of laying sewer lines are identical:
- Laying a line from the septic tank (connection point to the drainage network) to the foundation of the house
- Equipment for the pipe laying site - through the foundation, under it through pits, drilling a well, an insert sleeve.
- Laying through the foundation, sealing, insulating the insertion sleeve.
- External and internal sealing of the sleeve, restoration of waterproofing, drainage around the foundation.
- Connecting the pipe to the internal sewerage circuit.
Output diagram through the foundation
Rules for the design and installation of an external system
Briefly, the instructions on how to properly make a local autonomous sewage system in a private country house (dacha) with your own hands look like this:
- Mechanical or manual excavation of a trench.
- Formation of a sand cushion.
- Layout of all component elements (pipeline, trays, fittings).
- Connection of fragments, starting from the exit from the internal sewer. For greater reliability, the fastening points are treated with silicone sealant
. - Testing the tightness of connections at maximum load.
- Backfill the trench, trying to compact sand or soil only on the sides of the pipe, avoiding sudden loads at right angles. The thickness of the sand backfill is at least 15 cm
.
For pipeline turns, shaped parts for external utility networks are used. If the distance from the foundation to the septic tank is more than 10-12 m, it makes sense to equip the area with an intermediate inspection well.
This video shows how to properly make a sewer system for a private home, as well as how to lay pipes yourself:
How to properly install a sewer system in a private house, do everything according to the diagram yourself and lay the pipes for the system without errors? The installation of the sewer system will be of higher quality if you follow several requirements:
When installing a sewer system, it is important to take into account every nuance.
: placement of plumbing fixtures, topography of the site, location of the intake manifold or septic tank, depth of pipe laying and angle of inclination.
Only with careful drawing up of the diagram, careful planning and observance of order
By installing a sewerage system in a private house or country house with your own hands, you can guarantee that the system will not freeze in the middle of winter and will drain waste well without creating additional problems in the house and on the property.
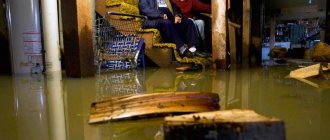
It's hard to imagine a country cottage without a civilized toilet and a cozy bathroom. But not every village is equipped with a waste collection system. Therefore, sewerage in a private house is carried out separately. Don't know which system to choose? This article will tell you about all the features of sewerage in a private house.
We described possible ways to organize waste collection, outlined their design and application features. They also provided step-by-step instructions on drawing up a project, installing a sewer pipeline, installing a septic tank and a drainage well.
There are several types of waste collection systems: central, storage, drainage, filtration.
Central
. The house's waste pipe is connected to the general sewer network, through which organic waste is collected in the city sewer.
Depending on the distance of the central pipeline to the house, a decision is made on the advisability of using an autonomous or central sewerage system
Accumulation system
- modern prototype. The main difference is the complete sealing of the waste collection point. It can be: concrete, brick, metal, plastic. To do this, a ditch for the container is dug on a plot of land remote from the residential building.
The principle of operation of the storage system is reduced to the discharge of organic compounds into a sealed container. When it is full, the contents are pumped out by a sewer truck.
This scheme for installing an individual sewer system in a private house has gained wide popularity due to its low cost.
Pipe ventilation arrangement
The sewer exhaust system is designed to balance the negative pressure inside the pipeline. Due to the connection of sewer pipes with the atmosphere, the system is leveled.
The ventilation system is used:
- air valve.
Fan hood
is a continuation of the central riser. It is installed above the roof ridge at a distance of 30-50 cm. To protect against precipitation, a deflector is attached to the outlet, which further enhances traction.
Installing a fan hood for a private cottage is extremely impractical. Such a system will require insulation of the pipeline, as well as the allocation of a separate ventilation duct in the partitions.
Air valve
- perfect option. It is easy to install into the pipeline. The device is installed directly indoors. The valve is equipped with a soft rubber membrane that only allows air to pass inward.
For a two-story house, one device is enough. The valve is installed on the second floor.
Diagram of connecting waste water discharge points to the central pipe. The difference in height between the dishwasher and toilet drainage connections determines the overall angle of inclination of the pipeline
Stage No. 3 - installation of a septic tank
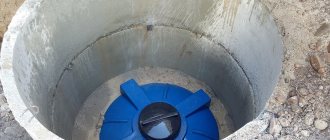
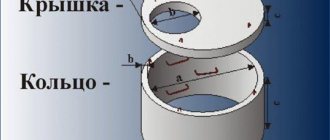
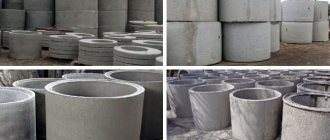
If you decide to make a sewerage system in a private house with your own hands, then it is better to install a septic tank made of concrete rings or a ready-made plastic tank.
The volume of the container for collecting and settling organic waste is determined by calculation. Be sure to add an extra cube. The pipe insertion point is located at a distance of 2/3 from the top edge of the septic tank, so it is not filled to the top.
Construction of a septic tank
The first step is to dig three holes for installing containers. To save time and financial costs, it is advisable to combine two settling tanks into one.
The bottom of the dug hole should be reinforced with a concrete base. Concrete cannot be placed on the ground, so add a layer of crushed stone 20 cm thick.
To construct the base, formwork from construction boards is installed. It must be secured with reinforcement along the outer and inner perimeter.
Use the same mixture composition as for pouring the foundation. In this case, be sure to lay a knitted mesh as a reinforcing element. It is better to take M500 grade cement, since the weight of the filled container will be large.
After the base has hardened, and this will not happen earlier than after 3 weeks, proceed to installing the drives.
Using a crane, they install it into the dug hole. When the first link is laid, the joint with the base must be coated with cement mortar or tile adhesive. This way you will achieve tightness.
Do the same with subsequent rings. Before installing the second and third, first apply a layer of mortar to the joints. After installing all the links, re-process the joints inside the container. When the tank is installed, a brick partition is made inside.
Mounted for cleaning. The horizontal partition is made of a concrete slab with holes for plastic covers.
The last step is all the inner surfaces of the two containers.
It is worth keeping in mind that the outlet from the first container should be 10 cm lower than the first - the entrance from the house.
The angle of inclination is determined by the same parameters as for home wiring: with a pipe diameter of 110 mm, the height difference per 1 m is 20 mm.
Installation diagram of a drainage septic tank with two sealed tanks. The presence of a second container allows you to filter water from silt and other contaminants
To ensure that the slope of the pipe complies with the standards, the inlet of the second settling tank is lowered by 10 cm relative to the first.
Insulation is attached to the top of the tanks, as well as to the inside of the cleaning hatches. Cleanout or inspection hatches are installed directly above the overflow pipes so that they can be cleaned.
A concrete base is not required. Here the soil under the rings should allow water to pass through and retain sewage.
Therefore, a sand-crushed stone cushion is poured onto the bottom of the pit. The thicker the layer of crushed stone, the longer the well will perform its functions. After 5 years, you will have to replace the top layer of crushed stone with a new one, because the old one will silt up.
Keep an eye on the level. When installing the first ring on crushed stone, one edge may become warped. If this happens, simply lift the link with a crane and level the level with crushed stone.
The joints of the rings must be treated with a solution to achieve a tight seal. The construction of waterproofing and an inspection hatch is similar to a sump.
Organization of septic tank ventilation
Installation of ventilation pipes for septic tanks is justified only if aerobic bacteria are used. They intensively absorb air supplied through the hood.
Another type of biological bacteria are anaerobes. Their life processes take place without oxygen.
It is important not to confuse these two concepts, since some anaerobes die if there is air in the environment.
Added to settling tanks. Bacteria completely convert organic matter into water. In practice, this effect can only be achieved by installing complex filtration systems, but they still need to be used. Therefore, install a ventilation pipe in both sumps.
PVC sewer pipe for outdoor use is discharged from each container through a lid. A deflector is installed at the end.
Stage No. 4 - laying the central pipe
The sewer pipe, which removes sewage from the house, is diverted from the base to a distance of 5 m. The pipeline for external use is painted orange. This product differs from “home” pipes in having thicker walls. The permissible laying depth is 3 m.
A layer of sand of 8-10 cm is poured onto the bottom of the dug hole, as well as on top of the laid pipe. To ensure the best removal of organic waste from the house to the septic tank tanks, the pipe should run in one line. Turns of the central drain are strictly prohibited.
Method for making a hole for sewerage in the foundation
If the foundation has already been built and you need to lay a pipe through it, you must:
- Dig a pit on both sides of the foundation, in the place where you want to lay the sewer pipe. The depth of the entrance should be about 1.9-2.0 meters. The specific value depends on the depth of soil freezing in a given region.
- Clean the surface of the foundation from soil residues and waterproofing in the place where the hole will be made.
- Prepare a tool - a hammer drill or a drill with a diamond bit. The latter is preferable, but expensive. It should be used when working with foundations more than 0.4-0.5 meters thick. You will need a regular drill with drills for concrete, metal, and angle grinders.
- Using a hammer drill or drill, make a hole in the foundation. The process is significantly accelerated by a drill or angle grinder to overcome reinforcement and fragment the material.
When using a crown or drill, you need to take regular breaks to cool and remove waste material - otherwise jamming will occur.
- The hole made is trimmed and cleared of debris. A sleeve made of a thick-walled steel or metal-plastic pipe is inserted inside. You can lay a sewer pipe into it.
- The joint between the sleeve and the foundation is sealed from the outside and inside, and the waterproofing is restored. After installing the sewer pipe, it is better to additionally use a rubber cuff. The installation is shown in one of the pictures in the article.
Scheme of connecting the riser to the external circuit
Consumables, calculation and prices
You definitely need to decide on the volume of the septic tank. The calculation is carried out taking into account that each resident of the house uses 200 liters of water per day
. The wastewater in the septic tank settles for 3 days. Based on these data, we obtain the exact size of the waste tank.
So, a family of 4 consumes 800 liters. In three days, 2400 liters are accumulated. This means that you need to select a septic tank of exactly this volume
. If desired, you can make a small reserve in case the tank is maximally loaded. Septic tanks with such parameters cost from 20 thousand rubles.
Main fittings:
- Crosses for connecting 4 sections at an angle (80-100 rubles).
- Tees with a side section at 45 or 90 degrees.
- Elbow for connecting pipes with different heights (RUB 450/piece).
- Straight-line double-sided coupling with rubber cuffs in sockets (from 30 rubles).
- Revision (60 rub.)
- reduction of various parameters (from 40 rubles/piece)
- Hood hood (from 50 RUR)
Before you begin to equip a sewer system, you must carefully familiarize yourself with the basic requirements put forward for it. As we will tell you in a special review.
Water can be not only beneficial, but also harmful to the human body. Find out which coarse filter is best for your summer cottage.
Method of laying pipes for sewerage during foundation construction
When the foundation is just being built, laying a pipe under the sewer system will not be difficult. It is necessary to determine exactly on which side, at what distance from the house the septic tank will be located, and the place of connection to the centralized wastewater disposal system. Then, a trench is dug from this point to the house.
When constructing a trench, you need to make it so deep that the future sewer pipe is located straight, without connections or turns. Do not forget about the slope in the direction from the house to the drainage point. The optimal slope is 2-4 cm per meter of sewer pipe. A larger or smaller slope value will lead to disturbances in drainage and rapid clogging of the pipe.
When laying sewer pipes OUTSIDE the house, only appropriate orange pipes are used.
The depth of the pipe in the trench, when laying through the foundation, should be equal to the depth of soil freezing - plus 0.4-0.5 meters. Sometimes in publications it is written that a heated mass of wastewater is discharged through the sewer system, this will protect it from freezing. This is true, but in mild frosts. In case of severe frosts, at least a layer of ice forms on the walls of the pipes. Very quickly it will cause a jam, complete freezing of the contents. Considering that ice expands when formed, there is a high probability of cracking of the sewer pipe.
A sleeve is placed in the foundation, at the junction with the trench. This is a thick-walled metal-plastic, steel pipe with a diameter of 20-30 cm larger than the sewer pipe. For the latter, pipes with a diameter of about 0.1 meters are recommended, the sleeve should have a diameter of 0.3-0.4 meters.
The pipe is inserted into the center of the sleeve, the empty space is filled with waterproofing, shock-absorbing material. The outer and inner sides are sealed with cement mortar. Traditionally, tarred hemp, jute rope, and tow were used as a shock absorber and waterproofing agent. They were wrapped around the pipe and compacted.
Another option was to use a carefully sifted, thickly kneaded clay mass. It was placed on both sides of the tarred rope, instead of it. Nowadays, it is more practical to use waterproof construction foam. The gun is used to fill the space between the inner walls of the sleeve and the passing drainage pipe. Both sides are sealed with cement mortar. Often, the entry and exit points through the base of the building are additionally sealed with a rubber cuff. You can purchase it at a building materials or plumbing store.
Sewage pipes should be positioned with a wide socket TO THE HOUSE, and not vice versa. This further ensures that no leaks occur. Over time, the rubber seals will lose their tightness, and water will seep into the cracks. But with the specified installation method, they will be firmly silted and will not allow liquid to pass through.
Advantages and disadvantages of different types of tanks
The final element of the system is a storage and cleaning tank.
In the absence of a central collector for collecting drains, autonomous installations are used.
- Cesspool
. It is easy to organize on site and is the cheapest option. But it cannot cope with large volumes of wastewater. There is a possibility of dirt getting into groundwater and causing an unpleasant odor. - Do-it-yourself septic tank made of brick filled with concrete or ready-made reinforced concrete rings
. It performs its functions well, is durable and strong. The disadvantages include long installation times and serious construction costs. - Industrial autonomous installation
. Such a septic tank is more expensive, but the costs are covered due to the speed of construction, high quality and long-term operation of the equipment. - Biological treatment station
. The most expensive option, requiring constant electricity. It features the highest degree of purification and high productivity.
Video
Watch a video that shows the process of defrosting a water drain in a private house:
Building a sewer system in a private house is quite simple. You can do everything yourself, without resorting to the services of specialists, and save some money, and then walk around and be proud.
To begin with, you need to approve with your wife (husband) the location of all plumbing units. Sink in the kitchen, dishwasher, washing machine, toilet, bathtub and sink in the bathroom. In general, provide for every little detail...
Removing the sewer pipe from the house.
And just to summarize, I would like to mention the drainage system from the house. To do this, let me remind you once again about pouring the foundation. It’s great that at that time a sewer pipe and a water supply pipe to the house were installed. Here she is at the stage of pouring the foundation of the house.
Now, in order to connect to it from outside the house, it is enough to dig a trench in the right place, unearth the pipe, remove the bag, clean everything from dirt and connect the sewer pipe leading to the septic tank.
I’m afraid to imagine what would have awaited me if I had not thought through this tiny nuance while pouring the foundation.
Don't forget about the little things!