How to build?
Making each type with your own hands is quite possible, just stock up on the necessary literature and patience.
The first step in installing a slab type is preparing a hole in the soil for future installation. The dimensions and depth in this case are not fixed by anyone (although there are recommended dimensions - up to 500 mm), the developer must independently select the optimal characteristics.
The next stage is filling the pit with crushed stone (up to 10-15 cm) and compacting it. You can pour the prepared solution after waterproofing the structure with roofing felt. The composition of the fill in this case is 1/3/5 (cement, sand, crushed stone). Often this type is installed on the ground floors of small buildings.
A pile foundation or a foundation on screw piles is an equally reliable and easy-to-install type. For this, you will need to dig holes in the corners of the proposed slab (the diameter should be kept at least 20 cm). The holes are first filled with moistened sand and gravel (from 10 to 15 cm) - this must be done for ease of compaction.
Preparing the formwork for further concrete pouring requires the installation of a roofing felt sheet and an armored belt. After compacting, pouring and greasing the piles, the latter are mounted with each other and serve as bases for reinforced concrete or concrete slabs. As already mentioned, there is a type of pile foundation without excavation.
The recessed view is more complex in design and installation. There is a sequential installation plan here.
- Make sure that the pit you dug is 10-15 centimeters larger than the size of the stove itself. This figure must be observed on each side of the pit. The depth characteristics in this case are not fixed, everyone follows different rules, but most often it does not exceed one and a half meters.
- The next step is to compact and tamp the bottom of the dug pit. Crushed stone can be used for this (pre-moistened or not, it’s up to you to decide). After compacting the bottom of the pit, the thickness of the crushed stone should not fall below 15 cm.
- For more dense compaction, the developer can use a sandy loam layer up to 30 cm thick, the latter is moistened with a small amount of water for greater compaction. When the sand layer dries, you need to add another layer of crushed stone on top of it. This time – up to 20 cm.
- The next important step is to make wooden formwork. The inner surface can be pre-lubricated with bitumen, this will ensure waterproofing of your structure.
- Further installation of a recessed type is similar to the installation of a pile foundation, however, the formed space from the soil walls to the foundation in this case is filled with sand.
The non-recessed type is represented by three separate types: columnar, monolithic slab, lattice. Each of these types has its own installation characteristics.
- Columnar is a cheaper option and is presented in the form of several vertical supports, immersed in pre-prepared soil by no more than 30%. The approximate distance between supports should be 2 meters.
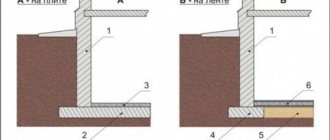
- A monolithic slab is more suitable for installing a foundation on soils without soil subsidence. But this type is applicable to lighter buildings, as it is susceptible to the influence of external factors - mechanical damage and others. Hydro- and heat-insulating elements can be installed under the finished monolithic slab to avoid freezing in the winter.
- The lattice type is perhaps one of the simplest types of non-buried foundation. Its manufacture involves the installation of a large number of slabs with reinforcement. This will save your resources when pouring. In addition, the lattice type is more resistant to destruction. If certain parts of the foundation break or form cracks, the risk of damage being transferred to another part of the foundation is reduced.
You can’t go anywhere without a foundation: we’re building a foundation for a stove
A mandatory attribute of a real wooden house since the times of ancient Rus', a sign of comfort and coziness is the Russian stove. The heroine of fairy tales is still popular today. But the real world is not so simple and magic will not save you from the hard work of installing a stove in your house. And we will not start with the head, but will take care of strong legs so as not to lose this very head. The foundation for the furnace is perhaps the most important part of the construction work. It depends on this whether the stove will serve us faithfully and whether it will not abandon us in the fight against time and nature. Let's move from legends to action.
Chapter one - arming yourself with knowledge
Before doing any work on installing any foundation for buildings, it is necessary to invite a professional geologist to study the soil. Based on geological research, experts must give an accurate picture of the underground component of your future home, and it is advisable to take care of this even before laying the foundation of the house itself, and not just the furnace. Geologists will draw up a description that necessarily includes the following points:
- Soil freezing level
- Groundwater leakage
- Type of working soil (required in layers)
- Seasonal deformations
Chapter two - choosing the type of foundation for the stove
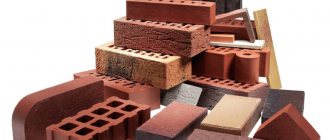
From whatever materials a Russian stove and its foundation are now built. And this part of everyday life itself is located not only in the house, they are also installed in the bathhouse. A Russian stove in a Russian bathhouse is beauty, and that’s all. The most common types of foundation:
- Slab (monolith)
- Pile
- Screw
- Tape
- Under the stone oven
- Foundation for an iron stove
installing a base for a stove in a wooden house The last type is interesting because, in general, it doesn’t exist. The structure of an iron stove is such that in order to provide a good foundation for an iron stove, you just need to make strong floors.
The choice of base type is influenced by the size of the future furnace, material and total weight. The foundation of the stove can be made either separately from the house support or by combining them. If the house already has a strip foundation, then the foundation for the stove is laid separately. When laying them together, you need to take into account that the stove is a massive structure. It is not a fact that the common foundation will be able to correctly distribute such a load, so it is preferable to think about a separate support for each element. Let's talk about the features of each type of foundation.
Slab foundations are widespread in our region. It is used, for example, under a brick oven. A reinforced monolithic slab is resistant to ground movement, but it will not cope with very massive buildings, the size of which inspires confidence, and groundwater also has a bad effect on it. Since the influence of water is detrimental to such a support, you cannot install it in a bathhouse. Cheap way, but not the most reliable. However, if conditions allow, then it is the best option.
A pile (columnar) foundation will cope well with moisture and clay soil. It is recommended to make the foundation for the sauna stove using this method. But the process is multi-stage: holes are drilled in the soil to the depth of freezing of the soil, the bottom is covered with crushed stone about 10 centimeters and compacted, roofing felt is rolled up for scorching and filled with concrete. After the structure shrinks, it is necessary to carry out waterproofing work. Foundation slabs are installed on top of the concrete pillars.
A screw pile is nothing more than piles with screws at the ends. This design has great strength: when screwed into the soil, the screws grab it and strengthen it, unlike other types of piles. Used in the same way as a foundation for a stove in a bathhouse. The disadvantages include the price and costs of specialists - without a team of workers it is impossible to install such piles with your own hands.
Chapter Three - Experimental
Let's move on directly to laying the foundation for the stove. In terms of popularity and simplicity (this is important for doing the work yourself), the slab foundation comes first, so to begin with, using its example, we will consider installing the base of the furnace. Materials: crushed stone, sand, concrete, rubble stone and much more. Stages of laying the slab base:
- Pit. We calculate its dimensions based on the dimensions of the oven - add another 10-15 centimeters to them on each side. The reserve is needed for proper installation of the formwork and installation of the filter. The hole goes deep to the level of soil freezing.
- Sand pillow. The bottom is filled with sand to a depth of 15 cm, thoroughly poured until the sand level stops decreasing, and compacted.
- Stone flooring. We fill the top 30 centimeters with crushed stone; you can mix it with small stones and brick fragments. All voids are filled with another thin layer of sand. On top of another 10 cm of crushed stone and two layers of roofing felt.
- Formwork. Plywood or planks are taken and installed around the perimeter of the well. Every half meter a support is placed for strength. We maintain a distance of 10 cm between the formwork and the edge of the pit.
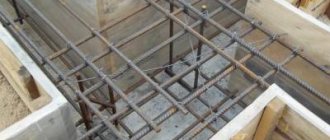
- Reinforcement mesh. We fasten the reinforcing mesh. We pour concrete in a layer of 4 centimeters, wait until it sets. After that we place a grid in it.
- Concrete. Concrete composition: 1 share of cement, 3 shares of sand, 5 crushed stone, plus water. We moisten the formwork. We begin to pour concrete in layers, knocking out the air. Each layer is 20 cm. We level the top layer and, as soon as it has set for the first time, cover it with roofing material.
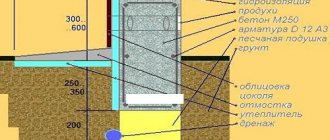
Foundation laying calculations
To calculate the size and thickness of the foundation, take into account the total weight of the stove
In order to correctly calculate the characteristics of the future foundation, you will need to determine its expected dimensions. The latter depends on the weight of the sauna stove structure and its dimensions. When installing a standard brick stove, the average mass of undried masonry is taken to be about 8 tons; after drying, it is approximately halved. At the same time, the option is not excluded when the monolith expands over the area it occupies (for the chimney). This approach to forming the base allows you to avoid uneven shrinkage of the two components of the brick structure.
The depth of placement depends on the following factors:
- characteristics of the soil in a given area (its heaving, for example);
- the freezing point characteristic of these places;
- indicator of depth of the foundation of the main building;
- depth of groundwater flow.
It is important to take into account the stage in which the construction of a residential building is at the time of construction of the foundation for a brick stove. On sandy soils, it is laid at a depth of approximately 80 cm. When calculating the option of heaving unstable soils, the required indicator is selected taking into account the freezing point of the soil.
Basic rules for laying a foundation
Whatever option you choose for the foundation for the stove, and whatever size you decide to implement, there are a number of basic rules that you should not ignore:
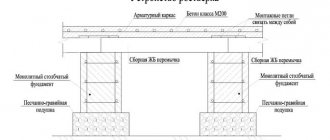
The foundation for the stove must be made independent, in no way connected with the foundation of the entire house. Why? The fact is that during operation, the house may shrink slightly. When lowering, it should not pull the stove along with it, as this can lead to its deformation, deterioration of draft and disruption of technical properties.
The foundation for the furnace is separated from the general one
In some cases, it is possible to partially combine two bases by connecting them with one wall.
- If both foundations (for the house and for the stove) are located close to each other, you need to fill them with sand 50 mm thick.
- If the foundation for a common house is strip, then the base for the stove should in no case be in contact with this foundation.
- When choosing a place for a stove and, accordingly, a foundation, you should not only rely on wishes, but also on factors such as: the location of doors, windows and roof beams. The location of the chimney should be taken into account so that the pipe does not fall into the ceilings and beams during the construction of the stove.
- When calculating the size and depth of the foundation, be sure to take into account the weight of the floors and the weight of the stove along with the chimney.
The size of the foundation is influenced not only by the dimensions of the furnace, but also by the density of the soil on which it is built. The main load in the furnace is usually created by the chimney, so when designing the furnace, it is necessary to place it closer to the center of the base. This will help avoid asymmetrical loading and premature incorrect shrinkage of the oven.
3298747c3106dbca1d54e8cc0871aa17.jpe
Sometimes, when designing a very large and massive stove with a stone chimney, stove makers create a separate base for the chimney.
Also, the choice of foundation depends on the material of the furnace. For a metal structure and a stone one, it will be different in depth; the entire mass of a brick oven is at least 400-500 kg, while a metal oven weighs approximately 150 kg.
How to calculate the weight of a stone stove
In principle, for a small metal stove you don’t have to build a separate foundation, especially if it is being built in a house that stands on a tiled monolithic foundation.
The density of the soil and the degree of its freezing play an important role in determining the size of the foundation. The climate in Russia is accompanied by fairly harsh winters throughout almost its entire territory. Therefore, the foundation for the furnace must be laid to the entire depth of soil freezing.
The type of soil is also of great importance.
Types of soil
It comes in three types:
- clay;
- sandy loam;
- loam.
In places where a large number of rivers, reservoirs, and lakes predominate, sedimentary types of soil are usually found. Here, it is better to entrust the construction of the foundation for the stove and the house to professionals, so calculations of the water passage point must be carried out.
In Central Russia, the most common type of soil is loam, which is a mixture of sand and clay. It is clay that predominates in it, so this soil is less plastic.
Loam
Building a foundation on such soil is usually associated with hassle and additional problems, since when dry the loam is crumbly, when frost sets in it begins to “heave”, and when there is a large amount of sediment it becomes viscous.
Clay soil
Therefore, in this case, the depth of laying the foundation for the furnace must be made above the freezing point.
But in forested areas, on the contrary, it is necessary to lay the foundation for the stove below the freezing point of the soil and the foundation must be built on a sand cushion 60-90 cm thick.
One of the most reliable types of soil for building a foundation is gravelly and rocky, but, unfortunately, sometimes you have to build a house and stove on an unstable one. Proper construction of a reliable foundation will help offset this fact.
63e1979d30350ce9bc0acaa98723d61f.jpe
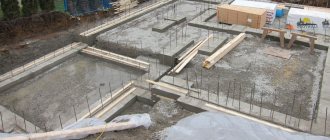
Foundation work is a responsible matter
Proper laying of the foundation for the furnace.
The construction of the foundation begins with digging a hole (or foundation pit). There should be a margin of 5 cm, that is, the dimensions of the pit are larger than the base of the stove by this distance. A similar space is used for the main chimney (this means the base for the foundation for the chimney).
Lay the foundation at least 50 cm deep. It is designed for single-story stoves that do not have mounted chimneys. However, furnaces are also built with such pipes. Only in this case should you dig a pit approximately 1 m deep (minimum 75 cm), and you can rest assured about the foundation for the pipe. Its operation will be at a high level thanks to technically correct installation. The house will always be warm, and smoke will not disturb the residents.
The bottom of the excavated trench must be properly leveled and compacted. This is important for subsequent masonry and foundation for the stove. The foundation is made using a level that is placed on the rule. Then it will be impossible to find fault with the horizontal surface of the bottom. Continue building the foundations without using mortar (dry) for the first row. Brick, crushed stone and other stone materials are suitable as materials. Having laid them out, they should be compacted thoroughly. After this, fill with liquid solution and level.
The foundation for a Russian stove consists of outer and inner rows, which differ in their technological process. For external ones, they most often take brick or rubble stone, which are laid on a thick mortar with the obligatory bandaging of the seams (placed “under the shoulder blade”).
How to choose and prepare a place?
The type and size of the foundation are determined by the size of the barbecue area, which, in turn, depends on the size of the stove, the number of people, the direction of the winds and other factors. If you plan to create a gazebo, inside of which there will be a brick stove, work and dining tables, then the foundation corresponds to the contours of this gazebo with reinforcement at the location of the stove. Let's look at the most difficult option:
- The site is selected based on the requirements for distance from wooden buildings and the prevailing wind direction.
- The site is planned, the top fertile layer of soil is removed.
- The pillow is filled with ASG.
- Adding a layer of river sand.
- Construction of formwork, inside which a reinforcement frame is knitted.
- Pouring the slab foundation, allowing the concrete to completely harden.
Backfill is required to create a permeable layer that will absorb rain or melt water. This option is good in the presence of heaving soils that have seasonal movements due to changes in the level of soil water. The slab foundation seems to “float” on the surface of unstable soil.
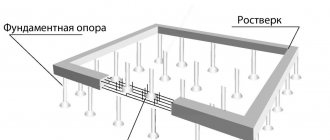
When using a pile (pile-screw) foundation, the platform hangs above the ground, which promotes drying and greater durability of the material. The piles are tied with a load-bearing belt - a grillage, which serves as a support for the concrete platform. The lack of contact with the soil, eliminating capillary suction of moisture, and the support of the piles on dense layers of soil make the option quite successful, especially since, as a rule, no basement is required.
A strip foundation is a trench with formwork and reinforcement cage placed inside, into which concrete is poured. The trench must be deeper than the soil freezing level, otherwise the tape may tear or break during seasonal movements. This condition can be overly complicated for small furnace sizes, but for large structures the method is good and quite economical.
The final choice of foundation is made after examining the condition of the soil, making a decision on the size and design of the site and the furnace itself, and financial capabilities.
Tools and materials for building a foundation
The first thing you need to do before starting construction work is to stock up on the necessary set of tools.
The work will have to be carried out not only in excavation, but also in carpentry, so prepare the following tools:
- Bayonet shovel (needed for digging the main pit).
- Scoop shovel (convenient to prepare sand-cement mortar).
- Hammer.
- Hacksaw or saw.
- Sieve for sifting cement (mesh size 1*1 mm).
- Sieve for sifting sand (mesh size 2*2 mm).
- Bucket for water (for preparing cement-sand mortar).
- A metal trough in which we will prepare the solution.
- Building level.
- Tape measure and pencil.
- Stapler.
- Concrete mixer.
Materials you will need:
- Boards (for making formwork).
- Polyethylene (for waterproofing formwork).
- Sand.
- Cement.
- Gravel.
- Reinforcing mesh or bars.
We begin to pour the foundation for a brick oven with our own hands
Foundation for a brick oven
Step 1. Marking for the foundation and pit
- Once you have decided on the location of the future furnace, you need to correctly calculate its dimensions based on power. It depends on the area of the room, the number of doors, windows, etc.
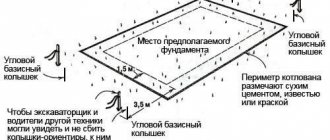
- We draw the required size of the oven on the ground. The foundation should be 15-20 cm larger than the heating structure. Make markings and install pegs that will mark the boundaries of the pit for the foundation pit.
- Using a bayonet shovel, dig a hole 70-100 cm deep, depending on the density of the soil and the climate zone (see above).
- We lay a sand cushion 10-15 cm thick at the bottom of the trench. We compact it tightly with a shovel and pour a layer of medium-fraction gravel to a height of 30 cm. Pour a bucket of water onto the surface of the sand-crushed stone cushion and compact it tightly.
Step 2. Installation of formwork and reinforcement
- Let's start building formwork from boards. In principle, any old boards or plywood that you have on the farm are suitable for formwork. This does not in any way affect the technical properties of the foundation.
- The formwork is a wooden box, which, for reliability, is fastened at the corners with metal corners. Connect the boards together using nails.
- We lower the finished formwork to the bottom of the pit.
- After the pillow is firmly compacted, it is necessary to waterproof the base. To do this, we measure the size of the pit onto the polyethylene, cut it out and attach the polyethylene to the walls along the perimeter of the formwork using a construction stapler.
- Reinforcement of the foundation is necessary in order to give rigidity to the entire structure. We will reinforce with steel rods with a cross-section of 12 mm, which must be connected to each other by welding in the form of a frame or metal wire with a cross-section of 0.8 mm.
- The final work on the construction of the foundation is joining the floor to the foundation. It is better to do this by laying an even row of bricks.
Step 3. Prepare the concrete mixture for pouring the foundation
We prepare a mixture of the following proportion: for 4 parts sand, take 1 part cement + 3 parts crushed stone of the middle fraction.
Concrete mixer
Stir the dry mixture well with a bayonet shovel and add water. Mix the solution well using a concrete mixer. In consistency, it should resemble thick sour cream.
Preparing concrete solution
We fill part of the pit with this mixture, not reaching the level of the base floor by 8 cm. This work must be completed within 24 hours. The concrete solution should be complete and not layered.
Fill and wait 2 weeks
After you fill the entire pit with concrete, you need to once again check the horizontalness of the coating with a building level. After the solution has completely dried, it will be more difficult to correct your mistakes.
We check the levelness of the foundation with a building level
Cover the foundation with a layer of polyethylene or roofing felt and leave for 2 weeks until completely dry.
We remove the upper part of the formwork only after complete drying, beating the boards with a hammer. Pour crushed stone and sand into the resulting gap and compact it well.
Soil for laying the foundation for a Russian stove
To begin with, before building a Russian stove, it is worth understanding that the foundation for the stove must be strong and reliable, and most importantly, compatible with the ground without depending on the foundation of the wooden house.
The Russian stove is heavy, so the foundation for the stove is placed on soil that will not shrink under load. In this case, it is necessary to take into account not only the structure of the soil, but also its degree of freezing, as well as the groundwater level. A geological study of the soil of a construction site will help determine the correct depth of the foundation and make the final calculation of the structure according to the results obtained.
The top layer of soil with a thickness of 10 to 50 centimeters must be removed, since this layer contains a large amount of organic impurities that give the soil a porous structure. Further, under the plant layer there are soils of the most diverse origin, which can be divided into four main types:
– continental soils have the form of a gravel-sand mixture, which was formed as a result of the destruction of natural rocks. These are the most reliable soils for laying a foundation for a Russian stove.
– sedimentary and alluvial soils arise in places where rivers previously flowed or seas and lakes were located. This type of soil is well suited for laying a foundation on it, since it is quite dense. An exception may be loess soils and porous clay, since when saturated with moisture the soil turns into mush, and the clay, absorbing moisture, swells and, upon freezing, increases significantly in volume.
Under these circumstances, a pit is dug to the full thickness of the clay layer and slightly below the soil freezing line. The bottom of the pit is compacted with crushed stone, a sand cushion with a thickness of 40 to 100 centimeters is installed on top, and a rubble foundation is laid on top.
– bulk soils can be found on the site of former construction sites or previously located buildings. Foundations can be built on this type of soil provided that there is no wood waste in it. It consists of compacted sand mixed with gravel and crushed stone. Compacted soil is considered to be soil that has lain for at least three years; for a shorter period of time, it must be compacted and a layer of crushed stone compacted into it.
– on permafrost soils, the base for the foundation can also serve as excellent thermal insulation between the soil surface and the Russian stove. Typically, stoves on the type of soil in question are built on floors reinforced with piles. Piles are not driven into the ground, but are lowered into wells previously drilled for them. The top plant layer under the base of the stove is not disturbed, since it serves as a good heat-insulating material.
Errors in the initial calculation of the foundation can lead to the following consequences, in which the roaster may fail completely: the formation of through cracks in the furnace masonry; violation of the integrity of the chimney channels; destruction of individual sections of masonry. In case of the listed breakdowns, there is only one way out - to disassemble and reassemble the stove in a new way, but even after repairing the damaged areas, the defects appear again.
Construction of the foundation for the furnace: general recommendations
There are several requirements for the base under the stove. And two of them can be identified as the most important:
- It must be durable and reliable.
- Even seasonal soil movements should not affect its design in any way.
At the same time, it is very important to take into account what kind of soil is in the area where the bathhouse is being built: black soil, sandy, clay soil, or is it a wetland?
The following readings indicate how deep the foundation should be for a brick stove in a bathhouse. The soil type is taken:
- sandy - 50 cm;
- rocky - 25-30 cm;
- clayey - 70-80 cm;
- wet soil - 100 cm.
This option is also worth considering separately if there is bulk soil on the site. In this case, the foundation must be built taking into account both the depth of its freezing and the level of dense untouched soil.
What kind of foundation can there be if the stove in the bathhouse turns out to be no more than 700 kg? In this case, you can do the following:
- You need to lay out a clay mortar on top of the finished floor;
- then an asbestos sheet is laid;
- then you need to put a sheet of metal (you can use roofing iron);
- Only now can you install the stove.
In this case, it will be possible to achieve a double goal. Firstly, all fire safety standards will be observed. And secondly, the thermal insulation performance of the floor will increase, i.e. the heat from the stove will not escape under the floor.
The base for any stove can be exactly the same, even if its weight does not exceed 200 kg. But still, experienced builders note that this arrangement option cannot be called 100% reliable, so they advise not to do this if the floor in the bathhouse is wooden. It is better to remove the wooden flooring where the stove is installed and make brickwork. But in any case, underneath you will need a cushion of sand and crushed stone.
Rubble stone foundation
The construction of the foundation of a brick oven in a wooden house, made of rubble concrete or rubble stone, has an important advantage: this material does not shrink.
The process of building a rubble foundation for a stove in a house with your own hands is much easier compared to reinforced concrete.
True, it cannot be done without a reinforced concrete element here either - the stone is not laid on the cushion itself, but on a slab 50-100 mm thick. But you can buy it ready-made, and then you won’t have to bother with making a reinforcing frame and waiting a long time for the concrete to mature.
The rubble stone is laid in compliance with the dressing. The hardened masonry is covered with two layers of roofing material using hot bitumen.
The foundation structure for a brick oven in a wooden house is completed by masonry consisting of two rows of bricks.
Articles that may be useful:
Video about the foundation for the stove.
Foundation for a furnace on stilts
If you decide to build a shallow foundation, you will need a pile foundation under the base slab. You can do this as follows.
The plant layer is removed to a depth of 200 - 250 mm.
Foundation on stilts
- Using a drill, holes are made with a depth of 1000 mm, while a 200 mm diameter will be quite enough. A layer of crushed stone is poured into the bottom of the wells and compacted. The location of the piles should be such that your foundation rests on them.
- Sleeves of the appropriate diameter are rolled up from roofing felt and inserted into the wells. You can pour the solution.
You can do it differently. If you have asbestos or polyethylene pipes of the appropriate diameter at your disposal, after crushed stone is poured into the bottom of the wells, the pipes are inserted there. Of course, the pipes will need to be aligned to the same level. Approximately 7–10 days after pouring the piles, the foundation itself can be poured.
Foundation slab on piles
Brick foundation for the stove
It looks like a slab laid on the ground, reinforced in the bottom layer. The thickness of the slab is 12-15 centimeters. Area - the larger it is, the more reliable the entire structure of the stove. However, on loamy and clayey wet soils, even the largest slab may not withstand the frost heaving that occurs when the soil freezes.
Therefore, for reliability, stability and, as a result, durability, stoves use a number of solutions designed for these soils. A certain number of piles are preliminarily created under the slab. And then the slab itself rests on them.
To install the piles, holes are drilled 100 centimeters deep and 20 centimeters in diameter, using a typical hand drill. Crushed stone is placed at the bottom of these pits at a depth of 10-15 centimeters. Rolled up tubes of roofing felt act as formwork. They are inserted into the hole, and then concrete is laid to the level of the foundation slab. After about 10 days, the foundation slab itself is laid. The foundation for the stove is ready.
Any foundation, regardless of its design, is usually waterproofed along the upper edge. This is done to prevent moisture coming from the soil from penetrating into the brickwork. Waterproofing looks like two layers of roofing material coated with hot bitumen.
Types of foundations for a stove
The climatic features of the area, the condition and structure of the soil, limit the design options for the base that distributes the load. The main types of foundation are divided into:
- Concrete slab laid on a leveled surface. Used for light stoves and barbecues if they are built on the ground. The total number of bricks of a building placed on such a foundation should not exceed 500 pieces. In the case of building a more massive building, choose the following foundations from this list.
- Reinforced concrete is the most common. The depth begins below the freezing point of the soil, so the value differs depending on the region.
- Rubble concrete. The rubble stone is laid out in layers in the prepared pit. Filled with concrete mortar. The stone layer is filled, repeated to a given height. Allows you to reduce solution consumption and is economically beneficial in areas where rubble stone is present. In other regions it is not profitable.
- The foundation on piles is shallow. A reinforced concrete slab laid on supports is suitable for areas rich in groundwater.
Before starting work, when marking the location for constructing the foundation for a brick kiln, add 50-100 mm in each direction to the dimensions of the base. This will ensure that the correct support is always wider than the structure being supported. Plus, it will eliminate the influence of ground displacements in the future.
Foundation laying technology for a Russian stove
The beginning of work on arranging the base for the stove begins with digging a pit. We will dig a hole for the foundation with dimensions slightly larger than the main parameters of the furnace, approximately 15 centimeters around the entire perimeter. This is done to make it easier for us to install the formwork and make a drainage side layer of crushed stone, sand, broken bricks, etc. Note that the foundation for the furnace must exceed the parameters of the furnace itself by 5 centimeters so that the loads on the base are distributed evenly.
Next, there is a need to lay a filter pad at the bottom of the resulting pit. We will cover the bottom of the pit with a layer of sand up to 20 centimeters thick and, having compacted it a little, water the entire layer with water several times until the sand stops settling under its own weight. When watering and shrinking, do not forget to add sand to the specified thickness. After complete shrinkage, level the layer of wet sand and compact it thoroughly.
The filter pad is supplemented with a layer of crushed stone about 20 centimeters thick. The crushed stone backfill can be mixed with broken bricks and small stones, and a thin layer of sand can be poured on top. We will pour water over the sand again so that as it settles, it fills the voids that have arisen on the surface. Next, we again fill in a layer of crushed stone 10 cm thick, which we compact well and cover with roofing felt in a couple of layers.
In order to fix the shape of the future base of the furnace to form a monolithic concrete foundation, it is necessary to use construction formwork. Formwork is made from plywood sheets and boards. The outer walls of the formwork are supported by pre-installed supports. Along the perimeter, after installing the formwork, we should have a gap of 10 cm to the edge of the trench. To prevent the box from drawing out the necessary moisture from the concrete, the walls of the formwork must be well moistened.
Next, when the trench, filter pad and installed and moistened formwork are completely ready, pour the first layer of concrete mortar up to 5 cm thick. The first layer of concrete will help fix the shape of the future foundation for the Russian stove. After the concrete has hardened, we begin tying the reinforcement. We knit the mesh of reinforcement into cells using wire. We check the verticality and horizontality of the resulting metal frame, while the ends of the rods should be located at a distance of about 2 cm along the entire perimeter of the future base.
We will prepare the concrete solution using the material and observing the following proportions: one part cement, three parts sand, five parts crushed stone and fill it with water to obtain the desired consistency.
Concrete is poured gradually in 20 cm increments, with each layer compacted and spilled with water. The last poured layer of concrete must be leveled and covered with a layer of roofing material or tarpaulin before it dries completely.
Adviсe
As you can see, making the necessary foundation for a stove is a complex but necessary process for the good operation of any heating system. There are several simple, summing up points that, if used correctly, will help you properly organize any stove in your home.
- Determine the parameters of your territory. These are: environmental conditions, possible mechanical damage, calculate the load and pressure from the stove. Carry out a deep analytical calculation - from your financial capabilities to groundwater level measurements. The more accurate the data, the easier it will be to choose the appropriate type of foundation, and the less hassle its operation will bring you.
- Everyone has their own financial capabilities, but try not to skimp on equipment, solutions and mechanisms for high-quality pouring. Remember, price equals quality, and the higher it is, the greater the chance that your installation will last a long time and will bring you only satisfaction and joy.
- Explore other resources, electronic and written, with quality information about foundation installation. You should understand that those who are aware are armed in case of unforeseen situations. And experience is a matter not only of theory, but also of practice.
See below for the process of building a furnace from laying the foundation.
Foundation calculation with example
The choice of base for the furnace directly depends on the total weight of the structure; to do this, you first need to calculate it by counting the amount of brick and cement mortar used. Typically, 1 cubic meter of brickwork weighs 1350 kilograms - keep this in mind.
If the total weight of the heating system exceeds 750 kilograms, then a high-quality foundation will require a strong and durable foundation, with a deep foundation made of rubble or concrete stone. With a lighter structure, a base made of roofing iron, asbestos sheets, or even ordinary wood may be suitable.
When making calculations for the foundation of a brick stove, take into account the type of soil on the site. On soft, swampy and easily sinking wet soil, the foundation should have a height of at least 150 centimeters, while on dry soil the foundation can have a depth of only 70 centimeters.
Here is an example of calculations:
We decided to install a brick kiln, using 0.8 cubic meters of brick and using cement mortar with a total weight of 70 kg. We will carry out the installation on dry black earth soil, with large stones under the base for foundation stability. First, let's calculate the total weight of the structure:
1350*0.8=1080kg
We add 70 kg and we get the total weight of the heating system - 1150 kilograms. Since our soil is quite hard, but the furnace has a large mass, we will install a foundation with a depth of 1 meter - this will be enough for long-term stability.
If the foundation for a brick stove is laid before the walls are erected, then before installing it you need to determine where the heating system will be installed - it will be impossible to change the decision, so before you start building the foundation, think about where exactly your stove will be located.
Stages of the technological process of masonry “under the blade”
Scheme of laying the foundation for the furnace.
- You should decide in advance on the placement of the base for the Russian stove. Remove all unnecessary objects from the surface and level it;
- if necessary, compact the soil layer;
- laying the first row dry. If they make a foundation for a stove on weak soil, then they also make bedding;
- compacting stones with a tamper;
- when voids appear, you need to fill them, for example, with crushed stone, compact them again using a tamper and fill them with mortar;
- installation of beacons for the second row is necessary to ensure the stability of the stove. To do this, identical outer stones are selected, which will become beacons. A mooring cord is also attached to them. After making sure that the stones are the right size, after laying them dry, a solution is applied to them. Now the stove will definitely not tilt;
- When laying a milestone row, stones are laid alternately: the narrow side, then the wide side, ensuring ligation with the middle part of the masonry. In this case, the foundation for the stove will last for many years;
- external mileposts are erected using mortar. Crushed stone and mortar, which is necessary for the next row, are placed in the voids.
The foundation for the chimney is built in exactly the same way, using similar technological processes.
Essential tool for continuous work
Compositions of mortars for laying furnace foundations.
Each working stage of constructing a foundation for a stove requires the use of certain tools. To properly carry out the masonry, you will need a jointer, a trowel, a shovel, levels, a tape measure, as a rule, a hammer-pick, and a mooring cord. It is necessary to prepare construction and insulating material and mortar in advance. Templates in the shape of a metal square can be used to determine the rectangularity of the foundation walls for the furnace. A plumb line is also suitable for this purpose.
You can’t do without a tamper: without it it’s impossible to level the surface. And on a flat surface, the foundation for a Russian stove will serve for a long time and faithfully for many years.