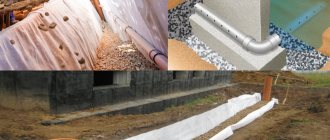
Laying sewerage under the foundation
Laying sewer pipes is the most important stage in the construction of a house; it is carried out after the excavation has been excavated. The pipes are laid in the ground or sand and gravel cushion under the foundation.
Theoretically, in a private house, it is possible to lay a sewer system under the foundation and after the construction of the house, but this may violate the integrity and geometry of the entire structure or simply fail due to thick walls or depth, so it is recommended to lay communications during the construction stage. Not to mention that drilling a finished slab is difficult, costly and time-consuming.
Important: it is rational to lay and test sewerage and communications at the initial stage of building a house in order to avoid unpleasant consequences and unnecessary expenses.
Sewerage is laid in two ways:
- Through the foundation - for basement floors with large depths;
- Directly to the bottom of the pit under the foundation itself, if it is shallow. Here communications are located below the freezing level or are insulated with foamed polyethylene.
Preparatory work
Before installing a sewer system under the foundation, certain preliminary steps must be taken:
- prepare all the necessary materials - pipes, insulation, fittings, sealant, etc.;
- draw a trench at the required depth;
- make a dig under the foundation strip, or a hole in a recessed wall;
- insert the sleeve into the hole.
It is necessary to lay the shortest direct route to the collector or septic tank. There should be no height differences or bends, otherwise you will have to constantly break through any blockages that arise, and in winter this can lead to pipes freezing and bursting.
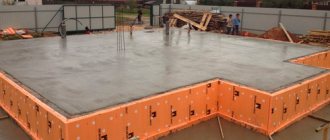
If the type of base is a monolithic slab, the work takes on increased responsibility and complexity. Sewerage is laid under the foundation slab before pouring, at the stage of creating a sand and gravel cushion. This is a very important stage, since the pipelines are filled with concrete, after which access to them becomes impossible. If errors are made during installation or connection, the slope or technological gap protecting the pipe from the pressure of the slab is not maintained, it will be impossible to repair or restore the system. In this case, the foundation and sewerage are done in parallel with constant consideration of the progress of work in the adjacent direction.
How to correctly lay pipes under the foundation?
Properly laying a sewer system under the foundation is not an easy task even for qualified builders, not to mention amateurs and non-professionals. This is a complex process that requires utmost attention and a professional approach at every stage and strict adherence to technologies: maintaining the slope, connecting bends, installing revisions, and so on.
- In accordance with all of the above, the scale of the work is determined and a drawing is drawn up, which indicates the location of the sewer risers, the joints of the pipes and their turns, the location of the installation of the septic tank or cesspool;
- Plus, it is necessary to calculate the diameter of the pipe depending on the expected volume of liquid passed through (most often 110 cm), as well as the angle of inclination for draining wastewater;
- It is very important that the slope falls within the range of 1 to 4 cm per meter, because... a small angle of inclination will cause stagnation, and if the inclination is too great, the liquid will flow out faster and not be cleared, which will cause a blockage.
There are also a huge number of points that the average person doesn’t even know about.
If you plan to lay a sewer system in the foundation of a house yourself, then you will have to master the basics of engineering, draw up a plan/drawing, and at the same time remember to comply with all sanitary requirements and standards. All this will take a lot of time, effort and money to eliminate the inevitable errors and miscalculations.
Important: taking into account all the nuances, only professionals who master the technology and have a full range of necessary tools and equipment can competently lay a sewerage system under/through the foundation.
What causes material residues to appear?
Usually - due to the inexperience of the builder. It seems like I figured everything out, bought several bags of cement and sand, diluted the solution, and after work there was still half a trough of unused mixture left. In some cases, the culprit is the unexpected end of the working day: I mixed concrete to fill the blind area for the house, and then suddenly it started to rain. Well, don’t forget about various distractions that force you to take time away from work and deal with more important matters. So then think about where to put the prepared material.
Remains of concrete mixture
Basic rules for laying sewer systems:
- The sewage system under the monolithic slab is located in pre-dug trenches;
- Pipes made of modern polymer materials, the guaranteed service life of which exceeds 50 years, are laid under the slab foundation;
- Pipes outside the building must lie 70 cm below ground level or have thermal insulation;
- With a strip foundation, the pipes are laid after the formwork is installed, so as not to miss the location of the sleeves or the pipes themselves;
- With a recessed strip base, sleeves are first inserted into the formwork, then the foundation is filled with concrete, and only after that pipes are inserted into the holes of the sleeves;
- With a shallow foundation of the strip type, sewerage pipes are laid in trenches below the level of the “tape” itself;
- The gaps between the foundation, sleeves and pipes are filled with sealant, and the diameter of the sleeve should be 5 cm larger than the diameter of the pipe itself, so that the pipe does not bend when shrinking;
- Before concreting, tests are carried out by pouring and collecting water to determine if there are areas of subsidence in the pipelines that could lead to blockages in the sewer system.
This is a standard list of work and requirements for sewerage during foundation construction. However, the full list of work is determined individually for each case and depends on the scale of the work, type of construction, season, climate, etc.
How to establish communications
To lay the pipelines of life support systems inside the cottage, it is necessary to make an input at a certain level, in accordance with the standards SP 31.13330 and SP 32.13330. The structural features of foundations should be taken into account to ensure the highest possible maintainability of engineering systems.
Requirements SP 31.13330 (water supply)
The sleeves are placed in the foundation when installing the formwork; it is not recommended to make holes after the concrete structure has gained strength by impact. When designing nodes for passing a water supply through a foundation slab or strip, it is necessary to take into account:
- the minimum permissible diameter of the communication pipe (sleeve) is 50 mm;
- to accommodate linear expansions during seasonal temperature changes, compensators should be used;
- the laying depth must exceed the soil freezing mark by 0.5 m, or polystyrene shells or heating cables are used to heat pipes;
- it is necessary to take into account the load on the soil from transport traffic;
- the entry hole in the supporting structures must be at least 0.2 mm larger than the diameter of the pipe; tightness is ensured by an oil seal at high groundwater levels or elastic materials in dry soils.
Sealing of communications inputs at high groundwater levels.
Water supply can only be installed vertically in floating slabs. In the underground, basement floor of a recessed strip foundation, the pipes enter horizontally. When using MZLF or NZLF, the main line passes under the tape, rises vertically inside and passes through the ceiling or floor along the ground.
Standards SP 32.13330 (sewerage)
Scheme of sewerage supply under the foundation
The laying of a sewer pipe through the enclosing structures of the cottage must meet the following requirements:
- minimum depth of 0.7 m from the blind area to avoid mechanical damage from vehicle traffic, people, soil cultivation;
- insulation with a heating cable, polystyrene foam shells when laid above the freezing mark;
- the outlet should be 1.5 - 5 m from the water supply with a sewer diameter of up to 20 cm, larger than this size, respectively;
- the slope of the sleeve or hole in the tape is 4 - 7 degrees to ensure gravity flow.
How to lay a sewer system into a finished foundation
At the design stage of the building, sewerage is already provided for by the project; not only the installation depth of the pipes is indicated, but also the method of sealing them, the angle of inclination, the maximum permissible diameter of the pipes and a number of other parameters. But what to do if you need to lay a sewer system in an existing strip foundation?
To begin with, you need to remember the features of each type of foundation. It is not difficult to install communication systems in a columnar base; there is enough space for arranging holes and channels with pipes. A strip foundation is a completely different matter. There are two key ways to lay sewer lines:
- External method on the base with the installation of a complex heating system.
- Underground method above the sole with direct entry through holes in the strip base.
The underground below the base under the load-bearing elements is structurally the most complex, because it is necessary to provide not only optimal pipes for such depths, but also install powerful pumps for pumping out liquid.
Design of sewer communications
Designing a sewer system for a residential building yourself is not so difficult; here you need to remember a number of rules:
- first you need to determine the installation location of the main equipment and calculate the pressure in the system;
- arrange water intake points in the house as compactly as possible to reduce the cost of installing pipes;
- provide a septic tank according to sanitary and hygienic rules, as well as equip a filtration system;
- even if the strip foundation is built on a flat area, all sewer pipes must be installed at an angle to increase the outflow rate and prevent the formation of blood clots;
- the outer part of the sewer system is made only straight, without unnecessary bends and turns;
- all pipes must be welded or soldered to the highest possible quality, and initially tested for leaks by ultrasound or running water under high pressure.
Preparing for sewer installation
Preparatory work consists of several stages:
- Selection of pipe material. Now you can buy plastic and metal-plastic sewer pipes, as well as steel and galvanized ones. The price for each type of pipe differs significantly, as does the method of installation. But it is polymer structures that are popular due to their practicality. They are light, durable and practically indestructible, but prone to deformation.
- Choosing the optimal diameter. All plastic pipes are hollow and smooth inside, so a calculation is immediately made of the maximum permissible volume of liquid that will be simultaneously pumped through the system. Pipes with an internal diameter of 32 mm are considered optimal, but for large private houses it is better to buy products with a diameter of 100 mm.
- Calculation of the angle of inclination of the sewer system. There are two options for calculating the angle of inclination of the main system. If communications are located in the basement of a house on a strip foundation, then the external outlet will be made either in the foundation or under the sole. When choosing the option with a hole in the wall, the upper edge of the basement, where all distribution units will be installed, is taken as the zero level. And the bottom of the septic tank or the place of entry into the city sewer is the lower part. The difference in height will be the required angle of inclination. If it is less than 5-8 º, then you need to additionally install pumps or check valves.
It is recommended to lay all pipes below the soil freezing depth. If this is not possible, then the pipes are laid in a trench on a sand cushion and additionally covered with soft but durable heat-insulating materials, for example, felt.
Is it possible to fill sewer pipes with concrete?
- home
- Products Product catalog
- Compatible Material System
- Compliance with SP 28.13330.2017
- Environments according to SP 28.13330.2017
- Colmatation, penetration depth
- Documentation
- Price, prices
- 1. REPAIR AND PROTECTION
- 2.WATERPROOFING
- 4. ADDITIVES
- WORKS
- OBJECTS
- USEFUL TIPS
Learning waterproofing. With your own hands
How to seal a joint between concrete and plastic pipe
Waterproofing joints between concrete and plastic pipes
Increasingly, in the construction and reconstruction of underground structures, basements, pools and tanks, plastic pipes are used instead of metal ones:
Waterproofing plastic pipe entries (sealing the joint between a plastic pipe and concrete) requires the use of special materials. Conventional methods of sealing joints are not suitable here:
conventional sealing material peels off from plastic pipes:
- Non-shrinking sealing material may crack:
How to avoid this?
First you need to select the appropriate material.
Options for laying pipes in a strip foundation
Installation under the base of the foundation is used in cases where the thickness of the strip foundation is too large or it is made of natural stone. It is also recommended to do digging in houses with concrete basements, but then the digging will be quite deep and doing it yourself will be problematic.
Laying under the base of the foundation is a difficult and time-consuming process; here they often use the method of inclined drilling in the resulting hole, and lay all the pipe communications. Although the method is relatively simple, it is recommended to calculate the well inclination angle as clearly and correctly as possible.
The lower boundary must coincide with the end of the pipe; the channel must be drilled only after the drill installation angle has been correctly calculated. It is also recommended to constantly monitor the movement of the drill, regularly clean and level the walls of the hole, so that later there will be no difficulties in laying pipe communications.
Thus, underground laying under the sole is complex and time-consuming; it is much easier to lay communications through a strip foundation by punching a hole in it.
Milling concrete surfaces
Milling ensures the preparation of concrete surfaces in residential and industrial construction. This operation helps to easily dismantle old coatings in parking lots, bridges, and runways.
Milling is used for rough removal of the top layers of concrete, when it is necessary to remove unevenness and differences from the concrete surface, as well as to clean it from heavy contamination with fuels and lubricants. The concrete surface after milling turns out to be relatively rough, and therefore requires further processing with a mosaic grinder.
Milling is used for:
- removing the top weak layer of concrete coating up to 3-5 mm thick;
- removal of old polymer coatings;
- creating grooves on the concrete surface that provide an anti-slip effect;
- leveling the floor for subsequent installation of parquet, laminate and other decorative coatings.
Low-quality cement-sand screeds up to 10 mm thick are removed by milling
Milling of concrete is carried out by two types of machines:
- rotary, on which drums (bush hammers) with lamellas (stars) are installed. When the drum rotates, the lamellas bite into the concrete and remove the unnecessary layer;
- disk The cutting tools of these machines are also lamellas, but they are mounted not on a drum, but on a disk (traverse).
The technology for milling concrete surfaces involves the use of two machines. First, a pass is made with a milling machine, and then a mosaic grinder is used to remove all the irregularities. If the required result cannot be achieved in one go, then the operations are repeated, that is, again, first use a milling machine, and then a grinding machine.
Laying through the foundation
Punching a hole in a strip foundation is much easier than in a monolithic slab. But all experts immediately say that it is better to initially leave openings for communications. It is clear that if the builders provided a hole in the base, then there are no problems with inserting pipes, because the holes are already covered with special waterproofing and seals. But what if there is no hole and you have to make it manually? Then a hammer drill or hammer drill and a diamond-coated bit will come to the rescue.
Punching holes is done in several stages:
- Clearing the foundation of adhered dirt and leveling it so that the crown goes in smoothly.
- Then you need to easily drill the drilling site with a small drill on the concrete so that the crown goes strictly in the center.
- At low speeds, mark the drilling location, re-check its outer diameter and compare it with the outer diameter of the pipes.
- At medium speed, smoothly drill a hole, regularly tap the core so that the bit does not jam. You also need to blow off dust and concrete chips so that they do not clog in the chamber.
When a finished hole is formed, roofing material is glued to the outer edges, and a plastic hollow pipe sleeve with rubber seals is installed inside. Now the required number of pipes can be passed through the sleeve and fixed with rubber seals, and moisture and water do not enter the basement through the hole.
If the foundation is already poured
If it is necessary to make holes in an operating foundation or a newly manufactured structure in which they forgot to place liners, several technologies are used. The most difficult case is a floating slab; the easiest way is to install communications under the grillage on piles or pillars.
Slab foundation
Unlike a floor on the ground, a floating slab is a load-bearing structure, the integrity of which must not be violated. The only option for underground communications in a slab foundation is inclined drilling.
The mobile machine is mounted only after drilling a hole in the reinforced concrete with a diamond core bit at the appropriate angle. The drill bit will not be able to pass through the reinforcement mesh without completely destroying the structure. The method is very expensive and is rarely used.
Therefore, most often sewer and water pipes are introduced through walls or a basement:
- a caisson is built close to the wall of the cottage;
- engineering systems are buried to the required depth;
- Shut-off valves, metering devices, and filtering equipment are installed inside the caisson;
- a light structure (booth) is erected on top;
- Heating can be organized inside it in any convenient way.
Important! The introduction of engineering systems according to this scheme has a significant drawback. Passive insulation for a booth is not enough; active insulation is usually produced by electrical appliances. When there is a power outage, there is a possibility of the water supply defrosting.
Strip foundation
When operating NZLF, MZLF, there are usually no special problems with the introduction of engineering systems. From the outside, the blind area is destroyed and a trench is dug to the building at the designed depth. The subfloor is partially opened from the inside or the floor is dismantled along the ground in a separate area. Pipelines are passed under the tape in sleeves to ensure maintainability of the systems.
Recommendations for sewer installation
Selecting the optimal diameter of external sewer pipes. It is not always possible to buy a crown with an outer diameter of 100 mm. Therefore, it is possible to install smaller diameter pipes and use pumps.
It is recommended to clearly calculate the maximum possible pressure in the system in order to select optimal communications.
The lower the septic tank or the connection point to the city sewer is located in relation to the house, the greater the pressure difference will be in the system, so you cannot do without check valves, as well as systems for releasing excess gas.
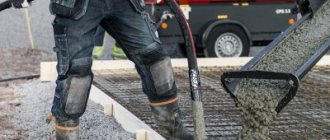
Flushing the pump
The pump is flushed right on site immediately after pouring concrete, before the material hardens in the pipes. This integral part of the technological process is included during the work shift, like other auxiliary operations.
Washing usually takes about 40 minutes and occurs in 2 stages:
- removing concrete residue from the boom
- removing concrete from the receiving bunker
The pump is flushed on site immediately after concrete is poured.
When cleaning the boom, 0.2 - 0.3 cubic meters of usable concrete are removed from the pipes. At the request of the client, this material can be poured into any form or container provided by the customer.
The remaining concrete from the receiving hopper is removed using water that comes from a tank installed on a concrete pump. The remaining concrete along with water is poured out in a place previously agreed upon with the customer.
Go to the equipment catalog
Watch a video of pouring concrete with a pump. You'll get an idea of the process in just 1 minute 54 seconds.
Are you planning to fill? Want to know more?
Making a sewer passage through the foundation
To make a sewer system in your own home, you need to solve many related problems.
The biggest difficulty is getting the pipeline out of the house. The reason is quite simple. The house always stands on a strong foundation. It is poured to different depths, so there are several methods for removing the pipe:
- Laying a pipeline under the foundation;
- Installation through walls.
Sewer pipes are mainly laid under floors. This is due to technological necessity. Therefore, the installation of such a pipeline has to be done across the entire foundation area.
How to remove a pipe directly from the house
Having a finished house, the question immediately arises: how to remove the sewerage through the foundation? To remove the sewer pipeline from your own home, it is necessary to install a boundary system that connects the septic tank to the outgoing pipes.
The pipe outlet passes through the foundation. Moreover, the installation depth must exceed the freezing value of the soil. The work is performed in the following sequence.
Stage 1. A trench is dug in which the external and internal systems will be joined.
Stage 2. A hole is made in the foundation for the sewerage system. To work you will need:
- Hammer;
- Metal punch;
- Electric drill;
- Set of drills.
If it is not possible to make a hole with such tools, a special diamond installation is used.
The drilling process is always quite complicated, because you have to drill through a concrete foundation. If a reinforcing mesh was made, you will have to use a grinder. It is easy to handle the fittings. Sometimes you have to work for several days to get the hole you want.
First, the location where the pipeline will be installed is determined on the surface of the foundation. A circle is drawn in this place, and its diameter must exceed the size of the sewer pipe, together with the sleeve.
A hammer drill drills concrete to maximum depth. Any reinforcement bars encountered are cut off with a grinder.
To make a hole in a concrete foundation, builders use several methods:
- Diamond drilling. It is considered the best option. The foundation material does not receive damage during such work. This technology is one of the most expensive, even if you rent such a machine;
- Hammer. Percussion drilling is in progress. The negative side is considered to be chiselling, which causes the appearance of microcracks. Concrete begins to peel off from the reinforcing mesh;
- Impactless drilling. One of the safest methods, which requires a lot of time. A large number of smaller ones are drilled around the entire perimeter of the desired large hole. The concrete plug is knocked out with a sledgehammer, and the reinforcement is cut off with metal scissors.
Stage 3. First, a sleeve is placed in the made channel, then a pipeline is laid. The resulting cracks are closed with polyurethane foam. It also becomes a good heat insulator.
Throw away
If the amount of remaining solution is small, it can be thrown away as construction waste. Although first you will have to wait for the material to completely harden - we pour the mixture onto the ground, and after a few hours we return to the construction site, break the concrete into pieces and store it in cement or putty bags, and then put the garbage in a specially designated place.
But many novice builders make quite common mistakes during the recycling process:
- Throw construction waste into a container with household waste. Typically, such tanks are not designed to be overloaded with heavy concrete, as a result of which workers have to manually remove all the packages from the tank, and then gradually load all the construction “joys” into the dump truck. So if the trash container near your house does not allow for loading construction materials, leave them next to the bin, carefully packing the concrete into bags - workers will load such garbage manually.
- Rinse the remaining solution down the drain. Even if the volume of remaining material is small, it is not recommended to send it on a “journey” through the communications system. The fact is that concrete particles will definitely get stuck at the joints or turns of the pipes, thereby forming a blockage. So, even if there is only a “couple of strokes” of plaster or mortar left, it is better to take the bucket outside, and tomorrow break up the hardened concrete and throw it in the trash. Otherwise, you will have to pay plumbers to repair the sewer.
- Construction waste is removed to undesignated places. In the towns and villages of Russia, improvised landfills have been preserved, into which local residents transport household waste, and once a year a bulldozer pushes all the bags into a pile for a big fire. Such places themselves pollute the environment, and if they throw out garbage that cannot be burned: scrap metal, bricks, concrete, the landfill remains clogged forever. And while non-ferrous metal is sometimes collected by children, no one needs hardened concrete.
Construction waste removal
Try to be careful when throwing away construction waste and look at your actions from the outside. Otherwise, you can become a pest for the planet you live on, or add more work to housing and communal services employees.
Undermining under a concrete foundation
If the septic tank is located close to the house (within five meters), and the thickness of the foundation does not exceed one meter, the simplest option for installing a sewer system is to create a tunnel in the place where the pipeline intersects with the base of the house.
The trench is not very deep, which reduces the complexity of such an operation.
Before starting to lay under the foundation, marking work is carried out. The point where the pipe coincides with the future sewer passage is marked.
When performing such work, the thickness of the walls, which is the reference point, must be taken into account. If this rule is not followed, the trenches may not line up. Their connection will not occur in a specific place. We'll have to start all over again. This will cause additional financial costs.
When the trench is ready, a sewer pipe is laid in it, maintaining the required slope.
If the pipeline is shallow, the sewer passage must be insulated to prevent freezing of the channel and the formation of ice. It can cause blockage of the entire space.
Backfilling of the trench is carried out carefully , using small portions of soil. Thus, the removed pipe is not allowed to move, and its slope is not allowed to change.
An additional pipe is passed directly under the foundation, the diameter of which is much larger than the sewer pipe. The length of this segment is made equal to the width of the foundation of the house. It plays the role of a sleeve in which the main pipeline is laid.
This device protects the sewer system in case of unexpected subsidence of the foundation. When repair work is carried out, it is much easier to replace the damaged area.
Application area
Main areas of application:
Application of hydraulic seal for concrete
- Installation of wells. To protect against the entry of surface groundwater into the well, waterproofing is done, and this plastic filler reliably seals the inter-ring seams and various structural defects.
- To eliminate leaks in reinforced concrete structures where the waterproofing is damaged - swimming pools, tanks, and other containers.
- For breakthroughs in basements, mines, tunnels, etc.
- When micro-leaks form, if the waterproofing of the foundation between the blocks, at the joints of the floor and walls, in places of cold seams is damaged.
- In case of water pipe breaks, as an emergency temporary measure.
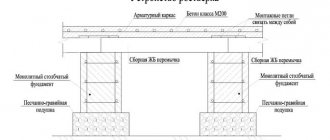
Slab foundation and laying of communications
This type of foundation requires very precise calculations at the very beginning of the project.
After pouring such a foundation with errors, it will be impossible to lay the necessary communications. Therefore, a trench is dug first. All communications and sewer pipes are laid in it, dressed in special protective sleeves.
In a slab foundation, the sleeve plays a very important role. It protects the monolithic slab from high pressure and also facilitates the process of replacing a damaged section of pipe. If the sleeve is missing, it is simply impossible to replace the pipe in such a foundation. The pipe can also be damaged when the foundation is being poured.
Foundation and communications
Communications in the foundation
Comfortable living is the dream of every homeowner. Comfort is created by the communications provided and arranged in the house: water, toilet and bath. It is best to carry out communications at the stage of foundation construction, since after the construction of the structure, carrying out work of such a plan becomes difficult, and in some cases simply impossible.
Preparing for sewer installation
Before the actual installation of sewer pipes, a number of preparatory measures are carried out:
- Select pipe products and fittings. Sewage pipes can be made of plastic, metal-plastic, steel and galvanized. The cost of each type of product has significant differences, and pipe installation is also carried out differently. Polymer products are very popular because they are lightweight, durable and practical. They are practically not deformed or destroyed. When choosing sewer pipes, you should pay attention to the color of the material from which they are made. Pipes for indoor sewage systems are gray in color. External sewerage, from the house to the septic tank or storage tank, is made of brown or red pipe products.
- Calculate the optimal value of the diametrical cross-section of the pipe. In this case, the maximum volume of fluid passed is taken into account. In most cases it is sufficient to use a pipe with a diameter of 32 mm. However, in large private houses, it is better to lay proper sewerage under the foundation using pipes with a diameter of 100 mm.
- Determine the optimal slope of the pipes being installed.
Experienced craftsmen claim that in order for sewage to move under the influence of gravitational forces, each meter of pipes being laid must be lowered by 2 cm.
Options for sewerage depending on the type of foundation
The complexity and method of laying sewer pipes largely depends on the type of foundation.
Sewerage and columnar base
The simplest method is to install sewer pipes through a columnar or pile-type foundation. Such a foundation allows communications to be carried out both before the installation of pillars and after completion of the construction process. When carrying out work, it is important to ensure that the trench is located at the optimal distance from the pillars. In this case, there will be no weakening of the soil around the supports, which can lead to a decrease in their bearing capacity.
Sewerage in a columnar foundation
However, when laying sewer pipes under a columnar foundation, it is worth remembering that the underground space in this case is not heated. Therefore, sewer pipes need to be provided with reliable thermal insulation or additional heating must be provided with cable heating elements.
Sewerage through a strip foundation
It is better and easier to plan and lay sewer pipes before the process of pouring the concrete base strip. In this case, the method of laying communications depends on the type of strip foundation:
- With a shallow foundation, the pipes are laid below the freezing level of the soil, directly under the foundation. It is recommended to dig a trench before constructing the belt. Moreover, it is recommended to place the piece of pipe that will be located under the tape base in a sleeve, which is a piece of metal pipe.
- A deep strip foundation requires actions of a different nature. A hole is cut into the formwork into which an asbestos-cement or steel sleeve is inserted. It is fixed in the formwork and filled with concrete mortar. Communication pipes are subsequently inserted into this sleeve.
A strip foundation allows you to lay sewer pipes after the foundation has been poured. Carrying out this type of work requires a lot of effort and expense, but everything can be done with your own hands. The process can be carried out in two ways: a tunnel is made under the foundation and pipes are passed through it, or a hole is drilled in a concrete strip.
Sewerage in strip foundation
The second method is done as follows:
- A mark is made on the foundation where the sewer pipe should pass. The hole must be large enough to allow the pipe protection sleeve to be inserted.
- Using a hammer drill, a hole is made in the concrete.
- Occurring reinforcement bars are drilled out using a drill.
- A sleeve is inserted into the prepared channel and the space around it is sealed with cement mortar.
- A sewer pipe is passed through the protective sleeve, and the gap between them is filled with foam. It serves as a good heat insulator.
Use not for its intended purpose
If leaving concrete for tomorrow is not an option, and it’s a shame to throw away the material, you can try using the solution for other purposes than its intended purpose. This is especially true for owners of private houses, who regularly face problems that require solutions, but are constantly put off until tomorrow.
Repair potholes on the road
Aren't you tired of having to go around puddles after every rain and keep bumping the bottom of your car into potholes on the road? There is nothing wrong with repairing an area of asphalt or primer yourself by pouring the remaining concrete, plaster or sand-mortar onto it. This way you will not only find a use for discarded material, but also do a good deed. Perhaps the neighbors will be inspired by such altruism and will also want to do something nice for others.
Concreting a section of a blind area or pedestrian path or parking space
Residents of apartment buildings often encounter such a phenomenon as the destruction of the blind area after winter. Melt water gets inside the concrete, and at night turns into ice and destroys the structure of the building. To repair a crack or broken area, it is enough to use a small amount of concrete left over from construction work. The same goes for pedestrian paths and parking spaces. There is no point in cursing builders who did their job incorrectly when you can fix everything yourself and forget about the problem.
Repair of blind area near the house
Concrete a fence post or part of the foundation for small buildings
The remaining solution can be used to begin long-planned construction. For example, start building a fence in the garden or start building a foundation for a barn. And even if this is only a small part of what remains to be done, the most important thing is to start.
Pouring into molds
From the remaining sand solution you can make several parts, which will then be useful in landscape design. This can be paving slabs, curb stones, prefabricated reinforced concrete lintels, wall blocks.
The main thing is to have a special mold that will give the concrete the desired look. You can also simply build a small box from boards, then fill it with concrete - you will get a good block for building anything.
Mold for casting garden paths
Concreting stair steps
If you have long been planning to make a stepped approach to your summer kitchen, basement or barn, then now is the time to use the leftover building material for this purpose. Simply lay out the formwork from the boards, and then fill the structure with the remaining concrete. And even if the second step appears in six months, it’s still better than throwing away unused concrete.
Restoring concrete steps
As you can see, even the remaining concrete mortar can be put to good use, especially if you think about it a little. Well, if nothing comes to mind, then just wait for the material to harden, and then pack it in paper bags and leave it by the trash can. The main thing is not to make the mistakes of novice builders, so as not to spoil the life of yourself and the people around you.